SWITCHBLADE 2 - Cabrinha
SWITCHBLADE 2 - Cabrinha
SWITCHBLADE 2 - Cabrinha

Create successful ePaper yourself
Turn your PDF publications into a flip-book with our unique Google optimized e-Paper software.
<strong>SWITCHBLADE</strong> 2<br />
<br />
<br />
<br />
<br />
<br />
CK07SwitchbladeUserManual.indd 1<br />
8/10/06 3:40:08 AM
CK07SwitchbladeUserManual.indd 2<br />
8/10/06 3:40:10 AM
DO NOT USE THIS PRODUCT UNLESS YOU HAVE READ AND UNDERSTAND THESE WARNINGS,<br />
CAUTIONS, AND INSTRUCTIONS WHICH ARE FOR YOUR SECURITY AND PROTECTION. THIS<br />
INFORMATION MAY BE SUBJECT TO CHANGE AT ANY TIME. FOR CURRENT UPDATES, PLEASE<br />
VISIT OUR WEBSITE AT: WWW.CABRINHAKITES.COM<br />
IF YOU ARE BELOW THE AGE OF 18, YOU SHOULD HAVE YOUR PARENT OR GUARDIAN READ<br />
THESE WARNINGS, CAUTIONS AND INSTRUCTIONS AND SHOULD NOT USE THIS PRODUCT<br />
UNLESS YOU ARE UNDER THE PROPER GUIDANCE AND SUPERVISION OF SUCH A PERSON.<br />
The use of this product exposes the user to many unavoidable and unexpected risks, dangers<br />
and hazards. The suppliers of this product are not responsible for any damage to property or any<br />
personal injury caused by any active negligence of the suppliers or by any use, misuse, abuse or<br />
irresponsible use of this product by the user.<br />
Kitesurfing is an extreme sport. Power kites and their lines and control equipment can be dangerous<br />
to flyers and to anyone in the vicinity of their use. Kitesurfing must be taken seriously and we<br />
recommend that, at least in the early stages of your use, you seek the guidance of professional<br />
instructors and experienced kiteboarders. Improper and/or unreasonable use of this kite may<br />
result in death or serious injury to any part of your body and to others. Do not use your kite near<br />
power lines, airports or streets, and keep your kite fly lines away from people and obstacles. Always<br />
fly in an open area and observe wind and weather conditions, particularly in circumstances<br />
where you may encounter offshore, onshore winds or strong winds. Do not attempt to use your<br />
kite on water until you are confident and comfortable with the use of a trainer kite on land. Spend<br />
time to become familiar with the operation of your kite and remember that you are responsible<br />
for its operation and for the security of those around you. As you learn the sport, work within<br />
your own limitations and do not exceed them. If you intend to use the kite on water, always<br />
use appropriate protective gears and flotation devices and do not attach yourself or tie yourself<br />
permanently to the kite lines. The kite is not intended for use as a flying device nor indeed is it<br />
intended as a means of flotation.<br />
...continues to next page<br />
CK07SwitchbladeUserManual.indd 3<br />
8/10/06 3:40:11 AM
continued from previous page...<br />
RECOMMENDED<br />
KITESURFING PRACTICE:<br />
KITESURFING is an extremely diverse sport, with<br />
many disciplines and ability levels. As with all<br />
sports, there can be certain inherent risks. The following<br />
contains key security points to remember<br />
when operating your <strong>Cabrinha</strong> kite.<br />
• Kitesurfing is a HAZARDOUS activity and the use of Kitesurfing<br />
equipment involves the risk of serious personal injury to<br />
any part of the user’s body or death.<br />
• Injuries are an INHERENT RISK of kitesurfing and the participation<br />
in kitesurfing implies the user’s acceptance and<br />
express assumption of those risks.<br />
• Children should always be under adult supervision.<br />
• It is strongly recommended that beginners take lessons.<br />
• ALWAYS inspect your equipment for signs of wear and tear<br />
each time before use, particularly all lines, canopy, bladders,<br />
screws and fittings.<br />
• IF any products are found to show signs of wear & tear these<br />
should be repaired or replaced immediately and before further<br />
use. If in doubt about any signs of wear & tear, please contact<br />
your local vendor. Contact details are available from www.<br />
cabrinhakites.com<br />
• NEVER place yourself in a situation where breakage of any<br />
one of the various kitesurfing components would pose a risk<br />
to yourself or others, or make it impossible to return to the<br />
shore securely & unassisted.<br />
• Make sure you use properly designed and manufactured<br />
parts from reputable suppliers.<br />
• Take time to study the conditions including sea state, tides,<br />
currents, weather conditions and forecasts before you decide<br />
to go sailing. Beware of sailing in offshore or onshore winds.<br />
• Familiarize yourself with any new location before venturing<br />
onto the water. Ask the locals to tell you about any hazards.<br />
• Watch out for other beach users, especially swimmers and<br />
small children. Make sure you keep your board and rig under<br />
control at all times and that they don’t get blown about on the<br />
beach or in the water.<br />
• Always use appropriate protective gear and flotation devices.<br />
Wear the correct protective clothing for the conditions such as<br />
a wetsuit or a UV top. It is recommended to wear a helmet.<br />
• Make sure someone knows where you’ve gone & when you<br />
are expected back – always sail with a buddy.<br />
• Be aware of the conditions as they change. Always return to<br />
the beach if there is a significant change in the conditions.<br />
i.e. wind dropping or wind & waves increasing.<br />
• As you learn the sport, work within your own limitations and<br />
do not exceed them.<br />
• Do not alter, modify or change this product.<br />
• This product is designed and manufactured only for kitesurfing<br />
on water or snow.<br />
• Keep these warnings, cautions and instructions for future<br />
reference.<br />
SNOW USE<br />
GENERAL GUIDELINES<br />
1) Always stay in control and be able to stop or avoid other<br />
people or objects<br />
2) SNOWKITE: People downwind or down slope have right of<br />
way. It is your responsibility to avoid them<br />
3) SNOWBOARD: People down slope have right of way. It is<br />
your responsibility to avoid them<br />
4) You must not stop where you obstruct others or are not visible.<br />
5) Whenever starting or merging with others look upwind/up hill<br />
and yield to others.<br />
6) Always use devices to help prevent runaway equipment.<br />
7) Observe any and all posted signs and warnings<br />
8) Keep out of closed areas<br />
9) SNOWBOARD: Prior to using any lift you must have the<br />
knowledge and ability to load, ride and unload safely.<br />
10) Do not snowboard/snowkite when tired or under the influence<br />
of alcohol or drugs.<br />
11) Snow terrain and snowboarding/snowkiting conditions vary<br />
constantly--watch out for and avoid any man made structures,<br />
trees, rocks, debris, variations in terrain or slopes,<br />
avalanche areas, crevasse, cliffs, power lines, water hazards,<br />
changes in snow surfaces or texture due to altitude and sun<br />
exposure, wind and weather changes, and any other conditions<br />
which could affect your ability to properly control your<br />
snowboard/snowkite.<br />
CK07SwitchbladeUserManual.indd 4<br />
8/10/06 3:40:11 AM
INDEX<br />
2 Introduction<br />
3 Important Information<br />
4 Wind, Water, & Weather Conditions / Wind Range Chart<br />
5 Know Your Ability Level / Kiteboarding Location<br />
6 Important Information<br />
7 Beach Etiquette<br />
KITE OVERVIEW & CONTROL SYSTEM<br />
8 Switchblade 2 Overview<br />
SETUP<br />
10 Sprint Inflation System<br />
11 Inflating the Kite<br />
12 Tips for Securing Your Kite<br />
Deflating the Kite<br />
16 Attaching Control Lines<br />
<strong>SWITCHBLADE</strong> 2<br />
USER MANUAL<br />
HOW TO:<br />
17 Area of Operation / Kite Positions, Zones & Power<br />
19 Steering<br />
20 Planning Your Launch<br />
21 Launching & Landing with a Partner<br />
23 Relaunching<br />
24 Tuning The Kite<br />
25 Repairs - Tears / Struts Bladders<br />
27 Repairs - Leading Edge Bladders<br />
29 Glossary<br />
1<br />
CK07SwitchbladeUserManual.indd 1<br />
8/10/06 3:40:12 AM
INTRODUCTION<br />
THANK YOU for purchasing a <strong>Cabrinha</strong> kite and welcome to the sport of kiteboarding.<br />
As you may know, the excitement of Kiteboarding is attracting people of all ages from all corners of the globe. It’s one of the most<br />
dynamic and fastest growing sports in the world.<br />
CAUTION: It can also be overwhelming if not approached in an educated manner.<br />
That’s why we have supplied this extensive user’s manual. It will help to educate<br />
you about your new kite and about the ways in which to use it. It contains information<br />
regarding the setup, care and maintenance of your Switchblade kite. For information<br />
about operation of the kite including how to power up and de-power your kite you must<br />
refer to the manual supplied with your <strong>Cabrinha</strong> control system. Please note that only a<br />
Switchblade compatible control system will provide all of the security and performance<br />
functions associated with this bow kite. Consult www.cabrinhakites.com for a list of<br />
compatible control systems for use with this kite.<br />
Please read this user’s manual carefully and entirely before using this kite. This manual is not intended to replace proper kiteboarding<br />
instruction, but rather to supplement it. Do not attempt to kiteboard without appropriate instruction. It will make this sport more<br />
enjoyable, not only for yourself, but for those around you.<br />
2<br />
CK07SwitchbladeUserManual.indd 2<br />
8/10/06 3:40:12 AM
IMPORTANT INFORMATION<br />
IMPORTANT INFORMATION<br />
KITEBOARDING is an extremely diverse sport, with many disciplines and ability levels. As with all sports, there are certain inherent<br />
risks. The following contains key points to remember when operating your <strong>Cabrinha</strong> kite.<br />
• Be familiar with the set up and use of the supplied security systems: OVERRIDE and the Harness Loop Quick Release<br />
systems.<br />
• Make sure your control system is rigged and used according to the supplied instructions.<br />
• Make sure your kite is compatible with the control system.<br />
• Always use your <strong>Cabrinha</strong> kite with a security system.<br />
• NEVER permanently attach yourself to this kite, the control bar, or lines.<br />
• NEVER use this kite as a flying device.<br />
• NEVER touch the kite lines while they are under tension; do not catch the kite using these lines.<br />
• When inflated but not in use, secure your kite with sand or with something heavy and non-abrasive; the more weight the<br />
better (see “Kite Care” for more information). An inflatable power kite will still fly, even without a rider, so be mindful of<br />
those around you and secure your kite. Your kite may cause serious injury or death if it launches unexpectedly.<br />
• Do not lend your gear to someone who has not been fully instructed on the use of inflatable kites. Other users should also<br />
read this user’s manual and be proficient in all its points.<br />
• Check your gear before use. Insure that your flying lines, security systems, kite, board, etc. are all rigged properly and are<br />
in working order.<br />
PROTECTIVE GEAR<br />
We strongly recommend the use of the following protective gear:<br />
• Helmet<br />
• Life Jacket, Impact Vest, or Flotation Vest<br />
• Neoprene Wet Suit<br />
• Gloves<br />
• Foot Protection<br />
• Eye Protection<br />
• Knife<br />
• Sunscreen<br />
3<br />
CK07SwitchbladeUserManual.indd 3<br />
8/10/06 3:40:13 AM
IMPORTANT INFORMATION<br />
WIND, WATER, & WEATHER CONDITIONS / WIND RANGE CHART<br />
WIND, WATER, AND WEATHER CONDITIONS<br />
• Do not underestimate the power of the wind.<br />
• Be aware of unpredictable and changing weather conditions.<br />
• Avoid “offshore” or “onshore” wind conditions.<br />
• Avoid strong, gusty wind.<br />
• Be careful of wave conditions, especially when learning.<br />
• Be educated about tides and rip currents.<br />
• Be mindful of your ability level. Do not kiteboard if conditions are beyond your ability level.<br />
• Be educated about air and water temperatures and wear appropriate protection against the elements.<br />
• Do not use this product in thunderstorms.<br />
• Consult an anemometer to determine wind speeds if necessary.<br />
• Do not use an oversized kite. Consult your Wind Range Chart for the correct recommended size. Use your common<br />
sense. If in doubt about what kite size to use, choose smaller rather than bigger.<br />
• Make certain that you are physically capable of operating the security Quick Release(QR) and Override devices provided<br />
with this kite. This kite and control system has been designed around a typical rider weight of 75kg.<br />
<br />
Riders with a weight greater than 75kg may need to use more force to operate the QR than lighter riders. Increases in<br />
wind strength may also result in greater force being required to operate the QR. Be certain to seek the advice of a professional<br />
such as your Authorized <strong>Cabrinha</strong> Dealer about the performance of the security systems in relation to body weight.<br />
WIND RANGE CHART<br />
This wind range chart is only to be used as a point of reference. It is based upon a rider who is approximately 170 lbs. (75 kg).<br />
Actual use may vary based on your body weight, ability level, water conditions, board size, and riding style. When choosing a kite<br />
size, please use your personal experience, common sense, and always check what other riders are using on the water for a size<br />
reference. Lighter riders should use a smaller kite and heavier riders may need a size larger. Be certain to seek the advice of a<br />
professional such as an instructor or Authorized <strong>Cabrinha</strong> Dealer before making your decision.<br />
<br />
<br />
<br />
<br />
<br />
<br />
<br />
<br />
<br />
<br />
<br />
<br />
<br />
<br />
<br />
<br />
<br />
<br />
<br />
<br />
<br />
<br />
* How to read: Gray = best suited for. Light Gray = usable. White = not recommended.<br />
4<br />
<br />
<br />
<br />
<br />
<br />
<br />
<br />
<br />
<br />
<br />
<br />
<br />
<br />
<br />
<br />
CK07SwitchbladeUserManual.indd 4<br />
8/10/06 3:40:14 AM
IMPORTANT INFORMATION<br />
KNOW YOUR ABILITY LEVEL / KITEBOARDING LOCATION<br />
KNOW YOUR ABILITY LEVEL<br />
• Do not attempt kiteboarding without appropriate instruction.<br />
• Do not kite alone.<br />
• Launch, land, and ride together with a partner or have someone<br />
on shore who can keep an eye on you.<br />
• Make sure you are in good physical condition before using<br />
this product.<br />
• Practice flying a small, traction kite or a “trainer kite” before<br />
flying this kite.<br />
• The more time spent on the “trainer kite”, the faster you will<br />
learn.<br />
• Make sure you are a proficient swimmer before using this<br />
product in or near the water.<br />
• Make sure the wind and water conditions are within your<br />
ability level and that you have made the correct equipment<br />
choices.<br />
• Never kiteboard further from shore than you are able to swim<br />
back.<br />
• Always save a reserve of energy; end your kiteboarding session<br />
before you are exhausted.<br />
• Make sure you’ve done your homework and that you know<br />
the security precautions of all aspects of the sport: rigging,<br />
Launching, landing, flying, riding, kiting among other water<br />
users, self rescuing, etc.<br />
• Understand your security systems before ever launching your<br />
kite.<br />
• Understand the technique of self-rescue before using this<br />
product in or near the water.<br />
• Never let someone who is not familiar with inflatable kites<br />
launch, catch, or use your kite. You will endanger them, as<br />
well as yourself and those around you.<br />
• You are responsible for the proper operation of your kite.<br />
KITEBOARDING LOCATION<br />
• Observe local laws and regulations regarding this product<br />
and the usage area.<br />
• Talk to the local riders about the weather conditions and<br />
beach rules.<br />
• Check your area thoroughly before launching your kite.<br />
• Make sure you have considerable space in which to launch,<br />
land, and use this product.<br />
• You should have at least 100 meters of space on both<br />
sides and downwind of you. Be especially aware of your<br />
downwind area.<br />
• Be mindful and aware of the wind direction in relation to<br />
your launch area.<br />
• Avoid areas with rocks and/or shallow or exposed reefs.<br />
• Be mindful of tide changes. As water levels change, you<br />
may be exposed to new obstructions.<br />
• Avoid launching, landing or using this product near power<br />
lines, telephone poles, trees, people, pets, buildings, automobiles,<br />
streets, sharp objects and airports.<br />
• Avoid crowded beaches and waterways.<br />
• Make sure your lines do not cross a walkway or passage.<br />
• Do not let others walk between you and your kite.<br />
• Be careful and mindful of other water users, including<br />
windsurfers, boaters, jet skiers, swimmers, floating objects,<br />
etc.<br />
• Before launching, make sure you have scouted a backup<br />
landing area, in case you do not make it back to your<br />
launch spot.<br />
5<br />
CK07SwitchbladeUserManual.indd 5<br />
8/10/06 3:40:14 AM
IMPORTANT INFORMATION<br />
KITE CARE<br />
Due to the often extreme nature of kiteboarding, a thorough approach should be taken when caring for your kite and all its associated<br />
rigging, as well as your protective gear.<br />
PREPARING FOR YOUR SESSION<br />
• Thoroughly check your protective equipment (helmet, etc.) to make sure it is in working order and in good condition.<br />
• A frequent inspection of the kite and the control system should be made in order to identify punctures, tears, or abrasions<br />
in the canopy, struts, or security systems. It is also necessary to check the fly lines for wear and for unwanted knots, which<br />
may reduce the strength of the fly lines.<br />
• Do not rig on asphalt, cement, gravel, or other abrasive surfaces; doing so may damage your equipment. It is best to rig on<br />
sand or grass. Damage done to your equipment by rigging on abrasive surfaces will not be covered under warranty.<br />
• Do not rig among sharp objects that could tear the canopy or puncture the struts and leading edge bladder.<br />
• Take care not to expose your flying lines to sharp objects that may wear through them.<br />
• While setting up, secure your kite with sand or sand bags. Do not secure your kite with rocks or other sharp or abrasive<br />
objects that may damage your kite.<br />
BETWEEN SESSIONS<br />
• Never leave an inflated kite unattended on the beach for a long period of time. Winds may shift or change and the kite may<br />
become unsecured and fly off.<br />
• Do not leave an inflated kite (secured or not), directly exposed to the wind for any length of time. This allows the trailing edge<br />
to flutter excessively, which can damage the kite or tangle the bridles/control lines. If you must leave the kite exposed to the<br />
wind on the beach, place sufficient amounts of sand between each strut and near the trailing edge to minimize or stop the<br />
fluttering<br />
• Do not leave your kite exposed to sunlight for long periods of time. Between sessions, choose a shaded area to secure your<br />
kite. When not in use, stow away.<br />
PROPER STORAGE<br />
• It is recommended to wash your kite with fresh water and dry thoroughly before rolling and storing.<br />
• Do not roll up kite when wet.<br />
• Clear the kite of sand or other foreign objects before stowing.<br />
• Once it is clean and dry, stow your kite in the supplied bag in a clean, dry, cool place.<br />
• Do not place heavy objects on the bag containing the kite.<br />
• Do not leave your kite inflated in your car or car rack box; exposing the kite to extreme temperatures while inflated may<br />
damage the internal bladders.<br />
• Wash your control system with fresh water from time to time by placing the entire control system (with lines wound onto the<br />
bar) into a bucket of fresh water and let it sit for 5 minutes. Allow to dry thoroughly before storing in a dry location.<br />
• Once it is clean and dry, stow your control bar in the supplied bag in a clean, dry, cool place.<br />
6<br />
CK07SwitchbladeUserManual.indd 6<br />
8/10/06 3:40:14 AM
BEACH ETIQUETTE<br />
BEACH ETIQUETTE<br />
Here are some basic things to consider when sharing beaches and water accesses with other users:<br />
SAFETY<br />
• Follow the instructions outlined in this manual.<br />
• Follow the instructions and rules and regulations posted at the areas you use.<br />
• Check with local kiteboarding associations and shops prior to launching in a new area. There may be local rules and regulations<br />
to follow which are not posted.<br />
• Utilize common sense.<br />
• Do not touch other people’s gear, unless instructed to do so by the owner. Picking up their bars, kites, etc. may disrupt a<br />
setup ritual they have.<br />
• Always secure your kite with sand or sand bags. An unmanned kite is dangerous.<br />
• Never leave an inflated kite unattended. Winds may shift and cause the kite to become unsecured and fly off.<br />
SETTING UP<br />
• Set up only the gear that you plan on using immediately. Deflate and put away your kites when not in use.<br />
• Set up in an area where you have plenty of space.<br />
• Set up in a manner conducive to having multiple users in the area.<br />
• Roll up your lines when not in use.<br />
• Always keep other beach and water access users in mind when launching, landing, and kiteboarding.<br />
• Yield to other beach users. Be courteous and cooperative.<br />
• Always be ready to lend assistance to other kiteboarders. The favor may be returned sooner than you think.<br />
7<br />
CK07SwitchbladeUserManual.indd 7<br />
8/10/06 3:40:14 AM
KITE OVERVIEW<br />
Switchblade 2<br />
6<br />
8<br />
1<br />
7<br />
2<br />
5<br />
14<br />
14<br />
4<br />
3<br />
13<br />
12<br />
12 13<br />
15<br />
17<br />
24<br />
18<br />
19/20/21<br />
16<br />
27<br />
22<br />
23<br />
28<br />
25<br />
26<br />
30<br />
*image not to scale<br />
29<br />
8<br />
CK07SwitchbladeUserManual.indd 8<br />
8/10/06 3:40:29 AM
KITE OVERVIEW<br />
Switchblade 2<br />
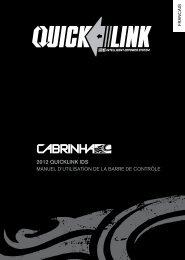
<strong>SWITCHBLADE</strong> 2 OVERVIEW - POWERDRIVE 121<br />
1. 4-Line Kite Body<br />
2. Bridle<br />
3. Steering (Rear) Line Attachment Point<br />
4. Depower (Front) Line Attachment Point<br />
5. Pulleys (KS6SEBP)<br />
6. Multi-Segmented Dacron Leading Edge<br />
7. True Match 3-D Battens<br />
8. Airlock High Volume Valve (KS6ALVA)<br />
9. SPRINT Single point inflation valves<br />
10. SPRINT Air distribution tubes (KS6STCOLA)<br />
11. SPRINT Air clips (KS6PINCHC)<br />
12. Front Flying Line (KS6RFL)<br />
13. Rear Flying Lines (KS6RFL)<br />
14. Line Connectors (FRONT/REAR) (KS6RECOST)<br />
15. Front Leader Lines<br />
16. Flagging Ring<br />
17. Centerline Adjustment Strap (KS6OVUPKT)<br />
18. Power/Depower Extensions<br />
19. Override Unit<br />
20. Override Sleeve (KS6ORT2)<br />
21. Tension Ring (KS6ORTRING)<br />
22. Depower Main Line (KS6SQCLDL)<br />
23. Leash Interface Ball (KS6SPLIB)<br />
24. Rear Leaders (KA6CCBL)<br />
25. Bar Floats (KS6CBBF)<br />
26. Line Managers<br />
27. Multi-Function Bar Ends (KS6CBEF)<br />
28. Harness Loop Quick Release<br />
29. Harness Loop (KS6HL)<br />
30. Bypass Leash (KS6BPLS)<br />
18<br />
21<br />
11<br />
10<br />
9<br />
9<br />
CK07SwitchbladeUserManual.indd 9<br />
8/10/06 3:40:34 AM
SETUP<br />
INFLATING THE KITE<br />
SPRINT INFLATION SYSTEM<br />
The Sprint inflation system is a simple to use feature to quickly inflate your kite to an even pressure. The Sprint system uses a<br />
single inflation point to connect your high volume, two way <strong>Cabrinha</strong> pump. As you pump your kite with air, all struts and your<br />
leading edge inflate quickly and simultaneously to the desired pressure. The supplied leash pump and threaded valve connection<br />
keeps your kite under control even when pumping up directly in the wind.<br />
Once the kite is pumped you can choose to clip off the air to the struts. This way if you damage a strut while in use, the rest of<br />
the kite will maintain its pressure. At the end of the session you can choose to deflate your kite completely by disengaging the<br />
strut clips.<br />
You can also keep your struts inflated and put your kite away rolled up so that the next session will take just minutes to set up.<br />
The Upper Section is<br />
The Inflation Cap<br />
The Lower Section is<br />
the Release Valve<br />
3<br />
2<br />
1<br />
10<br />
CK07SwitchbladeUserManual.indd 10<br />
8/10/06 3:40:34 AM
SETUP<br />
INFLATING THE KITE<br />
INFLATION BASICS<br />
See the section on Kite Care before inflating your kite.<br />
• Unroll your kite with the struts facing up.<br />
• Make sure your back is to the wind and that the leading edge of the kite is closest to your body. Secure the kite with sand<br />
or sand bags to keep it from flapping in the wind.<br />
• Use the supplied pump leash to connect the pump to the kite. This will free your hands to pump the kite.<br />
• Open the inflation cap by turning it counter-clockwise.<br />
• Make sure that the release valve is seated firmly by turning clockwise. Do not over tighten the release valve when the kite is<br />
not inflated. Doing so may twist and damage the bladder. The valve base is held in place by a Velcro disc<br />
• Attach the pump using the supplied <strong>Cabrinha</strong> adapter (or use a standard nozzle). To attach the adapter, remove the adapter<br />
from retaining strap. Thread the adapter on to the upper section of the Airlock. Attach the hose and pump the kite. Be<br />
sure to secure the adapter before launching the kite.<br />
• Open all of the Air Clips to allow air to flow from the LE into the struts.<br />
• When inflating, hold the pump with both hands and provide even pressure to the handle. This will help maintain the life of<br />
the Pump.<br />
• Confirm that the corners of each strut under the leading edge are able to fully inflate. Lightly push air around in the bladders<br />
until the corners are free and correctly lined up.<br />
• It is common that the LE will inflate before the struts. If a strut is not inflating, make sure that the air clip is open and the<br />
air tube is not pinched or damaged.<br />
• When the leading edge is fully inflated, remove pump hose and screw the inflation cap back on. Lightly turn/tighten until<br />
inflation cap is firmly secured.<br />
• Tighten the lower release valve.<br />
• Do not under-inflate or over-inflate the kite. Proper inflation will make it difficult but not impossible to bend the ends of the<br />
kite in. If it is very easy to bend the wing tips in, the leading edge is under-inflated. Your kite should be firm enough that<br />
while on its back, the wing tips should extend into the air and the kite should retain its bowed shape. If the leading edge is<br />
under-inflated, it may cause poor performance and re-launching problems. NOTE: The pumps are rated to 1bar of pressure,<br />
however due to wear and tear; pumps can fail at a much lower pressure.<br />
• It is recommended that you isolate the air in your struts. After the kite is inflated, close the clips on the air distribution<br />
tubes.<br />
• Once the kite is properly inflated, turn the kite over and secure with sand. (see SETUP TIPS ON SECURING YOUR KITE)<br />
Properly-Inflated Kite<br />
Under-Inflated Kite<br />
11<br />
CK07SwitchbladeUserManual.indd 11<br />
8/10/06 3:40:37 AM
SETUP<br />
SECURING YOUR KITE / DEFLATING THE LEADING EDGE<br />
TIPS FOR SECURING YOUR KITE<br />
• Never leave an inflated kite unattended on the beach for a long period of<br />
time. Winds may shift or change and the kite may become unsecured and<br />
fly off.<br />
• Always secure your kite with sand or sand bags, using more weight than<br />
you think you need. An unmanned kite is dangerous.<br />
• Never secure your kite with rocks or sharp objects (including your board);<br />
they will compromise the life of the kite. If you do not have a sandy beach<br />
launch, consider sand bags.<br />
• Do not leave an inflated kite (secured or not), directly exposed to the wind<br />
for any length of time. This allows the trailing edge to flutter excessively,<br />
which can damage the kite or tangle the control lines. If you must leave<br />
the kite exposed to the wind on the beach, place sufficient amounts of<br />
sand between each strut and near the trailing edge to minimize or stop<br />
the fluttering. Also, if possible, leave the kite in a shaded area.<br />
• Keep in mind other beach users and make sure your kite and lines will not<br />
be a danger to others.<br />
• Wind your lines onto the bar when you are not kiting. This will keep the<br />
beach free of lines and will prevent other beach users from becoming<br />
tangled in your equipment.<br />
DEFLATING THE KITE<br />
The kite may be deflated completely or partially for your convenience. To deflate<br />
the Leading Edge, you must unscrew the release valve and not the inflation cap.<br />
The release valve is the lower portion of the AIRLOCK. After deflating, clear the<br />
valve of any sand or debris; then seal the valve before stowing kite to prevent<br />
debris from getting inside internal bladder. To deflate the struts, unclip the air<br />
clips at each strut. This will allow air to flow through the leading edge and out<br />
of the airlock.<br />
Important: CAUTION<br />
When closing valve on deflated kite, hold bladder in place to prevent twisting<br />
the bladder. Do not over tighten valve when kite is deflated. You may tighten it<br />
further when kite is partially inflated again.<br />
12<br />
CK07SwitchbladeUserManual.indd 12<br />
8/10/06 3:40:40 AM
SETUP<br />
PAUSE!<br />
FOR SETUP OF YOUR CABRINHA CONTROL SYSTEM, REFER<br />
TO YOUR SUPPLIED CONTROL SYSTEM MANUAL.<br />
IF YOU ARE UNSURE AS TO WHICH CONTROL SYSTEMS ARE<br />
COMPATIBLE WITH THIS KITE, PLEASE REFER TO THE KITE/<br />
CONTROL SYSTEM COMPATIBILITY CHART AND CONTROL<br />
SYSTEM USER MANUALS AVAILABLE ONLINE AT<br />
WWW.CABRINHAKITES.COM.<br />
WHEN YOU ARE READY TO CONNECT YOUR CONTROL SYS-<br />
TEM TO THIS KITE, RESUME READING ON PAGE 14.<br />
13<br />
CK07SwitchbladeUserManual.indd 13<br />
8/10/06 3:40:41 AM
SETUP<br />
CONNECT AND LAUNCH - ATTACHING CONTROL LINES<br />
ATTACHING CONTROL LINES<br />
Once you have completed SET UP 1 & 2, you are ready to connect your control system to your inflated kite.<br />
• With your lines laid out, carry the kite to the end of the flying lines farthest from your control bar. Make sure the leading edge<br />
is facing into the wind.<br />
• Secure the kite with sand or sand bags. Do not secure kite with anything sharp or abrasive.<br />
• You will notice four connection bridles on your kite (two bridles on each wingtip. There are three knots on each rear bridle<br />
and one larks head loop on each front bridle. Utilize the middle knot on the rear bridle; the other knots are there for tuning<br />
purposes. (Fig. 1)<br />
• Slip the knot on your yellow de-power (center) line into the larks head loop on the yellow bridle on the left wing tip of the<br />
kite. Give the knot a tug to secure.<br />
• Using a larks head knot, attach your yellow steering (outside) line to the yellow bridle on the left wing tip of the kite. Give the<br />
knot a tug to secure.<br />
• Slip the knot on your black de-power (center) line into the larks head loop on the black bridle on the right wing tip of the<br />
kite. Give the knot a tug to secure.<br />
• Using a larks head knot, attach your black steering (outside) line to the black bridle on the right wing tip of the kite. Give the<br />
knot a tug to secure.<br />
CAUTION: See “Kite Overview” as reference.<br />
1<br />
2 3<br />
1 2 3<br />
14<br />
CK07SwitchbladeUserManual.indd 14<br />
8/10/06 3:40:44 AM
KITEBOARDING BASICS<br />
AREA OF OPERATION / KITE POSITIONS, ZONES & POWER<br />
AREA OF OPERATION<br />
This is the 100 meters of area to each side and downwind of the rider. Do not launch your kite if you do not have this distance<br />
between yourself and other people, or obstructions.<br />
KITE POSITIONS, ZONE & POWER<br />
It is important to understand kiteboarding’s basic zones of power before you launch a kite. MANY OF THE ACCIDENTS THAT HAPPEN<br />
IN KITEBOARDING happen on land, and many also happen when kiteboarders put their kites in what is called neutral position.<br />
Unfortunately, people often think that the kite is stable in neutral position. However, wind fluctuates-it gusts and lulls-and in neutral<br />
position, something known as lofting can occur when wind fluctuates. When a kite luffs (or receives less wind in its foil), the kite<br />
will move slightly away from the pilot. When a gust hits, the kite receives a surge of power, and often that surge of power is too<br />
much for a kiteboarder standing with the kite high overhead. As a result, the kiteboarder may be lofted (lifted) into the air. Lofting<br />
can be serious, but you may reduce the chances of lofting by understanding the power zones, and by avoiding putting your kite<br />
in the neutral position while on land.<br />
15<br />
CK07SwitchbladeUserManual.indd 15<br />
8/10/06 3:40:46 AM
HOW TO:<br />
AREA OF OPERATION / KITE POSITIONS, ZONES & POWER<br />
Neutral Position - This is the position just above the pilot’s head in the sky. If the pilot levels out the bar, the kite will gravitate<br />
to the neutral position. However, it is difficult and dangerous to keep the kite in this position. Although in this position the kite<br />
may feel steady and may feel like it has the least amount of power or pull, it is also the position in which on land the pilot is<br />
most susceptible to lofting. On the water, the neutral position can be utilized to rest while you reel in your board, but on land, we<br />
strongly suggest you do not utilize the neutral position. After launching, it is best to make your way to the water without delay. Do<br />
NOT linger on land with the kite in neutral position. It is VERY dangerous.<br />
Lofting – Lofting occurs when the kite is above the riders head in the neutral position. Instability in the wind can cause sudden<br />
vertical force and lift a rider off of their feet.<br />
Neutral Zone - This is the area that includes the neutral position and the area to the left and right of the pilot. It encompasses<br />
the most upwind or windward positions in which to fly the kite. When flown here, the kite has less power or pull than when it<br />
is in the power zone. However, use caution when the kite is in this zone, especially when on land, and especially in gusty wind<br />
conditions.<br />
Power Zone - This is the area in front and to the sides of the pilot, but excluding the neutral position and zones. It is the area<br />
in which the kite has the most power and pull. When flown in this area, the kite can be powerful and dangerous, so avoid flying<br />
your kite in this zone when learning. Use extreme caution when flying the kite in this zone.<br />
Generating Power - One way to generate power from your kite is by steering your kite from low to high or from high to low in<br />
the sky. The movement of your kite in the sky creates lift, which creates power. Keep this in mind, especially when learning. When<br />
bringing the kite from a low position up to the neutral position, the movement of the kite actually creates power and generates<br />
speed, so be prepared. When under-powered, you may use this ability of the kite to your advantage by creating power and speed<br />
to get planing.<br />
16<br />
CK07SwitchbladeUserManual.indd 16<br />
8/10/06 3:40:47 AM
HOW TO:<br />
STEER<br />
STEERING<br />
This is a partial list of techniques to be remembered and applied. Be certain to always take instruction<br />
from a professional.<br />
Key Points to Remember<br />
• When practicing steering a kite on land, always remember that your kite has extreme power. Be prepared. We suggest you<br />
develop your kite handing skills on land with a trainer kite, and then move to the water for further practice using the “body<br />
dragging” techniques with your power kite.<br />
• When first learning to fly your kite, always keep your eyes on the kite.<br />
• Steer slowly. Do not make any abrupt motions with the control bar.<br />
• Keep in mind the power of the kite.<br />
• Never turn the control bar like a car steering wheel. It is ineffective for steering the kite and may actually cause the kite to<br />
become out of control.<br />
Steering the Kite to the Left<br />
• Hold the bar with both hands, shoulder distance apart.<br />
• With your eyes on the kite, slightly pull on the control bar with your left hand,<br />
pulling it toward your body.<br />
• This will allow your left arm to bend and your right arm to extend. Keeping<br />
one arm extended is important; do not pull both arms toward your body at<br />
the same time.<br />
• Pull slowly. The quicker your movements, the faster the kite will turn and the<br />
more power it will create.<br />
• Once the kite starts to turn, it will continue to turn left unless you “tell it”<br />
otherwise.<br />
• Be ready to steer the kite in the other direction.<br />
Steering the Kite to the Right<br />
• Hold the bar with both hands, shoulder distance apart.<br />
• With your eyes on the kite, slightly pull on the control bar with your right hand,<br />
pulling it toward your body.<br />
• This will allow your right arm to bend and your left arm to extend. Keeping<br />
one arm extended is important; do not pull both arms toward your body at<br />
the same time.<br />
• Pull slowly. The quicker your movements, the faster the kite will turn and the more<br />
power it will create.<br />
• Once the kite starts to turn, it will continue to turn right unless you tell it<br />
otherwise.<br />
• Be ready to steer the kite in the other direction.<br />
17<br />
CK07SwitchbladeUserManual.indd 17<br />
8/10/06 3:40:54 AM
HOW TO:<br />
PLANNING YOUR LAUNCH<br />
Planning Your Launch<br />
• Choose an area where you have at least 100 meters of space to your left and right and especially downwind of you.<br />
• Set up your equipment so that your kite is downwind of where you will be launching, but most importantly, so that it is at<br />
an angle off of the wind.<br />
• DO NOT SET UP YOUR KITE FOR A STRAIGHT DOWNWIND LAUNCH! The kite will launch with too much power and you<br />
will endanger the lives of yourself and those around you if you launch in this manner.<br />
• Basically, if the wind is at your back, and straight downwind is at a 180°, then you will want to set your kite at about a<br />
100° off the wind, either to the left or to the right of you.<br />
• The more the kite is positioned into the wind when you launch, the less power it will have when it goes up, and the easier<br />
your launch will be.<br />
• Your partner will stand with the kite while you will stand 30 meters away at your control bar.<br />
• Make sure you launch slowly, and launch the kite at an angle, NOT STRAIGHT DOWNWIND!<br />
<br />
<br />
<br />
<br />
<br />
<br />
18<br />
CK07SwitchbladeUserManual.indd 18<br />
8/10/06 3:40:54 AM
HOW TO:<br />
LAUNCHING WITH A PARTNER<br />
LAUNCHING WITH A PARTNER<br />
1. Before launching, re-familiarize yourself with your Quick Release System in the event that you must engage them. Make<br />
sure you have them properly set up.<br />
2. Next, thoroughly check your lines, your gear, and your launching and landing sites; if all is okay, you are ready to launch<br />
your kite. Be certain your kite is properly inflated; this is imperative to the re-launchability of your kite.<br />
3. Before you launch, organize a clearly defined release signal that you and your partner both understand.<br />
4. Disengage the Override ball.<br />
5. Next, engage the security pin.<br />
6. Have your partner stand with the kite at 100° off of the wind.<br />
7. Your partner should hold the kite in the middle of the leading edge, with the leading edge vertical and pointing into the<br />
wind.<br />
8. Your partner should stand behind the kite and not to the side or in front of the kite.<br />
9. Also, your partner SHOULD NOT touch the bridle or flying lines.<br />
10. With the control bar in your hands and at chest height, take a few steps back to take the slack out of the flying lines.<br />
11. Signal your partner to let go of your kite. It is important that your partner lets you steer the kite out of his or her hands.<br />
12. CAUTION: Your partner SHOULD NOT throw the kite into the air. Instruct him/her against doing this BEFORE you launch.<br />
When the kite is thrown into the air, it hinders the ability of the kite to launch properly. When thrown, the kite may either<br />
launch too abruptly and powerfully or it may not launch at all. It is potentially a very dangerous way to launch.<br />
13. Once your partner lets go of the kite, have him/her move upwind of you and out of your way.<br />
14. SLOWLY steer the kite to the edge of the power window. DO NOT make any abrupt motions. The slower you steer the kite,<br />
the more in control you will be.<br />
15. With the kite at the edge of the power window and the wind at your back, walk slowly to the water’s edge, keeping in<br />
constant check with the kite. You should know what the kite is doing at all times.<br />
16. If anything goes wrong with the launch, you should be ready to push the control bar away to depower the kite.<br />
17. CAUTION: the more wind there is during your launch, the faster everything will happen. That is why it is important that<br />
you launch the kite slowly.<br />
18. When you are an appropriate distance from any obstacles, you may engage the override ball. You will then need to use<br />
force to push the bar past the Override ball to immediately depower your kite.<br />
19<br />
CK07SwitchbladeUserManual.indd 19<br />
8/10/06 3:40:55 AM
HOW TO:<br />
STEER / LAUNCH / LAND - LANDING A KITE TO YOUR PARTNER<br />
LANDING A KITE TO YOUR PARTNER<br />
1. Prior to launching, make sure your partner has been instructed on how to land your kite properly.<br />
2. Also, you should always determine adequate landing spots before you launch your kite.<br />
3. Having done that, make sure that when you are heading toward shore, that your landing location is still un-crowded and<br />
un-obstructed.<br />
4. Never land your kite over, on top of, or near others, especially if they are downwind of you. You should have an area clear<br />
of people, pets, power lines, trees, and other obstructions.<br />
5. As you approach shore, keep your kite low near the water, at the edge of the power window.<br />
6. Drop down (or step) off your board and body drag the final distance to shore. Do not approach the shoreline with speed.<br />
7. Slowly steer your kite into the wind and to your partner.<br />
8. Your partner should be on the windward side of your kite as he/she approaches it.<br />
9. Once the kite is nearly touching the ground, your partner should grab the kite at the middle of the leading edge strut.<br />
He/she should grab the kite in the same location on the kite as when it was launched.<br />
10. Your partner SHOULD NOT grab the kite bridles or flying lines.<br />
11. Your partner should AVOID grabbing the kite by either wing tip or the trailing edge of the kite. Grabbing the kite by the<br />
wing tip or the trailing edge will often cause it to flip or spin; the kite will also be hard to manage.<br />
12. Once your partner has the kite’s leading edge, he/she should walk the kite away from the water’s edge.<br />
13. Your partner may either continue to hold the kite or he/she may secure the kite by turning it over, with the struts down<br />
and the leading edge pointed into the wind, and securing it with sand or sand bags.<br />
14. Once on land, with your kite secured, you may wind up your lines.<br />
20<br />
CK07SwitchbladeUserManual.indd 20<br />
8/10/06 3:40:55 AM
HOW TO:<br />
STEER / LAUNCH / LAND - RELAUNCHING<br />
RELAUNCHING YOUR Switchblade<br />
Important CAUTION: Proper inflation of the struts, especially the leading edge, is imperative for re-launchability of your kite.<br />
Make sure your kite struts are properly inflated before entering the water.<br />
• When your kite goes down on the water, know that the kite may re-launch on its own, often when you do not expect it to,<br />
so be prepared.<br />
• If your kite goes down on its face, with the leading edge and struts facing the water, you must steer the kite onto its side<br />
in order to re-launch.<br />
• Pull the rear leader line toward your body. Maintain constant tension on this leader line. CAUTION: Make sure not to wrap<br />
the leader line around your hand and do not allow your body to get entangled in the lines. You may need to pull as much<br />
as two meters of leader in order to lift the wingtip of the kite.<br />
• HINT: Keep your board on your feet and in front of you. This will slow your forward momentum and increase the speed of<br />
relaunch.<br />
• Once the wingtip begins to lift, the kite will soon roll onto its side.<br />
• Once on its side, the kite will begin to move toward the edge of the wind window. You may have to finesse the kite to the<br />
edge of the window; to do this continue to hold onto the same leader line until the kite wants to re-launch.<br />
• Sometimes, especially in light wind, you must be patient as the kite works its way to the edge of the wind window. Do<br />
not get impatient and start pulling on both sides of the bar. This only confuses the kite. Continue to work the kite to the<br />
original side you chose.<br />
• When the kite is ready to re-launch, release the leader line and steer the kite up into the sky. Slowly steer your kite into<br />
the sky and level out your bar.<br />
21<br />
CK07SwitchbladeUserManual.indd 21<br />
8/10/06 3:40:56 AM
HOW TO:<br />
TUNING THE KITE<br />
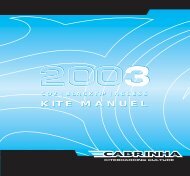
TUNING THE KITE<br />
Proper tuning of your Switchblade kite is essential for best performance. A properly tuned kite increases its efficiency, speed, and<br />
allows the kite to de-power correctly. The following guidelines will help you to properly tune the kite to suit your style of riding.<br />
• All models have a desired sweet spot that is achieved by the correct tension of the steering (back) and de-power (front)<br />
lines. Fine-tuning of the kite may be done by making small adjustments to the Centerline Adjustment Strap (CAS.).<br />
• Please note that, due to the full range of depower available in the system, the CAS is used to position the bar within the<br />
depower range. If you find yourself riding with you’re arms fully extended and bent over at the waist, you can pull the red<br />
ball and the bar will move closer to you.<br />
• The Switchblade is very sensitive to over sheeting. Too much back line tension can cause the kite to fly slowly or even<br />
backwards in light wind. Over sheeting will also minimize the amount of shutdown available in the depower range.<br />
• Do not ‘over sheet’ the kite. The first objective is to set the kite’s maximum power while allowing it to fly efficiently across<br />
the sky. More power and quicker turning is achieved by tensioning the steering (back) lines. This is called ‘sheeting in the<br />
kite’. There is however, a point of diminishing returns. Too much back line tension will cause the kite to fly slowly across<br />
the sky and not allow it to fly to the edge of the power window.<br />
• With the kite directly overhead, hook into the harness loop and fully sheet in (power up) the kite. If the kite is oversheeted,<br />
the kite will sit back in the window. (CAUTION: beware of lofting. Leaving the kite overhead for long periods of<br />
time increases the risk of this phenomenon. If you feel yourself being lifted, sheet out immediately and be ready to pull<br />
your QRS).<br />
• De-power the kite by pulling on the CAS until the desired effect is achieved. The more you pull on the CAS the less power<br />
the kite will have. Keep in mind that you will still be able to de-power the kite through the Depower Loop, so do not depower<br />
too much with the CAS. To increase power, pull down on the large plastic loop on the CAS.<br />
View of kite from riders perspective. Kite in the neutral position directly above the rider.<br />
Over sheeted wingtip (too much back line tension)<br />
Front line too tight<br />
Correct Trim<br />
22<br />
CK07SwitchbladeUserManual.indd 22<br />
8/10/06 3:40:56 AM
REPAIRS<br />
TEARS / STRUT BLADDERS<br />
Major Tears<br />
For a major tear in the kite fabric, consult your dealer for a reputable kite repair loft.<br />
Minor Tears<br />
For a minor tear in the kite fabric, you may repair the tear with kite repair tape. Your kite has been supplied with an adhesive<br />
kite repair material.<br />
1. Clean and dry your kite.<br />
2. Lay the kite flat on a clean, dry, smooth surface.<br />
3. Cut two pieces of repair tape the same size, making sure they are each big enough to cover the entire tear.<br />
4. Carefully cover one side of the tear with a piece of the repair tape. Gently rub the tape smoothly onto the surface of the kite.<br />
5. Next, cover the opposite side of the tear with the second piece of repair tape, in the same manner as before.<br />
6. Make sure the tape is secure.<br />
REPAIRING STRUT BLADDERS<br />
Key Points to Remember<br />
• Before attempting to repair one of your kite bladders, make sure your<br />
kite is clean and dry. Always keep your kite pump, valves and bladders<br />
free of sand, water and other things that will dirty them.<br />
• Make sure the bladders are deflated.<br />
• Avoid repairing your kite on the beach or in dirty, dusty, windy, or<br />
abrasive areas. It is best to find a clean, dry spot out of the wind. A<br />
grassy spot is ideal.<br />
• You will need a set of flying lines and a bladder repair kit (supplied<br />
with kite) before you begin to repair the bladder.<br />
• Keep track of all valve parts for later use.<br />
1. First, lay the kite out flat with the struts facing up.<br />
2. Detach the Velcro closure at the end of the damaged strut. This will<br />
open up the sleeve of the strut and will allow you access to the<br />
internal bladder. (Fig. 1)<br />
3. Next, separate the Sprint inflation tube from the LE SPRINT valve at<br />
the affected strut by removing the tubing lock collar (LE valve)<br />
(Fig. 3).<br />
4. Slide the air clip off of the tube (Fig. 4).<br />
5. Remove the screws (2) from the base of the strut valve (Fig. 5). Keep<br />
track of the valve parts for later use.<br />
6. Tie one flying line around the valve. Cinch it down well on the valve.<br />
7. Gently insert the valve/tube down into the strut sleeve.<br />
8. Go to the base of the sleeve and gently pull the bladder out of the<br />
sleeve. Detach the flying line and leave it in the sleeve. Having the<br />
flying line through the sleeve will allow you to easily replace the bladder<br />
once it is repaired.<br />
1<br />
2<br />
3<br />
23<br />
CK07SwitchbladeUserManual.indd 23<br />
8/10/06 3:40:57 AM
REPAIRS<br />
TEARS / STRUT BLADDERS<br />
9. Slide the air clip back onto the inflation tube. Inflate the bladder<br />
and clamp the tubing so that it maintains air. Do not over inflate the<br />
bladder.<br />
10 Submerge the bladder in water to locate the hole. A bathtub or large<br />
sink full of water is best.<br />
11. Look for bubbles to locate the hole.<br />
12. Once you have located the leak, dry the area and mark the hole with<br />
a circle. A permanent marker works best for this. (Fig. 6)<br />
13. Dry and clean the rest of the bladder with a soft towel.<br />
14. Again, deflate the bladder.<br />
15. Decide whether to use the glue or a patch supplied in your bladder<br />
repair kit.<br />
16. If the hole is on a seam, you will need to glue the area.<br />
17. If the hole is on a flat area of the bladder, remove the backing on one<br />
of the patches and press it onto the bladder, covering the hole.<br />
18. Set the bladder aside for approximately 20 minutes to dry.<br />
19. Again, inflate the bladder and check to make sure it is now holding<br />
air.<br />
20. If you have repaired the holes in the bladder, coat the entire bladder<br />
in talcum powder to assist insertion back into the sleeve. (OPTIONAL)<br />
21. Deflate once again.<br />
22. Tie the flying line from the end of the strut opening onto the valve.<br />
23. Lay the bladder flat at the end of the strut, so that you may now feed<br />
it back into the sleeve.<br />
24. Gently feed the valve, followed by the rest of the bladder, into the<br />
sleeve.<br />
25. From the valve opening of the sleeve, you will pull the flying line out<br />
of the sleeve, while pulling the bladder back into place.<br />
26. Once the bladder is replaced, pull the valve back into the hole of the<br />
sleeve and remove the flying line from its base.<br />
27. Inflate the strut partially to make sure the bladder fits into all four<br />
corners of the sleeve.<br />
28. Attach the Air Distribution tube and clip connected to the LE.<br />
4<br />
5<br />
6<br />
7<br />
24<br />
CK07SwitchbladeUserManual.indd 24<br />
8/10/06 3:40:59 AM
REPAIRS<br />
LEADING EDGE BLADDERS<br />
REPAIRING LEADING EDGE BLADDERS<br />
1. First, lay the kite out with the struts facing up.<br />
2. Each end of the Leading Edge (LE) bladder is folded over and secured with a Velcro<br />
closure. You will also find a zipper access pocket at the center of the LE. Undo each<br />
Velcro closure and unzip the center access pocket. This will open up the sleeve of the<br />
strut and will allow you access to the bladder. (Fig. 1,2)<br />
3. Separate the Airlock Valve Assembly from the leading edge. Carefully lift the retainer<br />
ring from the bladder. Using the small pull tab on the Velcro ring, carefully peel the<br />
Airlock base off of the inside of the LE. Keep track of the assembly for later use. (Fig.<br />
3,4,5)<br />
4. Next, disassemble the SPRINT valves. Remove the tubing lock collars of the strut valves<br />
(Fig. 6).<br />
5. Slide the air clips off of each tube. (Fig. 7).<br />
6. Remove the screws (2) from the base of each LE valve. (Fig. 8).<br />
7. Keep track of the valve parts for later use.<br />
8. For the next step, you will need two flying lines. Starting with one end of the leading<br />
edge, tie one line around the wing tip end of the bladder. Cinch the line down well.<br />
Using the second line, follow the same procedure with the other end of the leading edge<br />
bladder.<br />
9. Next, gently push the valves down into the strut sleeve.<br />
10. Now, access the leading edge bladder through the zippered access pocket near the<br />
leading edge valve. (Fig. 2)<br />
11. Gently pull one side of the bladder out of the sleeve at a time, leaving the flying line<br />
through both sides of the sleeve. Having the flying line through the sleeve will allow you<br />
to easily replace the bladder once it is repaired.<br />
12. Once out of the sleeve, attach the air clips. Inflate the bladder and close all clips and<br />
the airlock valve so that it maintains air. Do not over inflate the bladder.<br />
13. Submerge the bladder in water to locate the hole. A bathtub or large sink full of water is<br />
best. You will need to submerge one section of the bladder at a time in order to locate<br />
the hole. Look for air bubbles to locate the hole.<br />
14. Once you have located the leak, dry the area and mark the hole with a circle. A permanent<br />
marker works best for this. (Fig. 9)<br />
15. Dry and clean the rest of the bladder with a soft towel.<br />
16. Again, deflate the bladder.<br />
17. Decide whether to use the glue or a patch supplied in your bladder repair kit.<br />
18. If the hole is on a seam, you will need to glue the area.<br />
19. If the hole is on a flat area of the bladder, remove the backing on one of the patches<br />
and press it onto the bladder, covering the hole.<br />
1<br />
2<br />
3<br />
4<br />
5<br />
6<br />
7<br />
25<br />
CK07SwitchbladeUserManual.indd 25<br />
8/10/06 3:41:01 AM
REPAIRS<br />
LEADING EDGE BLADDERS<br />
8<br />
9<br />
10<br />
11<br />
20. Set the bladder aside for approximately 20 minutes to dry.<br />
21. Again, inflate the bladder and check to make sure it is now holding air.<br />
22. Deflate once again.<br />
23. Tie each flying line to the corresponding ends of the bladder.<br />
24. Lay the bladder flat near the center access pocket and fold it, accordion<br />
style, so that you may feed each end back into the sleeve without twisting<br />
the bladder.<br />
25. Starting with one end, feed the bladder into the access pocket.<br />
26. Walk to one end of the leading edge and gently pull on the flying line,<br />
while holding the end of the sleeve. Slowly feed the bladder back into this<br />
side of the sleeve. (Fig. 10)<br />
27. Next, follow the same instructions with the other side of the bladder, until<br />
the valves are near the holes and the bladder is fully inserted.<br />
28. Tuck the ends of the bladder into the corresponding tips.<br />
29. Once the bladder is replaced, pull the valves back into the holes of the<br />
sleeve. (Fig. 11)<br />
30. Next, place the SPRINT valves back into position. (Fig. 12)<br />
31. Making sure not to catch the internal bladder in the zipper, close the<br />
center LE zipper pocket. Next, fold over wingtip access pockets and secure<br />
the Velcro strips.<br />
32. Re-attach the Airlock Valve Assembly.<br />
33. Partially inflate the Leading Edge to make sure the bladder fits into all four<br />
corners of the sleeve.<br />
34. Reassemble the SPRINT valves and connect the air distribution tubes to<br />
each strut.<br />
12<br />
26<br />
CK07SwitchbladeUserManual.indd 26<br />
8/10/06 3:41:03 AM
GLOSSARY<br />
FREQUENTLY USED KITEBOARDING & WIND<br />
TERMINOLOGY<br />
TRAINER KITE<br />
A kite that may be used on land to simulate the motions used<br />
in kiteboarding. It is an excellent instructional and learning<br />
tool. Despite its small size, this kite still has power, so be<br />
alert.<br />
INFLATABLE KITE<br />
A kite with inflatable tubes designed to float the kite and to<br />
facilitate water re-launchability.<br />
LEADING EDGE (LE)<br />
The front inflated tube of your kite.<br />
STRUTS<br />
The outer fabric tubes found on your kite. They house the<br />
inner inflatable bladders, which are filled with air to give<br />
structure to the kite.<br />
BLADDER<br />
The inner inflatable tube found within the leading edge and<br />
the struts of the kite. (Imagine a bike-it has both a tire on the<br />
outside and an inner tube which holds air).<br />
AIRLOCK - a 2 part valve that allows a single point for inflation<br />
and deflation of the kite.<br />
SPRINT<br />
Single Point Rapid Inflation Technology.<br />
AIR CLIPS<br />
Clips that prevent air transfer between the LE and the struts<br />
AIR DISTRIBUTION TUBES<br />
Tubes that connect the LE bladder to the strut bladders.<br />
OVERRIDE - Is a system designed to limit the travel of the<br />
control bar under normal riding conditions. It allows the<br />
rider to spin the bar after rotations without depowering the<br />
kite too much. Also acts as a line manager for the depower<br />
extensions.<br />
OVERRIDE MODE – The area of the de-power mainline above<br />
the Override sleeve<br />
OVERRIDE SLEEVE - The plastic tube located on the depower<br />
main line that provides the fixed point onto which the<br />
Override Unit snaps<br />
OVERRIDE UNIT – the plastic fitting that keeps the bar from<br />
entering into Override Mode. It can be pushed out of the way<br />
to enter into Override Mode.<br />
QRS-QUICK RELEASE SECURITY SYSTEM<br />
Connection points on the control systems that the rider may<br />
release in an emergency. QRS Harness Leash (Patent) that is<br />
attached to the rider and kite, designed to disconnect you in<br />
an emergency.<br />
BYPASS LEASH SYSTEM<br />
An optional security leash feature that is recommended for<br />
first time users and kiteboarding schools, and for riders who<br />
kiteboard without being hooked into the harness loop.<br />
CONTROL BAR<br />
The steering device the rider uses to steer the kite.<br />
BRIDLES<br />
The lines that hang from the wing tips and leading edge of<br />
the kite. The flying lines will be attached from the control bar<br />
to these bridle lines in order to connect control bar to kite.<br />
Tow Points – The attachment points for the bridle<br />
LEADER LINES<br />
The lines that attach directly to the control bar. You will<br />
attach these lines to the flying lines in order to connect them<br />
to your bar.<br />
FLYING LINES<br />
A term used to describe all four of the lines included with<br />
your kite package. These lines connect the bridle lines on the<br />
kite to the leader lines on the control bar and are typically<br />
20-30 meters in length.<br />
STEERING LINES<br />
The two outside flying lines that attach to the trailing edge<br />
bridles on the kite-one to the left wing tip and the other to<br />
the right wing tip.<br />
DE-POWER LINES<br />
The two center flying lines that attach to the leading edge<br />
27<br />
CK07SwitchbladeUserManual.indd 27<br />
8/10/06 3:41:03 AM
GLOSSARY<br />
bridles on the kite-one to the left wing tip, the other to the<br />
right wing tip. These lines assist in de-powering the kite.<br />
Centerline adjustment strap (CAS)-<br />
Used to depower the kite by changing the relationship<br />
between the front and back line lengths. It is also used to<br />
position the bar closer to the rider.<br />
TENSION RING – A ring located on the Override unit that<br />
allows the rider to adjust the release load required to enter<br />
into Override Mode.<br />
FLAGGING RING - The ring to ring connection that acts as<br />
an alternate leash attachment point. By connecting to the<br />
flagging ball and releasing the control system the rider is left<br />
connected to the kite by one line.<br />
HARNESS<br />
A piece of equipment used to temporarily attach the rider to<br />
the control bar harness line. This enables the rider to save<br />
energy by utilizing their body weight and all of their muscles<br />
to hang on to the kite. Most common are the waist harness<br />
(attaches around the torso) and the seat harness (attaches to<br />
the waist and around the legs)<br />
KITEBOARDING<br />
The term used to describe the sport of power kiting on water.<br />
KITESURFING<br />
Another term used to describe the sport of power kiting on<br />
water.<br />
NEUTRAL POSITION<br />
This is the position just above the rider’s head in the sky.<br />
If the rider levels out the bar, the kite will gravitate to the<br />
neutral position. However, it is difficult and dangerous to keep<br />
the kite in this position. Although in this position the kite may<br />
feel steady and may feel like it has the least amount of power<br />
or pull, it is also the position in which on land the rider is<br />
most susceptible to lofting. On the water, the neutral position<br />
can be utilized to rest while you reel in your board, but on<br />
land, we strongly suggest you do not utilize the neutral position.<br />
After launching, it is best to make your way to the water<br />
without delay. Do NOT linger on land with the kite in neutral<br />
position. It is VERY dangerous.<br />
NEUTRAL ZONE<br />
This is the area that includes the neutral position and the<br />
area to the left and right of the rider. It encompasses the<br />
most upwind or windward positions in which to fly the kite.<br />
When flown here, the kite has less power or pull than when<br />
it is in the power zone. However, use caution when the kite is<br />
in this zone, especially when on land, and especially in gusty<br />
wind conditions.<br />
POWER ZONE<br />
This is the area in front and to the sides of the rider, but<br />
excluding the neutral position and zones. It is the area in<br />
which the kite has the most power and pull. When flown in<br />
this area, the kite can be powerful and dangerous, so avoid<br />
flying your kite in this zone when learning. Use extreme<br />
caution when flying the kite in this zone.<br />
LAUNCHING<br />
The motion in which the rider steers the kite from their<br />
partner’s hands into the sky.<br />
SELF LAUNCHING<br />
A technique in which the rider launches the kite without assistance,<br />
usually by weighting down a wing tip with sand until<br />
he/she is ready to launch.<br />
RE-LAUNCHING<br />
The motion in which the rider steers the kite off of the water<br />
and back into the sky.<br />
BODY DRAGGING<br />
This is an instructional tactic / step in which the rider flies<br />
the kite while in the water, but without the board. The rider<br />
will launch, then walk to the water, and basically drag in the<br />
water while practicing flying, re-launching and self-rescue<br />
techniques.<br />
WATER STARTING<br />
The motion of the rider in which he/she goes from sitting or<br />
lying in the water to standing on the board.<br />
GYBING<br />
The motion in which the rider changes the direction of the<br />
board he/she is riding. The rider switches from a starboard<br />
tack to a port tack or vice versa.<br />
28<br />
CK07SwitchbladeUserManual.indd 28<br />
8/10/06 3:41:03 AM
GLOSSARY<br />
PLANING<br />
The point in time in which the rider gets the board skimming<br />
on the water.<br />
LANDING<br />
The motion in which the rider steers the kite into their<br />
partner’s hands on shore.<br />
OVER-POWERED<br />
A situation in which the rider has a kite too powerful for<br />
his/her ability level, weight, strength, and/or wind conditions.<br />
UNDER-POWERED<br />
A situation in which the rider has a kite not powerful enough<br />
for his/her weight, strength, and/or wind conditions.<br />
REACH<br />
A direction of travel relative to the wind direction. Generally<br />
90-160 degrees off the wind.<br />
LULL<br />
A term used to describe wind when it lessens in strength,<br />
for any amount of time. A term also used to describe the<br />
complete de-powering of a kite.<br />
LUFF<br />
A term used to describe what happens to the kite in a lull.<br />
SIDESHORE<br />
Wind is blowing from the left or from the right, parallel to the<br />
shore. Ideal wind direction for kiteboarding.<br />
ONSHORE<br />
Wind is blowing directly or to a great extent directly from the<br />
water toward the land. Do not operate your kite in or near<br />
water in this wind direction.<br />
SIDE ONSHORE<br />
Wind is blowing from either the left or the right and from the<br />
water toward the land. This is a combination of onshore and<br />
sideshore wind. Utilize caution when operating your kite in or<br />
near water in this wind direction.<br />
OFFSHORE<br />
Wind is blowing from the shore directly or to a great extent<br />
out to the water. Do not operate your kite in or near water in<br />
this wind direction.<br />
SIDE OFFSHORE<br />
Wind is blowing from either the left or the right and from the<br />
shore out to the water. This is a combination of offshore and<br />
sideshore wind. Do not operate your kite in or near water in<br />
this wind direction.<br />
GUSTY WIND<br />
Wind is inconsistent and varies considerably from one wind<br />
strength to another.<br />
DOWNWIND<br />
The direction in which the wind is traveling.<br />
UPWIND<br />
The direction from which the wind is blowing.<br />
LEEWARD<br />
The downwind side of the kiteboarder.<br />
WINDWARD<br />
The upwind side of the kiteboarder.<br />
KNOTS<br />
A measure of speed based on nautical miles.<br />
1 knot = 1 nautical mile per hour.<br />
1 knot = 1.15 miles per hour.<br />
1 knot = 1.85 kilometers per hour.<br />
MPH<br />
Miles Per Hour. A measure of speed.<br />
1 mph = 1.6 kilometers per hour.<br />
BEAUFORT SCALE<br />
A system for estimating wind strength based on the effects<br />
wind has on the physical environment (e.g. the behavior of<br />
waves, smoke, etc.). Instruments are not used to determine<br />
wind strengths in this point scale (O = calm to 12 = hurricane).<br />
PUMP – Device used to inflate the kite<br />
BAR (unit) – A unit of pressure<br />
• 1 bar = 14 PSI<br />
• 1 mbar = 0.015 PSI<br />
PSI – A unit of pressure. Pounds per square inch<br />
• 1 PSI = 68.9mbar<br />
29<br />
CK07SwitchbladeUserManual.indd 29<br />
8/10/06 3:41:03 AM