

SXVR-H9 handbook.pdf - Starlight Xpress
SXVR-H9 handbook.pdf - Starlight Xpress
SXVR-H9 handbook.pdf - Starlight Xpress

You also want an ePaper? Increase the reach of your titles
YUMPU automatically turns print PDFs into web optimized ePapers that Google loves.
Handbook for the <strong>SXVR</strong>-<strong>H9</strong> Issue 1 June 2009<br />
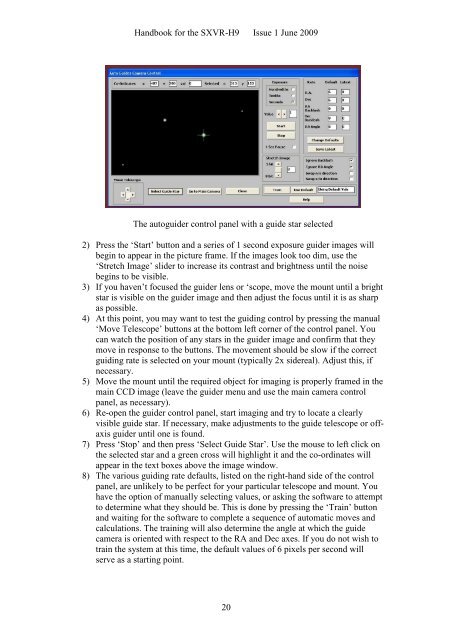
The autoguider control panel with a guide star selected<br />
2) Press the ‘Start’ button and a series of 1 second exposure guider images will<br />
begin to appear in the picture frame. If the images look too dim, use the<br />
‘Stretch Image’ slider to increase its contrast and brightness until the noise<br />
begins to be visible.<br />
3) If you haven’t focused the guider lens or ‘scope, move the mount until a bright<br />
star is visible on the guider image and then adjust the focus until it is as sharp<br />
as possible.<br />
4) At this point, you may want to test the guiding control by pressing the manual<br />
‘Move Telescope’ buttons at the bottom left corner of the control panel. You<br />
can watch the position of any stars in the guider image and confirm that they<br />
move in response to the buttons. The movement should be slow if the correct<br />
guiding rate is selected on your mount (typically 2x sidereal). Adjust this, if<br />
necessary.<br />
5) Move the mount until the required object for imaging is properly framed in the<br />
main CCD image (leave the guider menu and use the main camera control<br />
panel, as necessary).<br />
6) Re-open the guider control panel, start imaging and try to locate a clearly<br />
visible guide star. If necessary, make adjustments to the guide telescope or offaxis<br />
guider until one is found.<br />
7) Press ‘Stop’ and then press ‘Select Guide Star’. Use the mouse to left click on<br />
the selected star and a green cross will highlight it and the co-ordinates will<br />
appear in the text boxes above the image window.<br />
8) The various guiding rate defaults, listed on the right-hand side of the control<br />
panel, are unlikely to be perfect for your particular telescope and mount. You<br />
have the option of manually selecting values, or asking the software to attempt<br />
to determine what they should be. This is done by pressing the ‘Train’ button<br />
and waiting for the software to complete a sequence of automatic moves and<br />
calculations. The training will also determine the angle at which the guide<br />
camera is oriented with respect to the RA and Dec axes. If you do not wish to<br />
train the system at this time, the default values of 6 pixels per second will<br />
serve as a starting point.<br />
20


