You also want an ePaper? Increase the reach of your titles
YUMPU automatically turns print PDFs into web optimized ePapers that Google loves.
Colour Chart - Allan Block<br />
35<br />
Oatmeal Bondi Blend® Sunstone Charcoal<br />
Installation Guide - Allan Block<br />
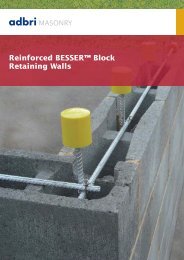
AB Installation Summary<br />
Step 1<br />
Excavate base trench at wall location and install Base Material (a well graded <strong>com</strong>pactable aggregate 5mm to 20mm diameter).<br />
Base Trench is typically 600mm wide by 100mm deep plus 25mm in depth for every 300mm of wall height. Begin excavation at the<br />
lowest point and dig a level trench into the slope until it is deep enough to ac<strong>com</strong>modate 100mm Base Material and the re<strong>com</strong>mended<br />
depth of embedment.<br />
Step 2<br />
Install base material and rake smooth and <strong>com</strong>pact, check the entire length for level and adjust as needed.<br />
Step 3<br />
Install basecourse starting at the lowest point. Place the first row of Allan Block unit on the base material with the raised front lip facing<br />
up and forward to the front of the wall. Check and adjust the level and alignment of all blocks with a stringline across the back of the<br />
blocks or the back of the lips. Make minor adjustments by tapping the block with a rubber mallet. Irregularities in the base course<br />
be<strong>com</strong>e larger as the wall stacks up!<br />
Step 4<br />
Install an Agricultural Pipe at the bottom rear of the drainage field with appropriate fall to designated drainage point. Fill Allan Block<br />
hollow cores and the minimum 300mm behind the wall with drainage material (not crushed rock or material containing ‘fines’).<br />
Using onsite soils, backfill behind drainage zone and in front of the base course.<br />
Step 5<br />
Brush off excess drainage material from top of blocks. Stack the next row of blocks with the vertical joints offset from the joints below.<br />
Blocks may be adjusted to form straight lines and smooth curves. Check it is level and adjust as needed before installing drainage and<br />
backfill materials as in Step 4.<br />
Step 6<br />
Using a vibrating plate <strong>com</strong>pactor, <strong>com</strong>pact over the top of the blocks running parallel to the wall. This will lock the blocks into<br />
position. Avoid hitting the front lip, as this will knock the blocks out of alignment. Next, <strong>com</strong>pact the drainage and then the backfill<br />
area, always running parallel to the wall.<br />
Step 7<br />
Install additional courses by repeating steps 5 and 6. Each lift of drainage and backfill materials should be installed in the same manner,<br />
<strong>com</strong>pact in lifts of 200mm (every course).<br />
This summary is intended as a general guide only. For more detailed information including creating curves, corners, steps,<br />
terraced walls or water management, please refer to the seperate Allan Block Installation Guide (available from Adbri Masonry<br />
or your local distributor) before constructing your wall.<br />
For walls that exceed the maximum heights in the table opposite please consult an engineer and check with your local<br />
Council for requirements.