RM4120W - Avanti Products
RM4120W - Avanti Products
RM4120W - Avanti Products

Create successful ePaper yourself
Turn your PDF publications into a flip-book with our unique Google optimized e-Paper software.
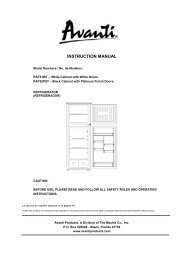
INSTRUCTION MANUAL<br />
MANUAL DE INSTRUCCIONES<br />
Model Numbers / No. de Modelos:<br />
<strong>RM4120W</strong> / RM4121B<br />
REFRIGERATOR<br />
(REFRIGERADOR)<br />
BEFORE USE, PLEASE READ AND FOLLOW ALL SAFETY RULES AND OPERATING<br />
INSTRUCTIONS.<br />
La sección en español empieza en la página 15.<br />
<strong>Avanti</strong> has a policy of continuous improvement on its products and reserves the right to change materials and specifications<br />
without notice.<br />
<strong>Avanti</strong> <strong>Products</strong>, A Division of the Mackle Co., Inc.<br />
P.O. Box 520604 - Miami, Florida 33152<br />
www.avantiproducts.com
THIS PAGE LEFT BLANK INTENTIONALLY<br />
2
TABLE OF CONTENTS<br />
Refrigerator Safety 4<br />
Important Safeguides 5<br />
Help Us Help You 6<br />
Parts and Features 7<br />
Important Safety Instructions 8<br />
Installation Instructions 8<br />
Before Using Your Unit 8<br />
Installation of Your Unit 8<br />
Electrical Connection / Extension Cord / Surge Protector 9<br />
Operating Your Unit 10<br />
Setting the Temperature Control 10<br />
Interior Light 10<br />
The Chiller Compartment 10<br />
Care and Maintenance 10<br />
Defrosting Your Unit 10<br />
Using Your Ice Cube Tray 11<br />
Cleaning Your Unit 11<br />
Power Failure 11<br />
Vacation Time 11<br />
Moving Your Unit 11<br />
Energy Saving Tips 12<br />
Reversing the Door Swing of Your Appliance 12<br />
Troubleshooting Guide 12<br />
Service for Your Refrigerator 13<br />
Wiring Diagram 13<br />
Your <strong>Avanti</strong> <strong>Products</strong> Warranty 14<br />
Instrucciones en Español 15 – 16<br />
Registration Information and Registration Card 19<br />
3
REFRIGERATOR SAFETY<br />
Your safety and the safety of others are very important.<br />
We have provided many important safety messages in this manual for your appliance. Always read<br />
and obey all safety messages.<br />
This is the Safety Alert Symbol. This symbol alerts you to potential hazards that<br />
can kill or injure you and others. All safety messages will follow the Safety<br />
Alert Symbol and either the words ” DANGER”, “WARNING” or “CAUTION”.<br />
Danger means that failure to heed this<br />
safety statement may result in severe<br />
personal injury or death.<br />
Warning means that failure to heed this<br />
safety statement may result in extensive<br />
product damage, serious personal injury, or<br />
death.<br />
Caution means that failure to heed this<br />
safety statement may result in minor or<br />
moderate personal injury, property or<br />
equipment damage.<br />
All safety messages will alert to know what potential hazard is, tell you how to reduce the chance of<br />
injury, and let you know what can happen if the instructions are not followed.<br />
4
IMPORTANT SAFEGUIDES<br />
Before the refrigerator is used, it must be properly positioned and installed as<br />
described in this manual,so read the manual carefully. To reduce the risk of fire,<br />
electrical shock or injury when using the refrigerator, follow basic precaution,<br />
including the following:<br />
<br />
<br />
<br />
<br />
<br />
<br />
<br />
Plug into a grounded 3-prong outlet, do not remove grounding prong, do not use an adapter, and<br />
do not use an extension cord.<br />
It is recommended that a separate circuit, serving only your refrigerator be provided. Use<br />
receptacles that cannot be turned off by a switch or pull chain.<br />
Never clean refrigerator parts with flammable fluids. These fumes can create a fire hazard or<br />
explosion. And do not store or use gasoline or other flammable vapors and liquids in the vicinity of<br />
this or any other appliance. The fumes can create a fire hazard or explosion.<br />
Before proceeding with cleaning and maintenance operations, make sure the power line of the<br />
unit is disconnected.<br />
Do not connect or disconnect the electric plug when your hands are wet.<br />
Unplug the refrigerator or disconnect power before cleaning or servicing. Failure to do so can<br />
result in electrical shock or death.<br />
Do not attempt to repair or replace any part of your refrigerator unless it is specifically<br />
recommended in this manual. All other servicing should be referred to a qualified technician.<br />
<br />
<br />
<br />
<br />
<br />
<br />
<br />
<br />
<br />
<br />
<br />
<br />
<br />
<br />
<br />
FOLLOW WARNING CALL OUTS BELOW ONLY WHEN APPLICABLE TO YOUR MODEL<br />
Use two or more people to move and install refrigerator. Failure to do so can result in back or<br />
other injury.<br />
To ensure proper ventilation for your refrigerator, the front of the unit must be completely<br />
unobstructed. Choose a well-ventilated area with temperatures above 60°F (16 ° C) and below<br />
90°F (32°C). This unit must be installed in an area protected from the element, such as wind, rain,<br />
water spray or drips.<br />
The refrigerator should not be located next to ovens, grills or other sources of high heat.<br />
The refrigerator must be installed with all electrical, water and drain connections in accordance<br />
with state and local codes. A standard electrical supply (115 V AC only, 60 Hz), properly<br />
grounded in accordance with the National Electrical Code and local codes and ordinances is<br />
required.<br />
Do not kink or pinch the power supply cord of refrigerator.<br />
The fuse (or circuit breaker) size should be 15 amperes.<br />
It is important for the refrigerator to be leveled in order to work properly. You may need to make<br />
several adjustments to level it.<br />
All installation must be in accordance with local plumbing code requirements.<br />
Make certain that the pipes are not pinched or kinked or damaged during installations.<br />
Check for leaks after connection.<br />
Never allow children to operate, play with or crawl inside the refrigerator.<br />
If you use the drainage container, you must set the drain select switch to OFF or the water can<br />
overflow from the drainage container<br />
Although the unit has been tested at the factory, due to long-term transit and storage, the first<br />
batch of cubes must be discarded.<br />
Do not use solvent-based cleaning agents of abrasives on the interior. These cleaners may<br />
damage or discolor the interior.<br />
Do not use this apparatus for other than its intended purpose.<br />
5
HELP US HELP YOU...<br />
Read this guide carefully.<br />
It is intended to help you operate and maintain<br />
your new unit properly.<br />
Keep it handy to answer your questions.<br />
If you don't understand something or you need<br />
more assistance, please call:<br />
<strong>Avanti</strong> Customer Service<br />
800-220-5570<br />
Keep proof of original purchase date (such as<br />
your sales slip) with this guide to establish the<br />
warranty period.<br />
CAUTION:<br />
THIS UNIT IS NOT DESIGNED<br />
FOR THE STORAGE OF<br />
MEDICINE OR OTHER MEDICAL<br />
PRODUCTS.<br />
Write down the model and serial numbers.<br />
You'll find them on a plate located on the rear<br />
outside wall of the unit.<br />
Please write these numbers here:<br />
____________________________________<br />
Date of Purchase<br />
____________________________________<br />
Model Number<br />
____________________________________<br />
Serial Number<br />
Use these numbers in any correspondence or<br />
service calls concerning your unit.<br />
If you received a damaged unit, immediately<br />
contact the dealer (or builder) that sold you the<br />
unit.<br />
Save time and money. Before you call for<br />
service, check the Troubleshooting Guide. It<br />
lists causes of minor operating problems that<br />
you can correct yourself.<br />
IF YOU NEED SERVICE<br />
We're proud of our service and want you to be<br />
pleased. If for some reason you are not happy<br />
with the service you receive, here are some<br />
steps to follow for further assistance.<br />
FIRST, contact the people who serviced your<br />
unit. Explain why you are not pleased. In most<br />
cases, this will solve the problem.<br />
NEXT, if you are still not pleased, write all the<br />
details, including your telephone number, and<br />
send it to:<br />
Customer Service<br />
<strong>Avanti</strong> <strong>Products</strong><br />
10880 NW 30 Street<br />
Miami, FL 33172 USA<br />
6
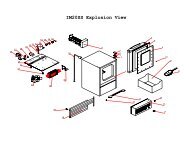
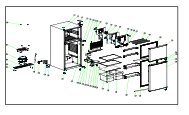
PARTS & FEATURES<br />
1. Chiller Compartment<br />
2. Temperature Control Knob<br />
3. Full Glass Shelf (Total 1)<br />
4. Half Glass Shelf (Total 1)<br />
5. Leveling Leg<br />
6. Large Door Bin<br />
7. Beverage Can Dispenser<br />
8. Small Door Bin<br />
9. 2-Liter Bottle Bin<br />
7
IMPORTANT SAFETY INSTRUCTIONS<br />
WARNING<br />
To reduce the risk of fire, electrical shock,<br />
or injury when using your appliance, follow<br />
these basic precautions:<br />
<br />
<br />
<br />
<br />
<br />
<br />
Read all instructions before using the refrigerator.<br />
DANGER or WARNING: Risk of child entrapment.<br />
Child entrapment and suffocation are not problems of the past. Junked or<br />
abandoned refrigerators are still dangerous. . . even if they will “just sit in the<br />
garage a few days.”<br />
Before you throw away your old refrigerator: Take off the doors. Leave the<br />
shelves in place so that children may not easily climb inside.<br />
Never allow children to operate, play with, or crawl inside the refrigerator.<br />
Never clean refrigerator parts with flammable fluids. The fumes can create a fire<br />
hazard or explosion.<br />
Do not store or use gasoline or any other flammable vapors and liquids in the vicinity<br />
of this or any other refrigerator. The fumes can create a fire hazard or explosion.<br />
-Save these instructions-<br />
INSTALLATION INSTRUCTIONS<br />
‣ Before Using Your Unit<br />
Remove the exterior and interior packing.<br />
Check to be sure you have all of the following parts:<br />
1 Water Drip Tray<br />
1 Ice Cube Tray<br />
2 Glass Shelves (1 Full size / 1 Half size)<br />
1 Instruction Manual<br />
Before connecting the unit to the power source, let it stand upright for approximately 2 hours.<br />
This will reduce the possibility of a malfunction in the cooling system from handling during<br />
transportation.<br />
Clean the interior surface with lukewarm water using a soft cloth.<br />
‣ Installing Your Unit<br />
This appliance is designed to be free standing only, and should not be recessed or built-in.<br />
Place your unit on a floor that is strong enough to support the unit when it is fully loaded. To<br />
level your unit, adjust the leveling legs at the bottom of the unit.<br />
Allow 5 inches of space between the back and sides of the unit, which allows the proper air<br />
circulation to cool the compressor and condenser.<br />
Locate the unit away from direct sunlight and sources of heat (stove, heater, radiator, etc.).<br />
Direct sunlight may affect the acrylic coating and heat sources may increase electrical<br />
consumption. Extreme cold ambient temperatures may also cause the unit not to perform<br />
properly.<br />
Avoid locating the unit in moist areas.<br />
Plug the unit into an exclusive, properly installed-grounded wall outlet. Do not under any<br />
circumstances cut or remove the third (ground) prong from the power cord. Any questions<br />
concerning power and/or grounding should be directed toward a certified electrician or an<br />
authorized <strong>Avanti</strong> <strong>Products</strong> service center.<br />
After plugging the appliance into a wall outlet, allow the unit to cool down for 2-3 hours before<br />
placing food in the refrigerator compartment.<br />
8
‣ ELECTRICAL CONNECTION<br />
Warning<br />
Improper use of the grounded plug can result in the risk of electrical shock. If the power cord is<br />
damaged, have it replaced by an authorized <strong>Avanti</strong> <strong>Products</strong> service center.<br />
This appliance should be properly grounded for your safety. The power cord of this appliance is<br />
equipped with a three-prong plug which mates with standard three prong wall outlets to minimize the<br />
possibility of electrical shock.<br />
Do not under any circumstances cut or remove the third ground prong from the power cord supplied.<br />
For personal safety, this appliance must be properly grounded.<br />
This appliance requires a standard 115/120 Volt AC ~/60Hz electrical ground outlet with three-prong.<br />
Have the wall outlet and circuit checked by a qualified electrician to make sure the outlet is properly<br />
grounded. When a standard 2-prong wall outlet is encountered, it is your responsibility and obligation<br />
to have it replaced with a properly grounded 3-prong wall outlet.<br />
The cord should be secured behind the appliance and not left exposed or dangling to prevent<br />
accidental injury.<br />
The appliance should always be plugged into its own individual electrical outlet which has a voltage<br />
rating that matches the rating label on the appliance. This provides the best performance and also<br />
prevent overloading house wiring circuits that could cause a fire hazard from overheated. Never<br />
unplug the appliance by pulling the power cord. Always grip the plug firmly and pull straight out from<br />
the receptacle. Repair or replace immediately all power cords that have become frayed or otherwise<br />
damaged. Do not use a cord that shows cracks or abrasion damage along its length or at either end.<br />
When moving the appliance, be careful not to damage the power cord.<br />
‣ EXTENSION CORD<br />
Because of potential safety hazards under certain conditions, it is strongly recommended that you do<br />
not use an extension cord with this appliance. However, if you must use an extension cord it is<br />
absolutely necessary that it be a UL/CUL-Listed, 3-wire grounding type appliance extension cord<br />
having a grounding type plug and outlet and that the electrical rating of the cord be 115 volts and at<br />
least 10 amperes.<br />
‣ SURGE PROTECTOR<br />
Most electrical appliances use a series of electric control boards to operate. These boards are very<br />
susceptible to power surges and could be damaged or destroyed.<br />
If the appliance is going to be used in an area or if your city / country is prone to power surges /<br />
outages; it is suggested that you use a power surge protector for all electrical devices / appliances<br />
you use. The surge protector that you select must have a surge block high enough to protect the<br />
appliance it is connected to. If you have any questions regarding the type and size of surge protector<br />
needed contact a licensed electrician in your area.<br />
Damages due to power surges are not considered a manufacturer covered defect and will void your<br />
product warranty.<br />
9
OPERATING YOUR UNIT<br />
‣ Setting the Temperature Control<br />
Your unit has only one control for regulating the temperature in the compartment. The temperature<br />
control is located on the upper right hand side of the compartment.<br />
The first time you turn the unit on, set the temperature control to “6”.<br />
The range of the temperature control is from position "OFF” to “6”. After 24 to 48 hours, adjust the<br />
temperature control to the setting that best suites your needs. The setting of “4” should be<br />
appropriate for home or office use.<br />
To turn the appliance off, turn the temperature control to ”OFF”.<br />
NOTE:<br />
• Turning the temperature control to “OFF” position stops the cooling cycle but does not shut off the<br />
power to the unit.<br />
• If the unit is unplugged, has lost power, or is turned off, you must wait 3 to 5 minutes before<br />
restarting the unit. If you attempt to restart before this time delay, the unit will not start.<br />
‣ Interior Light<br />
When you open the door the light will be ON automatically. When you close the door the light will<br />
turn OFF automatically.<br />
‣ The Chiller Compartment<br />
This compartment is designed for production of ice cubes and short-term storage (3-4 days at<br />
most) of some commercially frozen foods.<br />
The temperature in this compartment does not get cold enough to freeze food safely for long<br />
periods of time and works best when the food is already frozen.<br />
Be design, this chiller compartment is not a true freezer, and may not keep ice cream frozen, or<br />
freeze items.<br />
A colder setting may be used for these items, but other items in the refrigerator may also be<br />
affected.<br />
The chiller door is susceptible to breaking due to excessive ice build up. This part is not covered<br />
under your warranty. Be sure to defrost when the ice reaches 1/4 inch thick.<br />
CARE AND MAINTENANCE<br />
‣ Defrosting Your Unit<br />
Defrost the unit when the frost accumulated on the evaporator is about 5mm (1/5 inch) thick. Set<br />
the thermostat dial to “0” position.<br />
Remove frozen or perishable foods from the chiller compartment and place it in a cooler to<br />
protect the food.<br />
During the defrost cycle, the ice melts into the water drip tray.<br />
To remove the water, either remove the water drip tray and/or place a collection container under<br />
the tray. Use a sponge or towel to pick up the melting ice off the unit floor.<br />
Dry the water collection tray and place back under the chiller compartment. Defrosting usually<br />
takes a few hours. After defrosting, return the thermostat dial to the desired position. To defrost<br />
quickly remove all foods from the unit and leave the door open. Never use a knife or other metal<br />
instrument to scrape ice/frost from the evaporator.<br />
10
‣ Using Your Ice Cube Tray<br />
Recommended thermostat setting for ice making is the<br />
maximum setting, 7.<br />
Fill the ice cube tray two-thirds full with cold water or with<br />
any liquid suitable for freezing and place the tray on the<br />
floor of the freezer to freeze properly.<br />
Be sure the bottom of the tray is dry, otherwise it may stick<br />
to the floor of the freezer.<br />
The best method of releasing ice cubes from the tray is to<br />
hold the tray under cold tap water for a second.<br />
To eject ice cubes from the tray, place over an ice bucket and twist slightly.<br />
CAUTION:<br />
Do not use boiling water because it may damage the plastic parts. In addition, never use a<br />
sharp or metallic instrument to remove frost as it may damage the cooling system and will<br />
void the warranty. We recommend using a plastic scraper.<br />
‣ Cleaning Your Unit<br />
Turn the temperature control to "OFF", unplug the unit, and remove the food, shelf, and tray.<br />
Wash the inside surfaces with a warm water and baking soda solution. The solution should be<br />
about 2 tablespoons of baking soda to a quart of water.<br />
Wash the shelf and tray with a mild detergent solution.<br />
The outside of the unit should be cleaned with mild detergent and warm water.<br />
Wring excess water out of the sponge or cloth before cleaning the area of the controls, or any<br />
electrical parts.<br />
Wash the outside cabinet with warm water and mild liquid detergent. Rinse well and wipe dry with<br />
a clean soft cloth.<br />
CAUTION:<br />
Failure to unplug the unit could result in electrical shock or personal injury.<br />
‣ Power Failure<br />
Most power failures are corrected within a few hours and should not affect the temperature of your<br />
unit if you minimize the number of times the door is opened. If the power is going to be off for a longer<br />
period of time, you need to take the proper steps to protect your food.<br />
‣ Vacation Time<br />
Short vacations: Leave the unit operating during vacations of less than three weeks.<br />
Long vacations: If the appliance will not be used for several months, remove all food and unplug<br />
the power cord. Clean and dry the interior thoroughly. To prevent odor and mold growth, leave<br />
the door open slightly: blocking it open if necessary.<br />
‣ Moving Your Unit<br />
Remove all the food.<br />
Securely tape down all loose items inside your unit.<br />
Turn the leveling legs up to the base to avoid damage.<br />
Tape the door shut.<br />
Be sure the unit stays secure in the upright position during transportation. Also protect the<br />
outside of unit with a blanket, or similar item.<br />
11
‣ Energy Saving Tips<br />
The unit should be located in the coolest area of the room, away from heat producing appliances,<br />
and out of the direct sunlight.<br />
Let hot foods cool to room temperature before placing in the unit. Overloading the unit forces the<br />
compressor to run longer.<br />
Be sure to wrap foods properly, and wipe containers dry before placing them in the unit. This cuts<br />
down on frost build-up inside the unit.<br />
Unit storage bin should not be lined with aluminum foil, wax paper, or paper toweling. Liners<br />
interfere with cold air circulation, making the unit less efficient.<br />
Organize and label food to reduce door openings and extended searches. Remove as many<br />
items as needed at one time, and close the door as soon as possible.<br />
‣ Reversing the Door Swing of Your Appliance<br />
This appliance has the capability of the door opening from either the left or right side. The unit is<br />
delivered to you with the door opening from the left side. Should you desire to reverse the opening<br />
direction, please call customer service for reversal instructions.<br />
PROBLEMS WITH YOUR REFRIGERATOR ?<br />
You can solve many common unit problems easily, saving you the cost of a possible service call. Try<br />
the suggestions below to see if you can solve the problem before calling the servicer.<br />
TROUBLESHOOTING GUIDE<br />
PROBLEM<br />
Unit does not operate.<br />
Turns on and off frequently.<br />
Vibrations.<br />
The unit seems to make too much noise.<br />
The door will not close properly.<br />
POSSIBLE CAUSE<br />
Not plugged in.<br />
The circuit breaker tripped or a blown fuse.<br />
The unit temperature control is set at “OFF”<br />
position.<br />
The room temperature is hotter than normal.<br />
A large amount of food has been added to the<br />
unit.<br />
The door is opened too often.<br />
The door is not closed completely.<br />
The temperature control is not set correctly.<br />
The door gasket does not seal properly.<br />
The unit does not have the correct clearances.<br />
Check to assure that the unit is level.<br />
The rattling noise may come from the flow of the<br />
refrigerant, which is normal.<br />
As each cycle ends, you may hear gurgling<br />
sounds caused by the flow of refrigerant in your<br />
unit.<br />
Contraction and expansion of the inside walls<br />
may cause popping and crackling noises.<br />
The unit is not level.<br />
The unit is not level.<br />
The door was reversed and not properly installed.<br />
The gasket is dirty or bent.<br />
The shelves, bins, or baskets are out of position.<br />
12
SERVICE FOR YOUR REFRIGERATOR<br />
We are proud of our customer service organization and the network of professional service<br />
technicians that provide service on your <strong>Avanti</strong> refrigerators. With the purchase of your <strong>Avanti</strong> unit,<br />
you can be confident that if you ever need additional information or assistance, the <strong>Avanti</strong> <strong>Products</strong><br />
Customer Service team will be here for you. Just call us toll-free.<br />
Product Information<br />
800-323-5029<br />
Part Orders<br />
800-220-5570<br />
In-Home Repair Service<br />
800-220-5570<br />
AVANTI PRODUCTS CUSTOMER SERVICES<br />
Whatever your questions are about our products,<br />
help is available.<br />
You may order parts and accessories that will be<br />
delivered directly to your home, by personal<br />
check, money order, Master Card, or Visa.<br />
An <strong>Avanti</strong> <strong>Products</strong> authorized service center will<br />
provide expert repair service, scheduled at a time<br />
that is convenient for you. Our trained servicers<br />
know your refrigerator inside and out.<br />
WIRING DIAGRAM<br />
13
YOUR <strong>Avanti</strong> <strong>Products</strong> WARRANTY<br />
WHAT IS COVERED<br />
LIMITED ONE-YEAR<br />
WARRANTY<br />
For one year from the date of<br />
purchase by the original owner, <strong>Avanti</strong><br />
<strong>Products</strong> will, at its option, repair or<br />
replace any part of the appliance<br />
which proves to be defective in<br />
material or workmanship under normal<br />
use. During this period <strong>Avanti</strong><br />
<strong>Products</strong> will provide all parts and<br />
labor necessary to correct such<br />
defects free of charge, so long as the<br />
appliance has been installed and<br />
operated in accordance with the<br />
written instructions in this manual. In<br />
rental or commercial use, the warranty<br />
period is 90 days. <strong>Avanti</strong> <strong>Products</strong> will<br />
provide you with a reasonable similar<br />
replacement product that is either new<br />
or factory refurbished. All <strong>Avanti</strong><br />
appliances of 3.5 cubic foot capacity<br />
or less must be brought / sent to the<br />
applicable service shop for repair.<br />
Staple your sales receipt here. Proof of<br />
original purchase date is needed to obtain<br />
service under warranty.<br />
LIMITED SECOND THROUGH<br />
FIFTH YEAR WARRANTY<br />
For the second through the fifth year from date<br />
of original purchase, <strong>Avanti</strong> <strong>Products</strong> will<br />
provide a replacement compressor free of<br />
charge due to a failure. You are responsible<br />
for the service labor and freight charges. In<br />
rental or commercial use, the limited<br />
compressor warranty is one year and nine<br />
months. Cost to move the appliance to the<br />
servicers’ shop and back to the user's home,<br />
as may be required, are the user's<br />
responsibility.<br />
<br />
<br />
<br />
<br />
<br />
<br />
<br />
<br />
<br />
<br />
<br />
<br />
Content losses of food due to spoilage.<br />
Incidental or consequential damages.<br />
Parts and labor costs for the following will<br />
not be considered as warranty:<br />
Evaporator doors, door springs, and/or<br />
frames.<br />
Inner door panels, door shelves, door<br />
rails, and/or door supports.<br />
Chest appliance lid liners.<br />
Vegetable crispers.<br />
Light bulbs and/or plastic housing.<br />
Plastic cabinet liners.<br />
Punctured evaporator that voids the<br />
warranty on the complete sealed system.<br />
Repairs performed by unauthorized<br />
servicers.<br />
Shipping and Handling costs associated<br />
with the replacement of the unit.<br />
WHAT IS NOT COVERED<br />
<br />
<br />
<br />
<br />
<br />
<br />
Service calls that do not involve defects in<br />
material or workmanship such as<br />
customer education, door reversal, or<br />
proper installation.<br />
Service calls that are related to external<br />
problems, such as abuse, misuse,<br />
inadequate electrical power, accidents,<br />
fire, floods, or acts of God.<br />
Surcharges including, but not limited to,<br />
any after hour, weekend, or holiday<br />
service calls, tolls, ferry trip charges, or<br />
mileage expense for service calls to<br />
remote areas, including the State of<br />
Alaska.<br />
Replacement of house fuses or resetting<br />
circuit breakers.<br />
Failure of the product if it is used for other<br />
than its intended purpose.<br />
This warranty does not outside the<br />
Continental USA.<br />
14
INSTRUCCIONES EN ESPAÑOL<br />
INSTALACION<br />
Retire los accesorios de empaque (plásticos protectores, cartón y tiras engomadas). Limpie el<br />
exterior con un trapo suave y seco, y el interior con un trapo húmedo y tibio.<br />
UBICACION<br />
1. Seleccione un lugar con un piso firme y nivelado.<br />
2. Su refrigerador requiere ventilación. Deje un espacio mínimo de 5” hacia arriba y espacio<br />
suficiente en el respaldo para permitir la circulación de aire.<br />
3. Evite luz directa del sol o calor. La luz directa del sol puede afectar la capa de pintura. Las<br />
fuentes de calor en su proximidad causarán un consumo mayor de electricidad.<br />
4. Para un mejor desempeño, nivele el refrigerador utilizando las patas ajustables o tornillos<br />
niveladores. Para verificar el nivel, abra la puerta hasta la mitad, debe regresar sola.<br />
INSTRUCCIONES PARA LA CONEXION A TIERRA<br />
Este aparato electrodoméstico debe estar conectado a tierra. En caso de un cortocircuito eléctrico, la<br />
conexión a tierra reduce el riesgo de choque eléctrico proporcionando un cable de escape para la<br />
corriente eléctrica. Este aparato viene equipado con un cordón que posee un cable a tierra con un<br />
enchufe de conexión a tierra. Este enchufe debe estar conectado en un tomacorriente instalado<br />
correctamente y conectado a tierra.<br />
ADVERTENCIA<br />
El uso inadecuado del enchufe de conexión a tierra puede resultar en un riesgo de choque eléctrico.<br />
Consulte con un electricista si no comprende bien las instrucciones de conexión a tierra o si existe<br />
alguna duda sobre si el aparato está conectado a tierra correctamente.<br />
NO USE UN CORDON DE EXTENSION ELECTRICA<br />
Use un tomacorriente de pared exclusivo. No conecte su refrigerador a cordones de prolongación<br />
eléctrica o junto a cualquier otro electrodoméstico en el mismo tomacorriente de pared.<br />
COMO AJUSTAR EL CONTROL DE TEMPERATURA<br />
Su unidad tiene un solo control para regular la temperatura, este control se encuentra localizado en la<br />
parte superior derecha del compartimiento.<br />
Al conectar y encender su unidad, asegúrese de rotar el control de temperatura hacia la posición de<br />
“6”.<br />
Este control de temperatura puede variar desde “OFF” hasta la posición “6”, después de haberse<br />
mantenido en la posición “6” por 24 o 48 horas aproximadamente, regrese el control de temperatura<br />
para ajustarlo a la posición que más se ajuste a sus necesidades, por ejemplo la posición “4” sería<br />
apropiada para usar su unidad en su hogar u oficinas.<br />
Para apagar su unidad, simplemente rote el control de temperatura hacia la posición de “OFF”.<br />
Nota:<br />
Rotando el control de temperatura hacia la posición de “OFF”, Usted solamente apaga el cyclo de<br />
enfriamiento, pero no desconecta su unidad de la fuente de corriente.<br />
Si la unidad es desconectada de la pared o sufre una interrupción de electricidad Usted siempre debe<br />
esperar por un aproximado de 3 a 5 minutos para poder encenderla de nuevo, de no hacerlo así, su<br />
unidad no comenzará a funcionar.<br />
ADVERTENCIA IMPORTANTE:<br />
Un refrigerador vacío es una atracción muy peligrosa para los niños. Quite los sellos magnéticos,<br />
puertas o cerraduras de todo electrodoméstico que no esté en uso, es tambien aconsejable remover<br />
o quitar puertas al momento de desechar su refrigerador.<br />
OPERACION<br />
Enchufe el cable a la toma de corriente, que debe ser 115-120v A/C, 10 AMP ó más. Para evitar<br />
vibraciones, este equipo debe estar bien nivelado. Para encender el refrigerador, gire el control de<br />
temperatura a la posición que corresponda al enfriamiento deseado.<br />
15
CUIDADOS EN LOS PERIODOS DE AUSENCIA<br />
Para cortos períodos de ausencia (menos de 21 días) el refrigerador podrá quedar funcionando.<br />
Coloque el botón de control de temperaturas en la posición mínima.<br />
En períodos de ausencia más largos, se aconseja dejar el refrigerador limpio y desconectado.<br />
Saque todo lo que tenga adentro del refrigerador y haga el deshielo y la limpieza general.<br />
También retire la bandeja del congelador, limpie bien y séquela internamente.<br />
Deje la puerta entreabierta para que penetre el aire y así evitar la formación de olores.<br />
ECONOMIA DE ENERGIA<br />
Evite dejar por mucho tiempo la puerta abierta.<br />
Evite aperturas frecuentes de la puerta.<br />
Nunca coloque alimentos calientes dentro del refrigerador. Espere que estén a una temperatura<br />
ambiental.<br />
Coloque el botón de control de temperaturas en la posición adecuada.<br />
SI USTED SE VA DE VACACIONES POR UN PERIODO DE 30 DIAS O MAS<br />
Saque todos los artículos del refrigerador-congelador.<br />
Desconecte el refrigerador del tomacorriente y limpie el refrigerador bien, incluyendo la bandeja<br />
del congelador.<br />
Deje la puerta abierta para evitar la formación de olores, condensación o moho.<br />
SI USTED SE MUDA<br />
<br />
<br />
<br />
<br />
Desconecte el refrigerador del tomacorriente y limpie el refrigerador bien, incluyendo la bandeja<br />
del congelador.<br />
Saque todas las partes movibles y empaquételas para que no se muevan durante la<br />
transportación.<br />
Cierre la puerta del refrigerador y séllela con cinta adhesiva.<br />
Asegúrese que el refrigerador va parado durante el viaje y cúbralo con una frazada.<br />
16
THIS PAGE LEFT BLANK INTENTIONALLY<br />
17
THIS PAGE LEFT BLANK INTENTIONALLY<br />
18
Registration Information<br />
Thank you for purchasing this fine <strong>Avanti</strong> product. Please fill out this form and return it to the<br />
following address within 100 days from the date of purchase and receive these important benefits:<br />
<strong>Avanti</strong> <strong>Products</strong>, A Division of The Mackle Co., Inc.<br />
P.O.Box 520604 – Miami, Florida 33152<br />
‣ Protect your product:<br />
We will keep the model number and date of purchase of your new <strong>Avanti</strong> product on file to<br />
help you refer to this information in the event of an insurance claim such as fire or theft.<br />
‣ Promote better products:<br />
We value your input. Your responses will help us develop products designed to best meet<br />
your future needs.<br />
-------------------------------------------------------(detach here)--------------------------------------------------------------<br />
---<br />
<strong>Avanti</strong> Registration Card<br />
Name Model # Serial #<br />
Address Date Purchased Store / Dealer Name<br />
City State Zip E-mail Address<br />
Area Code Phone Number Occupation<br />
Did You Purchase An Additional Warranty As your Primary Residence, Do You:<br />
Extended Own Rent<br />
None<br />
Your Age:<br />
Reason for Choosing This <strong>Avanti</strong> Product: under 18 18-25 26-30<br />
Please indicate the most important factors 31-35 36-50 over 50<br />
That influenced your decision to purchase Marital Status:<br />
this product:<br />
Married Single<br />
Price<br />
Product Features<br />
<strong>Avanti</strong> Reputation<br />
Product Quality<br />
Salesperson Recommendation<br />
Other: ___________________<br />
Friend / Relative Recommendation<br />
Warranty<br />
Other: ___________________<br />
Comments:<br />
Is This Product Used In The:<br />
Home Business<br />
How Did You Learn About This Product:<br />
Advertising<br />
In-Store Demo<br />
Personal Demo<br />
19
VER: <strong>RM4120W</strong> – 2.0 - 03222011<br />
PRINTED IN CHINA<br />
CKAV<br />
20