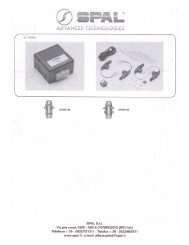
Shaved 40 - uri=spal-usa
Shaved 40 - uri=spal-usa
Shaved 40 - uri=spal-usa

Create successful ePaper yourself
Turn your PDF publications into a flip-book with our unique Google optimized e-Paper software.
<strong>Shaved</strong> <strong>40</strong><br />
Installation Manual &<br />
Operation Instructions
CHANNEL 6<br />
CHANNEL 4<br />
WHITE/BLACK<br />
BROWN<br />
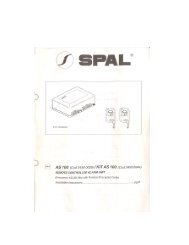
Each Kit Contains The Following Components<br />
(1) Receiver<br />
(1) Emergency Switch<br />
(2) Wire Harnesses<br />
CIRCUIT<br />
COLOR<br />
GROUND<br />
BLACK<br />
CHANNEL 2 INPUT<br />
GREEN<br />
CHANNEL 7<br />
PURPLE<br />
CHANNEL 5<br />
BLUE<br />
CHANNEL 3<br />
ORANGE<br />
+12V<br />
RED<br />
IGNITION<br />
YELLOW<br />
(4)<br />
CHANNEL<br />
1/4''<br />
1 INPUT<br />
x 20<br />
GREY<br />
x 1 Mounting<br />
CHANNEL 6<br />
WHITE/BLACK<br />
CHANNEL 4<br />
BROWN<br />
Bolts/Nuts/Washers<br />
(2) <strong>40</strong>-Pound Solenoids<br />
CIRCUIT<br />
GROUND<br />
CHANNEL 2 INPUT<br />
CHANNEL 7<br />
CHANNEL 5<br />
CHANNEL 3<br />
+12V<br />
IGNITION<br />
CHANNEL 1 INPUT<br />
CHANNEL 6<br />
CHANNEL 4<br />
COLOR<br />
(2) Yellow Butt Connectors<br />
BLACK<br />
GREEN<br />
PURPLE<br />
BLUE<br />
ORANGE<br />
RED<br />
YELLOW<br />
GREY<br />
WHITE/BLACK (2) Yellow 5/16'' Ring Terminals<br />
BROWN<br />
(2) #10 Blue Rings<br />
CIRCUIT<br />
GROUND<br />
CHANNEL 2 INPUT<br />
CHANNEL 7<br />
CHANNEL 5<br />
CHANNEL 3<br />
+12V<br />
IGNITION<br />
CHANNEL 1 INPUT<br />
CHANNEL 6<br />
CHANNEL 4<br />
COLOR<br />
BLACK<br />
GREEN<br />
PURPLE<br />
(2) Nylon BLUE Cables<br />
ORANGE<br />
RED<br />
YELLOW<br />
GREY<br />
(4)<br />
WHITE/BLACK<br />
Cable Crimps<br />
BROWN<br />
Installation Instructions for<br />
SPAL <strong>Shaved</strong> Door Handle Kit <strong>Shaved</strong>-<strong>40</strong><br />
This kit is designed to operate two or more functions. Both doors and five other<br />
functions can be controlled with the SPAL four-button remote control. The additional<br />
channels can be used to operate power door locks, power door releases, trunk<br />
releases, control linear actuators, or roll up or down power windows.<br />
Channels 1 and 2 are Positive outputs. Channels 3 through 7 are all negative outputs.<br />
Please refer to the diagrams on page 7 of this instruction manual for positive,<br />
negative, and reverse polarity diagrams.<br />
**Proper wiring is critical to the correct operation of this product. Make sure all wires<br />
are properly connected, properly grounded, free of potential damage, and are correctly<br />
fused**<br />
2
Basic Function of the SPAL <strong>Shaved</strong> Door Kit<br />
The remote control supplied with your kit has four buttons, but is capable of controlling<br />
7 channels.<br />
Channel 1:<br />
Opens drivers door<br />
Channel 2:<br />
Channel 3:<br />
Channel 4:<br />
Channel 5:<br />
Channel 6:<br />
Channel 7:<br />
Operation Section<br />
Opens passenger door<br />
Optional negative outputs (250 mA)<br />
**Additional relays are required for each channel**<br />
(See Page 7 For Wiring Diagrams)<br />
Negative Trigger<br />
Negative Trigger<br />
1 2<br />
3 4<br />
Basic Functions Of The Remote Control<br />
To Operate:<br />
1 2 3 Press: 4 5 6 7 8<br />
Channel 1 ON Button 1<br />
Channel 2 Button 2<br />
Channel 3 Button 3<br />
Channel 4 Button 4<br />
Channel 5 Button 1 + Button 2<br />
Channel 6 Button 1 + Button 3<br />
Channel 7 Button 1 + Button 4<br />
TTERY<br />
ABLE CRIMPS<br />
Brown or Yellow<br />
Wire of Receiver<br />
Programming Section<br />
CIRCUIT<br />
COLOR<br />
GROUND<br />
BLACK<br />
CHANNEL 2 INPUT<br />
GREEN<br />
CHANNEL 7<br />
PURPLE<br />
Reprogramming 35 Amp Fuse the Remote Transmitters:<br />
CHANNEL 5<br />
BLUE<br />
CHANNEL 3<br />
ORANGE<br />
EMERGENCY<br />
+12V<br />
RED<br />
**This <strong>Shaved</strong> Door kit can accept up to 4 IGNITION SPAL remote YELLOW transmitters (Part #MULTI-RCU7TX)**<br />
CHANNEL 1 INPUT<br />
GREY<br />
SWITCH<br />
CHANNEL 6<br />
WHITE/BLACK<br />
CHANNEL 4<br />
BROWN<br />
The remote transmitters are shipped Pre-Programmed. In the event that a remote<br />
transmitter loses the programmed code, or if you wish to add more remote<br />
transmitters, follow these instructions:<br />
• Make sure ignition is OFF.<br />
To Brown or Yellow<br />
Wire from Spade Connector<br />
Harness of Receiver<br />
• Locate the programming button located on the side of the receiver, next to the LED.<br />
• Press the programming button 3 times quickly (The LED will light).<br />
• Press Button (1) on each transmitter you want learned in to the receiver (one at a time).<br />
There is a 10 second window to learn all new transmitters.<br />
• The LED will remain lit for approximately 10 seconds after the last remote transmitter has<br />
been recognized.<br />
Negative Trigger<br />
• Wait for the LED to go out. Then test each remote transmitter for proper function.<br />
Jumper Settings:<br />
To avoid damage to attached components,<br />
1 2<br />
3 4<br />
the jumpers must remain in the factory setting.<br />
Dip Switch Settings:<br />
DOOR LATCH<br />
MECHANISM ARM<br />
If The Control Unit Is Connected To:<br />
DOOR LATCH<br />
MECHANISM ARM<br />
Dip Settings*<br />
1 2<br />
Solenoids<br />
CABLE CRIMPS<br />
1-2: Off<br />
3 4<br />
3-7: Off<br />
Actuators 1-2: On 3-7: 35 Amp Fuse Off<br />
* Switches 3-8 will always be in the OFF position<br />
EMERGENCY<br />
SWITCH<br />
3<br />
Negative Trigger<br />
Negative Trigger<br />
Negative Trigger<br />
To Brown or Yellow<br />
1 2 3 4 5 6 7 8<br />
ON<br />
1 2 3 4 5 6 7 8<br />
ON<br />
DIP SWITCHES
Mounting / Wiring Section<br />
• The solenoids provided in the SHAVED<strong>40</strong> kit can be mounted horizontally or<br />
vertically (with the plunger UP) to the door with the provided hardware.<br />
• Attach the solenoid to the door latch with the supplied cable and cable crimp.<br />
-Loop the cable through the solenoid and the door latch and crimp the two ends<br />
together with the cable crimp.<br />
DOOR LATCH<br />
MECHANISM ARM<br />
CABLE CRIMPS<br />
1.25" MAXIMUM<br />
EXTENSION<br />
Black: Connect<br />
to ground<br />
Brown or Yellow<br />
Wire of Receiver<br />
Solenoid Wiring:<br />
• Attach the white wire of the Driver Door Solenoid to the Brown wire (large<br />
gauge/channel 1, from spade connector harness) of the receiver.<br />
• Attach the white wire of the Passenger Door Solenoid to the Yellow wire (large<br />
gauge/channel 2, from spade connector harness) of the receiver<br />
• Connect the remaining black wire of the solenoid to a ground located on the<br />
vehicle body. (The door is not a proper grounding source!)<br />
**A mechanical backup switch should be utilized in the case of power failure. (See the<br />
optional wiring section)**<br />
4
Mounting / Wiring Section<br />
Receiver Mounting and Wiring:<br />
**The receiver must be mounted inside the vehicle to avoid moisture**<br />
***Do not plug in the receiver module until all the wiring is complete!***<br />
***Do Not Ground the Antenna!***<br />
ANTENNA<br />
LED<br />
PROGRAMMING BUTTON<br />
JUMPERS<br />
MOLEX CONNECTOR<br />
RED & BLACK WIRES MUST BE<br />
CONNECTED IN ORDER FOR THE<br />
MOLEX CONNECTOR<br />
SEE TABLE<br />
SEE TABLE<br />
SYSTEM TO WORK PROPERLY!<br />
DIP SWITCHES<br />
NOT USED<br />
NOT USED<br />
+12 VOLTS DC<br />
CH1 OUTPUT (+)<br />
CH2 OUTPUT (+)<br />
SPADE CONNECTORS<br />
Notes:<br />
*Connecting the YELLOW (ignition) wire will disable Channels 1-4 while the ignition key is ON.<br />
**Whan installing a SHAVED ACT Kit replace the 35 Amp fuse with the supplied 10 Amp fuse<br />
.<br />
Molex Connector<br />
Spade Connectors<br />
Pin # Wire Color Circuit Wire Color Circuit<br />
1 Black Ground Violet Not Used<br />
2 Not Used Not Used Orange Not Used<br />
3 Purple Channel 7 Red Positive 12 VDC**<br />
4 Blue Channel 5 Brown Channel 1<br />
5 Orange Channel 3 Yellow Channel 2<br />
6 Red Positive 12 VDC<br />
7 Yellow Ignition*<br />
8 Not Used Not Used<br />
9 White/Black Channel 6<br />
10 Brown Channel 4<br />
5
Optional Wiring Section<br />
Emergency/Backup Switch (included in kit):<br />
It is strongly recommended that an emergency/backup switch be mounted outside the<br />
vehicle in the case of lost transmitters or keys locked in the vehicle.<br />
B AT<br />
T E R Y<br />
Power Wire<br />
DO NOT GROUND INSIDE THE DOOR<br />
Inside Button Option:<br />
Internal Buttons: If you wish to remove the door handles from inside the vehicle and<br />
use power buttons, you will need to wire the buttons as follows:<br />
Wiring Options<br />
Item to be Description Relay Type # of Relays Diagram<br />
Activated of Function Required<br />
Optional Mechanical Backup Cable (HR-Entry)<br />
6<br />
Ground Wire<br />
Drivers Door Grey wire of Control Unit Chassis Ground<br />
Passenger Door Green wire of Control Unit Chassis Ground<br />
1 Power window motor Move window up & down SPDT 2 Reverse<br />
1 Power window motor Move window one direction SPDT 1 Reverse<br />
Linear actuator Move in & out SPDT 2 Reverse<br />
Solenoid Activate Solenoid SPST 1 Positive or Negative<br />
Trunk Release Open the Trunk SPST 1 Positive or Negative<br />
Door lock actuator Lock & unlock SPDT 2 Reverse<br />
SPST = Single pole single throw relay, 30 or <strong>40</strong> amp<br />
SPDT = Single pole double throw relay 30 or <strong>40</strong> amp<br />
Relays can either be purchased from SPAL USA or from your local auto parts store.<br />
A mechanical backup cable<br />
should be utilized in all shaved<br />
door applications.<br />
By using a mechanical<br />
backup, you do not run the risk<br />
of being locked out of the vehicle<br />
if the battery were to go dead.<br />
SPAL USA offers a universal<br />
mechanical cable<br />
(part #HR-ENTRY) that can be run<br />
to a concealed location, such as<br />
the front wheel well.
Optional Wiring Diagrams<br />
Positive Output<br />
+ 12 VDC<br />
+ 12 VDC<br />
FUSE<br />
FUSE<br />
Output From Receiver<br />
Output From Receiver<br />
Output From Receiver<br />
86<br />
86<br />
86<br />
87<br />
87<br />
87A<br />
87A<br />
87A<br />
30<br />
30<br />
30<br />
85<br />
85<br />
85<br />
+ 12 VDC Output<br />
12 VDC Output<br />
+ 12 VDC Output<br />
B<br />
B A<br />
AT<br />
T<br />
B T<br />
ATE E<br />
T R<br />
R<br />
E Y<br />
Y<br />
R Y<br />
Negative Output<br />
GROUND<br />
GROUND<br />
Output<br />
Output<br />
From<br />
From<br />
Receiver<br />
Receiver<br />
Output From Receiver<br />
86<br />
86<br />
86<br />
87 87<br />
87A<br />
87A<br />
87A<br />
30<br />
30<br />
30<br />
12 VDC<br />
+ 12 VDC<br />
85<br />
85<br />
+ 12 VDC<br />
85<br />
Ground Output<br />
Ground Output<br />
Ground Output<br />
FUSE<br />
FUSE<br />
FUSE<br />
B AT B T ATE R<br />
B<br />
T E Y<br />
AT R<br />
T Y<br />
E R Y<br />
Reverse Polarity Output<br />
Output From Receiver<br />
Output From Receiver<br />
Output From Receiver<br />
5 S<br />
W W<br />
SI<br />
II<br />
WS<br />
WR<br />
T<br />
I<br />
TI<br />
E C<br />
TC<br />
H<br />
CH<br />
Output From Receiver<br />
H<br />
Output From Receiver<br />
Output From Receiver<br />
+ 12 VDC<br />
+ 12 VDC<br />
+ 12 VDC<br />
87<br />
8787A<br />
86 87A<br />
85<br />
87A<br />
86 30 85<br />
86 85<br />
30<br />
30<br />
30<br />
85<br />
85<br />
30<br />
85<br />
87A 30<br />
87<br />
87A<br />
87A<br />
86<br />
86<br />
86<br />
FUSE<br />
FUSE<br />
FUSE<br />
B ATT<br />
E R Y<br />
B A<br />
B<br />
TT<br />
A E R<br />
TT Y E R Y<br />
87<br />
Power Window<br />
Motor<br />
FOR POWER WINDOWS TWO RELAYS MUST BE PLACED BETWEEN<br />
Power<br />
THE SWITCH<br />
Window<br />
AND THE<br />
Power Motor Window<br />
WINDOW MOTOR. THE DASHED LINES INDICATES WHERE THE WIRES MUST BE CUT.<br />
Motor<br />
7<br />
**In a reverse polarity system, a switch that rests at ground must be used.**
Trouble Shooting Reverse Polarity Wiring Problems<br />
Switch doesn't work properly but the shaved kit transmitters do work<br />
Step 1 Did you purchase a switch kit designed for three switches and only use two switches?<br />
YES - Connect third switch<br />
NO - Check wiring<br />
Switch works properly but shaved kit transmitters do not work<br />
Step 1<br />
Step 2<br />
Step 3<br />
Step 4<br />
Does the LED on the remote light up when you press the transmitter button?<br />
YES - Transmitter works properly continue to step 2<br />
NO - Replace transmitter battery<br />
Can you hear the receiver make a clicking sound when you press channel 1 or 2 on<br />
the transmitter?<br />
YES - Receiver and relay work properly. Go to step 4<br />
NO - Go to step 3<br />
Does the LED on the receiver light up when the transmitter button is pressed?<br />
YES - Transmitter is properly learned and OK, go to Step 4<br />
NO - Check power and ground to the receiver and then reprogram the transmitters<br />
Use a test light to check for voltage at pin 87 of the relay. Did the test show greater<br />
than 10 volts?<br />
YES - The relay checked works properly. The other side of the motor is not properly grounded.<br />
NO - Connect pin 87 to a proper voltage source.<br />
Limited Warranty Statement<br />
SPAL USA WARRANTY STATEMENT<br />
SPAL USA warrants this product to be free from defects in material and workmanship for a<br />
period of one (1) year from the date of sale to the original purchaser, and not more than two (2)<br />
years from the date of manufacture. SPAL USA will repair this product free of charge if, in the<br />
judgment of SPAL USA, it has been proven defective within the warranty period. The product<br />
should be returned, at the customer expense, to the location of original purchase. This warranty<br />
does not cover any expenses incurred in the removal and/or reinstallation of the product.This<br />
warranty does not apply to any product damaged by improper installation, accidental misuse,<br />
abuse, improper line voltage, fire, flood, lightning, or other acts of God, or a product altered or<br />
repaired by anyone other than SPAL USA.This warranty is in lieu of other warranties, expressed<br />
or implied, including any implied warranty of merchantability. No person is authorized to assume<br />
for SPAL USA any other liability concerning the sale of this product.<br />
IMPORTANT-KEEP YOUR INVOICE WITH THIS WARRANTY STATEMENT!<br />
1731 SE Oralabor Road • Ankeny, IA 50021<br />
info@spal<strong>usa</strong>.com, www.spal<strong>usa</strong>.com<br />
Sales: 800-345-0327 • Fax: 800-654-7725<br />
Tech Support Line: 800-454-7725<br />
8<br />
06/06