
Create successful ePaper yourself
Turn your PDF publications into a flip-book with our unique Google optimized e-Paper software.
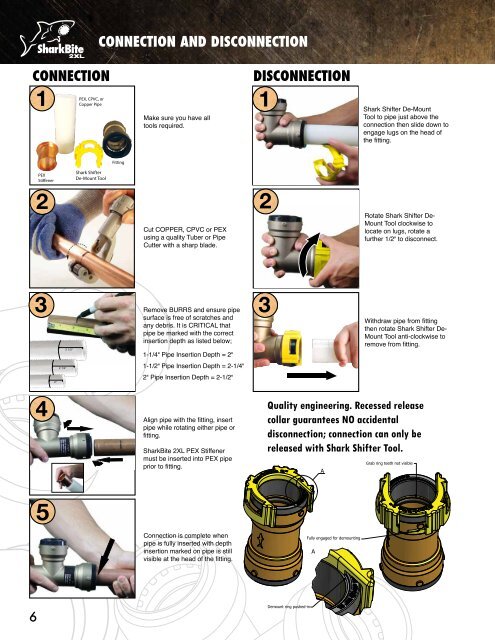
CONNECTION AND DISCONNECTION<br />
CONNECTION<br />
1<br />
Make sure you have all<br />
tools required.<br />
DISCONNECTION<br />
1<br />
Shark Shifter De-Mount<br />
Tool to pipe just above the<br />
connection then slide down to<br />
engage lugs on the head of<br />
the fitting.<br />
Shark Shifter<br />
De-Mount Tool<br />
2<br />
Cut COPPER, CPVC or PEX<br />
using a quality Tuber or Pipe<br />
Cutter with a sharp blade.<br />
2<br />
Rotate Shark Shifter De-<br />
Mount Tool clockwise to<br />
locate on lugs, rotate a<br />
further 1/2" to disconnect.<br />
3 3<br />
Remove BURRS and ensure pipe<br />
surface is free of scratches and<br />
any debris. It is CRITICAL that<br />
pipe be marked with the correct<br />
insertion depth as listed below;<br />
1-1/4" Pipe Insertion Depth = 2"<br />
1-1/2" Pipe Insertion Depth = 2-1/4"<br />
2" Pipe Insertion Depth = 2-1/2"<br />
Withdraw pipe from fitting<br />
then rotate Shark Shifter De-<br />
Mount Tool anti-clockwise to<br />
remove from fitting.<br />
4<br />
Align pipe with the fitting, insert<br />
pipe while rotating either pipe or<br />
fitting.<br />
SharkBite <strong>2XL</strong> PEX Stiffener<br />
must be inserted into PEX pipe<br />
prior to fitting.<br />
Quality engineering. Recessed release<br />
collar guarantees NO accidental<br />
disconnection; connection can only be<br />
released with Shark Shifter Tool.<br />
5<br />
Connection is complete when<br />
pipe is fully inserted with depth<br />
insertion marked on pipe is still<br />
visible at the head of the fitting.<br />
6