
Create successful ePaper yourself
Turn your PDF publications into a flip-book with our unique Google optimized e-Paper software.
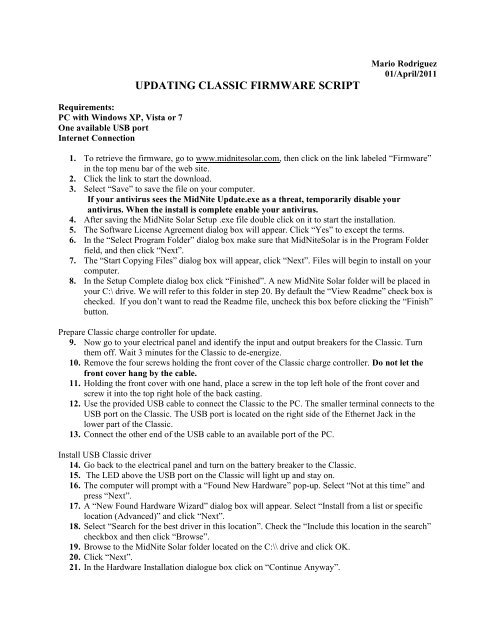
UPDATING CLASSIC FIRMWARE SCRIPT<br />
Mario Rodriguez<br />
01/April/2011<br />
Requirements:<br />
PC with Windows XP, Vista or 7<br />
One available USB port<br />
Internet Connection<br />
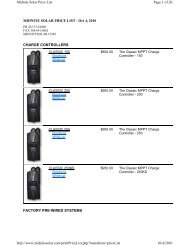
1. To retrieve the firmware, go to www.midnitesolar.com, then click on the link labeled “<strong>Firmware</strong>”<br />
in the top menu bar of the web site.<br />
2. Click the link to start the download.<br />
3. Select “Save” to save the file on your computer.<br />
If your antivirus sees the <strong>MidNite</strong> <strong>Update</strong>.exe as a threat, temporarily disable your<br />
antivirus. When the install is complete enable your antivirus.<br />
4. After saving the <strong>MidNite</strong> <strong>Solar</strong> Setup .exe file double click on it to start the installation.<br />
5. The Software License Agreement dialog box will appear. Click “Yes” to except the terms.<br />
6. In the “Select Program Folder” dialog box make sure that <strong>MidNite</strong><strong>Solar</strong> is in the Program Folder<br />
field, and then click “Next”.<br />
7. The “Start Copying Files” dialog box will appear, click “Next”. Files will begin to install on your<br />
computer.<br />
8. In the Setup Complete dialog box click “Finished”. A new <strong>MidNite</strong> <strong>Solar</strong> folder will be placed in<br />
your C:\ drive. We will refer to this folder in step 20. By default the “View Readme” check box is<br />
checked. If you don’t want to read the Readme file, uncheck this box before clicking the “Finish”<br />
button.<br />
Prepare Classic charge controller for update.<br />
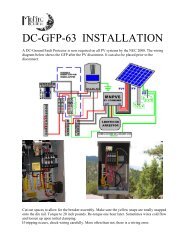
9. Now go to your electrical panel and identify the input and output breakers for the Classic. Turn<br />
them off. Wait 3 minutes for the Classic to de-energize.<br />
10. Remove the four screws holding the front cover of the Classic charge controller. Do not let the<br />
front cover hang by the cable.<br />
11. Holding the front cover with one hand, place a screw in the top left hole of the front cover and<br />
screw it into the top right hole of the back casting.<br />
12. Use the provided USB cable to connect the Classic to the PC. The smaller terminal connects to the<br />
USB port on the Classic. The USB port is located on the right side of the Ethernet Jack in the<br />
lower part of the Classic.<br />
13. Connect the other end of the USB cable to an available port of the PC.<br />
Install USB Classic driver<br />
14. Go back to the electrical panel and turn on the battery breaker to the Classic.<br />
15. The LED above the USB port on the Classic will light up and stay on.<br />
16. The computer will prompt with a “Found New Hardware” pop-up. Select “Not at this time” and<br />
press “Next”.<br />
17. A “New Found Hardware Wizard” dialog box will appear. Select “Install from a list or specific<br />
location (Advanced)” and click “Next”.<br />
18. Select “Search for the best driver in this location”. Check the “Include this location in the search”<br />
checkbox and then click “Browse”.<br />
19. Browse to the <strong>MidNite</strong> <strong>Solar</strong> folder located on the C:\\ drive and click OK.<br />
20. Click “Next”.<br />
21. In the Hardware Installation dialogue box click on “Continue Anyway”.
22. Click Finish to finish driver installation.<br />
Changing Classics’ COM port<br />
The Classic charge controller can only be recognized if it is set up for COM 8 on the PC; most likely<br />
you’ll need to change the default COM number of the classic. Here is how:<br />
23. On your computer go to the Control Panel and click on System.<br />
24. Select the tab labeled “Hardware” and click on “Device Manager”.<br />
25. In the Device Manager, expand the tree branch labeled “Ports (COM & LPT1)”. Right click on<br />
“USB CDC serial port emulation (COMxx)” and select “Properties”.<br />
26. Select the tab labeled “Port Settings” and click on “Advanced”.<br />
27. In the “COM Port” number drop down selection box, select “COM8” and press “OK” to exit that<br />
window.<br />
28. Click “OK” on the “USB CDC serial port emulation (COM8) Properties” to save changes. Now<br />
close the “Device Manager”, click “OK” on “System Properties” and then close the “Control<br />
Panel”.<br />
Uploading Classic <strong>Firmware</strong><br />
29. Turn OFF the battery breaker to the Classic on the electrical panel and open the “<strong>MidNite</strong><br />
<strong>Update</strong> GUI”. The “<strong>MidNite</strong> <strong>Update</strong> GUI” can be found by clicking on the Start menu in the<br />
lower left portion of the monitor screen and then selecting “<strong>MidNite</strong> <strong>Update</strong> GUI”.<br />
30. Click on the model (150, 200, and 250) of the Classic to be updated. A black window will<br />
appear and close automatically upon completion of the update.<br />
31. Now turn ON the battery breaker to the Classic. The update should start automatically. Wait<br />
until the “update” goes to 100% then turn the battery breaker to the Classic OFF and then<br />
ON. Turning the breaker on and off resets the Classic so the new settings take effect.<br />
32. If MNGP (<strong>MidNite</strong> Graphics Panel) needs to be updated as well, turn OFF the battery breaker<br />
to the Classic. Click on the “MNGP” button on the “<strong>MidNite</strong> <strong>Update</strong> GUI” then turn ON the<br />
breaker.<br />
33. Wait until the uploading percentage reaches 100% and then turn the battery breaker to the<br />
classic OFF and then ON. Turning the breaker on and off resets the Classic so the new<br />
settings to take effect. This now completes the firmware installation. The battery settings,<br />
saved graphs and LCD settings on the Classic will remain the same.<br />
Beware: If the Classic has been updated with a different model of Classic firmware than the factory<br />
default, the charge controller will display a “WRONG CODE” message on the bottom right corner<br />
of the Status screen and it will not turn ON.