DC-GFP-63 INSTALLATION - MidNite Solar
DC-GFP-63 INSTALLATION - MidNite Solar
DC-GFP-63 INSTALLATION - MidNite Solar

Create successful ePaper yourself
Turn your PDF publications into a flip-book with our unique Google optimized e-Paper software.
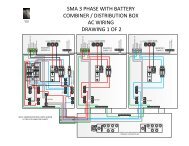
<strong>DC</strong>-<strong>GFP</strong>-<strong>63</strong> <strong>INSTALLATION</strong><br />
A <strong>DC</strong>-Ground Fault Protector is now required on all PV systems by the NEC 2008. The wiring<br />
diagram below shows the <strong>GFP</strong> after the PV disconnect. It can also be placed prior to the<br />
disconnect.<br />
Cut out spaces to allow for the breaker assembly. Make sure the yellow snaps are totally snapped<br />
onto the din rail. Torque to 20 inch pounds. Re-torque one hour later. Sometimes wires cold flow<br />
and loosen up upon initial clamping.<br />
If tripping occurs, check wiring carefully. More often than not, there is a wiring error.
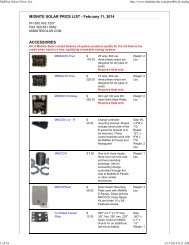
<strong>DC</strong>-<strong>GFP</strong>-80 <strong>INSTALLATION</strong><br />
A <strong>DC</strong>-Ground Fault Protector is now required on all PV systems by the NEC 2008. The wiring<br />
diagram below shows the <strong>GFP</strong> after the PV disconnect. It can also be placed prior to the<br />
disconnect.<br />
The 80 amp panel mount version comes with 4AWG lugs as shown.<br />
Note:<br />
For Battery-less <strong>DC</strong>-<strong>GFP</strong> installations connect the white wire to PV negative rather than Battery<br />
negative.