Oiltech DUO - Olaer.de
Oiltech DUO - Olaer.de
Oiltech DUO - Olaer.de

You also want an ePaper? Increase the reach of your titles
YUMPU automatically turns print PDFs into web optimized ePapers that Google loves.
<strong>DUO</strong>2/0209<br />
<strong>Oiltech</strong><br />
<strong>DUO</strong>2<br />
FRISTÅENDE OLJERENARE<br />
OFF-LINE OIL FILTER UNIT<br />
INSTALLATIONS- OCH SERVICEANVISNINGAR<br />
INSTALLATION AND SERVICING INSTRUCTIONS
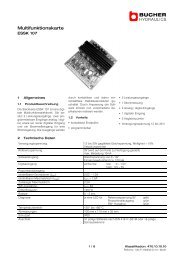
<strong>DUO</strong>2 oil filter unit<br />
Summary<br />
<strong>DUO</strong>2 is an off-line oil filter unit for efficient filtration of lubricating fluids in many different<br />
environments.<br />
<strong>DUO</strong>2 is compact in size, which makes it i<strong>de</strong>al for use in many types of machinery.<br />
<strong>DUO</strong>2 is available with pump capacity 10-80 l/min.<br />
Oil filter<br />
Contamination indicator<br />
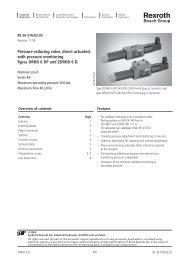
Functional overview<br />
Pressure<br />
relief valve<br />
(10 bar)<br />
Oil inlet<br />
(G1 1 /2)<br />
Pump<br />
Motor<br />
M<br />
9<br />
Socket for Minimess<br />
(option)<br />
Pump motor<br />
Oil pump<br />
Pressure controlled bypass<br />
valve (3,5 bar)<br />
Filter<br />
Oil outlet<br />
(G1)<br />
Visual contamination<br />
indicator (2,2 bar)<br />
Electrical contamination<br />
indicator (option)
<strong>DUO</strong>2 oil filter unit<br />
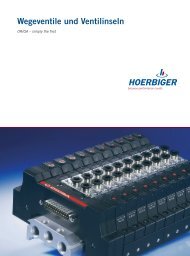
Installation<br />
Install <strong>Oiltech</strong> oil filter unit <strong>DUO</strong>2 on its<br />
base plate or attached to a wall by the<br />
electric motor feet. In both cases the oil<br />
filter requires to be upright.<br />
Please read this information prior to<br />
installing <strong>Oiltech</strong> oil filter unit <strong>DUO</strong>2.<br />
Caution!<br />
Disconnect the main power<br />
supply during any kind of<br />
interference on enclosed<br />
components or lines!<br />
Oil outlet<br />
(G1)<br />
Oil connection<br />
We recommend placing the oil inlet of the<br />
pump as close to the tank as possible to<br />
allow as short an inlet line as possible.<br />
Connect the oil inlet line to the pump<br />
connection. The oil inlet line diameter<br />
should not be minor to the pump<br />
connection diameter. Avoid flow rates in<br />
excess of 1 m/s in the oil inlet line.<br />
Minimize the difference in height between<br />
the tank fluid level and the oil inlet to pump.<br />
We recommend placing the pump inlet<br />
below the tank fluid level. To prevent<br />
draining of the tank when replacing the<br />
filter cartridge, the tank fluid level should<br />
NB!<br />
The pump is fitted with a pressure relief<br />
valve 10 bar as standard. If another<br />
pressure level is required, consult your<br />
local <strong>Olaer</strong> office.<br />
<strong>DUO</strong>2 must never be run in such a way<br />
that maximum pump pressure is excee<strong>de</strong>d<br />
(see separate pump information). This<br />
could occur if the oil outlet from the pump<br />
is shut or severely throttled. This could<br />
damage the pump and cause personal<br />
injury.<br />
Oil inlet<br />
(G1 1 /2)<br />
be below the oil filter fluid level. If this is<br />
not possible, a non-return valve or a shutoff<br />
valve should be used in the pump inlet<br />
(consult your local <strong>Olaer</strong> office).<br />
Maximum negative pressure in the pump<br />
inlet line with oil filled pump is -0,5 bar.<br />
An oil filter provi<strong>de</strong>d with an extremely<br />
long inlet line could generate problems at<br />
initial start-up because of too much air in<br />
the line. In such a case prime the suction<br />
line with oil.<br />
<strong>Olaer</strong>/<strong>Oiltech</strong> shall not be held responsible<br />
for the consequences of any modification<br />
or variation with regard to connection.<br />
10
*Service<br />
A free space<br />
corresponding to<br />
minimum the height<br />
of the oil filter size<br />
should be available<br />
above the oil filter.<br />
(Max. cartridge<br />
size: 500 mm.)<br />
Ø9 mm (6x)<br />
220 mm<br />
Electrical connection<br />
The <strong>DUO</strong>2 off-line oil filter is fitted with a<br />
three-phase wi<strong>de</strong> voltage range AC-motor<br />
for operation in most environments.<br />
Voltage at 50 Hz<br />
D/Y 220-240V / 380-420V<br />
Voltage at 60 Hz<br />
D/Y 255-290V / 440-480V<br />
*<br />
170 mm<br />
11<br />
180 mm<br />
Electrical connection<br />
Caution!<br />
Electrical connections should<br />
be ma<strong>de</strong> by a qualified<br />
electrician.
Servicing<br />
Over time, the filter cartridge will get<br />
clogged. This willl be indicated by the<br />
contamination indicator. Such an indication<br />
could take place at start-up caused by<br />
viscous oil. Check by clearing the indicator.<br />
Cases where the oil pressure drop exceeds the<br />
maximum limit of 2 bar, will be indicated by<br />
a red peg on the contamination indicator,<br />
or by an electrical indication (option).<br />
If such an indication is ignored, clogging<br />
will continue. When the pressure drop<br />
across the filter cartridge reaches 3,5 bar,<br />
a safety valve in the oil filter will open.<br />
Contamination<br />
indicator<br />
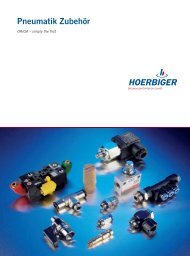
Replacement of filter cartridge<br />
Replace the filter element when indicated<br />
by the contamination indicator.<br />
1 Cut off the oil filter unit and the shutoff<br />
valve, if any.<br />
2 Open the bleed screw fitted on the oil<br />
filter cover. Turn approx. two turns.<br />
3 Unscrew the cover of the oil filter and<br />
remove used filter cartridge. Used<br />
cartridge should be han<strong>de</strong>d over to<br />
special <strong>de</strong>pots/stations.<br />
Never use standard refuse disposal.<br />
4 Install new filter cartridge.<br />
Ensure that this is fitted with an O-ring<br />
in the bottom.<br />
12<br />
2, 6, 7<br />
5 Install a new O-ring in the oil filter<br />
cover and install the cover.<br />
Carefully tighten (never use tool).<br />
6 Start-up the pump motor with the<br />
bleed screw open (approx. two turns).<br />
7 Tighten the bleed screw when only<br />
fluid appears around the screw.<br />
At start-up contamination indication<br />
could take place due to viscous oil.<br />
Clear the indicator.<br />
5<br />
3, 4
Disassembly and assembly of <strong>DUO</strong>2<br />
Follow the instructions<br />
below for disassembly<br />
and assembly of the<br />
<strong>DUO</strong>2 during repair<br />
and maintenance work.<br />
Replace all damaged<br />
and worn sealings,<br />
O-rings and other<br />
mounting <strong>de</strong>tails.<br />
Disassembly<br />
1 See instructions for ”Replacement<br />
of filter cartridge”, 1–3.<br />
2 Cut off the pump motor using the<br />
main circuit-breaker.<br />
3 Disconnect oil inlet and outlet and<br />
optional connections.<br />
4 Remove the screw fixing the oil<br />
filter to the base plate.<br />
5 Remove the screws fixing the oil<br />
filter to the adapter block.<br />
Remove the oil filter.<br />
6 Remove the screws fixing the<br />
adapter block to the pump.<br />
7 To repair or replace the motor,<br />
remove the screws fixing the<br />
motor to the base plate.<br />
5, 10<br />
13<br />
6, 9<br />
4, 11<br />
7, 8<br />
Assembly<br />
8 Place the motor and pump on the base<br />
plate.<br />
Fit the screws and washers to the pump.<br />
9 Place the adapter block to the pump. Check<br />
that the O-ring is correctly installed.<br />
Fit the screws and tighten alternately.<br />
10 Place the oil filter to the adapter block.<br />
Check that the O-ring is correctly installed.<br />
Fit the screws and tighten alternately.<br />
11 Fit and tighten the screw fixing the oil<br />
filter to the base plate.<br />
12 To install the filter cartridge, see<br />
instructions for replacement of filter<br />
cartridge (4–5).<br />
13 Connect the oil inlet and outlet and all<br />
optional connections. Continue according<br />
to instructions for replacement of filter<br />
cartridge (6–7).
Prior to start-up<br />
Check that valves and all throttling <strong>de</strong>vices<br />
are open at start-up.<br />
At start-up<br />
Check that the direction of rotation of the<br />
pump is correct by looking at the electric<br />
motor cooling fan.<br />
Cleaning<br />
<strong>Olaer</strong>/<strong>Oiltech</strong> shall not be held responsible<br />
for the consequences of any interference<br />
with the oil filter unit, e.g. insi<strong>de</strong> cleaning.<br />
In case where the oil filter unit has been<br />
running with contaminated fluid, clean it by<br />
running it with clean fluid.<br />
Caution!<br />
When cleaning the exterior of<br />
the oil filter, for instance using<br />
water, disconnect all power<br />
supplies.<br />
14<br />
Miscellaneous<br />
In the event of a breakdown, consult your<br />
local <strong>Olaer</strong> office.<br />
<strong>Olaer</strong>/<strong>Oiltech</strong> shall not be held responsible<br />
for the consequences of any customer<br />
repair and/or modification.<br />
Consult your local <strong>Olaer</strong> office when using<br />
viscous fluids e.g. gear box oils or in case<br />
of cold starting.
Options<br />
1 Electrical contamination indicator for<br />
external control of filter status.<br />
To be installed on the contamination<br />
indicator.<br />
2 Socket, with nipple type Minimess, to<br />
check the working pressure or to make<br />
oil tests in the system.<br />
2<br />
15<br />
1
THE OLAER-GROUP AROUND THE WORLD<br />
AUSTRALIA<br />
<strong>Olaer</strong> Fawcett Christie Hydr. Pty Ltd<br />
13 Boola Place, Cromer<br />
N.S.W. 2099<br />
Tel: +61 2 9981 6888<br />
Fax: +61 2 9981 61 44<br />
E-mail: sales@olaer.com.au<br />
AUSTRIA<br />
<strong>Olaer</strong> Speicher-Technik GmbH<br />
Hai<strong>de</strong>rstraße 38<br />
AT-4052 Ansfel<strong>de</strong>n<br />
Tel: +43 7229 80306<br />
Fax: +43 7229 80306-21<br />
E-mail: olaer@netway.at<br />
www.olaer.at<br />
BELGIUM<br />
S.A. <strong>Olaer</strong> Benelux N.V.<br />
Doornveld 4<br />
BE-1731 Zellik<br />
Tel: +32 2 466.15.15<br />
Fax: +32 2 466.16.24<br />
E-mail: info@olaer.be<br />
www.olaer.be<br />
CZECHIA<br />
<strong>Olaer</strong> CZ s.r.o.<br />
Vi<strong>de</strong>nská 125<br />
CZ-61900 BRNO<br />
Tel: +42 5 47125 601-3<br />
Fax: +42 5 47125 600<br />
E-mail: olaer@sky.cz<br />
CHINA<br />
Fenghua <strong>Olaer</strong> Hydraulics Co. Ltd<br />
16 Xinfeng Road<br />
Fenghua City, Zhejiang<br />
Tel: +86 574 8922546/8911039<br />
Fax: +86 574 8911039<br />
DENMARK<br />
<strong>Oiltech</strong> AB<br />
Møllebækvej 14<br />
DK-9632 MØLDRUP<br />
Tel: +45 86 69 20 38<br />
Fax: +45 86 69 23 38<br />
E-mail: oiltech@post.tele.dk<br />
FINLAND<br />
<strong>Oiltech</strong> Hydraulics OY<br />
Veneentekijäntie 2<br />
FI-00210 Helsinki<br />
Tel: +358 9 413 755 00<br />
Fax: +358 9 413 755 50<br />
E-mail: stig.so<strong>de</strong>rstrom@oiltechhydraulics.fi<br />
FRANCE<br />
<strong>Olaer</strong> Industries S.A.<br />
16, rue <strong>de</strong> Seine, B.P. 7<br />
FR-92704 Colombes Ce<strong>de</strong>x<br />
Tel: +33 1 41 19 17 00<br />
Fax: +33 1 41 19 17 20<br />
E-mail: olaer@olaer.com<br />
www.olaer.com<br />
GERMANY<br />
<strong>Olaer</strong> Industries GmbH<br />
Zum Gunterstal 4<br />
DE-66440 Blieskastel<br />
Tel: +49 6842 9204-0<br />
Fax: +49 6842 9204-15<br />
E-mail: info@olaer.<strong>de</strong><br />
HOLLAND<br />
<strong>Olaer</strong> Ne<strong>de</strong>rland B.V.<br />
De Lind 10, Postbus 75<br />
NL-4840 AB Prinsenbeek<br />
Tel: +31 76-5412453<br />
Fax: +31 76-5411502<br />
E-mail: info@olaer.nl<br />
www.olaer.nl<br />
INDIA<br />
Fawcett Christie Hydraulics Ltd.<br />
C-30, Shankarapark<br />
Shankarapuram<br />
Bangalore 560 004<br />
Tel: +91 80 6610508<br />
Fax: +91 80 6611716<br />
ITALY<br />
<strong>Olaer</strong> Italiana S.p.A.<br />
Strada Fantasia 83<br />
IT-10040 Leini (TO)<br />
Tel: +39 011 991.85.11<br />
Fax: +39 011 997.80.97<br />
E-mail: olacomm@olaer.it<br />
www.olaer.it<br />
KOREA<br />
Hyundai <strong>Olaer</strong> Hydraulic Co., Ltd.<br />
2NA-702 Shiwha Industrial Group<br />
Jungwang Dong<br />
Shihungsi, Kyunggido 429-450<br />
Tel: +82 345 499 0797-8<br />
Fax: +82 345 499 2249<br />
NORWAY<br />
<strong>Oiltech</strong> AS<br />
Dynamitveien 23, PB 133<br />
NO-1401 Ski<br />
Tel: +47 6491 1180<br />
Fax: +47 6487 4321<br />
E-mail: oiltech@oiltech.no<br />
www.oiltech.no<br />
POLAND<br />
<strong>Oiltech</strong> Polska<br />
ul. Gen. Bora-Komorowskiego 22<br />
PL-03-982 WARSZAWA<br />
Tel: +48 22 6738162<br />
Fax: +48 22 6738163<br />
SOUTH AFRICA<br />
Fawcett Christie Hydraulics.<br />
c/o Rolton Products CC<br />
P.O. Box 43244<br />
ZA-Industria 2042<br />
Tel: +27 11 474 3095<br />
Fax: +27 11 474 8384<br />
SPAIN<br />
<strong>Olaer</strong>-<strong>Oiltech</strong> Iberica, S.A.<br />
Travesia Industrial, no 29<br />
ES-08907 L’Hospitalet <strong>de</strong> Ll.<br />
(Barcelona)<br />
Tel: +34 933 368 900<br />
Fax: +34 933 357 186<br />
E-mail: olaer@olaer.es<br />
www.olaer.es<br />
SWEDEN<br />
<strong>Oiltech</strong> AB<br />
Förrådsvägen 2<br />
SE-181 41 Lidingö<br />
Tel: +46 8 636 07 00<br />
Fax: +46 8 767 97 56<br />
E-mail: info@oiltech.se<br />
www.oiltech.se<br />
SWITZERLAND<br />
<strong>Olaer</strong> (Schweiz) AG<br />
Bonnstraße 3<br />
CH-3186 Düdingen<br />
Tel: +41 26 492 70 00<br />
Fax: +41 26 492 70 70<br />
E-mail: info@olaer.ch<br />
www.olaer.ch<br />
UNITED KINGDOM<br />
Fawcett Christie Hydraulics Ltd.<br />
Sandycroft Industrial Estate<br />
Chester Rd, Sandycroft<br />
Deesi<strong>de</strong>, Flintshire CH5 2QP<br />
North Wales<br />
Tel: +44 1244 535515<br />
Fax: +44 1244 533002<br />
E-mail: sales@fch.co.uk<br />
www.fch.co.uk<br />
USA<br />
Oil Air Hydraulics Inc.<br />
11505 West Little York<br />
Houston, Texas 77041<br />
Tel: +1 713 937 89 00<br />
Fax: +1 713 937 04 38<br />
E-mail: oilair1@pdq.net<br />
www.fluidpower.com<br />
LANGBORG AB 08-98 25 30