Respironics BIPAP Auto SV - Impact Biomedical Corp.
Respironics BIPAP Auto SV - Impact Biomedical Corp.
Respironics BIPAP Auto SV - Impact Biomedical Corp.

Create successful ePaper yourself
Turn your PDF publications into a flip-book with our unique Google optimized e-Paper software.
5-2<br />
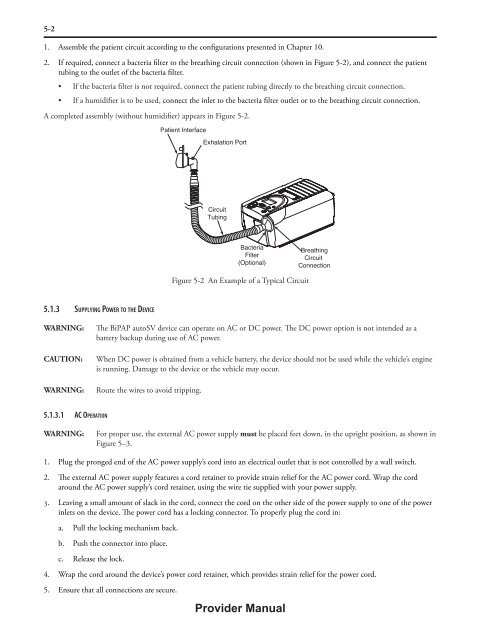
1. Assemble the patient circuit according to the configurations presented in Chapter 10.<br />
2. If required, connect a bacteria filter to the breathing circuit connection (shown in Figure 5-2), and connect the patient<br />
tubing to the outlet of the bacteria filter.<br />
• If the bacteria filter is not required, connect the patient tubing directly to the breathing circuit connection.<br />
• If a humidifier is to be used, connect the inlet to the bacteria filter outlet or to the breathing circuit connection.<br />
A completed assembly (without humidifier) appears in Figure 5-2.<br />
Patient Interface<br />
Exhalation Port<br />
Circuit<br />
Tubing<br />
Bacteria<br />
Filter<br />
(Optional)<br />
Breathing<br />
Circuit<br />
Connection<br />
Figure 5-2 An Example of a Typical Circuit<br />
5.1.3 Supplying Power to the Device<br />
WARNING:<br />
CAUTION:<br />
WARNING:<br />
The BiPAP auto<strong>SV</strong> device can operate on AC or DC power. The DC power option is not intended as a<br />
battery backup during use of AC power.<br />
When DC power is obtained from a vehicle battery, the device should not be used while the vehicle’s engine<br />
is running. Damage to the device or the vehicle may occur.<br />
Route the wires to avoid tripping.<br />
5.1.3.1 AC Operation<br />
WARNING:<br />
For proper use, the external AC power supply must be placed feet down, in the upright position, as shown in<br />
Figure 5–3.<br />
1. Plug the pronged end of the AC power supply’s cord into an electrical outlet that is not controlled by a wall switch.<br />
2. The external AC power supply features a cord retainer to provide strain relief for the AC power cord. Wrap the cord<br />
around the AC power supply’s cord retainer, using the wire tie supplied with your power supply.<br />
3. Leaving a small amount of slack in the cord, connect the cord on the other side of the power supply to one of the power<br />
inlets on the device. The power cord has a locking connector. To properly plug the cord in:<br />
a. Pull the locking mechanism back.<br />
b. Push the connector into place.<br />
c. Release the lock.<br />
4. Wrap the cord around the device’s power cord retainer, which provides strain relief for the power cord.<br />
5. Ensure that all connections are secure.<br />
Provider Manual