Installation Guide - Ubiquiti Networks
Installation Guide - Ubiquiti Networks
Installation Guide - Ubiquiti Networks

Create successful ePaper yourself
Turn your PDF publications into a flip-book with our unique Google optimized e-Paper software.
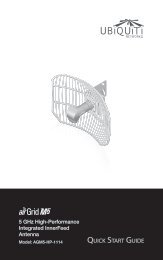
<strong>Installation</strong> <strong>Guide</strong><br />
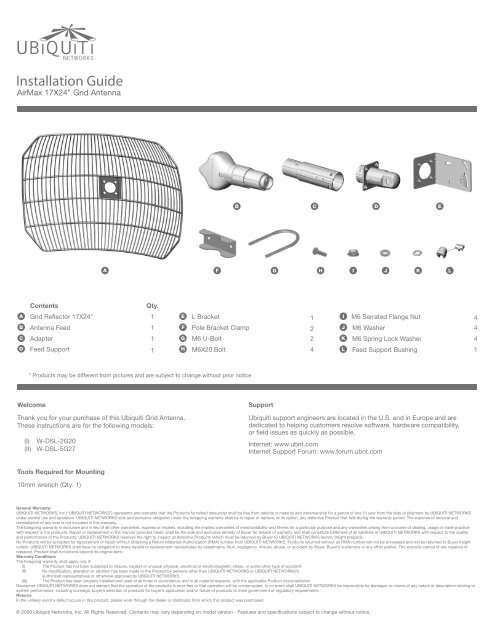
AirMax 17X24" Grid Antenna<br />
B<br />
C<br />
D<br />
E<br />
A<br />
F<br />
G H I J K L<br />
Contents<br />
Qty.<br />
A<br />
B<br />
C<br />
D<br />
Grid Reflector 17X24"<br />
Antenna Feed<br />
Adapter<br />
Feed Support<br />
1<br />
1<br />
1<br />
1<br />
E<br />
F<br />
G<br />
H<br />
L Bracket<br />
Pole Bracket Clamp<br />
M6 U-Bolt<br />
M6X20 Bolt<br />
1<br />
2<br />
I<br />
J<br />
2<br />
K<br />
M6 Serrated Flange Nut<br />
4<br />
M6 Washer<br />
4<br />
M6 Spring Lock Washer<br />
4<br />
4 L Feed Support Bushing<br />
1<br />
* Products may be different from pictures and are subject to change without prior notice<br />
Welcome<br />
Thank you for your purchase of this <strong>Ubiquiti</strong> Grid Antenna.<br />
These instructions are for the following models:<br />
(I) W-DSL-2G20<br />
(II) W-DSL-5G27<br />
Support<br />
<strong>Ubiquiti</strong> support engineers are located in the U.S. and in Europe and are<br />
dedicated to helping customers resolve software, hardware compatibility,<br />
or field issues as quickly as possible.<br />
Internet: www.ubnt.com<br />
Internet Support Forum: www.forum.ubnt.com<br />
Tools Required for Mounting<br />
10mm wrench (Qty. 1)<br />
General Warranty:<br />
UBIQUITI NETWORKS, Inc (“UBIQUITI NETWORKS”) represents and warrants that the Products furnished hereunder shall be free from defects in material and workmanship for a period of one (1) year from the date of shipment by UBIQUITI NETWORKS<br />
under normal use and operation. UBIQUITI NETWORKS sole and exclusive obligation under the foregoing warranty shall be to repair or replace, at its option, any defective Product that fails during the warranty period. The expense of removal and<br />
reinstallation of any item is not included in this warranty.<br />
and performance of the Products. UBIQUITI NETWORKS reserves the right to inspect all defective Products (which must be returned by Buyer to UBIQUITI NETWORKS factory freight prepaid).<br />
No Products will be accepted for replacement or repair without obtaining a Return Materials Authorization (RMA) number from UBIQUITI NETWORKS. Products returned without an RMA number will not be processed and will be returned to Buyer freight<br />
collect. UBIQUITI NETWORKS shall have no obligation to make repairs or replacement necessitated by catastrophe, fault, negligence, misuse, abuse, or accident by Buyer, Buyer’s customers or any other parties. The warranty period of any repaired or<br />
replaced. Product shall not extend beyond its original term.<br />
Warranty Conditions<br />
The foregoing warranty shall apply only if:<br />
(I) The Product has not been subjected to misuse, neglect or unusual physical, electrical or electromagnetic stress, or some other type of accident.<br />
(II)<br />
authorized representatives or otherwise approved by UBIQUITI NETWORKS.<br />
(III) The Product has been properly installed and used at all times in accordance, and in all material respects, with the applicable Product documentation.<br />
Disclaimer. UBIQUITI NETWORKS does not warrant that the operation of the products is error-free or that operation will be uninterrupted. In no event shall UBIQUITI NETWORKS be responsible for damages or claims of any nature or description relating to<br />
system performance, including coverage, buyer’s selection of products for buyer’s application and/or failure of products to meet government or regulatory requirements.<br />
Returns<br />
In the unlikely event a defect occurs in this product, please work through the dealer or distributor from which this product was purchased.
1. Install Feed Support and L Bracket to Grid Reflector<br />
Install D Feed Support and E L Bracket to A Grid Reflector by<br />
A<br />
E<br />
H M6X20 Bolt (Qty. 4)<br />
K M6 Spring Lock Washer (Qty. 4)<br />
J M6 Washer (Qty. 4)<br />
H<br />
K<br />
J<br />
1<br />
D<br />
Vertical Polarization<br />
Horizontal Polarization<br />
2. Install Adapter and Connect Network Cable<br />
to Antenna Feed<br />
Insert C Adapter into the D Feed Support.<br />
Route network cable through the bottom hole of the D Feed Support and<br />
attach to the RJ-45 slot on the back of the B Antenna Feed.<br />
C<br />
B<br />
D<br />
D<br />
2<br />
3. Install Antenna Feed<br />
Insert B Antenna Feed into the C Adapter.<br />
Polarization of the W-DSL antenna must match the device that it will be<br />
communicating with (Horizontal to Horizontal, Vertical to Vertical). For<br />
Vertical polarization, the A Grid Reflector and B Antenna Feed must<br />
match figure 3A. For Horizontal polarization the A Grid Reflector and<br />
B Antenna Feed must match figure 3B.<br />
A<br />
C<br />
B<br />
B<br />
3<br />
Vertical Polarization<br />
Horizontal Polarization<br />
4. Install Feed Support Bushing to Feed Support<br />
Wrap network cable with the L Feed Support Bushing and then slide it<br />
into the hole in the D Feed Support .<br />
L<br />
D<br />
4<br />
5. Attach Antenna to Pole<br />
Mounting bracket can accommodate<br />
1.25"-2.2" pole.<br />
Attach antenna assembly to pole by<br />
G<br />
F<br />
I<br />
M6 U-Bolt (Qty. 2)<br />
Pole Bracket Clamp (Qty. 2)<br />
M6 Serrated Flange Nut (Qty. 4)<br />
5<br />
I<br />
F<br />
G