INSTRUCTION MANUAL - Singer
INSTRUCTION MANUAL - Singer
INSTRUCTION MANUAL - Singer
You also want an ePaper? Increase the reach of your titles
YUMPU automatically turns print PDFs into web optimized ePapers that Google loves.
4830 & 4832<br />
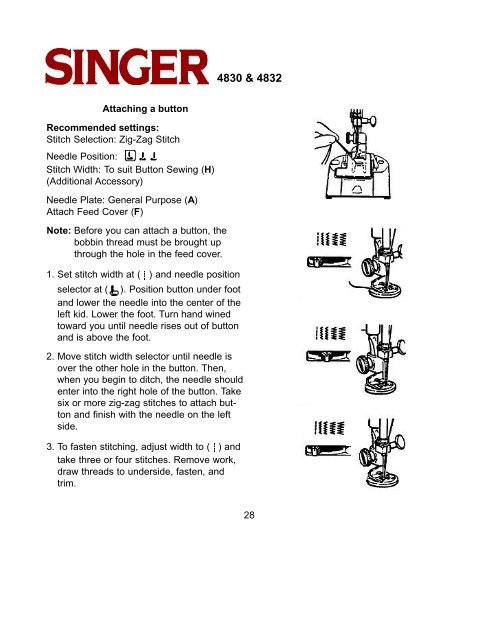
Attaching a button<br />
Recommended settings:<br />
Stitch Selection: Zig-Zag Stitch<br />
Needle Position:<br />
Stitch Width: To suit Button Sewing (H)<br />
(Additional Accessory)<br />
Needle Plate: General Purpose (A)<br />
Attach Feed Cover (F)<br />
Note: Before you can attach a button, the<br />
bobbin thread must be brought up<br />
through the hole in the feed cover.<br />
1. Set stitch width at ( ) and needle position<br />
selector at ( ). Position button under foot<br />
and lower the needle into the center of the<br />
left kid. Lower the foot. Turn hand wined<br />
toward you until needle rises out of button<br />
and is above the foot.<br />
2. Move stitch width selector until needle is<br />
over the other hole in the button. Then,<br />
when you begin to ditch, the needle should<br />
enter into the right hole of the button. Take<br />
six or more zig-zag stitches to attach button<br />
and finish with the needle on the left<br />
side.<br />
3. To fasten stitching, adjust width to ( ) and<br />
take three or four stitches. Remove work,<br />
draw threads to underside, fasten, and<br />
trim.<br />
28


