ZE-NC3131D - Zenec
ZE-NC3131D - Zenec
ZE-NC3131D - Zenec

You also want an ePaper? Increase the reach of your titles
YUMPU automatically turns print PDFs into web optimized ePapers that Google loves.
<strong>ZE</strong>-<strong>NC3131D</strong><br />
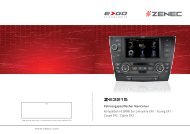
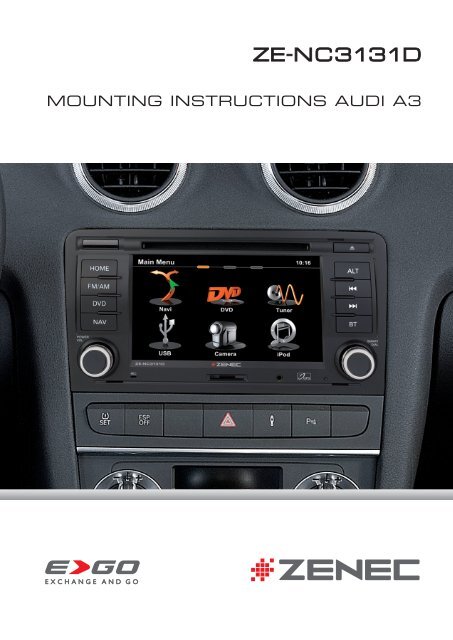
MOUNTING INSTRUCTIONS AUDI A3
MOUNTING INSTRUCTIONS AUDI A3<br />
BITTE BEACHTEN<br />
Anschlussvorbreitung<br />
Verbinden Sie den entsprechenden<br />
Stecker des Hauptanschlusskabels mit<br />
dem CAN/Stalk Interface).<br />
Das Hauptanschlusskabel wird, wie<br />
im Anschlussdiagramm aufgelistet,<br />
angeschlossen.<br />
Dabei sollten Sie darauf achten, dass<br />
der im Hauptanschlusskabel integrierte<br />
8-polige Stecker entsprechend mit dem<br />
<strong>ZE</strong>-<strong>NC3131D</strong> verbunden wird.<br />
PLEASE NOTE<br />
Connection preparation<br />
Connect the appropriate connector<br />
of the main connection cable with the<br />
CAN/Stalk interface.<br />
Connect the main connection cable as<br />
described in the electrical connections<br />
overview.<br />
Take care to connect the 8-pin<br />
connector, which is integrated in the<br />
main connection cable, to the<br />
<strong>ZE</strong>-<strong>NC3131D</strong>.<br />
UKW Antennenkabel mit Doppel-Fakra<br />
Anschluss<br />
Je nach Fahrzeugtype ist der UKW<br />
Antennenstecker als gewinkelte Type<br />
ausgeführt. Das <strong>ZE</strong>-<strong>NC3131D</strong> lässt sich in<br />
so einem Fall nicht montieren. Es wird ein<br />
Doppelfakra Verlängerungskabel benötigt<br />
(im Handel gesondert erhältlich).<br />
FM antenna cable with double Fakra<br />
connector<br />
Depending on the vehicle model the<br />
FM double Fakra can be an angled<br />
type, which prevents mounting of the<br />
<strong>ZE</strong>-<strong>NC3131D</strong>. In such cases, a double<br />
Fakra extension lead is required (to be<br />
purchased separately).
1<br />
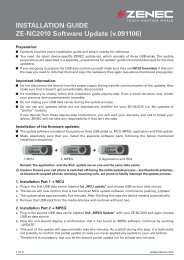
Montage:<br />
1<br />
Bevor Sie sich an den Ausbau<br />
des Audi Originalgerätes machen,<br />
bereiten Sie das <strong>ZE</strong>-<strong>NC3131D</strong> für<br />
den Anschluss vor. Verbinden<br />
Sie das Hauptanschlusskabel<br />
im Lieferumfang wie im<br />
Anschlussdiagramm zu sehen<br />
mit dem <strong>ZE</strong>-<strong>NC3131D</strong>. Verbinden<br />
Sie nun den entsprechenden<br />
verbleibenden Stecker des<br />
Hauptanschlusskabels mit dem<br />
CAN/Stalk Interface.<br />
Installation:<br />
Before you approach the removal<br />
of the OE factory installed device,<br />
start by preparing the <strong>ZE</strong>-<strong>NC3131D</strong><br />
for mounting as follows: Connect<br />
the main harness of the set content<br />
to the device as shown in the<br />
wiring diagram. Proceed to connect<br />
the appropriate cable end of the<br />
main harness to the CAN/Stalk<br />
interface.<br />
2<br />
2<br />
Lösen Sie mit dem beiliegenden<br />
Entriegelungswerkzeug<br />
Ihr Werksradio aus dem<br />
Einbauschacht. Hierzu müssen<br />
alle vier Entriegelungsschlüssel<br />
eingeführt werden. Das Gerät<br />
sollte sich nun ohne Kraftaufwand<br />
herausziehen lassen.<br />
Unlock the OE factory radio with<br />
the unlock tool contained in the<br />
set. You need to insert all four keys.<br />
It should be possible to pull out<br />
the radio without any brute force<br />
applied.<br />
3<br />
3<br />
Um das Gerät vollständig aus<br />
dem Geräteschacht entfernen<br />
zu können, müssen Sie<br />
zuvor alle Steckanschlüsse<br />
(z.B. Hauptanschlusskabel,<br />
Antennenkabel, etc.) auf der<br />
Rückseite trennen. Legen Sie das<br />
Werksradio zur Seite, um es vor<br />
Beschädigungen zu schützen.<br />
To completely remove the factory<br />
radio, all the cables (i.e. main wire<br />
harness, antenna cable etc.) must<br />
be unplugged on the backside of<br />
the device. Put the radio aside<br />
in a safe place, to protect it from<br />
damage.<br />
4<br />
4<br />
Ziehen Sie die Kabel aus dem<br />
Konsolenschacht. Montieren Sie<br />
jetzt die GPS Antenne an geeigneter<br />
Stelle (freie Sicht nach oben) und<br />
ziehen Sie das Antennenkabel in<br />
den Schacht. Montieren sie das<br />
externe Bluetooth Mikrofon, falls<br />
erwünscht. Die beste Position ist<br />
hinter dem Rückspiegel, bzw. hinter<br />
dem Steuerrad.<br />
Pull the cables out of the console,<br />
so they are within reach for device<br />
connections to be attempted. Install<br />
the GPS antenna in a suitable<br />
location underneath the front window<br />
(unobstructed view up to the sky).<br />
Proceed with routing the antenna<br />
cable to the mounting slot. Mount<br />
the external Bluetooth microphone,<br />
if so desired. Ideal places are behind<br />
the rear mirror or behind the steering<br />
wheel.<br />
5<br />
5<br />
Stecken Sie den Quadlockstecker<br />
vom vorbereiteten <strong>ZE</strong>-<strong>NC3131D</strong><br />
Gerät an das Gegenstück im<br />
Fahrzeug an und schliessen Sie<br />
die Verriegelung. Verbinden Sie<br />
die den Fakrastecker vom GPS<br />
Antennenkabel mit dem Gerät<br />
und auch das Kabel vom externen<br />
Mikro, wenn dieses montiert wurde.<br />
Insert the Quadlock plug of the <strong>ZE</strong>-<br />
<strong>NC3131D</strong> into the receptor of the<br />
vehicle and lock it. Connect the Fakra<br />
plug of the GPS antenna cable on the<br />
backside of the device - and do the<br />
same with the plug of the external<br />
microphone, if the external mic has<br />
been fitted.
6<br />
6<br />
Stecken sie den Doppelfakra<br />
Antennenstecker vom Fahrzeug am<br />
Gerät an. Wenn das Fahrzeug über<br />
einen gewinkelten Fakrastecker<br />
verfügt, benötigen Sie ein<br />
Adapterkabel (als Zubehör im<br />
Handel erhältlich). Verstauen Sie<br />
die Kabel in den Randbereichen<br />
und setzen Sie das <strong>ZE</strong>-<strong>NC3131D</strong> an<br />
den Schacht an.<br />
Connect the dual Fakra plug of<br />
the two FM antenna leads to<br />
the respective connector on the<br />
backside of the device. If your<br />
vehicle features an angled Fakra<br />
plug, you need to purchase an<br />
adapter cable (sold as accessory).<br />
Now lay all the wires to the side, to<br />
make room for the device. Align the<br />
<strong>ZE</strong>-<strong>NC3131D</strong> with the mounting bay.<br />
7<br />
7<br />
Wenn alle Anschlusskabel ordentlich<br />
verstaut sind, können Sie den<br />
<strong>ZE</strong>-<strong>NC3131D</strong> langsam in den<br />
Einbauschacht einschieben. Gehen<br />
Sie vorsichtig vor, um Schäden an<br />
den hinter dem Gerät befindlichen<br />
Kabeln und Steckern zu vermeiden.<br />
If all the wires have been properly<br />
arranged, you can push back the<br />
<strong>ZE</strong>-<strong>NC3131D</strong> in the bay to see, if<br />
there is enough room. Never apply<br />
brute force to avoid shearing of<br />
wires or broken connectors.<br />
8<br />
8<br />
Wenn genügend Spielraum nach<br />
hinten vorhanden ist, drücken<br />
Sie den <strong>ZE</strong>-<strong>NC3131D</strong> soweit<br />
nach innen, bis Sie hören wie die<br />
Verriegelung einklickt.<br />
With some slack left to move and<br />
no obstacle in the way, push back<br />
the <strong>ZE</strong>-<strong>NC3131D</strong> until you hear<br />
the clicking sound of the latching<br />
mechanism.<br />
9<br />
9<br />
Der Einbau des <strong>ZE</strong>-<strong>NC3131D</strong> ist<br />
hiermit beendet.<br />
The installation of your <strong>ZE</strong>-<strong>NC3131D</strong> is<br />
now complete.<br />
bl<br />
bl<br />
Nach beendetem Einbau starten Sie<br />
den Motor und fahren aus der Garage<br />
ins Freie (GPS Antenne braucht „freie<br />
Sicht nach oben“). Das <strong>ZE</strong>-<strong>NC3131D</strong><br />
schaltet sich mit der Zündung<br />
ein – wechseln Sie nun manuell in den<br />
Navigationsmodus durch drücken der<br />
NAV Taste und lassen Sie das Gerät<br />
ca. 3 - 5 Minuten lang den „Sat Fix“<br />
erstellen.<br />
Solange das Gerät noch Satelliten<br />
sucht, wird dies über ein Icon mit kreisenden<br />
Punkten auf dem Bildschirm<br />
dargestellt.<br />
Sie können nun das Gerät ausschalten,<br />
ein Navigationsziel eingeben oder<br />
aber weitere Einstellungen im Setup<br />
Menü nach persönlichem Wunsch<br />
vornehmen.<br />
With the installation completed, start<br />
the engine and drive your vehicle out<br />
of the garage into open terrain (GPS<br />
antenna must have free “sight up to<br />
the sky”). The <strong>ZE</strong>-<strong>NC3131D</strong> will turn on<br />
with the ignition – please select the<br />
navigation mode manually by pressing<br />
the NAV button. Device now needs 3 to<br />
5 minutes to create a “Sat Fix”.<br />
As long as the device is searching for<br />
GPS satellites, you can see a small icon<br />
with rotating dots on the screen.<br />
You can turn your device off, enter a<br />
destination or continue to set functions<br />
according to personal preferences in<br />
the setup menu.
Bitte Beachten/Please Note<br />
➜ Das Fahrzeug ist mit einem Eigendiagnosegerät (DME)<br />
ausgestattet.<br />
Um Fehlermeldungen zu vermeiden, muss vor<br />
Montagebeginn unbedingt der negative Pol der<br />
Fahrzeugbatterie abgehängt werden.<br />
➜ Eine einwandfreie Funktion des <strong>ZE</strong>-<strong>NC3131D</strong> kann nur<br />
dann gewährleistet werden, wenn Sie das im Lieferumfang<br />
enthaltene Zubehör verwenden.<br />
➜ Es ist nicht nötig, am originalen Anschlusskabel<br />
Veränderungen irgendwelcher Art vorzunehmen.<br />
➜ Achten Sie bei der Installation darauf, dass die<br />
verschiedenen Anschlusskabel und Zubehörteile nicht<br />
durch scharfe Kanten beschädigt und die Anschlusskabel<br />
nicht geknickt werden.<br />
➜ Je nach Präferenz und Wahl des geräteinternen oder<br />
des externen (zu montierenden) Mikrofons, muss im<br />
„Setup Menü“ die Mikrofonquelle für den Bluetooth<br />
Modus entsprechend angepasst werden.<br />
➜ Achten Sie vor der finalen Montage des <strong>ZE</strong>-<strong>NC3131D</strong><br />
darauf, dass alle Steckverbindungen auf der Geräterückseite<br />
richtig verbunden und fest eingerastet sind.<br />
➜ Bei Fragen oder Problemen wenden Sie sich an<br />
Ihren <strong>ZE</strong>NEC-Händler, bei dem Sie das Gerät gekauft<br />
haben. Zusätzlich finden Sie unter www.zenec.com eine<br />
ausführliche FAQ Datenbank, wo viele der Fragen und<br />
Probleme, welche während der Installation auftreten<br />
könnten, entsprechend beantwortet werden.<br />
➜ Da Updates (Software und Kartenmaterial) für<br />
das Navigationssystem nur über den USB-Anschluss<br />
installiert werden können und sich der USB-<br />
Anschluss an der Rückseite des <strong>ZE</strong>-<strong>NC3131D</strong> befindet,<br />
sollten Sie die im Lieferumfang befindliche Media<br />
Link Box unbedingt an einem leicht zugänglichen Ort<br />
installieren. Die Media Link Box verfügt über einen<br />
entsprechenden USB Port.<br />
➜ Tampering with the on-board electrical system might<br />
cause error codes to be stored in the DME.<br />
It is thus recommended to disconnect the GND wire of the<br />
negative battery pole before you start with any installation<br />
work.<br />
➜ The flawless function of the <strong>ZE</strong>-<strong>NC3131D</strong> can only<br />
be guaranteed, when the original accessories and wire<br />
harnesses contained in the set are deployed as described in<br />
this installation manual.<br />
➜ The <strong>ZE</strong>-<strong>NC3131D</strong> is a plug and play product,<br />
modifications on the original wire loom of the vehicle are<br />
not required at all.<br />
➜ When mounting the <strong>ZE</strong>-<strong>NC3131D</strong> always pay proper<br />
attention not to damage any of the wires, plugs or other<br />
parts. Avoid applying too much mechanical force especially<br />
when pushing the unit back into the slot.<br />
➜ Depending on the preference and selection of the<br />
device internal or external (to be installed) microphone,<br />
the BT microphone source must be checked and chosen<br />
accordingly, in the setup menu.<br />
➜ Please check if all plug-and-socket connections on the<br />
rear of the <strong>ZE</strong>-<strong>NC3131D</strong> are properly seated before you lock<br />
the unit in place.<br />
➜ Please contact your authorized <strong>ZE</strong>NEC dealer or the<br />
distributor of the country, where you have purchased your<br />
E>GO unit, if you have any technical problems or further<br />
questions.<br />
In addition, you can look up a detailed FAQ data base on<br />
www.zenec.com, where most of the questions revolving<br />
around the connectivity or the installation of a given E>GO<br />
model are explained in detail.<br />
➜ Any update of the main unit software or the<br />
navigation system (software and map data) requires<br />
the USB port of the media link box to be present and<br />
accessible. For this purpose, the installation of the<br />
media link box is mandatory. The media link box is<br />
contained in the <strong>ZE</strong>-<strong>NC3131D</strong> set – just make sure you<br />
find a good and suitable mounting location that is easy<br />
to access (i.e. glove compartment, arm rest box etc.).
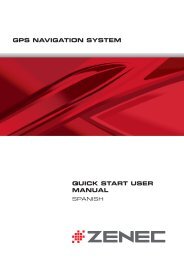
Anschlussdiagramm/Electrical Connections Overview Diagram<br />
Packliste/Packing list<br />
NO. ITEM SKETCH MAP QUANTITY<br />
1<br />
2<br />
3<br />
4<br />
5<br />
6<br />
7<br />
Grundgerät<br />
Main unit<br />
Externe GPS-Antenne<br />
External GPS antenna<br />
Hauptanschlusskabel<br />
Main wire harness<br />
Media Link Box<br />
Media link box<br />
DVB-T Anschlusskabel<br />
DVB-T connection<br />
cable<br />
Externes<br />
BT Mikrofon<br />
External<br />
BT microphone<br />
BT Mikrofon<br />
Adapterkabel<br />
BT microphone<br />
interface<br />
T OUCH ANOTHER W ORLD<br />
<strong>ZE</strong>NEC by ACR AG<br />
Bohrturmweg 1<br />
CH-5330 Bad Zurzach<br />
Schweiz/Switzerland<br />
E-Mail: support@zenec.com<br />
www.zenec.com<br />
1<br />
1<br />
1<br />
1<br />
1<br />
1<br />
1<br />
8<br />
9<br />
10<br />
11<br />
12<br />
13<br />
14<br />
15<br />
Steckbares<br />
Anschlusskabel<br />
Detachable cable<br />
Fernbedienung<br />
Remote control<br />
Diebstahlschutzaufkleber<br />
Anti-theft label<br />
Bedienungsanleitung<br />
User manual<br />
Montageanleitung<br />
Mounting instructions<br />
CAN Bus Interface<br />
CAN bus interface<br />
USB-Stick<br />
USB stick<br />
Entriegelungswerkzeug<br />
Unlock Tool<br />
Firma/Company:<br />
3<br />
2<br />
1<br />
3<br />
1<br />
1<br />
1<br />
4<br />
Druckfehler und technische Änderungen vorbehalten. Subject to technical changes and misprints.<br />
Stand Mai 2012