Instructions: Creating your own SPSS file - LibQUAL+
Instructions: Creating your own SPSS file - LibQUAL+
Instructions: Creating your own SPSS file - LibQUAL+

Create successful ePaper yourself
Turn your PDF publications into a flip-book with our unique Google optimized e-Paper software.
<strong>Creating</strong> <strong>your</strong> <strong>own</strong> <strong>SPSS</strong> <strong>file</strong><br />
The <strong>LibQUAL+</strong> ® system now furnishes you with two .csv (comma separated value) text<br />
documents needed to create <strong>your</strong> <strong>SPSS</strong> <strong>file</strong>. These can be found in the Data Repository<br />
located at http://www.libqual.org/SurveyInstruments/LibQual/DataRepository.aspx .<br />
The documents to d<strong>own</strong>load are:<br />
<br />
<br />
Raw Data <strong>file</strong><br />
<strong>SPSS</strong> Syntax <strong>file</strong><br />
The creation of the <strong>SPSS</strong> <strong>file</strong> entails two main steps. These are: 1) importing the raw<br />
data into <strong>SPSS</strong> and creating a .sav <strong>file</strong> and 2) applying the syntax <strong>file</strong> to provide<br />
metadata for the raw data contained in the .sav <strong>file</strong>.<br />
Step 1: Importing raw data into <strong>SPSS</strong> and creation of the .sav <strong>file</strong><br />
<br />
<br />
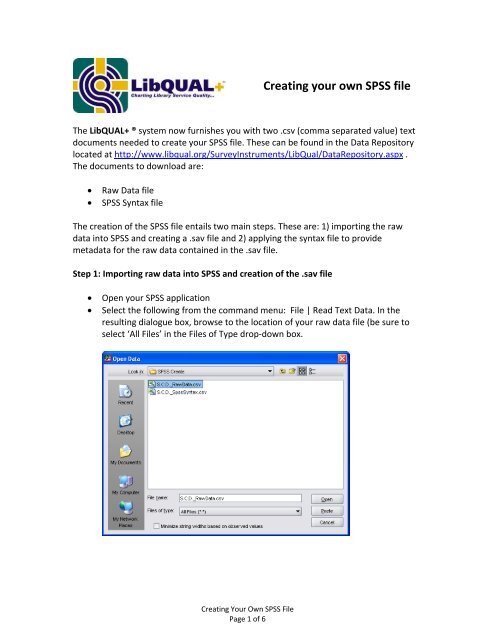
Open <strong>your</strong> <strong>SPSS</strong> application<br />
Select the following from the command menu: File | Read Text Data. In the<br />
resulting dialogue box, browse to the location of <strong>your</strong> raw data <strong>file</strong> (be sure to<br />
select ‘All Files’ in the Files of Type drop‐d<strong>own</strong> box.<br />
<strong>Creating</strong> Your Own <strong>SPSS</strong> File<br />
Page 1 of 6
Selection of the raw data <strong>file</strong> in the previous step should bring up the Text<br />
Import Wizard. Follow the steps as illustrated below. Navigate through the six<br />
steps by clicking the ‘Next’ button. After you reach the end of the wizard, click<br />
‘Finish’.<br />
<strong>Creating</strong> Your Own <strong>SPSS</strong> File<br />
Page 2 of 6
<strong>Creating</strong> Your Own <strong>SPSS</strong> File<br />
Page 3 of 6
Prior to this step, you may see a warning stating “Invalid variable names for this application have<br />
been found and changed.” Disregard this box by clicking ‘OK’<br />
<br />
After completing the Text Import Wizard, you should see <strong>your</strong> data in a <strong>SPSS</strong><br />
window. Be sure to save <strong>your</strong> <strong>file</strong> after the data import.<br />
<strong>Creating</strong> Your Own <strong>SPSS</strong> File<br />
Page 4 of 6
Step 2: Applying the syntax <strong>file</strong> to provide metadata for the .sav <strong>file</strong><br />
Before you apply the syntax to <strong>your</strong> .sav <strong>file</strong>, will need to prepare the .csv <strong>file</strong> that<br />
contains <strong>your</strong> customized <strong>SPSS</strong> syntax. The steps in this process differ depending on<br />
<strong>your</strong> reporting language and the spreadsheet application you are using. Microsoft Excel®<br />
has issues rendering Unicode encoding natively that other spreadsheet applications<br />
such as OpenOffice’s Calc do not. Try the instructions for American English/ASCIIencoded<br />
first. If the characters appear corrupt /altered in the opened spreadsheet, then<br />
try the alternate instructions.<br />
<strong>Instructions</strong> for American English and other ASCII‐encoded Languages<br />
<br />
Open <strong>your</strong> customized <strong>SPSS</strong> syntax <strong>file</strong> in <strong>your</strong> spreadsheet application (e.g. MS<br />
Excel). The sheet should appear in two columns as illustrated in the image below.<br />
<br />
<br />
Select the columns with text and copy.<br />
In the window of <strong>your</strong> <strong>SPSS</strong> data <strong>file</strong>, browse to File | New | Syntax<br />
<strong>Creating</strong> Your Own <strong>SPSS</strong> File<br />
Page 5 of 6
In the resulting new syntax window, paste the text from the .csv <strong>file</strong><br />
<br />
<br />
Select all text in the <strong>SPSS</strong> syntax window (Edit | Select All) and click the “Run<br />
Current” icon (the blue arrow in the top bar).<br />
If the <strong>file</strong> runs successfully, you will see the results in the output window and the<br />
variable view of the .sav <strong>file</strong> should look similar to the illustration below (with<br />
items populated in the Label, Values, and Missing columns). You are now ready<br />
to begin <strong>your</strong> analysis. Happy hunting!<br />
<strong>Creating</strong> Your Own <strong>SPSS</strong> File<br />
Page 6 of 6