
Create successful ePaper yourself
Turn your PDF publications into a flip-book with our unique Google optimized e-Paper software.
FRONT PANEL CONTROLS<br />
FUNCTIONAL DESCRIPTION<br />
8<br />
DRIVE ACTIVE – This switch actives the<br />
drive section with all of it’s features. This<br />
function can also be controlled remotely. Please<br />
refer to the rear panel description of the remote<br />
jacks.<br />
9<br />
DRIVE - This knob controls the amount of gain<br />
in the tube stage, and provides an extra gain all<br />
the way up to 34 dB. This control also compresses<br />
the sound when turning up the level of<br />
the knob up to maximum, producing pure tube<br />
limitation.<br />
10<br />
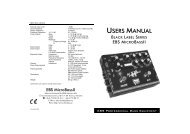
POST DRIVE EQ - This filter section contains<br />
two high performance filters for fine tuning your<br />
drive channel sound:<br />
MIDDLE has a frequency range of 50-2k Hz<br />
and facilitates total control all from the bass<br />
timbres up to the mids, controlling with<br />
precision the difinition of the mids.<br />
EDGE is “bell” type filter controlling the<br />
higher mids for setting definition, presence and<br />
ambience to the sound.<br />
Middle<br />
<br />
11<br />
12<br />
Edge<br />
LEVEL - This knob controls the level of the<br />
drive channel. The drive channel must be<br />
activated for this control to work.<br />
CLEAN LVL - This knob controls the level of<br />
the clean channel to be mixed in with the drive<br />
channel sound. The drive channel must be<br />
activated for this control to work.<br />
DRIVE CHANNELOPTIONS:<br />
BOOST – The boost switch makes possible a<br />
choice of two different overdrive types. When<br />
this switch is in its' inner position a flat, or linear,<br />
gain is achieved with the drive knob. However,<br />
when this switch is in the outer position, the<br />
frequencies below 350 Hz is bypassed,<br />
producing a warmer distortion without<br />
saturation, allowing the player adding more low<br />
bass than with conventional bass amps. The bass<br />
is compensated over the tube stage, giving the<br />
same bass response up to mid distorted sounds.<br />
SERIAL - The serial switch selects the source<br />
for the drive channel. In outer position the<br />
source is taken directly after the gain and<br />
preshape filters. In inner position, the source is<br />
taken after the clean channel, including all of the<br />
clean channel features; filters, compresssor and<br />
tube buffer.<br />
8<br />
REMOTES – The <strong>EBS</strong> <strong>Fafner</strong> is equipped with<br />
two remote jacks for controlling with foot<br />
switches the character filters,<br />
filter active,<br />
drive<br />
active functions on the front panel plus a mute<br />
function.<br />
You may use the RM-4 pedal from <strong>EBS</strong>, or any<br />
standard footswitch pedal making connection to<br />
ground for each of the remote functions. In<br />
addition, these jacks provide current suitable for<br />
LED indication.<br />
Note: Each of the functions switches on the front<br />
panel needs to be set to inner position in order to<br />
be remotely controlled.<br />
9<br />
SPEAKER OUTPUTS – Connect your<br />
speakers here. Care should be taken when<br />
connecting speakers so that the minium total<br />
impedance is not lower than 2 ohms.<br />
Note: Lower impedance than 2 ohms may cause<br />
permanent damage to the amp.<br />
<strong>EBS</strong> will not take responsibility for<br />
eventual hearing damages caused by the<br />
powerful <strong>EBS</strong> <strong>Fafner</strong>.<br />
10<br />
AC INPUT – Connect only to the indicated AC<br />
voltage. If the mains fuse blow, replace only<br />
with the same type.<br />
11<br />
SYSTEM FAN – The system fan is a temperature<br />
controlled fan and will increase the speed<br />
according to the temperature and power output.<br />
IMPORTANT: Make sure not to cover the<br />
ventilation opening!<br />
SOMETHINGABOUT TUBES…<br />
Although the ECC83 (12AX7) is a long life tube,<br />
it is recommended replacing the tube once a year<br />
to guarantee perfect operation.<br />
In order to replace the tube, please follow the<br />
instruction below:<br />
1) Power off and unplug the amplifier from the<br />
mains.<br />
2) Let the amplifier fully discharge for at least<br />
five (5) minutes.<br />
3) Remove the top cover by removing the four<br />
bolts at the amps left at right side, and the two<br />
bolts on the top cover next to the rear panel.<br />
4) Locate the tube at the poweramp board and<br />
carefully remove the tube.<br />
5) Place the new tube in place. Be sure that no<br />
tube pins are damaged.<br />
6) Place the top cover in place.<br />
Done!<br />
FAFNER XD MANUAL<br />
6 11