Hammond Organ Service Manual - Early Models (A,B ... - Audiofanzine
Hammond Organ Service Manual - Early Models (A,B ... - Audiofanzine
Hammond Organ Service Manual - Early Models (A,B ... - Audiofanzine

Create successful ePaper yourself
Turn your PDF publications into a flip-book with our unique Google optimized e-Paper software.
It<br />
CONSOLE POWER WIRING<br />
{Main and Chorus Generators)<br />
0.<br />
Starting and Synchronous Motors<br />
A shaded pole induction motor is used for starting the generator and<br />
is located at the right end of the generator as viewed from the back.<br />
The rotor of this motor will slide endwise when current is supplied<br />
and engage a pinion on its shaft with a gear on the generator driving<br />
shaft, bringing the tone generator up to slightly greater than synchronous<br />
speed.<br />
When the organ is started, the starting switch is turned on and held<br />
for about 8 seconds while the starting motor brings the system up to<br />
speed. The "run" switch is then turned on. This switch simultaneously<br />
connects the synchronous motor and introduces a resistor in series<br />
with the starting motor (Figure l), thus reducing its driving power.<br />
With a braking action of the synchronous motor and a loss of power<br />
of the starting motor, the system slows to synchronous speed and<br />
the synchronous motor begins to carry the load. A period of about<br />
B seconds should be allowed for this to take place, after which the<br />
starting switch may be released. The starting switch springs back<br />
to the "off" position, and turns off the starting motor, which is<br />
disengaged from the rotating shaft by a spring-<br />
should be noted that the synchronous motor can supply power only<br />
at synchronous speed, Thereforei if for any reason the system fails<br />
to reach synchronous speed it will not continue to run after the starting<br />
switch is released. Failure to start properly is usually due to<br />
increased oil viscosity and may be overconne by an increase in starting<br />
time.<br />
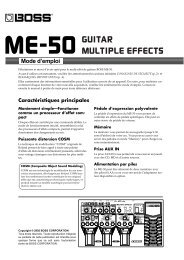
As the schen-iatic diagram (Figure 1) indicates, the "run" switch in its<br />
"off" position shorts out the wirewound resistor attached -o the line<br />
panel. If the "run" switch is defective in its '"off*" position, the generator<br />
will not start because this resistor will be permanently in series with<br />
the starting motor. Before assuming that there is anything amiss with<br />
the motors, short out this resistor and start the generator in the norrnal<br />
manner. If the generator operates satisfactorily, replace the "run" switch<br />
The "run" switch on all consoles is a two-circuit switch, but types of<br />
switches having two different terminal arrangements have been used, as<br />
shown in Figure 2. When replacing a switch, observe the wiring of the<br />
old switch and check the connections of the new switch with an ohmmeter.<br />
Note that black and blue are connected in the "on" position, and yellow<br />
and brown are connected in the "off" position, no rnatter which type of<br />
switch is used.<br />
STARTING MOTORS<br />
CHORUS<br />
MAIN<br />
<<br />
I<br />
W<br />
m<br />
o<br />
Q<br />
Z<br />
< -J a<br />
<<br />
MAIN<br />
SYNCHRONOUS MOTORS<br />
CHORUS<br />
ON<br />
ON<br />
u<br />
<<br />
A A<br />
OFF<br />
OFF<br />
-START" rvVXAA*-<br />
SWITCH<br />
"RUN"<br />
SWITCH<br />
WIRE WOUND RESISTOR<br />
U5V, LINE, 1 GEN. - ISO OHMS<br />
115V. LINE, 2 GEN. - 125 OHMS<br />
230V. LINE, 1 GEN. - 1000 OHMS<br />
230V. LINE. 2 GEN. 500 OHMS<br />
FIGURE I<br />
SWITCH AND MOTOR CIRCUITS<br />
2-15