You also want an ePaper? Increase the reach of your titles
YUMPU automatically turns print PDFs into web optimized ePapers that Google loves.
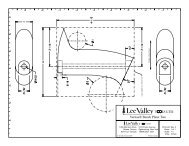
<strong>Stacking</strong> <strong>Corners</strong><br />
XK605<br />
Made in Sweden.<br />
These unique stackable hinges enable you to make stacking frames for<br />
a host of purposes. Just screw boards onto hinges to form a square or<br />
rectangular frame, and then stack as many frames as you want, until you<br />
reach the desired height. When not in use, each frame collapses nearly<br />
flat for compact storage. Useful for making raised-bed grow-boxes,<br />
composters, or stackable and removable sides for wagons or utility trailers.<br />
To unload whatever is being held or carted, you can remove one layer at a<br />
time and then the contents, working your way downward.<br />
Safety Note: These stacking corners are made by the manufacturer in the<br />
millions, primarily for use in the shipping industry as pallet hinges. As<br />
such, they are not as fi nely fi nished as we would like and may have sharp<br />
or rusty edges. Depending where you locate your stacking frame(s), and<br />
whether children (or even adults) could come in contact with these edges,<br />
we suggest that you lightly fi le these (edges) before assembly.<br />
Making Stacked Frames without Gaps<br />
(e.g., Grow-Boxes)<br />
Sides can be made in several styles. If<br />
you wish to use them for raised-bed<br />
grow-boxes or composters, where<br />
you do not want any soil to escape,<br />
the sides should be constructed<br />
so that there are no gaps between<br />
frames. For this type of application,<br />
use 1"×8" ( 3 /4"×7 1 /2" dressed) boards<br />
(see Figure 1), or 1"×4" ( 3 /4"×3 1 /2"<br />
dressed) boards. If you are using<br />
hardwood, pre-drill 5 /32" pilot holes.<br />
#10× 3 /4"<br />
Round-Head<br />
Screw, 8 per<br />
hinge.<br />
Fasten top edge of wood flush<br />
with top edge of hinge.<br />
7 1 /2"<br />
Figure 1: Sides with no gaps.
In order to hold the heavy load exerted by the soil inside the frames,<br />
braces are recommended when boards longer than 4 feet are used<br />
(see Figure 2).<br />
21/4"<br />
4' Max. Unsupported Span<br />
3" to 6" wide × 7 1 /4"<br />
long × 3 /4" thick braces<br />
screwed onto boards.<br />
2"<br />
Place extension of bottom<br />
brace into ground. Successive<br />
braces/boards are restrained<br />
by adjoining board.<br />
Figure 2: Brace supports for spans greater than 4'.<br />
Boxes should be no longer than 12' to prevent excessive bowing and<br />
no wider than 5' so you can reach across them comfortably. Most<br />
raised-bed grow-boxes are made 4' wide and 8' long.<br />
Note: It is possible to build the frames using 2"×8" (1 1 /2"×7 1 /2" dressed) or<br />
2"×4" (1 1 /2"×3 1 /2" dressed) material, but this will require a small chamfer<br />
on the inside corner edge of the boards to allow the two pieces to sit at 90°<br />
to each other. If 2" material is used, it will not be possible for the frame to<br />
collapse fl at for storage unless it is partially dismantled.<br />
Filling Raised-Bed Grow-Boxes: Although you may fill a grow-box with<br />
plain soil, a soilless mix is a better choice. We had great results with a 1:1<br />
mix of sand and compost. (Although we tested only mushroom compost,<br />
yard waste compost and composted animal manure should also work.)<br />
This mix makes a light aerated growing medium, ideal for root growth and<br />
virtually free from any weeds. Make sure you adjust the pH to about 6.5 by<br />
adding sufficient lime. Once every 2 weeks, depending on the needs of the<br />
crops, add a water-soluble complete fertilizer to your waterings.<br />
Soil in boxes tends to dry out faster than on the ground. Make sure you<br />
keep an eye on the moisture levels during dry periods. Test the dryness of<br />
the soil 4 to 5 inches below the surface before adding water. It should be<br />
moist, not dry or soggy.<br />
You may also notice that the raised beds drain better in wet weather and<br />
warm up sooner in the spring, allowing for early plantings.<br />
2
Making Stacked Frames with Gaps<br />
(e.g., Wagon Frame)<br />
The extensions on the bottom end of<br />
each hinge not only allow you to stack<br />
the frames on top of one another, but<br />
also serve as locators for fitting the<br />
lower frame onto a flat-bed wagon<br />
or utility trailer. To fit properly, the<br />
planks should be cut 2" shorter than<br />
the dimensions of the flat-bed on<br />
which the frame(s) will rest.<br />
3 1 /2"<br />
3 1 /2"<br />
1/2"<br />
Gap<br />
When these hinges are used to make<br />
wagon or trailer sides for hauling<br />
material, the sides may be constructed<br />
so that there are gaps between the<br />
boards. In this case, you may use<br />
1"×4" ( 3 /4"×3 1 /2" dressed) boards to<br />
obtain a gap of approximately 1 /2" (see<br />
Figure 3). If you are using hardwood,<br />
pre-drill 5 /32" pilot holes.<br />
You may wish to increase the gap<br />
between boards by using 1"×3"<br />
( 3 /4"×2 1 /2" dressed) boards. This will<br />
yield a gap of approximately 1 3 /8"<br />
(see Figure 4).<br />
The screws will be quite close to<br />
the edge of these narrow boards. To<br />
prevent splitting, drill 5 /32" pilot holes<br />
for the mounting screws.<br />
1"<br />
Figure 3: Sides with 1 /2" gaps.<br />
2 1 /2"<br />
2 1 /2"<br />
Pre-drill 5 /32" pilot holes.<br />
Position 2 1 /2" sides so these<br />
distances are roughly the same.<br />
Repeat for lower sides.<br />
Figure 4: Sides with 1 3 /8" gaps.<br />
13/8"<br />
Gap<br />
Safety Note: If you will be making frames for utility trailer sides, it is<br />
essential that the frames are fastened to each other, and that the bottom<br />
frame is fastened to the trailer, in order to ensure that the frames do not<br />
bounce off the trailer! There are many ways of securing a frame to a<br />
fl at-bed; here are two suggestions:<br />
a) Place four screws into the sides of the fl at-bed, near each corner<br />
(see Figure 5). Hook a bungee cord over each hinge on the uppermost<br />
frame, with the opposite end hooked over the corner screws.<br />
3
) Drill 7 /32" screw clearance holes in the lower extensions of each hinge<br />
(see Figure 6). The lower frame can then be fastened by driving a<br />
screw through each of these holes into the edge of the fl at-bed.<br />
Successive frames can have this hole transferred into the upper end of<br />
the adjoining hinge, with a screw going through both holes and into<br />
the side boards.<br />
Trailer<br />
Flat-Bed<br />
Hook bungee<br />
cord over screw,<br />
one at each<br />
corner of trailer.<br />
Figure 5: Trailer sides secured<br />
with bungee cords.<br />
Drill 7 /32" holes through steel<br />
hinge only, then fasten with<br />
#10× 3 /4" round-head screws.<br />
Figure 6: Trailer sides secured<br />
with screws.<br />
152<br />
© <strong>Lee</strong> <strong>Valley</strong> <strong>Tools</strong> Ltd. 2009<br />
www.leevalley.com<br />
1090 Morrison Drive 814 Proctor Avenue<br />
Ottawa, Ontario Ogdensburg, New York<br />
K2H 1C2 Canada 13669-2205 USA<br />
1-800-267-8761 1-800-267-8735<br />
customerservice@leevalley.com<br />
INS-380 Rev. C<br />
Printed in Canada.