TT INTEGRABLE GAR final GB - Vintec and Transtherm
TT INTEGRABLE GAR final GB - Vintec and Transtherm
TT INTEGRABLE GAR final GB - Vintec and Transtherm

Create successful ePaper yourself
Turn your PDF publications into a flip-book with our unique Google optimized e-Paper software.
<strong>TT</strong> <strong>INTEGRABLE</strong> <strong>GAR</strong> <strong>final</strong> <strong>GB</strong> 1/10/01 13:56 Page 1<br />
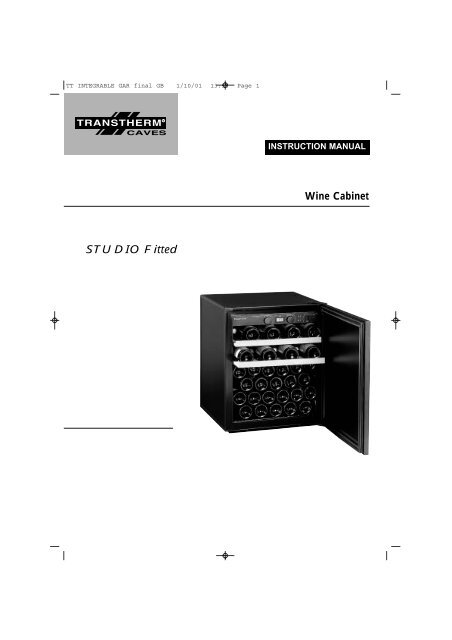
INSTRUCTION MANUAL<br />
Wine Cabinet<br />
STUDIO Fitted
<strong>TT</strong> <strong>INTEGRABLE</strong> <strong>GAR</strong> <strong>final</strong> <strong>GB</strong> 1/10/01 13:56 Page 2<br />
Contents<br />
1 - Description of your wine cabinet …………………………… P 3<br />
2 - Various TRANSTHERM cabinet models …………………… P 4<br />
3 - Installing your wine cabinet ………………………………… P 5<br />
4 - Installing your wine cabinet in a fitted cupboard …………… P 5<br />
5 - Commissioning ……………………………………………… P 8<br />
6 - Settings panel ………………………………………………… P 8<br />
7 - Temperature settings ………………………………………… P 9<br />
8 - Temperature adjustments……………………………………… P 9<br />
9 - Layout <strong>and</strong> loading recommendations ………………………P 10<br />
10 - Important wine concepts ………………………………………P 11<br />
11 - Everyday care of your wine cabinet …………………………P 12<br />
12 - Operating anomalies …………………………………………P 13<br />
13 - Specifications …………………………………………………P 15<br />
TRANSTHERM<br />
121-123, rue du Maire Coppeaux - 59610 FOURMIES - FRANCE
<strong>TT</strong> <strong>INTEGRABLE</strong> <strong>GAR</strong> <strong>final</strong> <strong>GB</strong> 1/10/01 13:56 Page 3<br />
Description of your wine cabinet<br />
1<br />
2<br />
3<br />
11<br />
10<br />
4<br />
9<br />
5<br />
8<br />
7<br />
6<br />
1<br />
Cabinet body<br />
7<br />
Wine rack<br />
2<br />
Upper hinge<br />
8<br />
Adjustable feet<br />
3<br />
Burgundy rack<br />
9<br />
Condensation drain hole<br />
4<br />
Door<br />
10<br />
Hygrometer<br />
5<br />
Lower hinge<br />
11<br />
Settings <strong>and</strong> control panel<br />
6<br />
Bordeaux rack<br />
English - P3
<strong>TT</strong> <strong>INTEGRABLE</strong> <strong>GAR</strong> <strong>final</strong> <strong>GB</strong> 1/10/01 13:56 Page 4<br />
Various TRANSTHERM cabinet models<br />
In order to adapt to different requirements <strong>and</strong> usages, there are 3 types of<br />
TRANSTHERM wine cabinets. These cabinets have different characteristics<br />
<strong>and</strong> specifications.<br />
important<br />
How do I know the model of my cabinet?<br />
The first page of this manual has a self adhesive label on<br />
it showing the exact model, type <strong>and</strong> serial number of<br />
your wine cabinet.<br />
1 temperature maturing cabinets:<br />
MAS - MANOIR - ERMITAGE - STUDIO<br />
Designed for storing <strong>and</strong> maturing all wines, these cabinets reproduce the exact<br />
conditions of a natural cellar (one temperature at all times), no matter what the<br />
outside temperature (between 0 <strong>and</strong> 35°C).<br />
3 temperature tasting cabinets:<br />
CASTEL - CO<strong>TT</strong>AGE<br />
In addition to the central maturing area (1 temperature) these cabinets also have<br />
2 specific compartments for bringing to room temperature (upper compartment)<br />
<strong>and</strong> chilling (lower compartment) a few bottles.<br />
Multiple temperature service cabinets:<br />
MAS - CELLIER - RÉSERVE<br />
Also known as "Day Cellars" these cabinets are not designed for maturing but<br />
for having all types of wine at their respective serving temperature. In fact, they<br />
are designed in such a way that you can have 10 different temperature areas in<br />
levels of the same cabinet (for the larger models).<br />
English - P4
<strong>TT</strong> <strong>INTEGRABLE</strong> <strong>GAR</strong> <strong>final</strong> <strong>GB</strong> 1/10/01 13:56 Page 5<br />
Installing your wine cabinet<br />
When unpacking your cabinet, make sure that there are no traces of impact or<br />
other damage <strong>and</strong> that there are no surface defects.<br />
Carefully remove all of the protections <strong>and</strong> adhesive strips from the packaging<br />
around your wine cabinet.<br />
Move your cabinet to its <strong>final</strong> location.<br />
ecommendation<br />
The place you have selected for your cabinet should:<br />
1 - Be ventilated<br />
2 - Enable air to pass between the wall <strong>and</strong> the back of the cabinet<br />
3 - Be well away from any heat source<br />
4 - Not be too damp (laundry, pantry, bathroom, etc.)<br />
5 - Have a solid <strong>and</strong> flat floor<br />
6 - Have a st<strong>and</strong>ard <strong>and</strong> accessible electricity supply (st<strong>and</strong>ard socket to<br />
country st<strong>and</strong>ards, linked to ground).<br />
important<br />
In order for you to level off your cabinet as easily as possible, it is equipped<br />
with 4 adjustable feet. However, we do recommend that you tighten the<br />
back feet to the maximum <strong>and</strong> use the front feet to create a level (a spirit<br />
level is recommended for this operation).<br />
important<br />
WAIT 48 HOURS BEFORE PLUGGING IN THE CABINET<br />
Should you need to move your cabinet, never tilt it more than 45° <strong>and</strong> always<br />
sideways, on the side that the electrical cable comes out.<br />
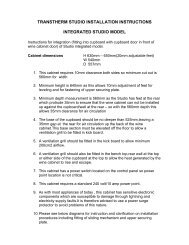
Installing your wine cabinet in a fitted cupboard<br />
Ensure that the cupboard base is stable, so as not to interfere with the cabinet.<br />
Ensure correct ventilation of the cabinet by respecting the clearance shown in<br />
the diagram on page 6. It is important that there is a space from the bottom to<br />
the top behind the cabinet. In the event that another cabinet is to be installed<br />
on top of the one containing the <strong>Transtherm</strong> unit, make sure that this space<br />
continues right to the top.<br />
1- Adjusting the feet:<br />
- Tighten the two back feet to the<br />
maximum as previously indicated.<br />
Pre-setting the front feet:<br />
- Tighten or loosen the front feet to<br />
bring the cabinet level (see diagram).<br />
English - P5
<strong>TT</strong> <strong>INTEGRABLE</strong> <strong>GAR</strong> <strong>final</strong> <strong>GB</strong> 1/10/01 13:56 Page 6<br />
2 - Installing the upper securing plate:<br />
Remove the two black plastic bungs. Position <strong>and</strong> secure the plate using the<br />
two M5X15 screws. Remove the hinge cover.<br />
3 - Placing inside the cupboard:<br />
Position the cabinet inside the cupboard, against the right h<strong>and</strong> side if the door<br />
is left h<strong>and</strong> opening, or vice versa for right h<strong>and</strong> opening.<br />
Check for stability, making sure the 2 front feet are in contact with the floor of<br />
the cupboard, thus avoiding any warping of the cabinet body once loaded. If<br />
this is not the case, adjust the feet until contact is achieved. The cabinet must<br />
be located in such a way that the front is a maximum of 8mm from the front of<br />
the cupboard (see diagram on page 7). The cabinet must then be secured using<br />
the upper securing plate (2 cruciform head screws). Leave at least 1mm play<br />
between the cupboard upright <strong>and</strong> its door, to ensure cabinet sealing.<br />
4 - Securing the accompanying hinge:<br />
Secure the accompanying hinge to the doors of the cabinet <strong>and</strong> cupboard<br />
(see diagram page 7).<br />
English - P6
<strong>TT</strong> <strong>INTEGRABLE</strong> <strong>GAR</strong> <strong>final</strong> <strong>GB</strong> 1/10/01 13:56 Page 7<br />
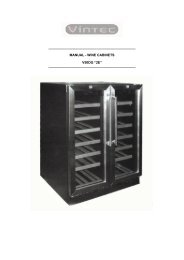
Securing the hinge<br />
The line of the 2 holes must be<br />
perfectly parallel with the<br />
edge of the frame.<br />
1 - Screw the hinge guide onto<br />
the door of the wine cabinet.<br />
2 - Open the door of the wine<br />
cabinet to 90°, slide the rail<br />
onto the guide <strong>and</strong> screw the<br />
rail horizontally onto the<br />
inside of the cupboard door.<br />
30 9<br />
46<br />
36<br />
150<br />
5<br />
19,5<br />
27,5<br />
Wine<br />
cabinet door<br />
Cupboard<br />
door<br />
guide<br />
max. 8<br />
English - P7
<strong>TT</strong> <strong>INTEGRABLE</strong> <strong>GAR</strong> <strong>final</strong> <strong>GB</strong> 1/10/01 13:56 Page 8<br />
Commissioning<br />
- Once you have waited 48 hours, connect your cabinet to the mains, having<br />
checked that there is power to the socket (check fuses <strong>and</strong> their amperage, the<br />
state of the trip, <strong>and</strong> if necessary try out another electrical appliance to verify<br />
the supply).<br />
- Once connected to the mains, make sure that the Off/On switch,<br />
on the right of your cabinet’s control panel, is set at "On" (I).<br />
- Once connected to the mains, make sure that the Off/On switch, on the right<br />
of your cabinet’s control panel, is set at "On" (I).<br />
important<br />
In the event of malfunction, turn to page 13<br />
Settings Panel<br />
The temperature control(s) <strong>and</strong> setting(s) are adjusted from your wine cabinet’s<br />
settings panel, as shown below:<br />
1 2 3 4 5 6 7<br />
1<br />
Hot thermostat setting button<br />
5<br />
Hot circuit operating indicator (red)<br />
2 Control thermostat<br />
3 Cold thermostat setting button<br />
6 TEST button<br />
7 On/Off switch<br />
4 Cold circuit operating indicator (green)<br />
English - P8
<strong>TT</strong> <strong>INTEGRABLE</strong> <strong>GAR</strong> <strong>final</strong> <strong>GB</strong> 1/10/01 13:56 Page 9<br />
Temperature settings<br />
You set your wine cabinet’s temperatures from the control panel located on the<br />
upper part of your cabinet using the hot <strong>and</strong> cold thermostat adjustment buttons<br />
(see page 8 Nos. 1 <strong>and</strong> 3).<br />
St<strong>and</strong>ard Setting<br />
The table below gives the st<strong>and</strong>ard setting enabling you to obtain the right<br />
temperature for conserving your wines.<br />
Model<br />
Ref<br />
FI<strong>TT</strong>ED STUDIO 9 12<br />
important<br />
The settings shown in the above table are st<strong>and</strong>ard, given for an ambient<br />
temperature of approximately 20°C. Depending on the outside temperature,<br />
<strong>and</strong>/or installation conditions, <strong>and</strong>/or the load, a few adjustments may have to<br />
be made. The setting values are not temperatures in Celsius, but are index<br />
values.<br />
Temperature adjustment<br />
If the load set up or the location of your cabinet calls for it, you can adjust the<br />
temperature settings up <strong>and</strong> down.<br />
Adjusting the temperature up<br />
Starting off from the st<strong>and</strong>ard temperature settings, shift both thermostats<br />
clockwise, keeping the same distance between them.<br />
Adjusting the temperature down<br />
Starting off from the st<strong>and</strong>ard temperature settings, shift both thermostats<br />
anticlockwise, keeping the same distance between them.<br />
important<br />
IN ALL CASES:<br />
AN INDEX VALUE CORRESPONDS WITH APPROXIMATELY ONE DEGREE<br />
CELSIUS. YOU WILL NEED TO WAIT APPROXIMATELY 48 HOURS<br />
BEFORE NOTICING THE EFFECTS OF A TEMPERATURE ADJUSTMENT.<br />
English - P9
<strong>TT</strong> <strong>INTEGRABLE</strong> <strong>GAR</strong> <strong>final</strong> <strong>GB</strong> 1/10/01 13:56 Page 10<br />
Layout <strong>and</strong> loading recommendations<br />
Every rack can be used as a storage rack or as a sliding rack. Your cabinet’s<br />
racks have 8 cut-outs for Bordeaux or Alsace bottle, <strong>and</strong> 7 for Burgundy or<br />
Champagne bottles. These enable you to install your bottles in total security.<br />
Rack layout in storage mode:<br />
To install bottles on a storage rack, proceed as follows:<br />
- Insert the rack in the desired position.<br />
- Place a wooden blocking dowel in the two orifices located about 15cm from<br />
the front of the rack, on the left <strong>and</strong> right at the top: these dowels act as a stop<br />
against the heat formed casing <strong>and</strong> stop the rack sliding without warning (see<br />
diagram)<br />
- Start by arranging bottles in each cut-out in the back row, with bottle ends<br />
towards the back.<br />
- Continue with the front row, placing the bottles the other way around.<br />
- Continue stacking in the same manner, taking care that no bottle touches the<br />
back wall.<br />
For information: the maximum capacity of a rack placed at the bottom of the<br />
cabinet is 30 traditional Bordelais bottles.<br />
important<br />
ecommendation<br />
Rack layout in sliding mode:<br />
To arrange bottles on a sliding rack, proceed as follows:<br />
- Insert the rack in the desired position.<br />
- Place a wooden blocking dowel in the two orifices located about 3cm from the<br />
back of the rack, on the left <strong>and</strong> right at the top: these dowels stop the rack from<br />
coming right out when you pull it outwards (see diagram)<br />
- Pull the rack towards you<br />
- Start by arranging bottles in each cut-out in the back row, with bottle ends<br />
towards the back.<br />
- Continue with the front row, placing the bottles the other way around.<br />
- A sliding rack can only take one layer of bottles.<br />
NEVER PULL OUT MORE THAN ONE LOADED SLIDING RACK AT<br />
A TIME<br />
You should remember that if you do not have enough bottles to fill your wine<br />
cabinet, it is better to distribute the load over all of the racks available, so as to<br />
avoid "all on top" or "all below" type loads.<br />
English - P10<br />
Don’t forget to change the dowel positions if you decide to change from slider<br />
rack to storage rack.
<strong>TT</strong> <strong>INTEGRABLE</strong> <strong>GAR</strong> <strong>final</strong> <strong>GB</strong> 1/10/01 13:56 Page 11<br />
Important wine concepts<br />
Your TRANSTHERM cabinet has been designed to guarantee the optimum<br />
conditions for storing <strong>and</strong>/or serving your wine.<br />
Wine is a highly complex product, requiring long <strong>and</strong> gentle development <strong>and</strong><br />
needs specific conditions in which to reach its full potential.<br />
All wine is stored at the same temperature, only the temperatures for serving<br />
<strong>and</strong> wine tasting can vary depending on the type of wine (see the table below).<br />
This being the case <strong>and</strong> just like the natural cellars used by wine producers, it<br />
is not the exact temperature that is important, but its constancy. In other words,<br />
as long as the temperature of your cabinet is between 10 <strong>and</strong> 14° C, your wine<br />
will be stored in perfect conditions if the temperature is not subject to any<br />
significant fluctuation.<br />
However, it is advisable to be especially careful concerning the values shown<br />
on your wine cabinet's hygrometer, which, due to its location in the wine cellar<br />
will always have tendency to display a pessimistic hygrometry level.<br />
IRRESPECTIVE OF THE CAUSE, IF YOU NOTICE EITHER<br />
ABNORMAL TEMPERATURE OR HYGROMETRY LEVELS INSIDE<br />
YOUR CABINET, BE REASSURED THAT ONLY LONG EXPOSURE<br />
TO THESE ABNORMAL CONDITIONS CAN HAVE A DETRIMENTAL<br />
EFFECT ON YOUR WINES.<br />
N<br />
Hygrometry<br />
You cabinet is equipped with an exclusive TRANSTHERM system enabling the<br />
creation, inside your wine cabinet, of the correct hygrometry level required to<br />
perfectly seal the corks in your bottles.<br />
Serving temperatures of wines (given as an indicator only)<br />
Bordeaux reds 16 à 18°C<br />
Burgundy reds 15 à 16°C<br />
Italian reds 14 à 16°C<br />
Spanish reds 14 à 16°C<br />
Potuguese reds 14 à 16°C<br />
Chilean reds 13 à 14°C<br />
Australian reds 13 à 14°C<br />
Washington <strong>and</strong> Oregon reds 13 à 14°C<br />
Californian reds 12 à 14°C<br />
Rhone reds 12 à 15°C<br />
Roussillon reds 11 à 13°C<br />
Languedoc wines 11 à 13°C<br />
Burgundy whites 11 à 13°C<br />
South African reds 11 à 12°C<br />
German whites 10 à 11°C<br />
Bulgarian reds 10 à 12°C<br />
New Zeal<strong>and</strong> whites 10 à 12°C<br />
Austrian whites 8 à 10°C<br />
Swiss reds 8 à 10°C<br />
Hungarian whites 7 à 9°C<br />
Sweet Bordeaux whites 6 à 8°C<br />
Natural sweet wines 6 à 8°C<br />
Champagne 6 à 8°C<br />
English - P11
<strong>TT</strong> <strong>INTEGRABLE</strong> <strong>GAR</strong> <strong>final</strong> <strong>GB</strong> 1/10/01 13:56 Page 12<br />
Everyday care of your wine cabinet<br />
Your TRANSTHERM cabinet is a simple tried <strong>and</strong> tested item of equipment.<br />
The following few operations enable you to obtain optimum operation <strong>and</strong> an<br />
extended life cycle.<br />
1 - Regularly remove dust (once a year) from the condenser (black metal grill<br />
fastened to the back of your wine cabinet).<br />
2 - Completely clean the inside of your wine cabinet once a year, taking care to<br />
ensure that you have unplugged <strong>and</strong> unloaded it (use water <strong>and</strong> a non caustic<br />
cleaning product, <strong>and</strong> make sure to rinse well).<br />
important<br />
The long life of your wine cabinet depends on regular monitoring,<br />
especially of anything that may appear abnormal, <strong>and</strong> informing us of any<br />
anomalies found.<br />
English - P12
<strong>TT</strong> <strong>INTEGRABLE</strong> <strong>GAR</strong> <strong>final</strong> <strong>GB</strong> 1/10/01 13:56 Page 13<br />
Operating anomalies<br />
When starting up<br />
The compressor will not operate at the temperature required, <strong>and</strong> at less<br />
than the ambient temperature:<br />
1 - Ensure that there is power to the electrical supply plug by connecting another<br />
electrical appliance to it, as well as checking that the On/Off switch is in<br />
position 1.<br />
2 - Press on the TEST button <strong>and</strong> check that the 2 indicator lights (green <strong>and</strong><br />
red) light up.<br />
3 - Turn the closed cold adjustment button in an anticlockwise direction <strong>and</strong><br />
check that the indicator light lights up.<br />
4 - If after carrying out steps 2 <strong>and</strong> 3 you still cannot get the compressor to start<br />
up correctly, contact your retailer.<br />
The compressor will not turn off:<br />
Adjust the cold indicator to its farthest mark <strong>and</strong> check if the cold circuit<br />
indicator light has gone out. If the compressor will still not turn off, unplug it<br />
<strong>and</strong> contact your retailer.<br />
In operation<br />
The check thermometer shows a lower temperature than required:<br />
1 - Check the recommendation temperature adjustment (table on Page 9).<br />
2 - Check that the red, hot circuit indicator light is lit up.<br />
3 - Press on the TEST button <strong>and</strong> check that the 2 indicator lights (green <strong>and</strong><br />
red) located to the right of the panel are lit up.<br />
If either of steps 2 <strong>and</strong> 3 are not correct, contact your retailer.<br />
The check thermometer shows a higher temperature than required:<br />
1 - Check the recommendation temperature adjustment (table on Page 9).<br />
2 - Check that the green, cold circuit indicator light is lit up.<br />
3 - Press on the TEST button <strong>and</strong> check that the 2 indicator lights (green <strong>and</strong><br />
red) located to the right of the panel are lit up.<br />
If either of steps 2 <strong>and</strong> 3 are not correct, contact your retailer.<br />
THE USE OF GLASS DOORS HAS AN EFFECT ON PERFORMANCE<br />
English - P13
<strong>TT</strong> <strong>INTEGRABLE</strong> <strong>GAR</strong> <strong>final</strong> <strong>GB</strong> 1/10/01 13:56 Page 14<br />
ecommendation<br />
In both the aforementioned cases, if the anomaly continues following possible<br />
recommended corrective actions <strong>and</strong> checking that the circuit indicator lights<br />
are functioning, contact your retailer<br />
important<br />
important<br />
In all cases, if your unit appears to be malfunctioning, contact your retailer.<br />
Any intervention on the cold circuit should be performed by a refrigeration<br />
technician, who should carry out an inspection of the circuit sealing system.<br />
In the same way, any intervention on the electrical circuit should be performed<br />
by an electrician.<br />
ANY INTERVENTION PERFORMED BY A TECHNICAL SERVICE<br />
NOT APPROVED BY TRANSTHERM WILL LEAD TO THE<br />
GUARANTEE BEING CONSIDERED AS NULL AND VOID<br />
English - P14
<strong>TT</strong> <strong>INTEGRABLE</strong> <strong>GAR</strong> <strong>final</strong> <strong>GB</strong> 1/10/01 13:56 Page 15<br />
Specifications<br />
Model<br />
FI<strong>TT</strong>ED<br />
Reference<br />
STUDIO<br />
Temperatures Height Width Depth Weight Tolerance<br />
1 640mm 540mm 557mm 35 kg +/- 2°C<br />
Model<br />
FI<strong>TT</strong>ED<br />
Electrical<br />
power<br />
Consumption<br />
per 24hrs<br />
Voltage*<br />
Hz Frequency<br />
*<br />
Refrigerant<br />
gaz<br />
Usage restrictions<br />
T°min T°max<br />
128W 0,68Kwh/24h 230 50 R 134a 0°C 35°C<br />
* These values may vary according to the country. To see the specific characteristics of your<br />
appliance, please consult the self adhesive label on the front of this manual.<br />
English - P15
<strong>TT</strong> <strong>INTEGRABLE</strong> <strong>GAR</strong> <strong>final</strong> <strong>GB</strong> 1/10/01 13:56 Page 16<br />
Warning<br />
The information contained in this document may be subject to modification<br />
without prior notice.<br />
TRANSTHERM offers no guarantee on this item if it is subjected to use other<br />
than that for which it is designed. TRANSTHERM cannot be held responsible<br />
for any errors in this manual, nor for any damage linked to or following the<br />
provision, performance or use of this item.<br />
This document contains original data, protected by copyright. All rights are<br />
reserved. Photocopying, reproduction or translation of this document, whether<br />
total or partial, is strictly prohibited without prior written consent from<br />
TRANSTHERM.<br />
English - P16
<strong>TT</strong> <strong>INTEGRABLE</strong> <strong>GAR</strong> <strong>final</strong> <strong>GB</strong> 1/10/01 13:56 Page 17<br />
Notes<br />
English - P17
<strong>TT</strong> <strong>INTEGRABLE</strong> <strong>GAR</strong> <strong>final</strong> <strong>GB</strong> 1/10/01 13:56 Page 18<br />
05/2001