Bastogne Rules.indd - MMP Gamers Archive
Bastogne Rules.indd - MMP Gamers Archive
Bastogne Rules.indd - MMP Gamers Archive

You also want an ePaper? Increase the reach of your titles
YUMPU automatically turns print PDFs into web optimized ePapers that Google loves.
The <strong>Gamers</strong>, Inc.<br />
Designer: Dean Essig<br />
German Research: Roland LeBlanc<br />
Playtesting: Jerry Axel, John Best,<br />
Joseph Vanden Borre, Dave Demko,<br />
Eric Demko, Jim Demko, John Essig,<br />
Andrew Fischer, Tim Gritten, Ernesto<br />
Sassot<br />
Editor: Dave Demko<br />
Introduction<br />
<strong>Bastogne</strong> is an Standard Combat<br />
Series game covering the defense<br />
of the <strong>Bastogne</strong> crossroads by the<br />
101 st Airborne Division, CCB, 10 th<br />
Arm Division, CCR 9 th Arm Division<br />
and assorted US units trapped by<br />
the German advance around the<br />
strongpoint. The game concludes when<br />
the first units of the 4 th Arm Division<br />
cut their way into the beleaguered<br />
garrison.<br />
1.0 General <strong>Rules</strong><br />
1.1Turn Sequence<br />
US Player Turn (Skip on Turn 1)<br />
• Reinforcements<br />
• Road March<br />
• US Barrage (Air Only)<br />
• Movement<br />
• Combat<br />
• Exploitation<br />
German Player Turn<br />
• Reinforcements<br />
• Road March (Skip on Turn 1)<br />
• Movement<br />
• DG Removal Remove DG<br />
markers from all units (both sides).<br />
• US Barrage (Air and Artillery)<br />
• German Barrage<br />
• Combat<br />
• Exploitation (Skip on Turn 1)<br />
1.2 Scale<br />
Each turn is one day. Each hex<br />
is approximately 400 meters. Ground<br />
units represent platoons and companies<br />
with battalions for some artillery<br />
units.<br />
1.3 Multiple Terrain<br />
Types<br />
Some hexes have more than one<br />
terrain type within them. In those cases,<br />
use only one. Terrain effects are not<br />
cumulative except that the Run terrain<br />
type is in addition to the main type of<br />
terrain of the hex.<br />
For movement, use the type with<br />
the highest MP cost, and remember that<br />
roads, trails, and railroads negate other<br />
terrain features for units using them.<br />
For combat, use the type which<br />
most benefits the defender.<br />
1.4 Runs<br />
Runs are a hex terrain feature that<br />
add one to the Movement Point cost of<br />
their hex. Roads, trails, and railroads<br />
negate runs in the same way as they<br />
negate streams. Runs have no effect on<br />
combat. Ignore runs in village hexes.<br />
1.5 Counter Colors<br />
German units are: Medium Grey (units<br />
of the 2 nd Pz Div, 15 th PG Div, or independent<br />
Germans), Lt Grey (26 th VG Div), Field<br />
Grey (Pz Lehr Div), or Pale Blue (5 th FJ<br />
Div). Stripes indicate KG affiliation.<br />
US units are: Darker Green (101 st Abn<br />
Div), Very Pale Green (9 th Arm Div), Pale<br />
Green (4 th Arm Div), and Green (10 th Arm<br />
Div and independent US units).<br />
Reduced strength units<br />
have a light colored<br />
boundary around the<br />
counter to help identify<br />
them.<br />
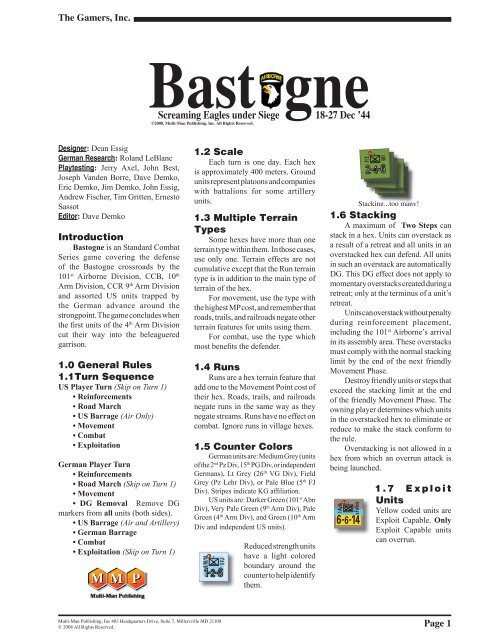
1.6 Stacking<br />
A maximum of Two Steps can<br />
stack in a hex. Units can overstack as<br />
a result of a retreat and all units in an<br />
overstacked hex can defend. All units<br />
in such an overstack are automatically<br />
DG. This DG effect does not apply to<br />
momentary overstacks created during a<br />
retreat; only at the terminus of a unit’s<br />
retreat.<br />
Units can overstack without penalty<br />
during reinforcement placement,<br />
including the 101 st Airborne’s arrival<br />
in its assembly area. These overstacks<br />
must comply with the normal stacking<br />
limit by the end of the next friendly<br />
Movement Phase.<br />
Destroy friendly units or steps that<br />
exceed the stacking limit at the end<br />
of the friendly Movement Phase. The<br />
owning player determines which units<br />
in the overstacked hex to eliminate or<br />
reduce to make the stack conform to<br />
the rule.<br />
Overstacking is not allowed in a<br />
hex from which an overrun attack is<br />
being launched.<br />
1 . 7 E x p l o i t<br />
Units<br />
Yellow coded units are<br />
Exploit Capable. Only<br />
Exploit Capable units<br />
can overrun.<br />
Multi-Man Publishing, Inc 403 Headquarters Drive, Suite 7, Millersville MD 21108<br />
© 2008 All Rights Reserved.<br />
Page 1
<strong>Bastogne</strong>, SCS #13<br />
1.8<br />
Disorganized<br />
Units (DG)<br />
Units can become DG<br />
because of barrage fires<br />
or when they overstack<br />
as a result of a retreat. They attack,<br />
barrage, defend and move at 1/2<br />
strength. DG units lose any Exploit<br />
Capability or ZOC they might have<br />
had. DG units cannot Road March.<br />
Otherwise, they behave normally.<br />
1.9 Supply<br />
There are no trace supply<br />
requirements in this game.<br />
1.10 Ranged Weapons<br />
Artillery and some weapon-type<br />
units (88s, Mortars,<br />
Infantry Guns, etc.)<br />
can fire at hexes that<br />
are not adjacent to<br />
them. For simplicity,<br />
these are all referred to<br />
as “artillery” in these<br />
rules.<br />
There are no Line of<br />
Sight requirements. A<br />
friendly unit, however,<br />
must be adjacent to the<br />
desired target. Artillery<br />
can “self-spot” target<br />
hexes adacent to<br />
themselves.<br />
The range is on the<br />
counter (in the colored<br />
Page 2<br />
Multi-Man Publishing, Inc 403 Headquarters Drive, Suite 7, Millersville MD 21108<br />
© 2008 All Rights Reserved.
The <strong>Gamers</strong>, Inc.<br />
dot). Artillery units can fire out to this<br />
maximum range (in hexes, not MPs)<br />
and range has no effect on barrage<br />
strength. Count the range out from the<br />
unit’s hex starting with the hex adjacent<br />
to the unit.<br />
Yellow Artillery. Some<br />
artillery units have<br />
Yellow coding inside<br />
their unit symbols. These<br />
are larger artillery units<br />
which are more capable of generating<br />
losses than others and are required to<br />
expend Artillery Ammunition to fire.<br />
No artillery unit has a ZOC. In<br />
exception to SCS rule 7.2e, artillery<br />
cannot tag along in attacks or advance<br />
after combat.<br />
1.11 Barrage<br />
Artillery units have a Barrage<br />
Rating and Range printed on them<br />
rather than an Attack Strength. An<br />
artillery unit can only make one Barrage<br />
per game turn. A given target hex can<br />
be barraged by any number of units,<br />
but all must be identified as firing at it<br />
before resolving any of the Barrages.<br />
Units can Barrage if in an EZOC,<br />
but the target must be adjacent to the<br />
firing unit.<br />
1.11a Barrage. Resolve Barrages<br />
as follows:<br />
• Each barraging unit barrages the<br />
target hex independently. Do not add<br />
their strengths together.<br />
• Roll one die for each barrage vs<br />
each target hex. Modify this roll for<br />
terrain. If the modified roll is less than<br />
or equal to the Barrage Rating of the<br />
firer, all units in the target hex are DG.<br />
Additional DGs have no greater effect<br />
on a target units except that each DG<br />
does yield another Kill Roll attempt.<br />
• For each DG result against a hex,<br />
roll one die. There are no modifiers<br />
to this Kill Roll. If the firing unit is<br />
Yellow Artillery, then kill one step on<br />
a roll of 4-6. If the firing unit is not<br />
Yellow Artillery, then kill one step<br />
on a 6. The owning player chooses<br />
which unit takes the step loss (if two<br />
units are in the hex). On any other roll,<br />
there is no effect beyond the DG result.<br />
Exception: see 2.3 88mm Guns.<br />
1.11b Artillery Ammunition. Both<br />
sides start with a pool of artillery<br />
ammunition which they track using<br />
the side’s Artillery Ammunition Track.<br />
One Artillery Ammo Point must be<br />
Multi-Man Publishing, Inc 403 Headquarters Drive, Suite 7, Millersville MD 21108<br />
© 2008 All Rights Reserved.<br />
Page 3
<strong>Bastogne</strong>, SCS #13<br />
expended off the track for each Yellow<br />
Artillery unit that fires a barrage. If no<br />
ammo is available, a Yellow Artillery<br />
unit cannot fire a barrage. The Germans<br />
never get additional artillery ammo<br />
during the game; the US does later via<br />
a dice roll according to the US Order of<br />
Arrival. Add these Ammo Points to the<br />
available pool on the track during the<br />
US Player’s Reinforcement Phase.<br />
1.11c Artillery and Non-Barrage<br />
Combat. Artillery units use their printed<br />
defense strength when defending in<br />
ground combat. They have no attack<br />
strength. Regular combat involving<br />
Yellow artillery does not cost Ammo<br />
Points.<br />
Design Note: Barrage Phasing.<br />
Both players are only allowed to<br />
make artillery barrages during the<br />
German Player Turn. This is because<br />
of the overall situation. The Germans<br />
are making barrages here to support<br />
their attacks, while the Americans are<br />
making barrages to break up those<br />
attacks. To allow both players offensive<br />
and defensive fires (by applying the<br />
phases to both Player Turns) would<br />
encourage the use of artillery for step<br />
hunting and waste the players’ time.<br />
The exception is US Air Strikes which<br />
are the only barrages allowed during<br />
the US Barrage Phase in the US<br />
Player’s turn. Air Strikes allow the US<br />
Player a little offensive edge toward<br />
the end of the game.<br />
1.12 Road March<br />
During a player’s Road March<br />
Phase, the player can execute a Road<br />
March with any of his qualifying<br />
units.<br />
1.12a Qualifications. To qualify for<br />
Road March, a unit must fulfill each<br />
of the following:<br />
a) The unit must be in a road,<br />
railroad or trail hex.<br />
b) The unit cannot be in a hex<br />
adjacent to an enemy unit<br />
(even if there is no EZOC).<br />
c) The unit cannot be DG.<br />
1.12b Procedure. A unit executing a<br />
Road March is given three Road March<br />
Points. Each Road March Point allows a<br />
unit to move any distance along a road,<br />
railroad, or trail until the unit stops.<br />
If the player chooses, he can expend<br />
another available Road March Point<br />
to move the unit again until it again<br />
stops. Once a unit expends all three<br />
available Road March Points, it can<br />
go no further during that Road March<br />
Phase. Units can move normally in the<br />
regular Movement Phase following a<br />
player’s Road March Phase in which<br />
they moved.<br />
A Road Marching unit must stop<br />
when:<br />
a) The player gets to the hex<br />
where he wants the unit to<br />
go.<br />
b) The road-type being followed<br />
changes. For example, if a unit<br />
is moving along a trail and it<br />
reaches a road junction where<br />
it wants to continue along a<br />
road instead, it stops in the<br />
junction hex.<br />
c) The unit crosses a friendly unit<br />
or stack occupying the road<br />
being followed. In this case,<br />
if there is only one friendlyoccupied<br />
hex , the moving unit<br />
can cross the friendly stack<br />
and stop in the next road hex.<br />
If more than one hex in a row<br />
contains friendly units, the<br />
Road Marching unit must stop<br />
before entering the first one<br />
(and cannot continue that way<br />
even with the expenditure of<br />
more Road March Points).<br />
Example: A unit qualified to move using<br />
Road March does so. First, it moves<br />
through a friendly unit astride the road<br />
it wants to follow and stops just after<br />
the unit. It has spent one Road March<br />
Point. It then moves a large number<br />
of hexes following it a continuous set<br />
of trail hexes until it stops when it<br />
hits a road junction where it wants to<br />
switch road types. It has now spent 2<br />
Road March Points. Lastly it moves<br />
several hexes along the regular road<br />
to the point where the player wants<br />
it to stop, having now spent 3 Road<br />
March Points.<br />
Player’s Note: Obviously, Road March<br />
can be very inefficient if the player<br />
changes road type multiple times or<br />
drives through friendly units.<br />
1.12c Restrictions. A Road<br />
Marching unit cannot enter any hex<br />
adjacent to an enemy unit, regardless<br />
of whether the enemy unit has a<br />
ZOC. Friendly units do not negate<br />
this restriction. A Road Marching unit<br />
cannot move into any hex that does<br />
not follow a contiguous track, road or<br />
railroad. Units making a Road March<br />
cannot stack at the end of their Road<br />
March move.<br />
2.0 German Special<br />
<strong>Rules</strong><br />
2.1 Turn 1<br />
There is no US Player Turn,<br />
German Road March Phase, or<br />
Exploitation Phase on Turn 1. This<br />
is because the Germans arrive in the<br />
map area late on the 18 th (after fighting<br />
through Task Forces Rose and Harper<br />
off map to the east).<br />
2.2 Removing Units<br />
Some German units are called<br />
upon to leave the game map. They<br />
have been directed elsewhere by higher<br />
headquarters. Remove all units of the<br />
specified formation still in play on the<br />
turn called for on the Order of Arrival.<br />
During the German Reinforcement<br />
Phase, pull the formation’s units from<br />
the game map from wherever they are<br />
no matter what their situation.<br />
Add the number of Victory Points<br />
earned from the formation’s removal<br />
(if any, see 4.0a) to the number on the<br />
German Victory Point Track.<br />
Player’s Note: Victory Points are<br />
awarded for keeping these units intact<br />
rather than burning them up in combat.<br />
The German player should be aware<br />
of how hard he uses these formation;<br />
he must keep their step losses down in<br />
order to win.<br />
Page 4<br />
Multi-Man Publishing, Inc 403 Headquarters Drive, Suite 7, Millersville MD 21108<br />
© 2008 All Rights Reserved.
The <strong>Gamers</strong>, Inc.<br />
Multi-Man Publishing, Inc 403 Headquarters Drive, Suite 7, Millersville MD 21108<br />
© 2008 All Rights Reserved.<br />
Page 5
<strong>Bastogne</strong>, SCS #13<br />
2.3 88mm<br />
Guns<br />
The Germans have a<br />
handful of 88mm gun<br />
units. These are special<br />
in two ways:<br />
1. Their Kill Roll succeeds on a<br />
roll of 5-6 instead of 6, even<br />
though they are small units.<br />
This makes a third type of<br />
Kill Roll different from the<br />
Yellow Artillery (4-6), and<br />
‘other’ artillery (6).<br />
2. The German player can select<br />
the target unit of his choice to<br />
take the step loss, as opposed<br />
to the normal case where the<br />
targeted player gets to choose<br />
from his own units.<br />
Both of these special cases apply<br />
only to Barrage resolution, and have<br />
no effect at all on normal combats an<br />
88 unit might be involved in.<br />
3.0 US Special <strong>Rules</strong><br />
3.1 Turn 1<br />
As also explained in 2.1, there is no<br />
US Player Turn, German Road March<br />
Phase, or Exploitation Phase on Turn<br />
1. This is because the Germans arrive<br />
in the map area late on the 18 th (after<br />
fighting through Task Forces Rose and<br />
Harper off map to the east).<br />
3.2 101 st Abn<br />
Arrival<br />
The 101 st Airborne<br />
Division arrives in the<br />
Reinforcement Phase<br />
of Turn 2. These units<br />
can be placed in any hex on or inside<br />
the 101 st Abn Div Assembly Area line<br />
on the map. They move normally from<br />
there on that turn and can use Road<br />
March that turn. They can overstack<br />
on placement.<br />
3.3 Air<br />
Strikes<br />
O n s o m e t u r n s ,<br />
according to the US<br />
Order of Arrival, the<br />
US player rolls a die to see how many<br />
Air Strikes he gets for that game turn.<br />
Roll for Air Strikes during the US<br />
Reinforcement Phase. Each Air Strike<br />
is only good for one Barrage. They<br />
cannot be saved from turn to turn.<br />
Air Strikes are Yellow Artillery<br />
Barrages that need no spotter, can hit<br />
anywhere on the map, have a Barrage<br />
Rating of 4, and do not use Artillery<br />
Ammunition. Beyond that, they are<br />
resolved like any other Barrage.<br />
Unlike other Barrage types, US Air<br />
Strikes can be used in the US Player<br />
Turn’s US Barrage Phase as well as<br />
the US Barrage Phase of the German<br />
Player Turn.<br />
3.4 Team SNAFU<br />
Every turn after Turn 1 the US<br />
player rolls on the Team SNAFU Table<br />
for additional ad hoc reinforcements.<br />
If any arrive they do so at Entry Hex I.<br />
If Entry Hex I is occupied by German<br />
units, then there is no Team SNAFU roll<br />
that turn. (This rule is an exception to<br />
the series rule 5.0c instructions on what<br />
to do if an entry hex is blocked.)<br />
3.5 The Relief<br />
Spearhead<br />
Towards the end of the game, the<br />
US player starts to roll for the arrival<br />
(from the south) of the very lead<br />
elements of Patton’s 3 rd Army (Task<br />
Force Abrams). Once the needed die<br />
roll is made, the units listed arrive. The<br />
Relief Spearhead can only arrive once<br />
and the bulk of the relief column arrives<br />
outside the scope of the game.<br />
4.0 Victory<br />
Victory in scenario 5.3 is determined<br />
by the total number of Victory Points<br />
(VPs) the German player accrues by the<br />
end of the game. The US player wins<br />
scenario 5.3 by denying the German<br />
player VPs. Scenarios 5.1 and 5.2 have<br />
their own victory conditions.<br />
Record VPs as they happen (4.0a<br />
and 4.0c) on the Victory Point Record<br />
on the map. Add to that total the<br />
applicable VPs from 4.0b when play<br />
ends to determine the VP total to use<br />
for 4.0d.<br />
4.0a VPs for Removed German Units. A<br />
number of German units are removed during<br />
the course of the game. The German player<br />
can get from 0 to 2 VPs for each of these<br />
formations based on the steps remaining in<br />
the formation at the moment it is removed.<br />
(In other words, the German player loses VPs<br />
for using them as suicide units.) This chart<br />
shows the VPs awarded according to the<br />
number of steps remaining in the formation<br />
when removed.<br />
Formation 2 VPs 1 VP 0 VP<br />
KG v.Bohm 9-7 6-5 4 or less<br />
KG Coch 20-16 15-11 10 or less<br />
KG v.Fallois 12-9 8-6 5 or less<br />
KG 902 21-16 15-11 10 or less<br />
4.0b VP for Routes. There are three<br />
routes marked on the map (A, B, and C). The<br />
German player earns VPs for each route that<br />
runs from the east to west map edges free<br />
of US units. Only US units with an attack<br />
strength of 1 or more, that are not DG, sitting<br />
on a route prevent the Germans from earning<br />
the VPs (see also the Important Note below).<br />
Check for these VPs at the end of play. Note<br />
that some routes connect at the ends. If those<br />
hexes are occupied, all routes going through<br />
those hexes are blocked.<br />
Route<br />
VPs<br />
A 5<br />
B 8<br />
C 4<br />
Important Note: For purposes of 4.0b, ignore<br />
the units of TF Abrams (the Relief Column).<br />
They can block a road so the Germans cannot<br />
use it, but cannot deny the VP award for the<br />
route if it is otherwise clear of US units.<br />
Design Note: Testing showed that players<br />
would not use Abrams as a set of combat units<br />
to actually remove pressure on <strong>Bastogne</strong>, but<br />
would spread them over the entire map in<br />
an effort to keep the Germans from getting<br />
any VPs for routes that were otherwise<br />
cleared. This little rule precludes that gamey,<br />
ahistorical tactic.<br />
Page 6<br />
Multi-Man Publishing, Inc 403 Headquarters Drive, Suite 7, Millersville MD 21108<br />
© 2008 All Rights Reserved.
The <strong>Gamers</strong>, Inc.<br />
4.0c VP for <strong>Bastogne</strong>. The German<br />
player earns two (2) VPs per turn he has<br />
one or more units in any hex or hexes of<br />
<strong>Bastogne</strong>. Award these VPs at the end of<br />
each US Player Turn that this condition is<br />
met. The Germans do not earn additional<br />
VPs for holding more than one hex.<br />
4.0d VP Levels.<br />
VPs<br />
Victory Level<br />
18 or more Major German Victory<br />
17-12 Minor German Victory<br />
11-9 Minor US Victory<br />
8 or less Major US Victory<br />
5.0 Scenarios<br />
5.1 Battle for Noville:<br />
Introductory Scenario<br />
This scenario covers the defense of<br />
the village of Noville. It was designed<br />
as a primer for the game-specific rules<br />
in preparation for the main campaign<br />
game, 5.3. Road March is allowed here,<br />
but cannot swing off the designated map<br />
area. (Yes, it is of limited utility.) Also,<br />
I took some liberties with the way Road<br />
March is working off map, regarding<br />
the entry of reinforcements.<br />
First Turn: 2<br />
Last Turn: 3<br />
Length: 2 turns<br />
US Artillery Points Available: Enough<br />
to shoot all artillery each turn<br />
German Artillery Points Available:<br />
Enough to shoot all artillery each<br />
turn<br />
Play Area: Inside the Black Scenario<br />
Boundary.<br />
Special <strong>Rules</strong>: In this scenario, do<br />
the German Player Turn first and the<br />
US Player Turn second. There are no<br />
SNAFU rolls for this scenario.<br />
US Information:<br />
Set Up:<br />
34.27: Team Desobry (C/609 TD<br />
Platoon)<br />
34.26: Comb Eng Bn (A Co)<br />
38.31: Team Desobry (B/20 Arm Inf<br />
Co)<br />
36.32: Team Desobry (D/3 Arm<br />
Platoon)<br />
36.30: Team Desobry (B/3 Arm Co)<br />
35.30: Team Desobry (D/90 Arm<br />
Recon Platoon)<br />
Just off map (in range to hit any hex<br />
in the play area):<br />
420 Arm Arty Bn<br />
755 Arm Arty Bn<br />
969 Arty Bn<br />
Design Note: Historically, the 755 Arm<br />
Arty Bn should be a reinforcement (to<br />
the off-map forces) on Turn 2 (and<br />
unable to fire in the first player turn of<br />
the game). I pushed it up 1/2 turn here<br />
for balance purposes.<br />
Reinforcements:<br />
Turn 2:<br />
33.24 or 35.24: 1 st Bn 506 Abn Inf<br />
(A/1, B/1, C/1)<br />
German Information:<br />
Set Up:<br />
Just off map (in range to hit any hex<br />
in the play area):<br />
26 VG Artillery (II/26, III/26 Arty<br />
Bn)<br />
766 Arty Bn<br />
Design Note: Historically, none of<br />
these German artillery units were<br />
available. They are provided here only<br />
so that both players can learn how to fire<br />
artillery. Yes, this means if this scenario<br />
is played historically, the Germans do<br />
not get any artillery ammo, either.<br />
Reinforcements (all enter through<br />
hexes 41.28, 41.31, and/or 41.35):<br />
Turn 2:<br />
KG v.Bohm (HQ Arm Car Co, Pz<br />
Co, 2 Aufk PG Co, 3 Aufk Bicycle Co,<br />
Wpn Mortar Co)<br />
Turn 3:<br />
KG Coch (2, 3, 4 Pz Co, 3/38 Pz<br />
Pio Co, 1/273 88mm Co)<br />
Victory:<br />
The Germans win if they clear Victory<br />
Route A in the map area before play<br />
ends and have no more than one Pz unit<br />
step loss out of the three Pz Companies<br />
in KG Coch. (A loss in KG v.Bohm does<br />
not count.) Pz units are only those with<br />
the actual armor unit type symbol.<br />
If the Germans clear the route but do<br />
have two or more Pz losses in KG<br />
Coch, it is a draw.<br />
Any other result is a US win.<br />
Multi-Man Publishing, Inc 403 Headquarters Drive, Suite 7, Millersville MD 21108<br />
© 2008 All Rights Reserved.<br />
Page 7
<strong>Bastogne</strong>, SCS #13<br />
5.2 Battle for<br />
Longvilly, Mageret &<br />
Neffe: Small Scenario<br />
This scenario covers the direct<br />
advance on <strong>Bastogne</strong> by the 26 th VG<br />
Division and Pz Lehr. On the US<br />
side, it covers the withdrawal of Team<br />
Cherry from Longvilly and the initial<br />
counterattack by the 501 st Abn Inf<br />
Rgt to stabilize the eastern side of the<br />
<strong>Bastogne</strong> perimeter.<br />
First Turn: 1<br />
Last Turn: 3<br />
Length: 3 turns<br />
US Artillery Points Available: Enough<br />
to shoot all artillery each turn<br />
German Artillery Points Available:<br />
Enough to shoot all artillery each<br />
turn<br />
Play Area: Inside the Red Scenario<br />
Boundary.<br />
Special <strong>Rules</strong>: Use the standard<br />
campaign sequence of play and<br />
restrictions on Turn 1. There are no<br />
SNAFU rolls for this scenario.<br />
US Information:<br />
Set Up:<br />
50.21: Ad Hoc Inf Co (SNAFU)<br />
50.22: CCR (C/482 Arm AA Co)<br />
47.22: CCR (HHC Arm Arty<br />
Platoon)<br />
37.17: Team Cherry (D/90 Arm Recon<br />
Platoon, HHC/3 Mortar Platoon)<br />
49.22: 58 Arty Bn<br />
49.24: Team Cherry (C/609 TD<br />
Platoon)<br />
49.23: Team Cherry (A/3 Arm Co)<br />
48.23: 73 Arm Arty Bn<br />
46.22: Team Cherry (C/20 Arm Inf<br />
Co)<br />
45.22: Team Cherry (D/3 Arm<br />
Platoon)<br />
37.20: Comb Eng Bn (C Co)<br />
40.19: Comb Eng Bn (D Co)<br />
Reinforcements:<br />
Turn 2:<br />
33.16 to 33.21 (inclusive):<br />
1 st Bn 501 Abn Inf (A/1, B/1,<br />
C/1)<br />
2 nd Bn 501 Abn Inf (D/2, E/2,<br />
F/2)<br />
3 rd Bn 501 Abn Inf (-) (G/3, H/3)<br />
377 Abn Arty Bn<br />
Note: I/3/501 is operating south<br />
of the play area near Wardin.<br />
Page 8<br />
Multi-Man Publishing, Inc 403 Headquarters Drive, Suite 7, Millersville MD 21108<br />
© 2008 All Rights Reserved.
The <strong>Gamers</strong>, Inc.<br />
German Information:<br />
Set Up:<br />
None<br />
Reinforcements (all enter Entry Area<br />
D and E within the play area):<br />
Campaign reinforcements on turns 1<br />
through 3 that come in via Entry Area<br />
D or E (only), ignore KG v.Bohm and<br />
KG Coch. The latter are on their way<br />
to fight at Noville and are not available<br />
here. Also ignore the Entry Area F<br />
reinforcements on turn 3.<br />
Victory:<br />
The side that holds Bizory, Neffe and<br />
Mageret at the end of play wins, any<br />
other result is a draw.<br />
5.3 Battle For<br />
<strong>Bastogne</strong><br />
This scenario covers the entire<br />
siege of <strong>Bastogne</strong>, from the opening<br />
assault on the screening armor forces<br />
until just after the relief column of the<br />
4 th Armored Division arrives.<br />
First Turn: 1<br />
Last Turn: 10<br />
Length: 10 turns<br />
US Artillery Points Available: 20<br />
German Artillery Points Available:<br />
18<br />
US Information:<br />
Set Up:<br />
50.21: Ad Hoc Inf Co (SNAFU)<br />
50.22: CCR (C/482 Arm AA Co)<br />
47.22: CCR (HHC Arm Arty<br />
Platoon)<br />
37.17: Team Cherry (D/90 Arm Recon<br />
Platoon, HHC/3 Mortar Platoon)<br />
49.22: 58 Arty Bn<br />
49.24: Team Cherry (C/609 TD<br />
Platoon)<br />
49.23: Team Cherry (A/3 Arm Co)<br />
48.23: 73 Arm Arty Bn<br />
46.22: Team Cherry (C/20 Arm Inf<br />
Co)<br />
45.22: Team Cherry (D/3 Arm<br />
Platoon)<br />
34.27: Team Desobry (C/609 TD<br />
Platoon)<br />
34.26: Comb Eng Bn (A Co)<br />
35.23: Comb Eng Bn (B Co)<br />
37.20: Comb Eng Bn (C Co)<br />
40.19: Comb Eng Bn (D Co)<br />
38.31: Team Desobry (B/20 Arm Inf<br />
Co)<br />
36.32: Team Desobry (D/3 Arm<br />
Platoon)<br />
36.30: Team Desobry (B/3 Arm Co)<br />
35.30: Team Desobry (D/90 Arm<br />
Recon Platoon)<br />
44.12: Team O’Hara (D/90 Arm Recon<br />
Platoon)<br />
42.12: Team O’Hara (B/54 Arm Inf<br />
Co)<br />
41.14: Team O’Hara (C-16 Inf TF)<br />
40.11: Team O’Hara (C/21 Arm Co)<br />
40.12: Team O’Hara (D/3 Arm<br />
Platoon)<br />
28.16: CCB (C/55 Arm Eng Co)<br />
28.15: CCB (B/769 Arm AA Co)<br />
27.16: CCB (A/20 Arm Inf Co)<br />
29.16: CCB (HHC/20 Arm Arty<br />
Platoon)<br />
21.16: 969 Arty Bn<br />
18.15: 420 Arm Arty Bn<br />
Reinforcements: Use the US Order<br />
of Arrival<br />
German Information:<br />
Set Up:<br />
None<br />
Reinforcements: Use the German<br />
Order of Arrival<br />
Victory:<br />
Use main Victory Conditions, 4.0.<br />
Multi-Man Publishing, Inc 403 Headquarters Drive, Suite 7, Millersville MD 21108<br />
© 2008 All Rights Reserved.<br />
Page 9
<strong>Bastogne</strong>, SCS #13<br />
5.4 Scenario Variants:<br />
Use these to make for variations<br />
on the campaign scenario (5.3) and to<br />
adjust the game’s balance to taste. No<br />
variant has a Victory Point cost, but<br />
each notes how greatly it offsets the<br />
original scenario’s balance.<br />
5.4a 2 nd Panzer Division Lends<br />
a Hand. Historically, parts of the 2 nd<br />
Pz Division (KG Guttman and KG<br />
Holtmeyer) did not participate in the<br />
battle to reduce <strong>Bastogne</strong>, and the<br />
portions of the division that did fight<br />
here, did so as an afterthought on their<br />
way west. If you use this option, allow<br />
KG Gutt to arrive at Entry Area E on<br />
turn 4. Balance: This option shifts<br />
the game a quite a bit toward the<br />
Germans.<br />
Notes: I chose to only bring Guttman<br />
on here as Holtmeyer also contains the<br />
divisional reserves and decided not to<br />
allow any changes to the removals of the<br />
original 2 nd Pz Division units. This was<br />
done to nudge the balance in the favor<br />
of the Germans, but to avoid turning<br />
the game into a blowout. It is a pretty<br />
strong nudge, so be careful when you<br />
use this one.<br />
5.4b 101 Abn Troops Returning<br />
from Field Dressing Stations. As is<br />
often the case in games with units with<br />
limited numbers of steps available to<br />
take as losses, the resolution of “who<br />
is dead” is a bit coarse. When rolling<br />
on the SNAFU Table each turn, roll<br />
once normally (for SNAFU units)<br />
and once again to see if any 101 st Abn<br />
companies return to the line because<br />
their walking wounded returned to<br />
battle. In this second roll, return one<br />
Abn Inf or Glider Inf Company out of<br />
the available dead 101 st Abn units for<br />
each SNAFU Company result the table<br />
provides. If there are none, then none<br />
return. They return at reduced strength<br />
at Entry Area I. Balance: This option<br />
shifts the game toward the Americans<br />
by just a touch.<br />
5.4c Late Arrivals. Instead of<br />
having the entire 101 st arrive on Turn 2,<br />
have the 501 st and 502 nd Abn Regiments<br />
arrive on Turn 2 and the rest of the<br />
division arrive on Turn 3. Balance: This<br />
shifts the game toward the Germans.<br />
5.4d S-4s do business like always.<br />
Historically, the supply officers in<br />
charge of the 101 st Airborne’s artillery<br />
sensed that their typical mission might<br />
change in this deployment to Belgium<br />
and as a result brought far more artillery<br />
ammunition than their normal load.<br />
Here, we assume they followed the<br />
same old checklist and didn’t think<br />
anything would be different. Give the<br />
US 12 Artillery Ammo Points at start<br />
instead of 20. Balance: This option is<br />
a big shift in favor of the Germans.<br />
5.4e Free Deployment. Allow the<br />
US player to set up as desired at start.<br />
Balance: This option shifts the game<br />
a touch towards the Americans.<br />
5.4f Ja, Wir haben deine Nutz<br />
hier! (Yeah, we got yer ‘nuts’ right<br />
here!). German dream scenario (can<br />
be combined with others above for a<br />
real nutty affair). Ignore all German<br />
Removals. Balance: This option gives<br />
a massive shift in the favor of the<br />
Germans. Note that the German player<br />
will not get any VPs for unit removal<br />
in this case.<br />
Designer’s Notes<br />
This was one of the rarest of rare<br />
game design projects for me. It was a<br />
simple joy to work on, playtest, and<br />
think about from the very beginning.<br />
I can’t honestly remember another<br />
project that came together as seamlessly<br />
and with so much simple fun as this<br />
one. I hope you find it to be as much<br />
fun as we did.<br />
For the first time, I designed a<br />
game under the overall rules protocol<br />
that no rule would be added unless<br />
we found in testing that we needed it,<br />
the goal being as simple of a game as<br />
possible. This is the opposite of the<br />
usual technique of creating all the rules<br />
you think you’ll need and then paring<br />
them down as testing proved they were<br />
not needed. That was a tedious and<br />
sometimes painful process that risked<br />
little remnants from obsolete rules<br />
being left in by mistake. I must say, I<br />
rather like the ‘build up’ approach.<br />
The basis of the rules here was<br />
the earlier SCS game Fallschirmjäger.<br />
Many of the special rules there were not<br />
needed here (airdrops, anti-aircraft fires<br />
and such) and a few of the rules that<br />
were ported over could be simplified<br />
in ways I rather wish I had done in FJ’s<br />
development. All in all, the chassis of<br />
rules that exists here is something I am<br />
very excited about, and I am already<br />
looking for new situations and projects<br />
to which to apply them.<br />
I suppose the biggest “what the<br />
heck?” rule in this game is Road<br />
March. This was the result of two<br />
very interesting problems in the early<br />
playtest games.<br />
First, with hexes only 400m<br />
across, even infantry units could<br />
move ‘enormous’ (in terms of hexes)<br />
distances in a day—literally all around<br />
the map. Vehicular units were even<br />
worse. I toyed with the idea of giving<br />
units huge MAs, but this was doomed<br />
as units would then be able to use that<br />
MA in situations where it just wasn’t<br />
appropriate. I needed to give them a<br />
lot of movement, but only under the<br />
‘right’ conditions. Road march allows<br />
this.<br />
Page 10<br />
Multi-Man Publishing, Inc 403 Headquarters Drive, Suite 7, Millersville MD 21108<br />
© 2008 All Rights Reserved.
The <strong>Gamers</strong>, Inc.<br />
The second problem in the early<br />
tests was that the US player was<br />
lacking any kind of edge of his seat<br />
nervousness about the overall situation.<br />
Units creeping along during regular<br />
movement doing a flank march could<br />
be spotted many turns in advance and<br />
counter moves made at one’s leisure.<br />
Road March allows the Germans to<br />
‘suddenly’ arrive at some critical point<br />
with no warning at all. This makes the<br />
US player appropriately paranoid and<br />
have a greatly interested in making a<br />
real perimeter. Interestingly enough,<br />
to eliminate much of the German<br />
zip-around-the-map capability, the<br />
Americans must occupy the rather large<br />
pocket they historically did.<br />
Next on the list of seemingly odd<br />
rules is the complete lack of normal<br />
trace supply. While at times this means<br />
some isolated pocket of US troops will<br />
hold out until the Germans destroy<br />
them, I’ve seen very, very few units<br />
that would rate as “out of supply”<br />
using the usual sorts of rules. The few<br />
that did were either hunkering down<br />
someplace hoping the enemy wouldn’t<br />
notice them or were busy being crushed<br />
by the enemy. Either way, there wasn’t<br />
much ‘good’ they were doing for their<br />
side and they certainly weren’t in a<br />
position to pull some sort of gamey<br />
stunt. Trace supply failed the necessity<br />
test to justify its rules weight.<br />
The game went through an<br />
absolute minimalist phase where with<br />
no stacking at all. This worked fairly<br />
well except in two matters: arranging<br />
the rear areas and reduced units. The<br />
rear areas take some management<br />
here (to make sure the roads are clear<br />
allowing road marches when needed)<br />
and it was silly at times to see large<br />
swathes of land used up in parking<br />
small artillery units and such. With no<br />
stacking, there was no way to assemble<br />
two reduced units so that players could<br />
afford the space in the line to hold them<br />
(putting them up there by themselves<br />
was dangerous). Allowing the minimal<br />
stacking of two steps cured both<br />
problems while keeping much of the<br />
original minimalist approach in play.<br />
It makes everything go faster as you’ll<br />
see.<br />
Artillery is handled much the way<br />
as in FJ except that only one kill roll<br />
is made per stack instead of rolling<br />
for each unit. (This is one of the side<br />
benefits of the limited stacking.) The<br />
tree-burst terrain effect modifier makes<br />
for some interesting feelings among<br />
players about being in the woods. Yeah,<br />
you get a defensive benefit there, but<br />
suddenly they are strictly unfriendly<br />
if you get barraged. It’s an interesting<br />
little conundrum. Finally, there are<br />
a couple of direct fire weapons (like<br />
the 88’s) that can fire from wherever<br />
they are to whatever hex there might<br />
be in range with no Line of Sight<br />
requirement. Basically, we just aren’t<br />
getting into LOS at this level and we’ll<br />
just have to assume the guns “found a<br />
way” to engage the target.<br />
US Player’s Notes<br />
by Dean Essig<br />
Your first job as the US player will be<br />
to avoid trying to do too much at the<br />
very beginning when you get an entire<br />
Airborne Division dumped in your lap<br />
while the Germans still look small and<br />
weak. The urge will be to try to take<br />
the war to them and block them along<br />
the east map edge or engulf them in the<br />
middle. Avoid falling into this trap. Not<br />
only can you ill-afford the losses of an<br />
offensive strategy, but all-too-often the<br />
US player trying this will be unable<br />
to break contact adequately to avoid<br />
getting sucker punched by the flanking<br />
German columns. The result is usually<br />
a nasty city fight inside <strong>Bastogne</strong>. This<br />
is not where you want to be.<br />
Once you avoid that trap, you’ll need to<br />
decide how big of a perimeter to set up.<br />
Larger ones allow for more ground to<br />
give up before you are in deep trouble.<br />
Smaller ones have less ground area to<br />
cover allowing more combat power per<br />
unit of distance. The fairly historical<br />
one is a good choice. There is value<br />
in being able to maneuver around the<br />
edges of the perimeter, having space<br />
to redeploy, and being able to give up<br />
a little ground when needed without<br />
creating a crisis. It is actually important<br />
to generate a real perimeter (as opposed<br />
to a string of little isolated outposts).<br />
Between the road march and regular<br />
movements, the Germans can make<br />
quick work of going around a weak<br />
outpost line.<br />
Salvage as many of your armor and<br />
mech units as possible and set them up<br />
in a fire brigade inside the perimeter.<br />
You’ll need them to counterattack.<br />
Avoid falling into the trap of leaving<br />
those at-start Team Cherry units<br />
isolated in Longvilly. Sure, there are no<br />
supply rules to make them disappear,<br />
but the imaginary thorn in the side of<br />
the Germans just isn’t worth leaving<br />
them outside the perimeter. Escape with<br />
them as soon as you can and get them<br />
in with the other US units.<br />
Your artillery is your lifeline. Keep<br />
a good eye on your ammo supply to<br />
make sure you never actually run out.<br />
This requires some budgeting and good<br />
target selection. It is worth it to hunt<br />
tanks and blunt spearheads. It is not<br />
worth it to blow up VG infantry. You<br />
don’t have a lot of free artillery, but<br />
make the best use of it you can. Look<br />
for targets in the woods.<br />
Your Air Strikes are an important<br />
offensive weapon late in the game as<br />
you’ll be able to use them (as opposed<br />
to other types of barrage) during the<br />
Barrage Phase of your turn.<br />
Toward the end of the game, you’ll be<br />
running out of space, units, ammunition<br />
and time. Wait, time running out is good<br />
for you and bad for the Germans. Your<br />
key to winning is to not run out of the<br />
first three before the Germans run out<br />
of the last.<br />
Multi-Man Publishing, Inc 403 Headquarters Drive, Suite 7, Millersville MD 21108<br />
© 2008 All Rights Reserved.<br />
Page 11
<strong>Bastogne</strong>, SCS #13<br />
OK, now looking at winning the game.<br />
Depending on a few key decisions and<br />
a little luck, your first games will be<br />
a matter of either “the Germans can’t<br />
win” or “the US can’t win.” That’s fine,<br />
I’ve seen both. What you’ll find is that<br />
the initial choices you (and the German<br />
player) make directly lead to the end<br />
game and that end game you get will<br />
be slanted one way or the other based<br />
on those initial considerations. This is<br />
not to say that given start X you will<br />
automatically get finish Y and nothing<br />
you do along the way will change it,<br />
but given X your finish will be around<br />
Y to a great extent. Keep playing the<br />
opening the same way and you’ll keep<br />
getting similar results. To win, you’ll<br />
need a fine balance of aggressiveness,<br />
passive defense, covering all avenues,<br />
and concentration. Yup, those are<br />
opposites, hence the concept of<br />
balance. I’ve seen US players launch<br />
into the Germans with their hair on fire<br />
only to find themselves out of units<br />
and artillery ammunition at the end<br />
when the crunch time came. Be too<br />
passive and the Germans will be able<br />
to maintain their strength too long and<br />
you’ll pay that way.<br />
One victory technique to be wary of<br />
is the idea of making two pockets: a<br />
main one around <strong>Bastogne</strong> and another<br />
around entry area A (in an effort to<br />
cut all the VP routes at once). This<br />
does not work as the Germans will<br />
be free to concentrate all their power<br />
against each pocket and defeat them<br />
in detail. Against a fairly ineffective<br />
German player, this plan has a chance<br />
at success (since he won’t be able to<br />
grind down the pockets fast enough),<br />
but if the German player is aggressive,<br />
he can make you really pay the price<br />
for cutting your local troops in half.<br />
Thinking that distance will save you<br />
as “it will take time for the Germans<br />
to shift from one pocket to the other”<br />
is a fallacy here.<br />
Another luxury you really don’t have<br />
is the ability to “spot” the losses you<br />
inflict. In other words, you aren’t in<br />
the position of being able to choose<br />
which German KGs to pound so as to<br />
deny the Germans the VPs they get for<br />
removing them. Your attacks will be<br />
based on the necessity of the moment,<br />
you don’t have the strength needed to<br />
“just hunt steps”. VPs for those KGs<br />
will depend entirely on how hard the<br />
German player chooses to use them.<br />
In summary, your job will be to build<br />
a decent perimeter around <strong>Bastogne</strong>,<br />
conserve your forces, and sap the<br />
strength of the German spearheads. Do<br />
that long enough, and you win.<br />
German Player’s Notes<br />
by John Best<br />
The first, and perhaps most important,<br />
point to make is about initiative. The<br />
German side definitely has the initiative<br />
at the start of the game and you must<br />
endeavor to keep it that way as the game<br />
moves through its various phases. In<br />
the first few turns, during the game’s<br />
most fluid phase, continually analyze<br />
the board each turn to identify places<br />
the American will have a hard time<br />
defending. You need to move units<br />
to those locations. They don’t have<br />
to be your most powerful units, but<br />
they should be numerous enough to<br />
make the American player think about<br />
them. In the later turns, when the<br />
game evolves naturally into its “siege”<br />
phase, you can keep the initiative by<br />
planning and executing attacks from<br />
many directions. Keep the pressure on<br />
constantly to keep the American offbalance.<br />
To do this, the German player<br />
will have to make decisions his about<br />
overall plan in the game for maneuver,<br />
and for combat.<br />
Addressing the maneuver decisions<br />
first, they naturally divide themselves<br />
into the tactical and operational levels.<br />
At the tactical level, if the American<br />
player gives you any holes in his line,<br />
get your fast infantry (the 3-4-10s) into<br />
those holes as quickly and as far as<br />
you can! The American player is going<br />
to pick some of those guys off in the<br />
barrage phase before you attack, but for<br />
those who survive, see if you can create<br />
some retreat possibilities through your<br />
ZOCs. Or at least make the American<br />
fire his artillery at your infiltrating<br />
units; it might take the pressure off<br />
your armor for a little while.<br />
At the operational level, the German<br />
side player has to make important<br />
decisions about the correct and<br />
maximal use of road march. Think<br />
about your entering units: Where are<br />
you going to want them to be in the<br />
combat phase? Sometimes you have<br />
to move some on-board units out of<br />
the way to clear a pathway for your<br />
entering reinforcement. Think of it as<br />
Page 12<br />
Multi-Man Publishing, Inc 403 Headquarters Drive, Suite 7, Millersville MD 21108<br />
© 2008 All Rights Reserved.
The <strong>Gamers</strong>, Inc.<br />
clearing a railroad track by putting units<br />
on “sidings” so the express train will<br />
have a clear path to its destination. You<br />
also need to think about repositioning<br />
your on-board units the same way. Any<br />
unit that is not currently engaged may<br />
have a lot of options for where it might<br />
be in the combat phase. Study your<br />
unengaged units and think about where<br />
they could go to increase pressure on<br />
the Americans.<br />
Let’s turn to the combat issues.<br />
Compared to his material, the German<br />
player will probably envy the American<br />
artillery, but as the German player,<br />
you must nevertheless develop an<br />
effective artillery plan to win. This<br />
plan will involve two components: (1)<br />
Determining what to do with your good<br />
artillery (the “yellow-box” units) and<br />
(2) determining what to do with your<br />
“free” artillery (the non “yellow-box”<br />
artillery—the ones that don’t require<br />
ammunition points). Regarding the<br />
former, be mission-oriented in handling<br />
this artillery. Attach a good unit or two<br />
to each of the various battlegroups<br />
and judge wisely when to spend an<br />
ammunition point in support of an<br />
attack. Probably there will not be too<br />
many situations where you will be<br />
able to afford to spend more than one<br />
artillery point on a specific attack.<br />
The Germans also have to develop an<br />
effective artillery program with their<br />
“free” artillery. It’s true that there is a<br />
lot of low-probability dicing with the<br />
free artillery. Perhaps as a result of this<br />
the German player may be inclined to<br />
neglect this component. But don’t; it<br />
can really make a difference. Actually<br />
shooting up an American unit, it can<br />
increase the odds in your immediately<br />
following combat phase significantly.<br />
The Germans also have to be fearless<br />
with their units. The German dead pile<br />
is going to get big, but nevertheless you<br />
cannot let yourself worry too much<br />
about “saving” your units. Your good<br />
armored units are always going to<br />
attract the unwelcome attention of the<br />
long-range American artillery, so you<br />
can’t count on them sticking around<br />
too long anyway. As suggested above,<br />
your artillery will help your attacks<br />
over the course of the game, even if<br />
you cannot count on it helping in any<br />
particular attack. It is also important<br />
to note that even attacks on the oneto-one<br />
column favor the German side<br />
when the game gets into the actual<br />
“siege” phase. You are bound to suffer<br />
casualties (step losses) attacking at<br />
these odds, but you’ll find that many<br />
of the German units are surprisingly<br />
resilient in terms of the combat values<br />
on their reduced sides. The more attacks<br />
you can engineer at least at acceptable<br />
odds, the greater your chances are of<br />
keeping the initiative.<br />
The discussion about “saving” units<br />
gets us to our final point about playing<br />
the German side. First, you must<br />
make a decision about the degree of<br />
commitment of your “victory point”<br />
kampfgruppen. If you over commit<br />
these units and burn them all out, you<br />
are not going to get any victory points<br />
for them. On the other hand, if you try<br />
to hold them out of combat in order to<br />
get victory points, you probably won’t<br />
make much progress! You need to have<br />
situational awareness about these units;<br />
it might be a good idea to use them<br />
until you see they are getting close to<br />
the point where they are not going to<br />
earn you victory points. Be advised<br />
that this might be very hard to judge<br />
in the actual game. Second, but related<br />
to the first point, you need to develop a<br />
victory point plan: How many of your<br />
victory points will come from exiting<br />
intact kampfgruppen? How many from<br />
holding the victory routes (and which<br />
ones)? Do you think you can actually<br />
storm your way into <strong>Bastogne</strong>? Holding<br />
back units may help with some victory<br />
points, but it compromises your chances<br />
to open the victory routes, and you are<br />
definitely not going to get a unit in<br />
<strong>Bastogne</strong> that way. As you can see, the<br />
German player in <strong>Bastogne</strong> maneuvers<br />
an interesting and powerful force, but<br />
one that requires some thought in order<br />
to be used effectively. Let “relentless<br />
pressure” be your mantra and you will<br />
give yourself your best chance to win<br />
as the German player.<br />
Abbreviations<br />
AA—Anti-Aircraft<br />
Abn—Airborne<br />
AG—Assault Gun<br />
Arm—Armor or Armored<br />
Arty—Artillery<br />
Bn—Battalion<br />
CCA—Combat Command A<br />
CCB—Combat Command B<br />
CCR—Combat Command R<br />
(Reserve)<br />
Co—Company<br />
Coch—Cochenhausen<br />
Comb—Combined<br />
Div—Division<br />
Eng—Engineer<br />
FA—Field Artillery<br />
FJ—Fallschirmjäger<br />
Gutt—Guttman<br />
Inf—Infantry<br />
KG—Kampfgruppe<br />
PG—Panzergrenadier<br />
Pz—Panzer<br />
PzJg—Panzer Jäger<br />
S—Sturm<br />
SMG—Submachinegun<br />
TD—Tank Destroyer<br />
TF—Task Force<br />
Multi-Man Publishing, Inc 403 Headquarters Drive, Suite 7, Millersville MD 21108<br />
© 2008 All Rights Reserved.<br />
Page 13
<strong>Bastogne</strong>, SCS #13<br />
Page 14<br />
Multi-Man Publishing, Inc 403 Headquarters Drive, Suite 7, Millersville MD 21108<br />
© 2008 All Rights Reserved.
The <strong>Gamers</strong>, Inc.<br />
Multi-Man Publishing, Inc 403 Headquarters Drive, Suite 7, Millersville MD 21108<br />
© 2008 All Rights Reserved.<br />
Page 15
<strong>Bastogne</strong>, SCS #13<br />
Page 16<br />
Multi-Man Publishing, Inc 403 Headquarters Drive, Suite 7, Millersville MD 21108<br />
© 2008 All Rights Reserved.