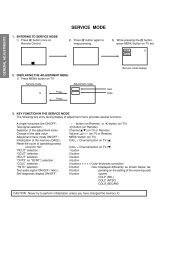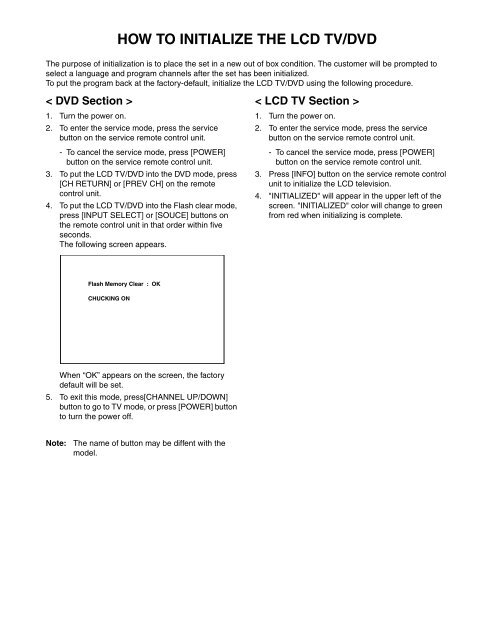
HOW TO INITIALIZE THE LCD TV/DVD
HOW TO INITIALIZE THE LCD TV/DVD
HOW TO INITIALIZE THE LCD TV/DVD

Create successful ePaper yourself
Turn your PDF publications into a flip-book with our unique Google optimized e-Paper software.
<strong>HOW</strong> <strong>TO</strong> <strong>INITIALIZE</strong> <strong>THE</strong> <strong>LCD</strong> <strong>TV</strong>/<strong>DVD</strong><br />
The purpose of initialization is to place the set in a new out of box condition. The customer will be prompted to<br />
select a language and program channels after the set has been initialized.<br />
To put the program back at the factory-default, initialize the <strong>LCD</strong> <strong>TV</strong>/<strong>DVD</strong> using the following procedure.<br />
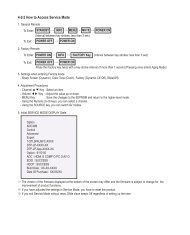
< <strong>DVD</strong> Section ><br />
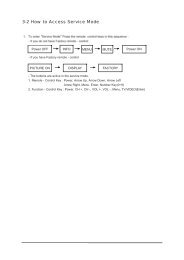
1. Turn the power on.<br />
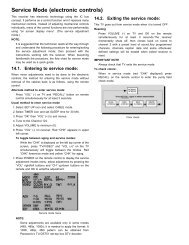
2. To enter the service mode, press the service<br />
button on the service remote control unit.<br />
- To cancel the service mode, press [POWER]<br />
button on the service remote control unit.<br />
3. To put the <strong>LCD</strong> <strong>TV</strong>/<strong>DVD</strong> into the <strong>DVD</strong> mode, press<br />
[CH RETURN] or [PREV CH] on the remote<br />
control unit.<br />
4. To put the <strong>LCD</strong> <strong>TV</strong>/<strong>DVD</strong> into the Flash clear mode,<br />
press [INPUT SELECT] or [SOUCE] buttons on<br />
the remote control unit in that order within five<br />
seconds.<br />
The following screen appears.<br />
< <strong>LCD</strong> <strong>TV</strong> Section ><br />
1. Turn the power on.<br />
2. To enter the service mode, press the service<br />
button on the service remote control unit.<br />
- To cancel the service mode, press [POWER]<br />
button on the service remote control unit.<br />
3. Press [INFO] button on the service remote control<br />
unit to initialize the <strong>LCD</strong> television.<br />
4. "<strong>INITIALIZE</strong>D" will appear in the upper left of the<br />
screen. "<strong>INITIALIZE</strong>D" color will change to green<br />
from red when initializing is complete.<br />
Flash Memory Clear : OK<br />
CHUCKING ON<br />
When “OK” appears on the screen, the factory<br />
default will be set.<br />
5. To exit this mode, press[CHANNEL UP/DOWN]<br />
button to go to <strong>TV</strong> mode, or press [POWER] button<br />
to turn the power off.<br />
Note:<br />
The name of button may be diffent with the<br />
model.
FIRMWARE RENEWAL MODE<br />
< <strong>DVD</strong> Section ><br />
1. Turn the power on and press [EJECT] button on<br />
the remote control unit to put the <strong>LCD</strong> <strong>TV</strong>/<strong>DVD</strong> into<br />
<strong>DVD</strong> mode. Then remove the disc.<br />
2. To put the <strong>LCD</strong> <strong>TV</strong>/<strong>DVD</strong> into F/W version up mode,<br />
press [9], [8], [7], [6], and [MODE] buttons on the<br />
remote control unit in that order.<br />
Fig. a appears on the screen.<br />
5. After programming is finished, the disc will be<br />
ejected automatically. Fig. c appears on the<br />
screen and the checksum will be shown in (*2).<br />
(*2)<br />
" ******* " differ depending on the models.<br />
F/W Version Up Mode Model No : ******<br />
VERSION : *.**<br />
VERSION : ************.***<br />
Completed<br />
SUM : ****<br />
" ******* " differs depending on the models.<br />
F/W Version Up Mode Model No : ******<br />
VERSION : *.**<br />
Please insert a DISC<br />
for F/W Version Up.<br />
EXIT: SELECT<br />
Fig. a Version Up Mode Screen<br />
3. Insert the disc for version up into the disc slot.<br />
4. The <strong>LCD</strong> <strong>TV</strong>/<strong>DVD</strong> enters the F/W version up mode<br />
automatically. Fig. b appears on the screen. Make<br />
sure to insert the proper F/W for the state of this<br />
model.<br />
Fig. c Completed Program Mode Screen<br />
At this time, no button is available.<br />
6. Remove the disc.<br />
7. Unplug the AC cord from the AC outlet. Then plug<br />
it again.<br />
8. Press [EJECT] button on the remote control unit to<br />
put the <strong>LCD</strong> <strong>TV</strong>/<strong>DVD</strong> into <strong>DVD</strong> mode again.<br />
9. Press [1], [2], [3], [4], and [INFO] buttons on the<br />
remote control unit in that order.<br />
Fig. d appears on the screen.<br />
" ******* " differs depending on the models.<br />
(*1)<br />
" ******* " differ depending on the models.<br />
F/W Version Up Mode Model No : ******<br />
VERSION : *.**<br />
VERSION : ************.***<br />
Reading...<br />
MODEL : ******<br />
Version : *.**<br />
Region : *<br />
EEPROM CLEAR : CLEAR<br />
EXIT: SELECT<br />
Fig. b Programing Mode Screen<br />
The appearance shown in (*1) of Fig. b is<br />
described as follows:<br />
No.<br />
1<br />
2<br />
Appearance<br />
Reading...<br />
Erasing...<br />
State<br />
Sending files into the memory<br />
Erasing previous version data<br />
3 Programming... Writing new version data<br />
Fig. d<br />
10. Press [CLEAR] button on the remote control unit.<br />
Fig. e appears on the screen.<br />
" ******* " differs depending on the models.<br />
MODEL : ******<br />
Version : *.**<br />
Region : *<br />
EEPROM CLEAR : OK<br />
EEPROM CLEAR : CLEAR<br />
EXIT: SELECT<br />
Fig. e<br />
When “OK” appears on the screen, the factory<br />
default will be set. Then the firmware renewal<br />
mode is complete.<br />
11. To exit this mode, press [CHANNEL UP/DOWN]<br />
button to go to <strong>TV</strong> mode, or press [POWER] button<br />
to turn the power off.
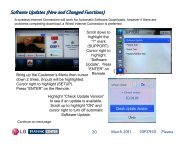
<strong>LCD</strong> <strong>TV</strong> Section ><br />
Equipment Required<br />
a. USB memory<br />
b. Remote Control Unit<br />
Firmware Update Procedure<br />
Note: There are two states (the User Upgrade and<br />
the Factory Upgrade) in firmware update.<br />
User Upgrade<br />
Factory upgrade<br />
The identification of User Upgrade and Factory<br />
Upgrade are done by the filename.<br />
1. Turn the power off and unplug the AC Cord.<br />
2. Insert the USB memory to the USB port as shown<br />
below.<br />
Rear Cabinet<br />
Upgrade the firmware only.<br />
The setting values are not<br />
initialized.<br />
Upgrade the firmware and<br />
initialize the setting values.<br />
USB port<br />
USB Memory<br />
The appearance shown in *1 is described as follows.<br />
Appearance<br />
Downloading...<br />
Writing...<br />
Checking...<br />
5. When the firmware update is completed, the<br />
following will appear on the screen.<br />
Note:<br />
Software Upgrade<br />
State<br />
Downloading the firmware from<br />
the USB memory.<br />
Writing the downloaded firmware<br />
in flash memory.<br />
Checking the new firmware.<br />
The software upgrade is completed.<br />
Remove USB storage device, unplug and replug power code.<br />
Unplug the AC cord and kindly remove the USB<br />
memory from the USB port. Plug the AC cord in<br />
the wall outlet again and turn the power on.<br />
When the Factory Upgrade is used, after restating<br />
<strong>TV</strong>, shift to initial screen menu in service mode.<br />
"<strong>INITIALIZE</strong>D" will appear on the upper left of the<br />
screen. "<strong>INITIALIZE</strong>D" color will change to green<br />
from red when initializing is complete.<br />
3. Plug the AC cord in the wall outlet and turn the<br />
power on.<br />
4. The update will start and the following will appear<br />
on the screen.<br />
Software Upgrade<br />
Software upgrade in progress. Please wait.<br />
Do not remove the USB device or turn the <strong>TV</strong> off<br />
while upgrade is in progress.<br />
*1<br />
Downloading...<br />
0%<br />
Note: If the above screen isn’t displayed, repeat from<br />
step 1.