NIBP100D Calibration - Biopac
NIBP100D Calibration - Biopac
NIBP100D Calibration - Biopac

You also want an ePaper? Increase the reach of your titles
YUMPU automatically turns print PDFs into web optimized ePapers that Google loves.
DOC59 v2<br />
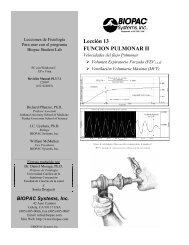
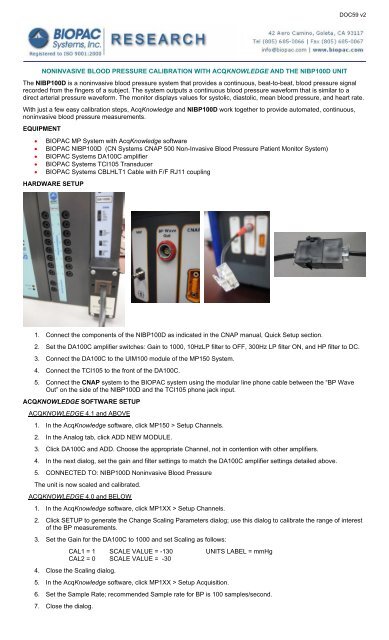
NONINVASIVE BLOOD PRESSURE CALIBRATION WITH ACQKNOWLEDGE AND THE <strong>NIBP100D</strong> UNIT<br />
The <strong>NIBP100D</strong> is a noninvasive blood pressure system that provides a continuous, beat-to-beat, blood pressure signal<br />
recorded from the fingers of a subject. The system outputs a continuous blood pressure waveform that is similar to a<br />
direct arterial pressure waveform. The monitor displays values for systolic, diastolic, mean blood pressure, and heart rate.<br />
With just a few easy calibration steps, AcqKnowledge and <strong>NIBP100D</strong> work together to provide automated, continuous,<br />
noninvasive blood pressure measurements.<br />
EQUIPMENT<br />
<br />
<br />
<br />
<br />
<br />
BIOPAC MP System with AcqKnowledge software<br />
BIOPAC <strong>NIBP100D</strong> (CN Systems CNAP 500 Non-Invasive Blood Pressure Patient Monitor System)<br />
BIOPAC Systems DA100C amplifier<br />
BIOPAC Systems TCI105 Transducer<br />
BIOPAC Systems CBLHLT1 Cable with F/F RJ11 coupling<br />
HARDWARE SETUP<br />
1. Connect the components of the <strong>NIBP100D</strong> as indicated in the CNAP manual, Quick Setup section.<br />
2. Set the DA100C amplifier switches: Gain to 1000, 10HzLP filter to OFF, 300Hz LP filter ON, and HP filter to DC.<br />
3. Connect the DA100C to the UIM100 module of the MP150 System.<br />
4. Connect the TCI105 to the front of the DA100C.<br />
5. Connect the CNAP system to the BIOPAC system using the modular line phone cable between the “BP Wave<br />
Out” on the side of the <strong>NIBP100D</strong> and the TCI105 phone jack input.<br />
ACQKNOWLEDGE SOFTWARE SETUP<br />
ACQKNOWLEDGE 4.1 and ABOVE<br />
1. In the AcqKnowledge software, click MP150 > Setup Channels.<br />
2. In the Analog tab, click ADD NEW MODULE.<br />
3. Click DA100C and ADD. Choose the appropriate Channel, not in contention with other amplifiers.<br />
4. In the next dialog, set the gain and filter settings to match the DA100C amplifier settings detailed above.<br />
5. CONNECTED TO: <strong>NIBP100D</strong> Noninvasive Blood Pressure<br />
The unit is now scaled and calibrated.<br />
ACQKNOWLEDGE 4.0 and BELOW<br />
1. In the AcqKnowledge software, click MP1XX > Setup Channels.<br />
2. Click SETUP to generate the Change Scaling Parameters dialog; use this dialog to calibrate the range of interest<br />
of the BP measurements.<br />
3. Set the Gain for the DA100C to 1000 and set Scaling as follows:<br />
CAL1 = 1 SCALE VALUE = -130 UNITS LABEL = mmHg<br />
CAL2 = 0 SCALE VALUE = -30<br />
4. Close the Scaling dialog.<br />
5. In the AcqKnowledge software, click MP1XX > Setup Acquisition.<br />
6. Set the Sample Rate; recommended Sample rate for BP is 100 samples/second.<br />
7. Close the dialog.
<strong>NIBP100D</strong> <strong>Calibration</strong> with AcqKnowledge www.biopac.com Page 2 of 2<br />
ADDITIONAL CALIBRATION NOTES<br />
The <strong>NIBP100D</strong> is able to generate a square voltage pulse wave which can be used for further calibration/verification<br />
needs. Prior to using this method, make sure the following steps are followed.<br />
1) The DA100C offset must be at zero, with the recommended settings in the Hardware Setup section, step # 5. To do<br />
this, please refer to Application Note #110 - AMPLIFIER BASELINE OFFSET ADJUSTMENT (available online at<br />
www.biopac.com). After doing this, set the scaling for the channel back to:<br />
CAL1 = 1 SCALE VALUE = -130 UNITS LABEL = mmHg<br />
CAL2 = 0 SCALE VALUE = -30<br />
2) Use a Voltage meter to verify that the excitation voltage of the DA100C amplifier reads ±2 VDC.<br />
<br />
Simply plug the leads of the meter into the Vref1 and Vref2 slots on the front of the amplifier and adjust the Vref<br />
screw until the voltage meter reads 2 VDC.<br />
3) Complete the following adjustments on the <strong>NIBP100D</strong> to generate a square wave pulse at 50 and 150 mmHg:<br />
a) Click the SETUP button on the front of the <strong>NIBP100D</strong>.<br />
b) Using the front dial, scroll to highlight SERVICE and press down on the dial to display the menu.<br />
c) Enter a password to access the service screen. The default password number is 8737. Use the front dial to<br />
scroll, and push to enter the digits.<br />
d) Scroll and choose the FUNCTION TEST setting.<br />
e) Scroll and choose the CHECK UP IBP setting.<br />
f) Scroll and Choose RECTANGLE.<br />
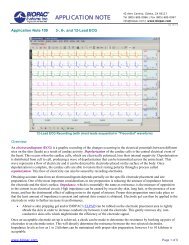
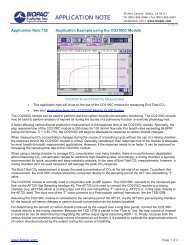
4) In AcqKnowledge, run the graph until you see a similar waveform.<br />
<br />
The values should<br />
reflect the square<br />
wave value of 50<br />
and 150 mmHg. <br />
<br />
Generally the calibration and actual measure values fall within 1%. If the values exceed your specification, an<br />
adjustment can be made to the scaling within the software. If necessary, set the scaling as follows:<br />
CAL1 = -10 SCALE VALUE = -10<br />
CAL2 = 10 SCALE VALUE = 10<br />
5) Run the square wave for a few seconds, then measure the Max and Min.<br />
6) Enter these values in CAL1 and CAL2 Volts, and enter 50 and 150 in SCALE VALUE 1 and SCALE VALUE 2<br />
respectively.