ESIN Plug Insert and Aiming Device ESIN ... - Hofer-medical
ESIN Plug Insert and Aiming Device ESIN ... - Hofer-medical
ESIN Plug Insert and Aiming Device ESIN ... - Hofer-medical

You also want an ePaper? Increase the reach of your titles
YUMPU automatically turns print PDFs into web optimized ePapers that Google loves.
Instruction Manual<br />
<strong>ESIN</strong> <strong>Plug</strong> <strong>Insert</strong> <strong>and</strong> <strong>Aiming</strong> <strong>Device</strong><br />
<strong>ESIN</strong> Measurement Gauge<br />
www.hofer-<strong>medical</strong>.com
Content<br />
Single Parts<br />
PI-1<br />
Intra-operative H<strong>and</strong>ling<br />
PI-2<br />
Assembling Instrument<br />
PI-2.1<br />
Connecting <strong>Plug</strong><br />
PI-2.2<br />
<strong>Insert</strong>ion of Sleeve System<br />
PI-2.3<br />
Using Measurement Gauge<br />
PI-2.4<br />
Disconnecting <strong>Plug</strong><br />
PI-2.5<br />
Post-operative H<strong>and</strong>ling<br />
PI-3<br />
Preparation<br />
PI-3.1<br />
Symbols<br />
Do not hammer in!<br />
Do not touch!<br />
Warning<br />
This description is not sufficient for immediate use of implants <strong>and</strong> instruments.<br />
An instruction into h<strong>and</strong>ling these instruments by a surgeon experienced with them is strongly recommended.
PI-1<br />
Single Parts<br />
C<br />
A<br />
D<br />
B<br />
A - <strong>Aiming</strong> <strong>Device</strong><br />
B - <strong>Insert</strong>er: 35° (st<strong>and</strong>ard) or 25° (optional)<br />
C - Fixation Screw (F)<br />
D - Clamping Screw (CS)<br />
E - Fixation Bolt<br />
E<br />
<strong>ESIN</strong> Trocar<br />
<strong>ESIN</strong> Drill Sleeve<br />
<strong>ESIN</strong> Tissue Protector Sleeve<br />
<strong>ESIN</strong> Measurement Gauge<br />
Drill Bit
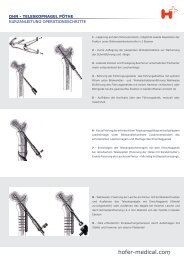
PI-2.1<br />
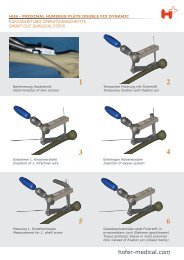
Intraoperative H<strong>and</strong>ling - Assembling Instrument<br />
Assembling of Instrument - Steps<br />
35°<br />
25°<br />
1 - Lead inserter (25° or 35°) into aiming device all the way<br />
to the stop - skid of inserter has to point upwards, inserted<br />
hole in aiming device <strong>and</strong> groove of inserter should be in<br />
one line<br />
1<br />
1<br />
3<br />
Lateral view opposite side<br />
2<br />
3<br />
2 - Fix aiming device by means of the clamping screw (CS) -<br />
clamping screw should be screwed in until it is positioned<br />
flush to the aiming device<br />
3 - Depending on the used version (25° oder 35°) screw in<br />
fixation screw (F) in correspondingly marked position (see<br />
detail view)<br />
2<br />
Detail<br />
3<br />
25°<br />
35°<br />
Lateral view opposite side<br />
4 - Tighten clamping screw with flat wrench<br />
4<br />
4
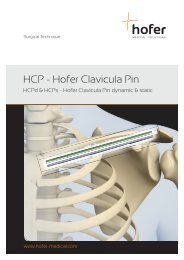
PI-2.2<br />
Intra-operative H<strong>and</strong>ling - Connecting <strong>Plug</strong><br />
Connecting <strong>Plug</strong> - Steps<br />
1<br />
1 - For connecting the plug the inserter is put on the plug<br />
from above. In doing so the plug has to be positioned on a<br />
solid surface.<br />
IMPORTANT: Pay attention to the correct alignment of<br />
the plug. The holes in plug <strong>and</strong> inserter have to correspond<br />
to eachother (see detail views).<br />
Detail lateral view<br />
Detail front view<br />
1<br />
1<br />
Check:<br />
1) correct alignment /<br />
position of plug?<br />
2) hole freely accessible?<br />
2- Screw fixation bolt in the inserter all the way to the<br />
stop to fix the plug (2).<br />
2<br />
ATTENTION: During screwing in do not touch the front<br />
part of the instrument (skid area)! The tip of the fixation<br />
bolt might damage gloves.<br />
Do not use fixation bolt or plug together with a hammer!<br />
The connection of the plug to the nail <strong>and</strong> an eventually correction of the position (see surgical technique)<br />
has to happen without using a hammer!
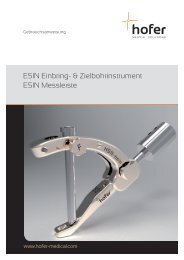
PI-2.3<br />
Intraoperative H<strong>and</strong>ling - <strong>Insert</strong>ion of Sleeve System<br />
Please note: The following steps are performed at different stages during surgery. For more information on<br />
use - especially on time of use - of the sleeve system please refer to the surgical technique.<br />
Depending on the used inserter (35° or 25°) the tissue protector sleeve (A) is inserted in the correspondingly marked<br />
hole of the aiming device.<br />
Attention: The tissue protector sleeve is not self retaining <strong>and</strong> may slip out, if it is not fixed by means of the fixation<br />
screw (F).<br />
The drill sleeve (B) exactly fits in the tissue protector sleeve. Finally, the trocar (C) can be inserted in the drill sleeve.<br />
C<br />
B<br />
A<br />
35° Version - St<strong>and</strong>ard 25° Version - Optional<br />
back hole<br />
front hole<br />
Lateral view detail opposite side<br />
Lateral view detail opposite side
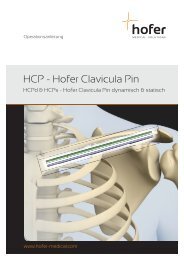
PI-2.4<br />
Intra-operative H<strong>and</strong>ling - Using the Measurement Gauge<br />
Direct Reading of drill bit protrusion<br />
Example: here = 30<br />
B<br />
Pay attention to the correct alignment of the measurement gauge!<br />
Scaling should increase in downward direction!<br />
A<br />
ATTENTION:<br />
Use measurement gauge only in combination with tissue protector sleeve (A) AND drill sleeve (B)!<br />
For measuring only use drill with length of 175 mm!<br />
B<br />
A
PI-2.5<br />
Intra-operative H<strong>and</strong>ling - Disconnecting <strong>Plug</strong><br />
For disconnection of the plug the fixation bolt is unscrewed totally (1). Then the inserter can be taken off from the<br />
plug (2).<br />
1<br />
2
PI-3.1<br />
Post-operative H<strong>and</strong>ling - Preparation<br />
The instrument must be disassembled before cleaning according to the pictures.<br />
3<br />
Disassembling - steps<br />
2<br />
1 - Unscrew fixation bolt<br />
2 - Loosen <strong>and</strong> unscrew clamping screw (if necessary<br />
use flat wrench)<br />
3 - Unscrew fixation screw<br />
1<br />
4 - Remove inserter from aiming device<br />
4<br />
<strong>Insert</strong>er <strong>and</strong>/or aiming device should be exchanged if:<br />
• they show no strong connection anymore<br />
• the aiming device does not guide the sleeve system properly anymore<br />
• the plug can not be connected safely to the inserter anymore<br />
• safe h<strong>and</strong>ling is negatively affected in any other form
Area for Notices
Epilogue<br />
© 2012 <strong>Hofer</strong> GmbH & Co KG. All rights reserved.<br />
Operation Manuals, H<strong>and</strong>books, H<strong>and</strong>outs <strong>and</strong> Software are proprietary. Copies, duplicates, translations or conversion of<br />
any form in a whole or only in parts are not allowed without a prior written approval by HOFER.<br />
Any further rights for the software are specified in the provided licence regulation.<br />
The HOFER logo is a registered trademark of the <strong>Hofer</strong> GmbH & Co KG in Austria <strong>and</strong> other countries.<br />
The rights at other br<strong>and</strong> <strong>and</strong> product names mentioned in this document lie with its owners <strong>and</strong> are recognized hereby.<br />
The mentioning of products which aren‘t from HOFER serves exclusively for information purposes <strong>and</strong> doesn‘t represent<br />
advertisement of any form. HOFER doesn‘t take on any liability with regard to the choice, performance or usability of<br />
the products.<br />
The methods specified in this document, modes of operation <strong>and</strong> the like were carefully checked. If faults or suggestions<br />
for improvement should st<strong>and</strong> out, however, despite this examination, then we ask you to inform us about these. The<br />
operation method represented here introduces merely a possible method for the indication to be treated. It remains<br />
to the decision of the respective surgeon to hold on to the described surgical technique or to vary it according to the<br />
requirements. Direct <strong>and</strong> indirect damages as well as consequential damages are therefore excluded in every case.<br />
Please do not hesitate to contact us for further information.<br />
20120511da_<strong>ESIN</strong>_<strong>Plug</strong>_Instrument_<strong>and</strong>_<strong>ESIN</strong>_Measurement_Gauge_Instruction_Manual-ge.indd<br />
Rev. May 2012<br />
<strong>Hofer</strong> GmbH & Co KG<br />
Fehringerstrasse 45<br />
A-8280 Fürstenfeld<br />
TEL: +43 (0)3382/53388<br />
FAX: +43 (0)3382/53093<br />
office@hofer-<strong>medical</strong>.com<br />
www.hofer-<strong>medical</strong>.com<br />
FN21826y<br />
UID ATU30764704