t h i c k - f i l m ceramic substrates design guide - CoorsTek
t h i c k - f i l m ceramic substrates design guide - CoorsTek
t h i c k - f i l m ceramic substrates design guide - CoorsTek
Create successful ePaper yourself
Turn your PDF publications into a flip-book with our unique Google optimized e-Paper software.
Quality Assurance<br />
<strong>CoorsTek</strong> is committed to providing the service and quality that customers have come to expect.<br />
<strong>CoorsTek</strong> is ISO-9001 and TS-16949 Certified to ensure product quality and traceability. Our quality<br />
system is built around OpX - Operational Excellence, a practice that embraces Six Sigma Quality and<br />
Lean Manufacturing techniques. Quality is achieved by utilizing our customer’s expectations to select<br />
target values and minimize variation around those values. Customer satisfaction is our goal.<br />
Acceptable Quality Level (AQL) Requirements<br />
<strong>CoorsTek</strong> typically applies Z1.4 sampling by attributes, general inspection Level II, for visual and<br />
dimensional inspections. Level S2 sampling is implemented in applications where limited inspection<br />
is needed such as destructive test.<br />
Inspection<br />
Requirement<br />
<strong>CoorsTek</strong> uses ANSI standards for our in process and final inspection. The following is a list of our<br />
typical requirements.<br />
For expert<br />
assistance with<br />
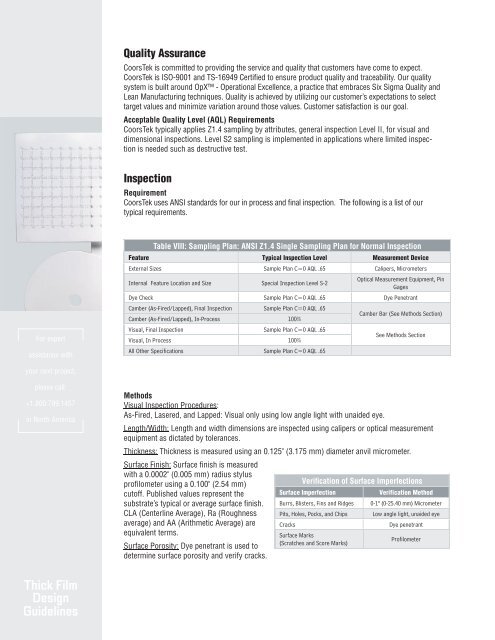
Table VIII: Sampling Plan: ANSI Z1.4 Single Sampling Plan for Normal Inspection<br />
Feature Typical Inspection Level Measurement Device<br />
External Sizes Sample Plan C=0 AQL .65 Calipers, Micrometers<br />
Internal Feature Location and Size Special Inspection Level S-2<br />
Optical Measurement Equipment, Pin<br />
Gages<br />
Dye Check Sample Plan C=0 AQL .65 Dye Penetrant<br />
Camber (As-Fired/Lapped), Final Inspection Sample Plan C=0 AQL .65<br />
Camber (As-Fired/Lapped), In-Process 100%<br />
Visual, Final Inspection Sample Plan C=0 AQL .65<br />
Visual, In Process 100%<br />
All Other Specifications Sample Plan C=0 AQL .65<br />
Camber Bar (See Methods Section)<br />
See Methods Section<br />
your next project,<br />
please call:<br />
+1.800.799.1457<br />
in North America<br />
Methods<br />
Visual Inspection Procedures:<br />
As-Fired, Lasered, and Lapped: Visual only using low angle light with unaided eye.<br />
Length/Width: Length and width dimensions are inspected using calipers or optical measurement<br />
equipment as dictated by tolerances.<br />
Thickness: Thickness is measured using an 0.125" (3.175 mm) diameter anvil micrometer.<br />
Surface Finish: Surface finish is measured<br />
with a 0.0002" (0.005 mm) radius stylus<br />
profi lometer using a 0.100" (2.54 mm)<br />
cutoff. Published values represent the<br />
substrate’s typical or average surface fi nish.<br />
CLA (Centerline Average), Ra (Roughness<br />
average) and AA (Arithmetic Average) are<br />
equivalent terms.<br />
Surface Porosity: Dye penetrant is used to<br />
determine surface porosity and verify cracks.<br />
Verifi cation of Surface Imperfections<br />
Surface Imperfection<br />
Verification Method<br />
Burrs, Blisters, Fins and Ridges 0-1" (0-25.40 mm) Micrometer<br />
Pits, Holes, Pocks, and Chips Low angle light, unaided eye<br />
Cracks<br />
Dye penetrant<br />
Surface Marks<br />
(Scratches and Score Marks)<br />
Profilometer<br />
Thick Film


