
Create successful ePaper yourself
Turn your PDF publications into a flip-book with our unique Google optimized e-Paper software.
SURGICAL TECHNIQUE<br />
<strong>ACU</strong>-<strong>LoCt</strong> TARGETED DISTAL RADIUS SYSTEM<br />
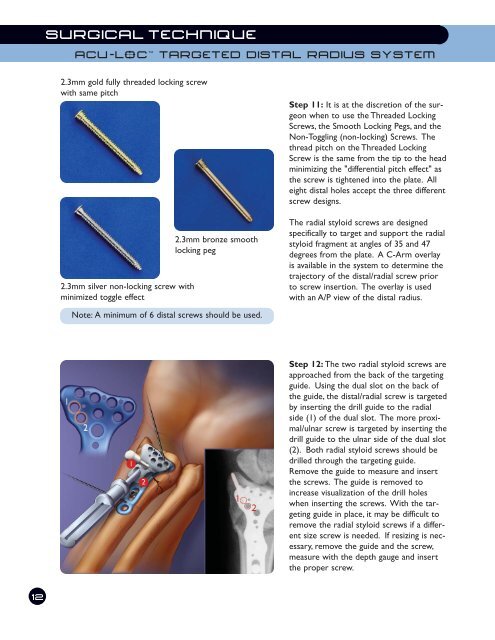
2.3mm gold fully threaded locking screw<br />
with same pitch<br />
2.3mm silver non-locking screw with<br />
minimized toggle effect<br />
2.3mm bronze smooth<br />
locking peg<br />
Step 11: It is at the discretion of the surgeon<br />
when to use the Threaded Locking<br />
Screws, the Smooth Locking Pegs, and the<br />
Non-Toggling (non-locking) Screws. The<br />
thread pitch on the Threaded Locking<br />
Screw is the same from the tip to the head<br />
minimizing the "differential pitch effect" as<br />
the screw is tightened into the plate. All<br />
eight distal holes accept the three different<br />
screw designs.<br />
The radial styloid screws are designed<br />
specifically to target and support the radial<br />
styloid fragment at angles of 35 and 47<br />
degrees from the plate. A C-Arm overlay<br />
is available in the system to determine the<br />
trajectory of the distal/radial screw prior<br />
to screw insertion. The overlay is used<br />
with an A/P view of the distal radius.<br />
Note: A minimum of 6 distal screws should be used.<br />
Step 12: The two radial styloid screws are<br />
approached from the back of the targeting<br />
guide. Using the dual slot on the back of<br />
the guide, the distal/radial screw is targeted<br />
by inserting the drill guide to the radial<br />
side (1) of the dual slot. The more proximal/ulnar<br />
screw is targeted by inserting the<br />
drill guide to the ulnar side of the dual slot<br />
(2). Both radial styloid screws should be<br />
drilled through the targeting guide.<br />
Remove the guide to measure and insert<br />
the screws. The guide is removed to<br />
increase visualization of the drill holes<br />
when inserting the screws. With the targeting<br />
guide in place, it may be difficult to<br />
remove the radial styloid screws if a different<br />
size screw is needed. If resizing is necessary,<br />
remove the guide and the screw,<br />
measure with the depth gauge and insert<br />
the proper screw.<br />
12