Owners Manual - Drive Medical
Owners Manual - Drive Medical
Owners Manual - Drive Medical

You also want an ePaper? Increase the reach of your titles
YUMPU automatically turns print PDFs into web optimized ePapers that Google loves.
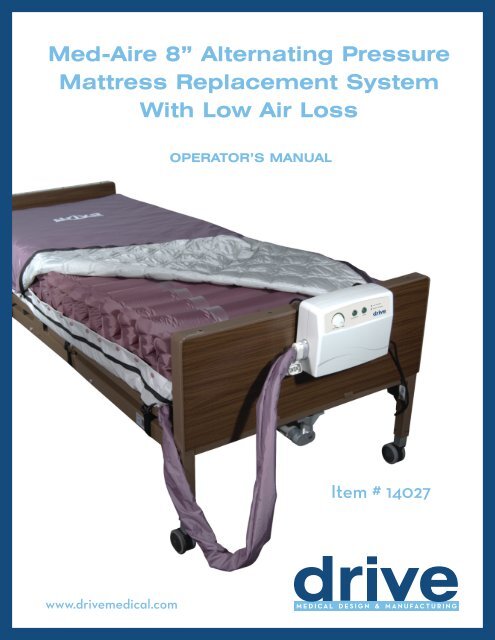
Med-Aire 8” Alternating Pressure<br />
Mattress Replacement System<br />
With Low Air Loss<br />
OPERATOR’S MANUAL<br />
Item # 14027<br />
www.drivemedical.com
TABLE OF CONTENTS<br />
IMPORTANT SAFEGUARDS............................................................................................................ 3<br />
STATEMENTS & SYMBOLS..............................................................................................................4<br />
INTRODUCTION..............................................................................................................................5<br />
PACKAGE CONTENT.......................................................................................................................6<br />
PRODUCT FUNCTIONS.................................................................................................................. 7<br />
Pump............................................................................................................................................... 7<br />
Mattress........................................................................................................................................... 7<br />
INSTALLATION.................................................................................................................................8<br />
GROUNDING INSTRUCTIONS........................................................................................................9<br />
OPERATION.....................................................................................................................................10<br />
General............................................................................................................................................ 10<br />
CPR function.................................................................................................................................... 12<br />
Pressure set up................................................................................................................................12<br />
Low pressure warning..................................................................................................................... 12<br />
CLEANING.......................................................................................................................................13<br />
HANDLING AND STORAGE............................................................................................................ 14<br />
MAINTENANCE............................................................................................................................... 14<br />
General............................................................................................................................................ 14<br />
Low pressure................................................................................................................................... 14<br />
TROUBLESHOOTING..................................................................................................................... 15<br />
SPECIFICATIONS............................................................................................................................ 16<br />
2
IMPORTANT SAFEGUARDS<br />
When using electrical products, especially when children are present, basic safety precautions should<br />
always be followed, including the following<br />
READ ALL INSTRUCTIONS BEFORE USING<br />
DANGER<br />
To reduce the risk of electrocution:<br />
• Always unplug this product immediately after use.<br />
• Do not use while bathing.<br />
• Do not place or store product where it can fall or be pulled into a tub or sink.<br />
• Do not place or drop into water or other liquids.<br />
• Do not reach for a product that has fallen into water. Unplug immediately.<br />
WARNING<br />
To reduce the risk of burns, electrocution, fire or injury to persons:<br />
• A product should never be left unattended when plugged in.<br />
• Close supervision is necessary when this product is used by, on, or near children or invalids.<br />
• Use this product only for it intended use as described in this manual.<br />
Do not use attachments not recommended by the manufacturer.<br />
• Never operate this product if it has a damaged cord or plug, if it is not working properly, if it has been<br />
dropped or damaged, or dropped into water. Return the product to a service center for examination<br />
and repair.<br />
• Keep the cord away from heated surfaces.<br />
• Never block the air openings of the product or place it on a soft surface, such as a bed or couch,<br />
where the air openings may be blocked. Keep the air openings free of lint, hair and the like.<br />
• Never drop or insert any object into any opening or hose.<br />
• Do not use outdoors or operate where aerosol (spray) products are being used.<br />
• Connect this product to a properly grounded outlet only. See Grounding Instructions.<br />
GROUNDING<br />
Before any connection is made, make certain that this product is connected to a protective earth<br />
conductor via the three-wire power cord; the three-blade plug should be inserted only into a socket<br />
outlet that provides a protective earth contact. Please refer to page 8 for more information.<br />
SAVE THESE INSTRUCTIONS<br />
3
STATEMENTS & SYMBOLS<br />
Note, caution, warning & danger statements<br />
NOTE<br />
Indicates some tips or some information users should be aware of.<br />
CAUTION<br />
Indicates correct operating or maintenance procedure in order to prevent damage to or destruction of<br />
the equipment or other property.<br />
WARNING/DANGER<br />
Calls attention to a potential danger that requires correct procedures or practices in order to prevent<br />
personal injury.<br />
Others<br />
Symbols on the printed label on the outside package box are as below:<br />
Grounding Terminal<br />
!<br />
Always read the operating instructions before use.<br />
4
INTRODUCTION<br />
This manual should be used for the initial set up of the system and for reference purposes.<br />
GENERAL<br />
The 14027 series is a high quality and affordable air support surface suitable for medium and high-risk<br />
pressure ulcer treatment. It has been specifically designed for prevention of bedsores and offers an<br />
affordable solution to 24-hour pressure area care.<br />
The 14027 series has been tested and certified for the following standards:<br />
UL 60601-1<br />
CAN/CSA C22.2 No. 601.1<br />
EN 60601-1<br />
EN 60601-1-2<br />
INTENDED USE<br />
The 14027 series is intended to reduce the incidence of pressure ulcers while optimizing patient comfort.<br />
It also provides the following:<br />
• Individual home care setting and long-term care<br />
• Pain management as prescribed by a physician.<br />
CONTRAINDICATION<br />
Patient conditions for which the application of pressure relieving therapy on an alternation system is<br />
contraindicated are as follows:<br />
• Cervical or skeletal traction<br />
• Unstable spinal cord injuries<br />
5
PACKAGE CONTENT<br />
Check inside the package. If any of the following items should be missing or damaged, please contact<br />
your local dealer or service center for replacement immediately.<br />
PUMP<br />
Make sure the type of pump is identical to which you purchased.<br />
Functionalities vary from model to model.<br />
MATTRESS<br />
Cell type: The mattress comes with a zippered base.<br />
The air cells are 8” in height.<br />
COVER SHEET<br />
Mattress cover is quilted and zippered so that it can be<br />
zippered to the base.<br />
MANUAL<br />
Always read this manual before using this product.<br />
6
PRODUCT FUNCTIONS<br />
PUMP<br />
The functions of the pump for the 14027 series are described below.<br />
Power Switch (1)<br />
The switch is at the right side of the pump.<br />
Turn ON/OFF the power, the pump will start/stop operation.<br />
Pressure-adjust Knob (2)<br />
Turn the soft/firm knob to set a comfortable pressure level.<br />
Normal Pressure Indicator (3)<br />
A visible indicator (green) tells the pressure has reached a preset or user-defined level.<br />
Low Pressure Indicator (4)<br />
A visible indicator (yellow or red) warns the pressure is below a preset or user-defined level.<br />
Alarm Reset (5)<br />
The audible/visible alarm turns on when the pressure is low.<br />
To mute the audible alarm, press the reset button. The visible alarm indicator will flash.<br />
Re-press the reset button to reactivate the alarm.<br />
Static/Alternating control (6)<br />
Press to set the air mattress either in static mode or alternating mode.<br />
5 6<br />
1. Power Switch<br />
2. Pressure-adjust Knob<br />
3. Normal Pressure Indicator<br />
4. Low Pressure Indicator<br />
5. Alarm Reset<br />
6. Static/Alternating Control<br />
2<br />
4<br />
3<br />
1<br />
Mattress<br />
The 14027 series comes with cell type mattress of different materials (Nylon/PVC or PU), provided<br />
optionally with the pump. Please refer to the Specifications section for details.<br />
7
INSTALLATION<br />
Step 1<br />
Place the mattress flatly on the bed frame.<br />
The inflation tube should be towards the foot end so that it can be connected to the inflation nozzles<br />
on the pump.<br />
Step 2<br />
You may place a thin cotton sheet over the quilted mattress top cover.<br />
Step 3<br />
Hang the pump over the frame or board at the foot end of the bed using the “hangers” on the back of<br />
the pump.<br />
Make sure the pump is secured.<br />
Step 4<br />
Connect the inflation tubes from the mattress to the pump’s inflating nozzles.<br />
Make sure they are properly attached.<br />
NOTE!<br />
Make sure the air hoses are not kinked or tucked under the mattress. Also check to ensure the CPR<br />
valve is properly attached.<br />
Step 5<br />
Plug the power cord into an electrical outlet with grounded AC power.<br />
This product should be grounded!<br />
The power cord has a grounding wire with a grounding pin.<br />
This three-wire plug must be plugged properly into an outlet and grounded as shown in the figure in<br />
the Grounding Instructions section.<br />
NOTE!<br />
Before inserting the plug into the outlet, make sure the voltage is compatible. Also make sure this<br />
product is well grounded.<br />
Step 6<br />
Turn on the power by pressing the power switch at the right side of the pump. Proceed to the Operation<br />
section.<br />
Step 7<br />
Make sure to disconnect the pump by unplugging the power cord when it is not in use.<br />
8
GROUNDING INSTRUCTIONS<br />
This product should be grounded. In the event of an electrical short circuit, grounding reduces the risk<br />
of electric shock by providing an escape wire for the electric current. This product is equipped with a<br />
cord that contains a grounding wire with a grounding plug.<br />
DANGER – Improper use of the grounding plug can result in a risk of electric shock.<br />
If repair or replacement of the cord or plug is necessary, do not connect the grounding to either flat blade<br />
terminal. The wire with insulation having an outer surface that is green with or without yellow stripe is the<br />
grounding wire. Before attempting any repair or replacement, contact your authorized <strong>Drive</strong> dealer.<br />
Check with a qualified electrician or serviceman if the grounding instructions are not completely<br />
understood, or if in doubt as to whether the product is properly grounded.<br />
This product has a grounding plug that looks like the plug illustrated in figure A below. A temporary<br />
adapter, which looks like the adapter illustrated in figure B and C, may be used to connect this plug to<br />
a 2-pole receptacle as shown in figure B if a properly grounded outlet is not available. The temporary<br />
adapter should be used only until properly grounded outlet (figure A) can be installed by a qualified<br />
electrician. The green colored rigid ear, lug, tab or the like extending from the adapter must be connected<br />
to a permanent ground such as properly grounded outlet box cover. Whenever the adapter is used, it<br />
must be held in place by the screw.<br />
If it is necessary to use an extension cord, use only a 3-wire extension cord that has a three-blade<br />
grounding plug and a 3-slot receptacle that will accept the plug on the product. Replace or repair if<br />
damaged.<br />
Grounded<br />
Outlet<br />
Adapter<br />
Grounded<br />
Outlet Box<br />
Grounding Pin<br />
9
OPERATION<br />
!<br />
Always read the operating instructions before use.<br />
GENERAL<br />
This product is designed to provide maximum comfort to patients. Make sure that you operate this<br />
product in a proper way to optimizing its value. Here we provide some general information you should<br />
be aware of.<br />
For products:<br />
DO NOT use another pump with different specifications unless instructed to do so by your authorized<br />
<strong>Drive</strong> dealer. It is dangerous to use a pump with pressure capacity greater than 120 mmHg. This may<br />
result in cell damage.<br />
DO NOT change any component by yourself. If there is need for replacement or repair, always contact<br />
your authorized <strong>Drive</strong> dealer.<br />
For patients:<br />
When the Normal Pressure indicator (green) comes on to indicate that the pressure has been adjusted<br />
to a desired level of firmness, the patient can then lie on the mattress.<br />
A firm surface will make it easier for the patient to transfer or reposition. Make use of the static mode<br />
function. To sit a patient up in bed, use the pressure knob. Increase the pressure so that the patient<br />
is properly supported.<br />
Hand check:<br />
Check if the pressure is properly adjusted by sliding one hand between the air mattress and the foam<br />
base (or bed frame if there is no foam base) to feel the patient’s buttock.<br />
Users should be able to feel the space in between, and the acceptable range is approximately 25 to<br />
40 mm (1” to 1-1/2”). This hand check procedure is issued by AHCPR.<br />
10
OPERATION<br />
!<br />
Always read the operating instructions before use.<br />
Please follow instructions below for detailed operating procedure of each type.<br />
Step 1<br />
Turn on the power. The indicator light on the power switch will come on.<br />
The pump starts to pump air into the mattress.<br />
The Low Pressure indicator (yellow or red) will come on as inflation undergoes.<br />
The audible alarm is activated, accompanying with the Low Pressure indicator, to alert that pressure is<br />
low. Press the Alarm Reset button to mute the audible alarm, and its indicator will flash.<br />
NOTE! For first inflation, we recommend that you press both the Alarm Reset and Static buttons to enter<br />
a quick and silent operation.<br />
Step 2<br />
When the pressure reaches the preset level by factory default within approximately 30~45 minutes, the<br />
Normal Pressure indicator will come on, and the Low Pressure indicator (and the audible/visible alarm)<br />
will turn off.<br />
NOTE! If the Low Pressure indicator (and the audible/visible alarm) won’t go off, please refer to page 15<br />
for troubleshooting.<br />
Step 3<br />
Turn the pressure-adjust knob to set a comfortable pressure level from soft to firm. (Pressure range:<br />
30~60 mmHg for Q2-02).<br />
NOTE! For suitable pressure, please refer to page 9 for the hand check procedure.<br />
Step 4<br />
The pump is preset in alternating mode and its cycle time is set at 10 min/60Hz or 12 min/50Hz.<br />
Press the Static button to set it in static mode, and the Static indicator will come on. The static mode will<br />
be started within approximately 6 minutes. Press the Static button again to switch back to alternating<br />
mode.<br />
NOTE! In static mode, the mattress provides a firm surface that makes it easier for the patient to transfer<br />
or reposition. The static mode prevents the patient from bottoming out when in a sitting position.<br />
Step 5<br />
During normal operation, the pump will monitor pressure changes. If the pressure is below a userdefined<br />
pressure level, the pump will automatically start to inflate the mattress. Accompanying with the<br />
Low Pressure indicator, the audible alarm will beep and its indicator will come on to bring attention to a<br />
low pressure condition. The pump will stop when the user-defined pressure level is reached.<br />
Press the Alarm Reset button to mute the alarm; its indicator will flash.<br />
Press the Alarm Reset button again to have the audible alarm and its indicator on.<br />
11
OPERATION<br />
!<br />
Always read the operating instructions before use.<br />
CPR FUNCTION<br />
When there is an emergency to perform CPR on the patient, pull the CPR strap at the head section of<br />
the mattress to release the air quickly from the mattress.<br />
The CPR strap is located at the front right-hand side of the mattress.<br />
PRESSURE SET UP<br />
Users can adjust the pressure level of the air mattress to a desired firmness by themselves or according<br />
to the suggestion from a health care professional.<br />
NOTE! It is recommended that the pressure-adjust knob turned to Firm or press Auto Firm on the panel<br />
when the mattress is first inflated. Users can then easily adjust the air mattress to a desired firmness<br />
according to the patient’s weight and comfort.<br />
LOW PRESSURE WARNING<br />
When abnormal pressure occurs, the Low Pressure indicator will come on. For Q2-02 and Q2-03, the<br />
audible alarm will be activated to bring attention to a low pressure condition.<br />
Check if the connections are secure and correctly installed according to the relevant instructions.<br />
NOTE! If the pressure is consistently low, check for any leakage (in tubes or connecting hoses). If<br />
necessary, contact your local dealer to replace any damaged tubes or hoses.<br />
12
CLEANING<br />
In this section, we describe the procedures to clean and decontaminate the pump. It is important to<br />
follow these procedures before using the system again.<br />
The cleaning task is required at least once a week to maintain personal hygiene.<br />
PUMP<br />
• DO NOT immerse or soak the pump.<br />
• Check for external damage and move the pump to the cleaning area.<br />
• Place the pump on a work surface and spray or wipe the outside of the case with quaternary ammonium<br />
solution.<br />
• DO NOT spray any cleaning solution directly on the surface of the pump.<br />
• DO NOT use a Hypocarbonate or Phenolic based cleaning solution as this may cause damage to<br />
the case. Allow the solution to incubate for 10 minutes or accordingly as stated by the cleaning<br />
product used.<br />
• Wipe case with a clean cloth. Make sure all areas are clean (top and bottom, both sides).<br />
• Spray cloth with cleaning solution and clean faceplate. DO NOT allow excess cleaning solution on<br />
faceplate or control panel. (If solution gets inside, damage will occur.) Allow surface to thoroughly<br />
dry after cleaning.<br />
• After the pump is thoroughly cleaned and dried, proceed to plug in the pump and test to see if it runs<br />
normally.<br />
• Unplug the pump and store with proper identification tag.<br />
• Avoid long exposure to sunlight.<br />
MATTRESS<br />
• Brush off or wipe down all surfaces of the cover sheet with soap and water before wetting with any<br />
liquid disinfectant.<br />
• Any obvious blood spots should be wet thoroughly with 1:9 Hypochiorite solution (1 part bleach to 9<br />
parts water) and allow drying for at least 10 minutes. Then blot with a clean, damp cloth.<br />
• Unzip the top cover from the mattress.<br />
• Brush or wipe down all surfaces with soap and water before applying any liquid.<br />
• Covers are immersed and soaked in disinfectant for the required incubation time.<br />
• After pre-soaking, the cover is rinsed through a regular cycle in a washer with no soap then laundered<br />
with mild detergent (wash temperature 93°F, rinse temperature 78°F or on the coldest setting).<br />
• Covers are aerated until they are fully dry. (Drying temperature range 90-120°F or on the coldest<br />
setting.)<br />
• The air cells are unsnapped from one side and are sprayed on all sides with a disinfectant.<br />
Let it sit for the required incubation time and wipe down with a clean cloth. (Make sure to disconnect<br />
all the air cells, one by one, and spray the disinfectant on all sides, including all the connecting tubes<br />
and hoses. Let it sit for least 10 minutes. )<br />
• If there is a base after you remove all the air cells, the base has to be sprayed down with the disinfectant,<br />
inside and outside. Let it sit for the required incubation time and wipe down with a cloth.<br />
• Repeat the process with the tubing set: spray, incubate, and then wipe clean.<br />
• The carrying bag should be turned inside out and completely wiped down using the disinfectant<br />
solution. Allow it to thoroughly air dry. Once the inside is dry, turn it back: wipe down the outside of<br />
the bag with disinfectant.<br />
• Dry the mattress on a SUNLESS area after cleaning.<br />
• Avoid long exposure to sunlight.<br />
13
HANDLING & STORAGE<br />
• Lay the mattress out flat and upside down.<br />
• Roll from the foot end towards the head end; the foot-end strap can then be stretched around the<br />
rolled mattress to prevent unrolling.<br />
• Do not fold, crease or stack the mattress.<br />
• Follow the national requirement to dispose of the mattress or pump.<br />
MAINTENANCE<br />
GENERAL<br />
• Check the power cord and plug to see if there are abrasions or excessive wear.<br />
• Check the mattress cover for signs of wear or damage. Ensure the mattress cover and tubes are<br />
connected together correctly.<br />
• Plug in the pump and check the airflow from the hose connection port. The airflow should alternate<br />
between ports every half-cycle time.<br />
• Check the air hoses to see if there are kinks or breaks. For replacement, please contact your local<br />
agent or dealer.<br />
• Make sure the mattress tube is well connected.<br />
• Check the pump and make sure both power and power indicator are off when the switch is turned<br />
off.<br />
LOW PRESSURE<br />
Examine if there is air leakage between the pump and the mattress connections or from the air mattress<br />
tubes:<br />
• Check connectors between the air mattress and pump. If there is any disconnection, please reconnect<br />
it.<br />
• Check the CPR Valves. Ensure their outlets are sealed.<br />
• Check the air-connecting tubes. Ensure each single cell is not broken.<br />
• Turn the pressure-adjust knob to Firm. Keep the tubes fully inflated and inspect for air leakage.<br />
• Check if there is any air leakage from cells. Ensure no leakage occurs. If any leakage occurs, please<br />
contact your local agent or dealer.<br />
14
TROUBLESHOOTING<br />
PROBLEMS<br />
The pump doesn’t work<br />
SOLUTIONS<br />
1. Check if the plug is inserted firmly into the outlet.<br />
2. Turn on the power switch again.<br />
• If the power indicator is ON and the pump still doesn’t<br />
work, contact your local dealer immediately.<br />
• If the power indicator is OFF, there may be a faultyoutlet.<br />
Try to connect the power cord to another outlet. If the<br />
power indicator is still OFF, contact a qualified<br />
electrician for main power check.<br />
Incomplete inflation<br />
(Low Pressure)<br />
1. For a quick check, adjust the pressure to Firm.<br />
2. Check to see if the tubes connected to the pump are<br />
twisted or there is any leakage occurring.<br />
• Always keep the tubes straight.<br />
• Change tubes if there is any leakage.<br />
• Ensure the CPR valves are closed. Ensure every<br />
single cell is not broken.<br />
Slow air flow<br />
A dirty filter may decrease the air flow. Replace the filter<br />
when dirty.<br />
• Check the air filter at the back of the pump at least<br />
once a month.<br />
15
SPECIFICATIONS<br />
SYSTEM<br />
ITEM<br />
Classification<br />
Applied Part<br />
Input Rating<br />
Fuse Rating<br />
Pressure Range<br />
Cycle Time<br />
Dimensions (Pump)<br />
Weight<br />
Environment Requirements<br />
Safety Standards<br />
SPECIFICATIONS<br />
Class I; IPX0; AP/APG NO; Type BF<br />
Mattress<br />
AC 120V 60Hz; 12W, 1A<br />
250V, T1A<br />
30 ~ 60 mmHg<br />
12 min/50Hz, 10 min/60Hz<br />
28.0 × 10.0 × 20.5 cm (11.0 x 3.9 x 8.1 in)<br />
2.6 kg (5.7 lbs)<br />
Temperature: Operation 50°F~95°F (10~35°C)<br />
Storage 5°F ~122°F (-15~50°C)<br />
Shipping 5°F ~158°F (-15~70°C)<br />
Humidity: Operation 20%~80% non-condensing<br />
Storage 10%~90% non-condensing<br />
UL, c-UL, CE<br />
* Due to the continual development of the above products, specifications are subject to change without<br />
prior notice.<br />
NOTE!<br />
The above specifications are also applicable to those areas operating with the same power supply<br />
range.<br />
AP/APG NO indicates the device is NOT suitable for use in the presence of flammable anesthetic mixture<br />
with air or flammable anesthetic mixture with oxygen or flammable anesthetic mixture nitrous oxide.<br />
The mattress can be used in the presence of oxygen administered by nasal cannula or face mask.<br />
Type BF symbol indicates the degree of protection against electric shock.<br />
Instructions or reference information for repair of equipment parts are provided by the manufacturer,<br />
please contact local dealer for further information.<br />
16
WARRANTY<br />
Your <strong>Drive</strong> brand product is warranted to be free of defects in materials and<br />
workmanship for 12 months of the original consumer purchaser.<br />
This device was built to exacting standards and carefully inspected prior to<br />
shipment. This 12 month Limited Warranty is an expression of our confidence in the<br />
materials and workmanship of our products and our assurance to the consumer of<br />
years of dependable service.<br />
In the event of a defect covered by this warranty, we will, at our option, repair or<br />
replace the device.<br />
This warranty does not cover device failure due to owner misuse or negligence, or<br />
normal wear and tear. The warranty does not extend to non-durable components,<br />
such as rubber accessories, casters, and grips, which are subject to normal wear<br />
and need periodic replacement.<br />
If you have a question about your <strong>Drive</strong> device or this warranty, please contact an<br />
authorized <strong>Drive</strong> dealer.<br />
© 2005 <strong>Medical</strong> Depot, Inc. All rights reserved.<br />
<strong>Drive</strong> is a trademark of <strong>Medical</strong> Depot, Inc.<br />
Port Washington N.Y. 11050 USA Made in Taiwan<br />
17
NOTES<br />
18
19<br />
NOTES
99 Seaview Boulevard<br />
Port Washington, NY 11050<br />
Phone: 516-998-4600<br />
Fax: 516-998-4601<br />
www.drivemedical.com