Using Microsoft PowerPoint Software on a SMART Board
Using Microsoft PowerPoint Software on a SMART Board
Using Microsoft PowerPoint Software on a SMART Board

You also want an ePaper? Increase the reach of your titles
YUMPU automatically turns print PDFs into web optimized ePapers that Google loves.
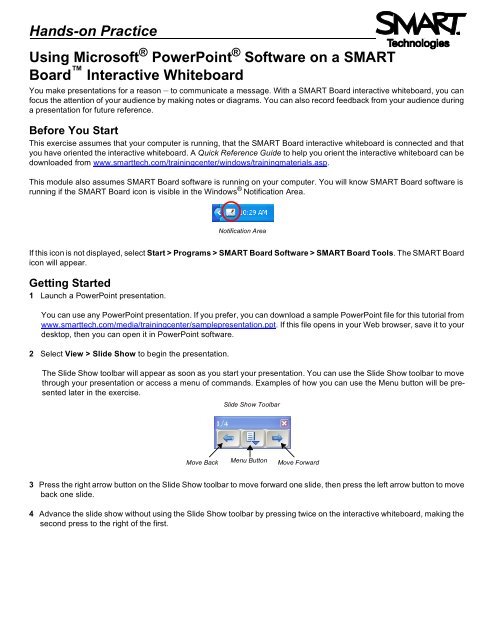
Hands-<strong>on</strong> Practice<br />
<str<strong>on</strong>g>Using</str<strong>on</strong>g> <str<strong>on</strong>g>Microsoft</str<strong>on</strong>g> ® <str<strong>on</strong>g>PowerPoint</str<strong>on</strong>g> ® <str<strong>on</strong>g>Software</str<strong>on</strong>g> <strong>on</strong> a <strong>SMART</strong><br />
<strong>Board</strong> Interactive Whiteboard<br />
You make presentati<strong>on</strong>s for a reas<strong>on</strong> – to communicate a message. With a <strong>SMART</strong> <strong>Board</strong> interactive whiteboard, you can<br />
focus the attenti<strong>on</strong> of your audience by making notes or diagrams. You can also record feedback from your audience during<br />
a presentati<strong>on</strong> for future reference.<br />
Before You Start<br />
This exercise assumes that your computer is running, that the <strong>SMART</strong> <strong>Board</strong> interactive whiteboard is c<strong>on</strong>nected and that<br />
you have oriented the interactive whiteboard. A Quick Reference Guide to help you orient the interactive whiteboard can be<br />
downloaded from www.smarttech.com/trainingcenter/windows/trainingmaterials.asp.<br />
This module also assumes <strong>SMART</strong> <strong>Board</strong> software is running <strong>on</strong> your computer. You will know <strong>SMART</strong> <strong>Board</strong> software is<br />
running if the <strong>SMART</strong> <strong>Board</strong> ic<strong>on</strong> is visible in the Windows ® Notificati<strong>on</strong> Area.<br />
Notificati<strong>on</strong> Area<br />
If this ic<strong>on</strong> is not displayed, select Start > Programs > <strong>SMART</strong> <strong>Board</strong> <str<strong>on</strong>g>Software</str<strong>on</strong>g> > <strong>SMART</strong> <strong>Board</strong> Tools. The <strong>SMART</strong> <strong>Board</strong><br />
ic<strong>on</strong> will appear.<br />
Getting Started<br />
1 Launch a <str<strong>on</strong>g>PowerPoint</str<strong>on</strong>g> presentati<strong>on</strong>.<br />
You can use any <str<strong>on</strong>g>PowerPoint</str<strong>on</strong>g> presentati<strong>on</strong>. If you prefer, you can download a sample <str<strong>on</strong>g>PowerPoint</str<strong>on</strong>g> file for this tutorial from<br />
www.smarttech.com/media/trainingcenter/samplepresentati<strong>on</strong>.ppt. If this file opens in your Web browser, save it to your<br />
desktop, then you can open it in <str<strong>on</strong>g>PowerPoint</str<strong>on</strong>g> software.<br />
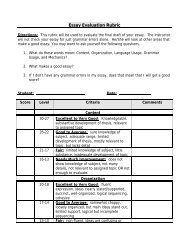
2 Select View > Slide Show to begin the presentati<strong>on</strong>.<br />
The Slide Show toolbar will appear as so<strong>on</strong> as you start your presentati<strong>on</strong>. You can use the Slide Show toolbar to move<br />
through your presentati<strong>on</strong> or access a menu of commands. Examples of how you can use the Menu butt<strong>on</strong> will be presented<br />
later in the exercise.<br />
Slide Show Toolbar<br />
Move Back<br />
Menu Butt<strong>on</strong><br />
Move Forward<br />
3 Press the right arrow butt<strong>on</strong> <strong>on</strong> the Slide Show toolbar to move forward <strong>on</strong>e slide, then press the left arrow butt<strong>on</strong> to move<br />
back <strong>on</strong>e slide.<br />
4 Advance the slide show without using the Slide Show toolbar by pressing twice <strong>on</strong> the interactive whiteboard, making the<br />
sec<strong>on</strong>d press to the right of the first.
Hands-<strong>on</strong> Practice<br />
5 Pick up a pen from the pen tray and circle something you would like to emphasize.<br />
6 Return the pen to the pen tray.<br />
7 Touch the interactive whiteboard <strong>on</strong>ce with your finger to clear your notes before c<strong>on</strong>tinuing with the presentati<strong>on</strong>.<br />
8 Move forward to the next slide in your presentati<strong>on</strong> using the Slide Show toolbar.<br />
If members of your audience ask for some of your source material, you can record the request as a note to remind<br />
yourself to get back to them later.<br />
9 Pick up a pen and write send source material.<br />
10 Return the pen to the pen tray.<br />
You d<strong>on</strong>’t want to permanently change your presentati<strong>on</strong> when saving this note, but you want to remember the acti<strong>on</strong><br />
item. This is a good reas<strong>on</strong> to use the Menu butt<strong>on</strong>.<br />
11 Press the Menu butt<strong>on</strong> <strong>on</strong> the Slide Show toolbar.
Hands-<strong>on</strong> Practice<br />
12 Select Capture to Notebook from the menu.<br />
Notebook software will open automatically and your note will be inserted <strong>on</strong> a new page in the Notebook file.<br />
13 Now that the reminder has been captured to Notebook software, press <strong>on</strong>ce <strong>on</strong> the interactive whiteboard to erase the<br />
it from your <str<strong>on</strong>g>PowerPoint</str<strong>on</strong>g> presentati<strong>on</strong>.<br />
There are times when you will want to make a note and save it as a permanent part of your <str<strong>on</strong>g>PowerPoint</str<strong>on</strong>g> presentati<strong>on</strong>.<br />
14 Pick up a pen and write a note <strong>on</strong> the current slide. If you are using the sample <str<strong>on</strong>g>PowerPoint</str<strong>on</strong>g> presentati<strong>on</strong> you could write<br />
make eye c<strong>on</strong>tact.<br />
You can c<strong>on</strong>tinue moving through your presentati<strong>on</strong> using the Slide Show toolbar. If you accidentally erase or remove<br />
your notes you can restore them. Simply press the Menu butt<strong>on</strong> <strong>on</strong> the Slide Show toolbar and select Restore Drawing<br />
or press the Click here to restore to writing ic<strong>on</strong> that appears in the bottom right corner of the screen.<br />
When you finish your presentati<strong>on</strong> you will be asked Would you like to add your drawing to the <str<strong>on</strong>g>PowerPoint</str<strong>on</strong>g><br />
presentati<strong>on</strong>?<br />
15 Press the Menu butt<strong>on</strong> <strong>on</strong> the Slide Show toolbar and select End Show from the drop-down menu. Press Yes when<br />
you are prompted to add your drawing.
Hands-<strong>on</strong> Practice<br />
16 Select File > Close and press Yes when asked if you would like to save the changes you have made to your<br />
file. This will save your notes to the <str<strong>on</strong>g>PowerPoint</str<strong>on</strong>g> file so they are ready for the next time you present.<br />
17 Press the Notebook taskbar butt<strong>on</strong> to view the Notebook file that was created earlier.<br />
18 Select File > Save.<br />
19 Follow the directi<strong>on</strong>s to specify a file name and locati<strong>on</strong>.<br />
C<strong>on</strong>gratulati<strong>on</strong>s!<br />
You’ve finished the <str<strong>on</strong>g>Using</str<strong>on</strong>g> <str<strong>on</strong>g>Microsoft</str<strong>on</strong>g> <str<strong>on</strong>g>PowerPoint</str<strong>on</strong>g> <strong>on</strong> a <strong>SMART</strong> <strong>Board</strong> Interactive Whiteboard Hands-<strong>on</strong> Practice.<br />
® 2005 <strong>SMART</strong> Technologies Inc. All rights reserved. <strong>SMART</strong> <strong>Board</strong>, the <strong>SMART</strong> logo and Notebook are trademarks of <strong>SMART</strong> Technologies Inc. <str<strong>on</strong>g>Microsoft</str<strong>on</strong>g> and <str<strong>on</strong>g>PowerPoint</str<strong>on</strong>g> are<br />
registered trademarks of <str<strong>on</strong>g>Microsoft</str<strong>on</strong>g> Corporati<strong>on</strong> in the United States and/or other countries. Printed in Canada 09/2005.
![Three Little Pigs [v6.0].cwk](https://img.yumpu.com/50082322/1/190x245/three-little-pigs-v60cwk.jpg?quality=85)