M558/658 M558/658 - Tikka
M558/658 M558/658 - Tikka
M558/658 M558/658 - Tikka

Create successful ePaper yourself
Turn your PDF publications into a flip-book with our unique Google optimized e-Paper software.
Fäll ner slutstyckshandtaget, gör en repetering<br />
och kontrollera att slutstycksspärren<br />
fungerar (Dvs. slutstycket stannar i<br />
sitt bakersta läge).<br />
- Vid montering av ev. kikarsikte använd<br />
originalfästen som passar direkt i de<br />
frästa spåren i lådan. Detta underlättar<br />
monteringen och eliminerar skador på<br />
kikarsiktet pga. felaktiga fästen eller<br />
felaktig montering. OBS! Kikarsikte<br />
monterat med originalfästen kan tas av<br />
och sättas tillbaka utan att träffläget<br />
ändrar sig.<br />
LADDNING AV VAPNET<br />
- Lyft slutstyckshandtaget och drag slutstycket<br />
bakåt. För in en patron i patronläget.<br />
Stäng slutstycket och säkra vapnet.<br />
För in magasinet och se till att det snäpper<br />
fast. Signalstiftet under tändstiftsmuttern<br />
visar att mekanismen är spänd.<br />
GENERAL INFORMATION<br />
When designing this new model of <strong>Tikka</strong> rifle<br />
special consideration has been given to the<br />
use of modern manufacturing methods and materials.<br />
The movement of the bolt is very<br />
smooth thanks to a separate guide bushing<br />
(TIKKA-Bushing) strengthened with glassfiber.<br />
All <strong>Tikka</strong> rifles have clip magazine and free<br />
floating barrel. Set triggers are available<br />
as an option on all models.<br />
MAINTENANCE BEFORE USE<br />
- Clean the oil from of the barrel by inserting<br />
a dry patch into the breech end of<br />
the barrel.<br />
- Clean extra oil from the bolt and breech<br />
area in the action.<br />
- Check that the recessed bolt space and<br />
locking lugs (marked A) are clean. Make<br />
sure however that all areas (A - C) are<br />
lightly lubricated.<br />
- Check that the sights are clean and free<br />
of debris.<br />
- Check the tightness of fastening screws 1<br />
and 2 (Fig. 1).<br />
- Check the fit between the stock and free<br />
floating barrel. A slip of paper roughly<br />
0.5 mm thick should move easily between<br />
barrel and stock over the whole length of<br />
the barrel.<br />
- Insert the bolt into receiver. When inserting<br />
the bolt it is advisable to have the<br />
guide bushing (H) in the rearmost position<br />
on the bolt body.<br />
- The bolt is released from the rifle by pulling<br />
the bolt backwards and simultaneously<br />
pressing the bolt release button. In doing<br />
this the bolt guide bushing (H) is also released<br />
which stops against the locking lugs.<br />
After performing the above check points, your<br />
rifle is now ready for test-firing. However,<br />
if a telescopic sight is to be used, attach<br />
mounts and scope prior to test-firing.<br />
OPERATION<br />
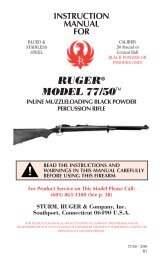
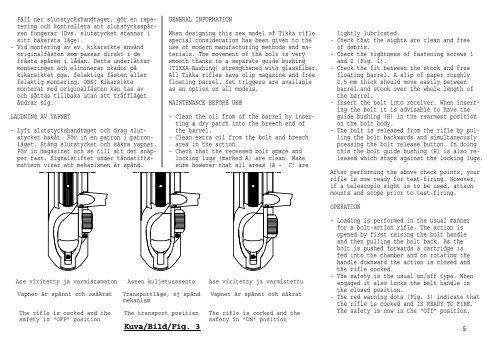
Ase viritetty ja varmistamaton Aseen kuljetusasento Ase viritetty ja varmistettu<br />
Vapnet är spännt och osäkrat Transportläge, ej spänd Vapnet är spännt och säkrat<br />
mekanism<br />
The rifle is cocked and the The transport position The rifle is cocked and the<br />
safety in "OFF" position safety in "ON" position<br />
Kuva/Bild/Fig. 3<br />
- Loading is performed in the usual manner<br />
for a bolt-action rifle. The action is<br />
opened by first raising the bolt handle<br />
and then pulling the bolt back. As the<br />
bolt is pushed forwards a cartridge is<br />
fed into the chamber and on rotating the<br />
handle downward the action is closed and<br />
the rifle cocked.<br />
- The safety is the usual on/off type. When<br />
engaged it also locks the bolt handle in<br />
the closed position.<br />
- The red warning dots (Fig. 3) indicate that<br />
the rifle is cocked and IS READY TO FIRE.<br />
The safety is now in the "Off" position.<br />
5