Ruger Model 77/50
Ruger Model 77/50
Ruger Model 77/50

You also want an ePaper? Increase the reach of your titles
YUMPU automatically turns print PDFs into web optimized ePapers that Google loves.
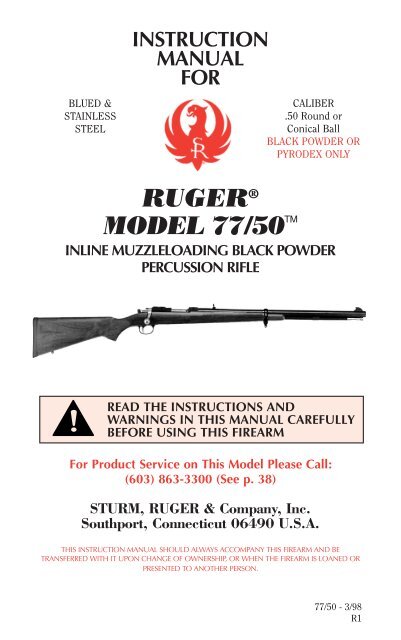
BLUED &STAINLESSSTEELINSTRUCTIONMANUALFORCALIBER.<strong>50</strong> Round orConical BallBLACK POWDER ORPYRODEX ONLYRUGER ®MODEL <strong>77</strong>/<strong>50</strong> TMINLINE MUZZLELOADING BLACK POWDERPERCUSSION RIFLE!READ THE INSTRUCTIONS ANDWARNINGS IN THIS MANUAL CAREFULLYBEFORE USING THIS FIREARMFor Product Service on This <strong>Model</strong> Please Call:(603) 863-3300 (See p. 38)STURM, RUGER & Company, Inc.Southport, Connecticut 06490 U.S.A.THIS INSTRUCTION MANUAL SHOULD ALWAYS ACCOMPANY THIS FIREARM AND BETRANSFERRED WITH IT UPON CHANGE OF OWNERSHIP, OR WHEN THE FIREARM IS LOANED ORPRESENTED TO ANOTHER PERSON.<strong>77</strong>/<strong>50</strong> - 3/98R1
FIREARMS SAFETY-YOUR RESPONSIBILITYSAFETY MUST BE THE FIRST AND CONSTANTCONSIDERATION OF EVERY PERSON WHOHANDLES FIREARMS AND AMMUNITION.This Instruction Manual is designed to assist you in learning how to use andcare for your RUGER ® MODEL <strong>77</strong>/<strong>50</strong> TM muzzleloading rifle properly.Only when you are certain you fully understand the Manual and can properlycarry out its instructions should you practice loading, etc. with liveammunition.If you have any doubts about your ability to handle or use a particular typeof gun safely, then you should seek supervised instruction.Such personalized instruction is often available from gun dealers, gun clubsor police departments. If none of these sources can help you, write to theNational Rifle Association, 112<strong>50</strong> Waples Mill Road, Fairfax, VA 22030-7400.They will assist you.The person with a gun in their possession has a full-time job. You cannotguess; you cannot forget. You must know how to use your firearm safely. Donot use any firearm without having a complete understanding of itsparticular characteristics and safe use.Remember: There is no such thing as a foolproof gun.TABLE OF CONTENTSPageGeneral Information . . . . . . . . . . . . . . . . . . . . . . . . . . . . . . . . . . . . . . . . . . 3Operation of Safety . . . . . . . . . . . . . . . . . . . . . . . . . . . . . . . . . . . . . . . . . . . .6Ammunition . . . . . . . . . . . . . . . . . . . . . . . . . . . . . . . . . . . . . . . . . . . . . . . . 7Eye and Ear Protection . . . . . . . . . . . . . . . . . . . . . . . . . . . . . . . . . . . . . . . .11To Load and Fire . . . . . . . . . . . . . . . . . . . . . . . . . . . . . . . . . . . . . . . . . . . . 11To Unload . . . . . . . . . . . . . . . . . . . . . . . . . . . . . . . . . . . . . . . . . . . . . . . . . 20Basic Disassembly and Reassembly . . . . . . . . . . . . . . . . . . . . . . . . . . . . . . 22Care and Cleaning . . . . . . . . . . . . . . . . . . . . . . . . . . . . . . . . . . . . . . . . . . . 27Regarding Accuracy . . . . . . . . . . . . . . . . . . . . . . . . . . . . . . . . . . . . . . . . . .34To Clear a Malfunction (“Jam”) . . . . . . . . . . . . . . . . . . . . . . . . . . . . . . . . . 35Maintenance of Stainless Steel Components . . . . . . . . . . . . . . . . . . . . . . . 36Attaching Scope Rings . . . . . . . . . . . . . . . . . . . . . . . . . . . . . . . . . . . . . . . . 36Sight Adjustment . . . . . . . . . . . . . . . . . . . . . . . . . . . . . . . . . . . . . . . . . . . . 37Service and Parts Policy . . . . . . . . . . . . . . . . . . . . . . . . . . . . . . . . . . . . . . 38Parts Drawing . . . . . . . . . . . . . . . . . . . . . . . . . . . . . . . . . . . . . . . . . . . . . . 42The Basic Rules of Safe Firearms Handling . . . . . . . . . . . . . . . . . . . . . . . 43Warranty Information . . . . . . . . . . . . . . . . . . . . . . . . . . . . . . . . . . . . . . . . 48“<strong>Ruger</strong> ® ” is a registered U.S. trademark.“<strong>77</strong>/<strong>50</strong> TM ” is a trademark of Sturm, <strong>Ruger</strong> & Co., Inc.2
!WARNINGS OF GREAT IMPORTANCE AREFOUND ON THE FOLLOWING PAGES:Alterations 3 Firing 17Manual Safety 7 Reloading 18Lead Exposure 7 Mishandling 19Ammunition 8 Disassembly 22Black Powder 9 Lubrication 29Percussion Caps 11 Storage 30Loading 13 Malfunctions 35Handling 17 Parts Purchasers 39OTHER CAUTIONS AND WARNINGS APPEARTHROUGHOUT THE MANUAL.FIREARMS ARE DANGEROUS WEAPONS –MUZZLELOADING BLACK POWDER FIREARMSREQUIRE SPECIAL PRECAUTIONS.READ THE INSTRUCTIONS AND WARNINGS IN THISMANUAL THOROUGHLY AND CAREFULLY BEFORE USING.!WARNING–ALTERATIONSThis product was designed tofunction properly in its originalcondition. Alterations can make itunsafe. Do not alter any part or addor substitute parts or accessoriesnot made by Sturm, <strong>Ruger</strong> & Co. Inc.DO NOT ALTER ANY GUNGENERAL INFORMATIONAND MECHANICAL CHARACTERISTICSThe rifle you have chosen, the RUGER ® MODEL <strong>77</strong>/<strong>50</strong> muzzleloadingrifle, is an original <strong>Ruger</strong> design. It is manufactured to our regular standards ofstrength and reliability entirely in modern <strong>Ruger</strong> factories in the U.S.A. Highquality steels and coil springs are used throughout, the same as in our centerfirerifles. It is a bolt-action, single shot, muzzleloading black powder rifle of moderndesign. It gives the black powder shooter many of the convenience and safetyfeatures of modern <strong>Ruger</strong> centerfire rifles, combined with traditionalmuzzleloading rifle characteristics. It is particularly useful for black powderhunting and target shooting.3
The RUGER ® MODEL <strong>77</strong>/<strong>50</strong> is a muzzleloading, percussion rifle intendedfor use with black powder, percussion caps, soft lead and jacketed “saboted”projectiles. It has a precision rifled barrel with a 1-in-28” rifling twist. It does notfire conventional cartridges, but is instead loaded from the muzzle of the barrel.It is of bolt-action operation, and must be cocked and capped by opening thebolt, placing a cap on the nipple, and then closing the bolt before normally firingthe rifle by pulling the trigger.Like any such rifle, it is to be USED WITH BLACK POWDER OR PYRODEXONLY, and its safe use requires that the shooter be thoroughly familiar with thespecial characteristics of these firearms.Other notable features of the RUGER ® MODEL <strong>77</strong>/<strong>50</strong> rifle include: Athree-position safety; in-line bolt action ignition; a fast lock-time triggermechanism (non-adjustable); a flush positioned bolt stop (bolt release); ahardwood stock with a rubber recoil pad; and studs to which sling swivels can beattached.The receiver of the RUGER ® MODEL <strong>77</strong>/<strong>50</strong> rifle incorporates integralscope mount bases (see illustration next page). It also comes with open sights – agold bead front sight and a folding leaf rear sight which is adjustable forelevation and windage.Disassembly of the rifle to its major components is readily accomplished byremoval of two screws and the barrel band. The bolt assembly can be quicklydisassembled for cleaning.All mechanical components are made of heat-treated chrome-molybdenum orstainless steel, with music wire coil springs throughout the mechanism.The mechanism of the RUGER ® MODEL <strong>77</strong>/<strong>50</strong> provides for securityagainst accidental discharge when properly handled. As with any other firearm,however, it must be used with strict attention to correct safety practices, some ofwhich are unique to muzzleloading firearms. In addition, the rifle should beinspected frequently to assure that it is working properly.The RUGER ® MODEL <strong>77</strong>/<strong>50</strong> Officer’s <strong>Model</strong> has the samemechanism and operation as the standard <strong>Model</strong> <strong>77</strong>/<strong>50</strong>, but is furnished with aspecial straight-gripped walnut stock with cut-checkered grip and forend and acurved butt plate reminiscent of the “Officer’s <strong>Model</strong>” Springfield rifles privatelypurchased by Calvary officers over a century ago.The RUGER ® MODEL <strong>77</strong>/<strong>50</strong> is also available in stainless steel constructionwith a laminated stock, for increased corrosion resistance and protection fromthe elements.4
NOMENCLATURERecoil PadBarrelMuzzleStockBarrel BandFront SightRear SlingSwivelFront SlingSwivelRamrodThimbleRamrodRamrod TipSafety(Shown “ON”)Scope Mount BasesNippleRear SightBolt HandleBoltReceiverBolt SleeveStriker/Cocking PieceDisassembly HoleTrigger GuardTriggerBolt StopFigure 1. Components frequently referred to are identified. In these photographs the cocking piece isshown cocked (protruding from the rear of the bolt sleeve) revealing the disassembly hole in the lowerportion of the cocked piece. The bolt stop (on the left side of the receiver) permits the bolt to bewithdrawn simply by pressing down lightly with the thumbnail. The safety selector (show in the “Safe”position) should be in the “Load-Unload” position when the bolt is being removed or being installed.5
OPERATION OF SAFETYThe RUGER ® MODEL <strong>77</strong>/<strong>50</strong> rifle has a three position safety. The safetyselector is located at the right of the bolt sleeve.The safety selector can be moved from the “Fire” position to its two otherpositions (“Load-Unload” and “Safe”) only when the striker is cocked. Fullyraising the bolt handle cocks the striker.The bolt handle can be raised and lowered only when the safety selector is ineither the full forward “Fire” or the middle “Load-Unload” position. When thesafety selector is in the full rearward “Safe” position, the bolt handle is locked inthe closed (fully down) position in order to prevent inadvertent lifting of the bolthandle and to ensure that the rifle will be ready to fire when the safety is taken“off”.Practice (with an unloaded rifle) moving the safety selector to the three positionsuntil you know the position of the safety selector for the three modes– “Fire,”“Load-Unload,” and “Safe.” WARNING: When manipulating the safety selector,DO NOT HAVE ANY FINGER INSIDE THE TRIGGER GUARD! When the safetyselector is in the “Fire” position and the trigger is pulled, the rifle will fire.The safety selector should always be in the “Safe” position except when the gunuser is actually firing or unloading the rifle. The safety selector shouldunfailingly be moved to the “Safe” position whenever the gun user ceases firing.SAFETY POSITIONSFigure 2. Safety selector in“FIRE” (full forward) position.The safety selector should bemoved to this position only whenthe gun user is actually firingthe rifle. When the safety is inthe fire position, it is referred toas being “off.” (When the safetyis in the “SAFE” position, shownin Figure 4, it is referred to asbeing “on.”)Figure 3. Safety selector in“LOAD-UNLOAD” (middle)position. The safety selector shouldbe in this position when the bolt isbeing cycled, to place a percussioncap on the nipple, to remove apercussion cap from the nipple, orwhen unloading the rifle. As soonas the bolt is closed, the safetyselector should be moved fullyrearward to the “SAFE” positionshown in Figure 4, unless the rifleis to be fired immediately.Figure 4. Safety selector in“SAFE” (full rearward) position.The safety selector is fully nestedin the groove in the cocking piece.When the safety selector is in thisposition, the bolt handle cannotbe raised. The curved arrow on thebolt sleeve indicates the directionand motion of the safety selectorto bring it to the “SAFE” position.Keep the safety in this positionexcept when actually loading,capping, unloading, or firing.6
! WARNING –MANUAL SAFETY31 SAFEFIRE2LOAD-UNLOADKeep the safety on unless actually firing. Alwaysmove the safety fully to its intended position andcheck it. The safety has three positions –“SAFE,”“LOAD-UNLOAD,” and “FIRE.” Never depend on asafety mechanism or any other mechanical deviceto justify careless handling or permitting the rifleto point in an unsafe direction. The only “safe”rifle is one in which the bolt is open, the barrel isempty of both powder and projectile, and thenipple is uncapped.KNOW HOW TO USE THE SAFETYThe safety selector is held in each of its positions by a plunger that is underspring tension. Therefore, the gun user should frequently check the position ofthe safety selector to be certain it has not been inadvertently moved. If the safetydoes not function properly, or if the selector seems to move too easily, or if thesafety selector does not seem firmly positioned in any of its three positions, therifle should be discontinued from use and returned to the Newport ProductService Department for repair (See p. 38).! WARNING – LEAD EXPOSUREDischarging firearms in poorly ventilatedareas, cleaning firearms, or handlingammunition may result in exposure tolead and other substances known to thestate of California to cause birth defects,reproductive harm, and other seriousphysical injury. Have adequate ventilationat all times. Wash hands thoroughly afterexposure.SHOOTING OR CLEANING GUNSMAY EXPOSE YOU TO LEADAMMUNITIONBLACK POWDER OR PYRODEX ONLYThe RUGER ® MODEL <strong>77</strong>/<strong>50</strong> is a single shot muzzleloading percussionrifle intended solely for use with Black Powder or Pyrodex. It should never, underany circumstances, be loaded with any type of smokeless powder as the resultcould be damage to the rifle and injury to the shooter or bystanders. Be awarethat certain smokeless powders may appear black in color even though they arenot Black Powder! Never use any powder that you are not certain is actuallyBlack Powder. The best way to do this is to only use powder from clearly markedoriginal cans of Black Powder or Pyrodex.7
Black Powder is usually classified by powder grain size, with “Fg” being thelargest granulation and “FFFFg” being the smallest granulation normallyavailable. Use only “FFg” (sometimes called “2F”) grain size black powder in theRUGER ® MODEL <strong>77</strong>/<strong>50</strong> rifle. Replica Black Powder such as Pyrodex RSmay be used, so long as suggested loading data is strictly adhered to. Note thatPyrodex RS is less dense than FFg black powder and must only be used as ameasure-for-measure substitute for FFg black powder. If you substitute PyrodexRS for FFg black powder on a weight-for-weight basis, you will overcharge yourrifle and risk serious injury.POWDER CHARGESince Black Powder is sold in bulk, you are in complete control over how youload your rifle. Be sure to weigh each charge, or use a dipper which holds theexact weight of powder you wish to load. Check to be sure the dipper holds thecorrect amount of powder by weighing a dipper-full of powder before you beginloading your rifle from the dipper. Never load powder into the barrel directlyfrom a flask or other powder container -- you run the serious risk of explosionand severe personal injury.A good starting accuracy load, using a pure lead .<strong>50</strong>” diameter ball or conicalprojectile, is 40 grains of FFg black powder. You may find that adjustment of thischarge upward or downward is more accurate in your rifle. A good startinghunting load for deer-sized game with the same projectile is 70 grains of FFgblack powder. Consulting a black powder loading manual for recommendedtarget or hunting loads is essential. Never exceed the maximum powder chargelisted for the specific projectile you are using! Never exceed a powder charge of120 grains of FFg black powder, regardless of the projectile you are using!!WARNING –AMMUNITIONNever Use Unknownor Smokless Powder?POWDER?Death, serious injury, and damagecan result from the use of wrongammunition, bore obstructions,powder overloads, or incorrectcomponents. Always wearshooting glasses and hearingprotectors.Never use smokeless powder inany muzzleloader! Never fire anunknown powder charge. If youare uncertain as to whichcomponents your rifle is loadedwith, do not fire it -- you mustunload your rifle and remove theunknown components.IMPROPER AMMUNITIONDESTROYS GUNS8
! WARNING–BLACK POWDERNever PourPowder DirectlyFrom Flask!Black Powder is an extremely sensitivepropellant and is readily ignited by heat,spark, static electricity, friction, pressure,impact, etc. Unlike smokeless powder,Black Powder will ignite with greatviolence and rapidity even whenunconfined.Black Powder should be handled only invery small quantities. Never pour powderdirectly from a flask or powder horn intoany muzzleloading firearm! Never smokewhile handling Black Powder!Many shooters pre-weigh single chargesinto small containers for use on therange or in the field. Never fire the riflenear an open powder container, or anexplosion may result.If you are not familiar with safe handlingprocedures for Black Powder and formuzzleloading firearms in general, youshould obtain one of the authoritativemuzzle loaders’ Manuals and study itcarefully before beginning to shoot.BLACK POWDER ISEXPLOSIVEPROJECTILESThe RUGER ® MODEL <strong>77</strong>/<strong>50</strong> is designed to use a .<strong>50</strong>0” diameter pure leadround ball or lubricated conical bullet of pure lead, a .490” round ball with alubricated .010 - .015” thick cloth patch, or a smaller diameter projectile encasedin a .<strong>50</strong>0” diameter sabot. Bullets of either type can be purchased from yourdealer, ready to use, or can easily be cast at home with a small investment inequipment. Information on bullet casting is available from the manufacturers ofmoulds and casting equipment and from various authoritative handbooks. Yourdealer should be able to provide you with any equipment which you may require.(See “Lead Exposure” Warning, p. 7)The <strong>Ruger</strong> <strong>Model</strong> <strong>77</strong>/<strong>50</strong>’s rifling twist (1 turn in 28”) is designed for best resultswith pre-lubricated soft lead conical projectiles, or jacketed or soft lead bulletsencased in “sabots” (See p. 10). Patched round balls generally do not deliver ashigh a level of accuracy with this rifling twist, but may be safely used if correctlyloaded (See p. 14).The use of non-saboted jacketed or alloy bullets is not recommended as accuracyis generally not as satisfactory as with the pure lead bullets. They may be difficultto load and may raise pressures to dangerous levels.Whatever projectile you select, you must remember that if it is not a tight fit inthe barrel when loaded, it could shift forward off the powder charge and act as abore obstruction, causing the barrel to bulge or burst when fired! It is your9
esponsibility to select the proper lead ball/patch combination of a lubricatedconical lead bullet that fits securely in the bore, yet is not excessively difficult toload, particularly after a shot or two of black powder fouling has built up in thebore.Never load multiple projectiles into the barrel. The rearmost projectile slamminginto the other projectiles when fired could cause a burst barrel and severepersonal injury. Use only one bullet at a time.SABOTSSome projectiles designed for muzzleloading rifles are considerably undersizedfrom the bore diameter and are encircled by a resilient synthetic or fibre “sabot”or “shoe”. An undersize sabot can easily release its projectile to become a boreobstruction, or the sabot itself can act as a bore obstruction. Never lubricate asabot -- this can cause the saboted bullet to slip forward up the bore and act asan obstruction when fired, possibly resulting in destruction of the rifle andsevere injury to the shooter or bystanders! If sabots are used, theirmanufacturer’s directions must be scrupulously followed.PATCHING.490” diameter round ball projectiles of soft lead must be fired with a lubricatedround linen cloth patch of .010 - .015” thickness (about that of a gun cleaningpatch) and about 1.5” diameter. However, many shooters prefer to use lubricatedsoft lead conical projectiles, and these often work best without a patch,particularly if they are hollow-based. Always follow the instructions regardingpatches that are furnished by the manufacturer of the projectile (or bullet moldif you cast your own bullets) that you chose. The best lubricants for patches arevegetable-based greases, synthetic lubricants specifically designed for this use.Petroleum-based lubricants often char the patches when fired and may leaveexcess residue in the bore -- don’t use them to lubricate patches for bullets.PERCUSSION CAPSA percussion cap is a small metal cup, the interior top of which is coated with apriming mixture. This priming mixture is usually covered with a foil or paperliner. It fires when struck a blow.The cap is placed on the nipple and when struck by the striker, the primingcompound explodes, igniting the powder charge.The cap should fit the nipple only tightly enough so that it does not fall off whenthe barrel is elevated with the bolt open. Do not attempt to use caps which aretoo tight or try to force or pound caps onto the nipples, as a prematuredischarge could result. Suggested cap size for the RUGER ® MODEL <strong>77</strong>/<strong>50</strong>rifle is No. 11 (U.S.) or equivalent.Since percussion caps have an open end (which is placed on the cylinder nipplewhen you are ready to fire), they are susceptible to contamination. Be carefulwhen handling percussion caps, especially with oily fingers, and try to keepwater, grease, dirt and other contaminants out of the open end of the caps.Failure to do so is the main cause of misfires in percussion muzzleloadingfirearms.10
! WARNING–PERCUSSION CAPSDON'TSTRIKECAP!Percussion caps are designedto fire as the result of a blow(“percussion”).A capped rifle loaded withpowder and ball is fullyloaded and will fire if the capis struck.Never clean, lubricate,disassemble, or work on arifle while it is capped orloaded. Never install, remove,or carry a capped nipple orbreech plug.Always remove thepercussion cap beforeunloading the barrel ordisassembling the rifle.NEVER STRIKE APERCUSSION CAPEYE AND EAR PROTECTIONSafety glasses must be used when loading and firing the RUGER ® MODEL<strong>77</strong>/<strong>50</strong>, or any percussion firearm. In percussion muzzleloaders, unlike cartridgefirearms, the thin percussion cap is the only seal against the hot gasses of mainpowder charge, which can escape out of the nipple with great force when therifle is fired. Small pieces of the percussion cap are frequently blown away to theside or rear when a percussion arm fires. Always wear hearing protection whenfiring any firearm, in order to avoid permanent hearing damage.TO LOAD AND FIREPractice this important aspect of gun handling (with an unloaded rifle) until youcan perform each of the steps – described below – with skill and confidence. Butbefore loading the rifle, please read completely through this manual, and becertain the muzzle is pointing in a safe direction. Do not load the rifle until youare ready to use it!(The following procedure assumes a new rifle with the bolt out.)11
INSERTING THE BOLT1. Be certain the barrel is empty by pointing the muzzle upward towards alight source and glancing through the rear of the action at the rear end ofthe nipple. You should see light through the hole in the nipple, indicatingthat the barrel is empty. Keep the muzzle pointed in a safe direction, andkeep your fingers off the trigger throughout the assembly and loadingprocess until you are actually ready to fire. (See Rule 2, p. 43).2. Position the safety selector in the “Load-Unload” position (see Figure 3,p. 6).3. Make certain the bolt is correctly assembled and ready to be inserted in thereceiver. If there is any doubt, see numbered paragraph 6, p. 33 (ToAssemble the Bolt) in the “Reassembly” section of this manual.4. Note that if the breech plug is not screwed all the way into the receiver, thebolt cannot be fully closed. Whenever you install the breech plug, be surethat you coat its threads with grease in order to be able to remove it forcleaning. (See p. 31).5. Depress the bolt-stop and insert the bolt into the receiver.LOADING!WARNING: Please re-read carefully the paragraph entitled“Warning - Black Powder”, p. 9.In the interests of both performance and safety, it is important that steps whichfollow be performed in sequence and with attention to detail:1. BEFORE LOADING:Lift the bolt handle and place the safety in the “load-unload” position. Removethe bolt by pressing down on the bolt stop and withdrawing the bolt to the rear.Look through the hole in the nipple with the barrel pointed toward a lightsource to make sure the barrel is empty of powder or ball. Reinsert the bolt.Check rifle to ensure that:A. Nipple is uncapped.B. Barrel is empty.C. Bore and nipples are free of grease, oil or other obstruction.2. CLEARING THE NIPPLES:Without loading the barrel, place a percussion cap on the nipple. Point therifle in a safe direction, a few inches from some grass, leaves, or snow. Movethe safety to the full forward “fire” position, and pull the trigger to fire thecap. You should see the grass, leaves, or snow move from the force of thepercussion cap. Repeat this process with a second cap. This is done to ensurethat the nipple passage is clear and dry.Open the bolt, place the safety in the “load-unload” position and remove thepercussion cap and cap fragments.12
Safety?! WARNING –LOADING?Know the bore diameter of your rifle you are loading andload projectiles of only correct diameter into it! Either atoo tight or too loose projectile can cause a burst barrel,resulting in serious injury to the shooter or bystanders.This rifle is designed to use a .<strong>50</strong>0” projectile (or a .490”projectile with a .010 - .015” thick patch), a #11percussion cap, and up to a maximum of 120 grains ofFFg black powder (or equivalent volume of Pyrodex RS)only. Never use smokeless powder of any kind.Before firing, be certain the percussion cap is seatedcompletely on the nipple. A rifle discharged by theclosing of the bolt on an incorrectly seated cap canresult in possible serious injury to the shooter and thosenearby.If a projectile does not fully seat readily, do not force it.Check to be certain that each projectile is the propercaliber and of correct dimensions. If you cannotdetermine why the projectile will not fit, carefullyremove the projectile, empty the rifle of all powder (seepp. 20 - 22) and write or call the factory.The wrong components or an excessive powder chargecan destroy your gun and result in serious injury to youor bystanders.BE SURE WHAT YOU LOADIS CORRECT3. CHARGING THE BARREL:A. Starting with the bolt open in itsfull rearward position, place safetyin the “load-unload” position. (SeeFig. 5) Do not touch the triggerwhile loading! Be sure that no capis on the nipple!MUZZLE UPNIPPLE UNCAPPEDACTION OPENB. With one hand, hold the riflesecurely with the barrel pointingstraight upwards and the recoilpad or butt plate on the ground.Keep your face and other bodyparts away from the muzzle!SAFETY IN"LOAD/UNLOAD"POSITION5LOADING POSITION13
C. Using a dipper or other single-chargemeasure, pour the desired amount ofpowder into the front opening (muzzle) ofthe barrel. (See Fig. 6) Never exceed thepowder charge recommended for theprojectile you have selected from areputable black powder loading manual. Donot pour powder directly from the flask orother powder container (See “BlackPowder Warning”, p. 9)BLACK POWDEROR PYRODEXONLY!LOADING POWDERD. Place the bullet in the muzzle of the charged barrel, with the flat spot(“sprue”) of the round ball or the point of a lubricated conical projectilefacing upward, out of the muzzle. (See Fig. 7) If you lubricate yourprojectile, be sure to use a lubricant designed specifically for blackpowder. Ordinary petroleum-based lubricants can cause fouling to buildup and make it difficult to fully seat the projectile on the powder charge,with the resulting danger of a burst barrel and injury to the shooter andbystanders.6CENTER BALLON PATCH7 8INSERTING CONICALPROJECTILEE. If you wish to use a patch on your round ball for tighter fit or improvedsealing of the ball in the barrel, place a 1 1/2” diameter patch lubricatedwith a commercial black powder gun grease centered over the muzzlebefore you place a ball into the muzzle. (See Fig. 8) Again, align the sprueof the bullet in the center of the bore facing upward, out of the muzzle.(See Fig. 9, p.15) Some shooters now push the ball slightly into themuzzle with a “short starter” rod of about 1” in length and then trimaway any excess patch material protruding from the muzzle, but this isoptional.14ORINSERTINGPATCHED BALL
F. Remove the ramrod from under the barrel by pulling it downward out ofits recess in the barrel and then forward (upward) out of the stock andramrod thimble. Grasp the ramrod around its side and, with a firm evenstroke, seat the bullet firmly on the powder charge. Do not push down onthe ramrod tip with the palm of your hand, in the event that the powdercharge ignites while you are loading! (See Fig. 10) For maximumaccuracy, the powder charge should be very lightly compressed by thebullet. Be sure that the bullet is seated deeply enough so that it restsfirmly against the powder charge. Do not leave an air space between thepowder and the bullet. This can cause the barrel to burst when firing!KEEP HAND OFF ENDNOTE RAMRODPROTRUSION WHENPROJECTILE IS FULLYSEATED ON POWDER9STARTING PROJECTILEG. You should not “pound” on the ramrod to fully seat the projectile, sincethis can deform the bullet, cause accuracy problems, or even set off thepowder charge and fire the rifle! Once you determine that you have fullyseated the projectile of your choice onto the correct powder charge, noteand mark how much of the ramrod protrudes from the muzzle. Youshould always be sure that no more of the ramrod protrudes after loadingthe rifle -- otherwise, you may have loaded too much powder, multipleprojectiles, or failed to have fully seated the ball onto the powder charge.Firing a rifle with any of these conditions can result in a wrecked rifleand injury to the shooter and bystanders. Be safe -- unload your rifle andstart over again if your ramrod protrudes excessively from the muzzleafter loading (See “To Unload”, p. 20)H. REMOVE THE RAMROD FROM THE BARREL. If you replace it in thethimble under the barrel, you will not leave it behind.IF YOU FORGET TO LOAD POWDERIf you have inadvertently loaded a ball without first loading a powdercharge, you must remove the breech plug with the breech plug wrenchand push the ball from the barrel (See “To Unload”, p. 20) before startingall over again.1510FULLY SEAT PROJECTILE
Safety4. CAPPING THENIPPLE:Remember that thesafest way to carryany loadedmuzzleloading rifleis uncapped. Cap itonly just before youare immediatelyready to fire. See“Handling Warning”,p. 17.SAFETY IN"LOAD/UNLOAD"POSITIONCAPCAPPING THE NIPPLENIPPLE11Be sure you use only #11 percussion caps of good quality and correct size.With the bolt open, carefully place a #11 cap on to the nipple. An inlinecapper, sold commercially, is preferred by some shooters. It is not required,but is especially helpful if a scope is mounted on the rifle. Do not put oil,grease, or dirt into the open end of the cap while loading -- misfires couldresult. The caps should be completely seated on the nipple without unduepressure. Caps should only be tight enough so that they do not fall off thenipple when the barrel is elevated with the bolt open. (See Fig. 11)!WARNING: It is dangerous to attempt to use caps which aretoo small. Never force a cap on to the nipple. Since caps fire bypercussion, excess force or a blow in seating them can cause the caps todischarge, firing the gun and forcing hot gas out of the nipple, which cancause injury.5. PREPARING TO FIRE:To normally fire the rifle, the bolt must first be closed after the nipple iscapped. This is done by pushing the bolt handle fully forward, and lowering it.DO NOT TOUCH THE TRIGGER WHILE OPERATING THE BOLT. KEEP THESAFETY IN THE “LOAD-UNLOAD” POSITION WHILE OPERATING THEBOLT, AND MOVE IT FULLY REARWARD TO THE “SAFE” POSITION ASSOON AS THE BOLT IS CLOSED. TOUCH THE TRIGGER ONLY WHEN YOUARE READY TO FIRE AND HAVE DISENGAGED THE SAFETY WHILEAIMING AT A TARGET.6. FIRING:Once the safety is pushed fully forward to the “fire” position, the RUGERMODEL <strong>77</strong>/<strong>50</strong> is now ready to fire. Light pressure on the trigger will causethe striker to fall forward, striking the percussion cap, and the rifle will fire.Always be certain that you know where the bullet will strike when you fire therifle.!WARNING: DO NOT TOUCH THE TRIGGER UNTIL YOU AREACTUALLY READY TO FIRE THE RIFLE.Never allow the thumb to touch the cocking piece as it can be pinched whenthe striker moves forward during firing.16
! WARNING –HANDLINGSTRIKERCOCKEDSAFETY "OFF"STRIKERUNCOCKEDSAFETY"ON"CAP NOTVISIBLECAP IS VISIBLEIf this rifle is to be carried loaded, certainprecautions must be observed in the interest ofsafety. It is safest to carry any muzzleloaderwith no percussion cap on the nipple. The gunshould never be carried with the striker restingon a percussion cap. Under suchcircumstances, a light accidental blow to thestriker can readily cause the gun to discharge.Never cap the nipple until you are ready toshoot the rifle. When capping, be sure that thesafety is in the “load-unload” position. Aftercapping, immediately place the safety in thefull-rearward “safe” position and keep it thereuntil you are actually aiming at a target orgame. Only when you are immediately going toshoot should you move the safety fully forwardto the “fire” position.However, the safety is a mechanical device andany mechanical device can fail. Never dependupon this or any other mechanical device tojustify careless handling of any firearm. Keepthe firearm pointed in a safe direction at alltimes.NEVER PUT THE STRIKERDOWN ON A CAPPEDNIPPLE! WARNING –FIRINGWhen firing any rifle, be sure all persons are asafe distance to the rear of the shooter. Whenfired, all muzzle loaders discharge gas andparticles through the clearance gap betweenthe striker and the rear of the nipple. Theseparticles of powder grains and percussion capfragments are projected broadly sideways athigh speed and can injure a person who isstanding too close to the rifle. When firing anymuzzle loader, always be certain that nothing– including either of your hands – is in thepath of the hot gas and particles which aredischarged from the top, front and sides of therifle. Small pieces of the percussion cap arefrequently blown away when a percussion armfires. Safety glasses must be used by shootersand bystanders when loading and firing anypercussion firearm. Always wear hearingprotection when firing any firearm, in order toavoid permanent hearing damage.17HOT GASES EXITNIPPLE AREA
Remember - Never lower the striker fully down onto a percussion cap or loadedrifle! See “Handling Warning”, p 17.WARNING: REMEMBER THAT EACH TIME A SHOT IS FIRED,! THE SAFETY SELECTOR IS IN THE “FIRE” POSITION.WHEN YOU OPEN THE BOLT, MOVE THE SAFETY SELECTORTO THE “LOAD-UNLOAD” POSITION BEFORE CLOSING THE ACTION.ONCE THE ACTION IS CLOSED, MOVE THE SAFETY FULLY BACK TOTHE “SAFE” POSITION.! WARNING –RELOADINGBlack powder is extremely sensitive and apowder charge poured down the barrel afterfiring a shot can readily be ignited by anember of partially burned powder or glowingpatch fragment in the bore. Pushing aprojectile down onto a powder charge can“fan” an ember into igniting the powdercharge and firing the rifle.Always wait one minute before reloading. Youshould wipe the bore with a cleaning patchsoaked in solvent between shots.If a cap fires but the powder charge does not,the powder may be smoldering and couldignite at any time. Wait at least one minutebefore attempting to recap. Remember thathot gasses can escape from the nipple if thepowder charge ignites when the bolt is open,and these gasses can burn you. Keep the riflepointed in a safe direction at all times.Keep your head, face, eyes and hands awayfrom the muzzle while reloading and alwayswear eye and hearing protection. Hold theramrod around its sides -- never place yourhand over the end of the ramrod so that itwould injure your hand if the powder chargegoes off (propelling the ramrod out) whilereloading.DON’T LOAD IN A HURRY7. RELOADING:After firing, the striker will remain down. Raise the bolt handle, put the safetyin “load/unload”, and draw the bolt to the rear in a firm, smooth stroke. Thiswill expose the nipple so you can remove the fired cap fragments. Fragmentsclinging to the nipple may be removed with the fingers, and fragmentsclinging to the bolt can be dislodged by fully pulling the bolt back smartlyagainst the bolt stop. To fire subsequent shots, repeat all preceding steps 3 -6, above. It is not necessary to fire a cap in between shots to clear the nipple,but you should be sure that the nipple is clear before reloading. A thin wire orsimilar tool works well for this.18
Best results are obtained by cleaning the bore after each shot, beforereloading. Soak a patch in black powder solvent or bore lubricant, place itover the front end of the ramrod, push it completely into the bore, and pull itcompletely out of the muzzle. If it is difficult to remove, push the patch backdown and then up until it can be removed. This “swabbing” after each shotmakes reloading much easier. Never try to reload another projectile if it isexcessively difficult to push down the barrel -- you may not fully seat it on thepowder charge and it may act as a bore obstruction, resulting in a burstbarrel and possible serious injury to the shooter or bystanders. Instead, openthe bolt, pull the projectile out of the muzzle, empty out all powder, andclean the barrel thoroughly before reloading.DRY-FIRING: Going through the actions of cocking, aiming, and pulling thetrigger of an unloaded gun is known as “Dry Firing.” The <strong>Ruger</strong> <strong>Model</strong> <strong>77</strong>/<strong>50</strong>should not be dry-fired, as damage to the nipple may occur, which can preventthe flame from the cap from fitting on the nipple correctly, or can prevent thecap flame from igniting the powder charge.!WARNING –MISHANDLING31 SAFEFIRE2LOAD-UNLOADNever carry the rifle loaded with thesafety selector in the “FIRE” position. Ifdropped or struck with the safety off, therifle may fire. Such a discharge can occurwith or without the trigger being directlystruck or touched. Never rest a loadedrifle against any object (wall, fence,vehicle, tree, etc.) because there is alwaysthe possibility that the rifle will be jarredor slide from its position and fall withsufficient force to discharge. Keep safety“on” unless actually firing.Never lower (uncock) the striker onto apercussion cap of a loaded rifle. Undersuch circumstances the striker will be indirect contact with the percussion capand a light accidental blow to the strikercan readily cause the gun to discharge.If the rifle is dropped, the bullet shouldbe fully reseated against the powdercharge, or it might act as an obstructionand cause the barrel to burst upon firing.When afield, periodically check to see ifyour bullet has remained fully seated onthe powder charge by inserting theramrod and pushing the projectile fullydownward onto the powder.19ANY GUN MAY FIRE IFDROPPED
SafetyTO UNLOAD(Keep rifle pointed in a safe direction)Completely unload the rifle immediately when you are finished shooting (byremoving cap, powder and ball), or fire it into a safe backstop.It is much easier and safer to fire any muzzleloading firearm rather than attemptto unload it. However, if this is impossible, or if you are uncertain that correctcomponents have been safely loaded, the rifle should be unloaded in accordancewith the following steps.1. Be sure the rifle ispointing in a safedirection.2. Carefully place thesafety in the “loadunload”position. (SeeFig. 12) Keep fingersaway from trigger at alltimes duringunloading!PUT SAFETY IN"LOAD/UNLOAD"POSITIONSAFETY IN “LOAD/UNLOAD”123. Open actionand carefullyremove thepercussion capand any capfragments orprimingcompoundfrom thenipple. (SeeFig. 13)ASAFETY IN"LOAD/UNLOAD"POSITIONOPEN ACTIONBREMOVE CAP13OPEN ACTION - REMOVE CAP4. Depress bolt stop andcompletely remove thebolt rearward from thereceiver. (See Fig. 14)APRESSBOLT STOPDOWNBPULL BOLT BACKOUT OF RECEIVER20REMOVE BOLT14
5. Using the breech plugwrench supplied,carefully unscrew thebreech plug from thechamber. Keep it in thebreech plug wrench andremove it out the rear ofthe receiver.(See Figs. 15a & 15b)6. Carefully elevate themuzzle and dump thepowder out of the rear ofthe barrel into a container.(See Fig. 16)7. Place some lubricating oil intothe barrel. Now place the ramrodinto the muzzle of the barrel,taking care not to damage it.Gently tap the end of the roduntil the ball comes out the rearof the barrel and receiver.(See Fig. 17)UNSCREW BREECH PLUGCOUNTERCLOCKWISEUNSCREW BREECH PLUGREMOVEBREECHPLUGREMOVE BREECH PLUG15a15bRAMRODREMOVEPOWDER16REMOVE POWDER2117REMOVEPROJECTILETAP OUT PROJECTILE
8. Reinsert the breech plug using the wrench.9. Inspect the chamber to be certain the bore is completely empty of powderand ball, and that no cap or priming compound remains on the nipple.10. Reinsert the bolt.11. Move the safety selector to the “Fire” position and with the rifle pointed in asafe direction, pull the trigger as you close the bolt and ease the bolt handledownward. This uncocks the striker. “Dry Firing” is not advisable in theRUGER ® <strong>77</strong>/<strong>50</strong> due to possible nipple damage. Never uncock the strikeronto a percussion cap! (See “Handling Warning”, p. 17).12. Once you know the rifle is completely unloaded and reassembled, run theramrod fully into the barrel and note how much of it protrudes from themuzzle. If any more of the ramrod ever protrudes from the muzzle at anytime you run the ramrod fully into the barrel, you must assume that the rifleis loaded -- be careful!BASIC DISASSEMBLY AND REASSEMBLYThe user of a RUGER ® <strong>77</strong>/<strong>50</strong> should carefully read all disassembly directionsand study all the illustrations and the Parts List in this manual before attemptingto take the gun apart. Know the names and location of the parts before removingany of them. Although the rifle mechanism is composed of only a few parts, it isessential that the disassembly and reassembly operations be carried out withknowledge and care.Only a few tools are required: A screwdriver or two to remove the trigger guardscrews and to remove the barrel band screw, and the supplied breech plugwrench to unscrew the breech plug.The tip of the screwdriver blade should perfectly fit the screw slots. A tip toolarge will scrape away metal, while too small a tip will damage the screw slots.! WARNING –DISASSEMBLYLOADEDNever clean, lubricate, disassembleor work on a rifle while it is loadedor capped. Never install or removea capped nipple. A capped nipplecan discharge the rifle if struck.Always unload any firearm beforecleaning, lubrication, disassembly,or assembly. Read instructionsbefore disassembling gun.UNLOAD BEFORE CLEANINGOR DISASSEMBLING22
Before taking the gun apart, set up to do it properly. Cover the work surface witha soft cloth so that the gun finish (and sights) will not be damaged, and provide atray into which the parts can be put as they are removed from the gun.It is preferable to carry out these procedures on a workbench or table which hasa covered top. A piece of shallow nap rug or an old, coarse blanket is an idealcovering. Such a covering not only reduces the chances of the rifle slipping andbeing scratched, but it serves also to trap pins, plungers and springs that mayotherwise get lost. It is advisable to have a container – such as a shoebox – inwhich each part can be placed as it is removed from the gun.Before attempting to disassemble the rifle for the first time, study the partsdrawing and parts list so as to be familiar with the relative position, appearanceand name of each part. Carry out the disassembly slowly, and carefully note theposition of the part in the gun before starting to remove it. If a part is underspring tension (such as, the Safety Selector, Bolt Stop, Trigger) remove itcautiously and anticipate the direction the spring and plunger are most likely to“jump.”WARNING: If a spring or plunger become lost, do not use a substitute. Springs ofcorrect tension are vital to the safe and reliable performance of firearms. See“Ordering Parts”, p. 39. Before starting disassembly, remove the sling, scope andrings and place the rear sight blade in its down flat position.DISASSEMBLY(Rifle Must Be Unloaded Prior To Disassembly)1. Keep the rifle pointed in a safe direction! Put the safety in the “load-unload”position.2. OPEN THE BOLT AND CHECK TO BE CERTAIN THAT THE RIFLE ISUNCAPPED AND UNLOADED. Run the ramrod completely down the barrel tomake sure the rifle has no bullet or powder in the barrel.3. TO REMOVE BOLT: Lift the bolt handle up. Depress the bolt stop on the leftside of the receiver. Remove the bolt from the rifle. (Before starting boltdisassembly, study Figure 21).4. TO DISASSEMBLE THE BOLT:a. While holding the bolt, rotate the bolt sleeve clockwise (as viewed fromthe rear of the rifle) to position shown in Figure 18, p. 24. The bolt sleeveshould be in the same position it is in when taken out of the receiver, butthe bolt sleeve may need to be rotated clockwise until the disassembly holeis fully exposed.23
. Insert the small end of breech plug wrench handle (or suitable nail) intothe “disassembly hole” in the striker/cocking piece assembly to hold it in therear position (Figure 19). NOTE: The pin should be as close as possible insize to the hole diameter, and at least 2 inches long so that it can be used to‘lever’ the cocking piece to the rear when reassembling the bolt stopassembly into the bolt. Do not use a soft paper clip, etc. Note that if you usethe breech plug handle as the bolt disassembly pin, you will be unable to usethe breech plug wrench to remove the breech plug until you reassemble thebolt.18 19ROTATE BOLT SLEEVEINSERT PINc. Unscrew the bolt sleevecounterclockwise (Figure 20).d. Remove the boltsleeve assembly. (Figure21).21SAFESAFE20UNSCREW BOLT SLEEVEREMOVE BOLT SLEEVE/STRIKER ASSEMBLY!CAUTION: The bolt sleeve assembly is intended to be a permanentassembly and should not be disassembled. The parts are under greatspring pressure and if disassembled could fly apart with sufficient force tocause serious injury. Also, special tools are required to correctlyreassemble this part.24
5. TO REMOVE THE BREECH PLUG:AUNSCREW BREECH PLUGCOUNTERCLOCKWISEBREECH PLUG WRENCH22aUNSCREW BREECH PLUGa. Using the supplied breech plugwrench and handle, carefully unscrew(counter-clockwise) and remove thebreech plug/nipple assembly from the rearend of the barrel. (See Figures 22a & 22b)It is easier to remove the breech plugfrom the receiver if you keep it in thebreech plug wrench as shown.22bBREMOVEBREECHPLUGREMOVE BREECH PLUG25
6. TO REMOVE THE STOCK: (Be certain the bolt has been removed from therifle.)a. Remove ramrod from stock. Unscrew barrel band screw and removebarrel band forward off the stock and barrel. (See Fig. 23)AREMOVE RODCREMOVEBANDBUNSCREWBAND23REMOVE RAMROD AND BARREL BANDb. Unscrew and remove the two screws in the trigger guardcounterclockwise and carefully remove trigger guard. (See Fig. 24) Notethat the longer screw goes in the rear hole of the trigger guard.AUNSCREWBUNSCREW24CREMOVE GUARDREMOVE TRIGGER GUARDc. VERY CAREFULLY lift the barrel/receiver assembly from the stock. (SeeFig. 25)BARREL/RECEIVER ASSEMBLY25STOCKSEPARATE BARREL/RECEIVER FROM STOCK26
THIS IS AS FAR AS YOU NEED TO DISASSEMBLE THE RIFLE FOR ROUTINECLEANING AND MAINTENANCE. SEE P. 30 FOR “REASSEMBLY”INSTRUCTIONS. DETAILED DISASSEMBLY INSTRUCTIONS FOLLOW FORFURTHER DISASSEMBLY ONLY WHEN REQUIRED IN CASES OF HEAVYFOULING, IMMERSION IN SALT WATER, ETC.DETAILED DISASSEMBLY1. To remove the trigger: (Safety Selector should be in the “Fire” position).a. While holding the trigger in place, press out the trigger pivot pin.(Caution: Trigger is spring loaded and under tension --- be careful!).b. Remove the trigger and trigger/sear spring.2. To remove the bolt stop and sear:a. Press out the sear/bolt stop pivot pin.b. Remove the bolt stop and bolt stop spring.c. Turn receiver upside down and slide sear forward. Sear will drop out ofthe top slot in the receiver.3. To remove safety assembly:a. Rotate the safety selector so that the upper section is positioned fullyover the center of the receiver tang.b. While holding the safety selector in place with thumb and forefinger,slide the retainer up out of receiver. (Caution: Safety Selector is underspring tension from a spring and plunger acting against the lower section ofthe safety selector. The spring and plunger will jump out if not contained).c. Lift out the safety selector.d. Remove the safety selector detent and safety selector detent spring.See page 30 for “Reassembly” instructions.CARE AND CLEANING!WARNING: ALWAYS BE CERTAIN THE RIFLE ISCOMPLETELY UNLOADED BEFORE CLEANING.REMOVE CAP, POWDER, AND PROJECTILE.BLACK POWDER FOULINGThe chemical compounds formed by Black Powder and Pyrodex residue andcertain percussion caps are extremely corrosive; rusting will begin within a veryfew hours after firing, if the rifle is left uncleaned under some conditions ofhumidity. Fouling will also slow down or “bind up” moving parts, possiblyresulting in misfires (failure to fire), and “hangfires” (firing delayed up to a fewseconds). It is, therefore, important that your RUGER ® MODEL <strong>77</strong>/<strong>50</strong> becleaned thoroughly and without delay after each use. Furthermore, Black Powderfouling promptly hardens with the passage of time making disassembly difficult,and this fouling is extremely corrosive, even to stainless steel.A firearm must be free of rust, dirt, grease and firing residues to function safelyand reliably. Periodic maintenance, which includes inspection of components todetermine if they are in proper working order, is absolutely essential.27
Firing deposits particles of bullet lubricant and powder in the bore, chamber,bolt, receiver, and other parts of the rifle. There is no fixed rule as to howfrequently the cleaning should be carried out, but the alert gun owner soonlearns that any firearm functions most reliably and accurately when it is free ofaccumulations of grease and other firing residues.Basic cleaning equipment includes: A correct size cleaning rod equipped withbore brushes (fiber and brass) and a tip in which a cloth patch can be inserted,patches, powder solvent, lubricant, small lint-free cloths and a toothbrush. Usecorrect size patches and brushes. Larger sizes will bind in the bore and can bevery difficult to remove!Timely attention to the simple procedures which follow will help ensure thatyour rifle remains in top condition for years of use:1. Be sure rifle is unloaded!2. Remove bolt from receiver. (See p. 20)It is not necessary to remove the stockfor cleaning, but removal may helpprevent damage to the stock from thebreech plug wrench handle, etc.Removal also makes it easier to cleanthe trigger and safety mechanism.3. Disassemble bolt according toinstructions on pp. 23 & 24. Then,place bolt components (except formainspring which should not be gottenwet) in pan filled with very hot waterand soap solution to soak.4. Unscrew and remove breech plug frominside receiver. It may be necessary totap the breech plug wrench handlewith a soft mallet to loosen the breechplug, especially after repeated firing.Screw in cleaning tube to preventcleaning solution from entering receiver and stock of rifle.(See Figure 26)5. With muzzle pointed down so that water cannot enter the triggermechanism, flush the barrel with warm water, until water runs clearfrom the muzzle. A cleaning patch wetted with hot, soapy water or anammonia-based window cleaner will also work.6. Using a bristle or brass brush wetted with soap and water solution,thoroughly scrub bore to remove all traces of fouling. Then, flush boreagain with very hot water. Do not permit water to enter the triggermechanism. Remove cleaning tube and carefully scrub receiver breechplug threads clean. Clean the trigger mechanism thoroughly with abrush wetted with a commercial black powder solvent. Dry bore andreceiver assembly thoroughly with clean cloth and set aside.ABINSERTCLEANING TUBETHREAD FULLYINTO RECEIVERINSERTINGCLEANING TUBE2628
7. Thoroughly scrub bolt component parts in pan, flush with very hot water,or ammonia-based window cleaner, rinse and then wipe dry. Scrub thefront of the bolt face with a toothbrush to remove all traces of powder andcap fouling.8. Soak the breech plug in very hot, soapy water or an ammonia-basedwindow cleaner. Scrub its threads with a toothbrush. Thoroughly dry thebreech plug, making sure the flash hole through the nipple is clean anddry.9. Inspect all parts (including bolt, barrel, receiver, trigger, etc.) to be surethat these are clean and dry. Pay particular attention to the breech plugthreads inside the barrel.10. Oil the bore and all parts thoroughly with a good quality gun oil, then reassemble.However, avoid lubricating the striker, striker spring, or theinside of the bolt, to avoid oil spattering when firing or sluggish ignition incold weather. Remember to lubricate the breech plug/nipple assemblythreads with a good quality black powder gun grease prior to reassembly(See page 30).11. The outside (exposed) metal parts should be wiped down and lightly oiledto remove fouling and prevent rusting.NOTE: Several firms offer Black Powder solvents and these may be used in place ofthe soap and hot water solution. However, not all smokeless powder solvents willrender the fouling left by Black Powder non-corrosive. Be sure you use a solventspecifically intended for black powder fouling, hot, soapy water, or an ammoniabasedwindow cleaner, followed by a good gun oil.Sometimes, lead build-up can occur in the barrel throat at the muzzle of the barrel,and in the bore. If ‘leading’ is noted in your rifle, clean it out before it builds up andinterferes with reliable functioning and accuracy. A special ‘lead removing’ cleaningtool (for bore and chamber) is available from gun stores.! WARNING –LUBRICATIONOILFiring a rifle with oil, grease, a bullet, or anyother material even partially obstructing the boremay result in damage to the rifle and seriousinjury to the shooter and those nearby. Do notspray or apply lubricants directly on blackpowder. If the powder charge is affected by thelubricant, it may not be ignited, but the energyfrom the percussion cap may be sufficient to pushthe bullet into the bore where it may becomelodged. Firing the obstructed bore may damagethe rifle and cause serious injury or death to theshooter and those nearby. In the event of amisfire, always reseat the bullet fully onto thepowder charge before re-capping. Use lubricantsproperly. You are responsible for the proper careand maintenance of your firearm.IMPROPER LUBRICATIONDESTROYS GUNS29
The rifle’s internal mechanism can be lubricated without disassembly. A very fewdrops of light oil recommended as suitable for firearms, applied periodicallyabout the various frame openings, will work its way into the mechanism parts.The exterior of the rifle should be cleaned with a solvent and then wiped with anoily cloth.Do not keep a rifle in a leather, fabric or canvas case or scabbard when it isstored. These materials attract moisture, even though they may appear to be dry.12. Never store a loaded gun!! WARNING –STORAGENever place or store any firearm in such amanner that it may be dislodged. Firearmsshould always be stored securely andunloaded, away from children and carelessadults.STORE SECURELY & UNLOADEDREASSEMBLY(Again, Be Sure Rifle Is Unloaded)1. To replace the safety assembly:a. Place the safety selector detent and safety selector detent spring into thehole in the receiver.b. Set the safety selector in place with its upper section positioned over thecenter of the receiver tang.c. While holding the safety selector in place with thumb and forefinger,slide the safety selector retainer into dovetail from the top. Align the notchin the safety selector retainer with the sear pivot pin hole.2. To replace the bolt stop and sear:a. Replace the bolt stop and bolt stop spring. Partially insert sear/bolt stoppin through bolt stop, spring and receiver (flush with sear slot).b. Place the rear end (the end with the hole in it) of the sear into the slotfrom the top of the receiver. Swing the rear end of the sear up and slide thesear into position until the hole in the sear is aligned with the mating holesin the receiver.c. Press in sear/bolt stop pin until head of pin stops against bolt stop.30
3. To replace the trigger:a. Rotate safety to “fire” position.b. Place the trigger/sear spring over the dimple in the trigger.c. Assemble the trigger while aligning the spring with the dimple on thesear.d. While holding the trigger in position, replace the trigger pivot pin.4. To replace the breech plug:a. Lubricate the breech plug/nippleassembly threads thoroughly with agood quality black powder gun grease.(See Figure 27) Do not lubricate theback or nipple portions of the breechplug. Failure to lubricate it will makethis part extremely difficult to remove.DON'T PLUGNIPPLE HOLE27RIG +P LUBETHREADSALWAYS LUBRICATEBREECH PLUG!b. Using the supplied breech plug wrench, insert and tighten the breechplug/nipple assembly into the threaded rear end of the barrel.(See Figure 28) Do not over-tighten -- firmly snug will do. It will tightenduring firing.AINSERTWRENCHBTIGHTEN BREECH PLUGCLOCKWISE28REPLACING THE BREECH PLUG31
5. To replace the barrel/receiver assembly into the stock: (Caution: Be certainthat the pivot pins are not protruding from either side of the receiver.)a. Carefully install the barrel/receiver assembly into the stock, making surethe barrel/receiver assembly is in the most rearward position.(See Figure 29)29INSERT BARRELLED ACTION INTO STOCKb. Install the trigger guard and screws (shorter screw in front).(See Figure 30)30SHORT SCREWIN FRONTBACREINSTALL TRIGGER GUARD32
c. Slide barrel band overbarrel and rearward ontothe stock forend. Tightenband screw when in place.Replace ramrod in stockthrough thimble underbarrel. (See Figures 31a,31b, & 31c) Ramrod headshould rest in barrel cutbeneath muzzle.Ramrod will not enterstock easily if bandscrew is tightenedexcessively.31aREINSTALL BANDTURNSCREWCLOCKWISE31bTIGHTEN BARREL BAND SCREWTHIMBLEHEAD INNOTCHREINSTALL RAMROD31c6. To assemble the bolt:a. Lubricate the bolt sleevethreads and the angledcocking cam surface on therear of the bolt. Slide thebolt sleeve assembly intothe bolt from the rear. Screwthe bolt sleeve into the boltto position shown (clockwisepast notch). (See Fig. 32)3233SCREW BOLT SLEEVE INTO BOLTb. Carefully remove thewrench handle on pin fromcocking piece (See Fig. 33)REMOVE PIN33
Safetyc. Carefully rotatecounterclockwise untilcocking piece snaps intosmall notch and nofurther! Only when thebolt is correctlyassembled should it beinserted into thereceiver. (See Fig. 34)BSTOP!AT SMALLNOTCHFINAL BOLT ASSEMBLYASLOWLY ROTATECOUNTERCLOCKWISE34BINSERT BOLTd. With safety in“load/unload” (middle)position, insert the boltinto the receiver. (SeeFig. 35)ASAFETY IN"LOAD/UNLOAD"POSITION35REINSERT BOLTREGARDING ACCURACYThe accuracy of any muzzleloading rifle can vary depending upon the make andtype of projectiles and powder charge used in it. Such being the case, if yourRUGER ® MODEL <strong>77</strong>/<strong>50</strong> rifle does not perform to expectations, it isadvisable to try several brands and types of projectiles to determine which onedelivers the best accuracy, before proceeding further. If your rifle is not as“accurate” as you believe it should be, before concluding that some serious faultexists, run the following checks:1. Be certain the barrel band and the trigger guard screws are snuglytightened.2. Be certain the bore is clean and free from accumulated fouling(deposited by black powder and lead bullets). See the “Care andCleaning” section of this Manual, pp. 27 - 30.3. Check the sights, or scope mounting system, for tightness, setting andalignment.4. Try increasing or decreasing the powder charge you use, neverexceeding 120 grains of powder. The heaviest charges are usually theleast accurate and give the most powder fouling, making consistentshot-to-shot accuracy difficult.34
If everything is tight, the bore is clean, the sights are properly aligned and securebut the accuracy problem persists, DO NOT alter the stock bedding in any way.Do not scrape away wood, and do not bed with “glass,” plastic, epoxy, etc. Once arifle stock has been altered, it cannot be reworked by our Product ServiceDepartment. If you still have an accuracy problem, write a brief letter to ourProduct Service Department, 411 Sunapee Street, Newport, New Hampshire03<strong>77</strong>3 and describe the nature of the problem based on the use of the specificcomponents and load you use. You will receive a prompt response from us and ifindicated, detailed instructions with regard to the return of the rifle.! WARNING – MALFUNCTIONS➞If the bolt hangs up, jams, or binds whenbeing closed, do not attempt to force itforward by pushing or striking the bolthandle.Most failures to close are caused by impropercapping of the nipple, a dirty receiver, capfragments, or a breech plug not properlyscrewed fully into the barrel.Whatever the cause, the gun user must,above all, recognize that jams can result inthe very potentially dangerous situation of apercussion cap discharging the powdercharge before the bolt is closed. If thisoccurs, cap fragments and hot gasses will flyout of the gun with sufficient force to causeinjury. Always wear shooting glasses andhearing protectors!STRIKING PERCUSSION CAPWILL FIRE THE RIFLETO CLEAR A MALFUNCTION (“JAM”)If the rifle becomes difficult to operate, this can usually be traced to three basiccauses (followed by the appropriate corrective action):1. Accumulated black powder fouling (cease firing & clean gun).2. Percussion cap fragments inside receiver (carefully remove).3. Percussion caps not fully seated on nipples (carefully reseat). Be sure you areusing the correct size cap (#11).If it becomes necessary to disassemble the rifle to clear a jam, be sure to unloadit first. Never work on any gun with a percussion cap on the nipple!35
MAINTENANCE OFSTAINLESS STEEL COMPONENTSFirearms and components made of stainless steel are relatively more resistant tocorrosion than those of blued steel. However, in the interest of proper operation andlong life of a stainless steel firearm, inspect it frequently and clean, lubricate andapply an appropriate rust preventative.Sometimes surface discoloration occurs from perspiration or from contact withsome types of gun cases. Rusting may occur as a result of the firearm being exposedto moisture, salt air or chemicals.Minor discoloration can usually be removed by rubbing the stainless area with anabrasive ink eraser, crocus cloth, or a “metal polishing” compound. When using anyof these abrasives, proceed with care and use light pressure to achieve a blending of“color” with those areas that are not discolored.External surfaces most subject to rusting from handling, or from exposure to theelements should be cleaned and wiped dry after use or after exposure to adverseconditions. If the rifle is to be stored, coat it with a light film of oil or preservative.Where the rifle is in continuing use, and the presence of oil or grease would beobjectionable, then the external surfaces can be coated (after cleaning and drying)with a paste wax formulated for use on metals. Apply the wax sparingly, allow timefor it to dry hard, then buff lightly with a soft cloth. When applying the wax, takecare that it does not get into the mechanism or on the functioning parts or in thebore.ATTACHING RUGER SCOPE RINGSEach <strong>Ruger</strong> telescope ring is a mated assembly of a top and a base. Do not mix theparts of the two ring assemblies as they are not interchangeable. On the undersideof each mounting ring assembly there is an integral lug, located off center withrespect to the front and back sides of the mount. The lug is nearer to the frontsurface. By reference to the lug, the mounting ring can be correctly assembled withthe front of the ring toward the muzzle of the rifle.1. Disassemble one ring and reassemble over the scope body between the turret andthe eyepiece. Remember - the lug on the base should be on the front side of thescope.2. Install the four top screws. Do not tighten.3. Disassemble the other ring and install it on the forward section of the scope tubewith the lug forwardly also. Install the four top screws. Again, do not tighten.4. Assemble the rings to the receiver with the lugs engaging the recesses in the topsurface of the receiver. Tighten the clamp nuts so that the rings are locked to thesemicircular cuts on the sides of the receiver.5. Rotate the scope until cross-hairs are aligned properly and slide scope to desiredeye relief. Then tighten the eight top screws each a bit at a time to grip the scopebody.6. Sight in according to the directions with your scope.36
7. The bottom finish of a telescopic sight mounted over the action may bedamaged by hot gasses and cap fragments exiting the breech area when firing.This should not affect the scope’s performance. Carefully clean all scope lensesof fouling when you clean your rifle.PLEASE NOTE THAT SOME STATES RESTRICT TELESCOPIC SIGHTS ONMUZZLELOADERS USED FOR HUNTING -- CHECK YOUR LOCAL GAMELAWS.SIGHT ADJUSTMENTThe folding leaf rear sight is adjustable for elevation. The slide must be movedone graduation to change the point of impact by approximately one inch at 25yards. Shooting to determine the slide setting for ‘zero’ at a particular distanceshould be done from a bench rest and over a measured distance. Use only a smallscrewdriver with a blade tip that exactly fits the screw-head. Loosen the screwsonly slightly so the slide doesn’t move too freely. Move the slide in the directionyou want the point of impact of the bullet to move. When the slide is positionedat the desired height, carefully tighten both screws.Lateral (windage) adjustment is made by “drifting’ the sight base in its slot. Placea short brass rod against the sight base (and only the base) and tap the sight inthe direction you wish to move the point of impact.SUGGESTED SIGHT PICTURETop of front sight even with top ofrear sight slide. Front sightcentered in notch of rear sightslide. Target bull’s-eye centered ontop of front sight.37
SERVICE AND PARTS POLICYIf you have any question with regard to the performance of your RUGER ®MODEL <strong>77</strong>/<strong>50</strong> rifle please write or call (603-863-3300) our Product ServiceDepartment, 411 Sunapee Street, Newport, New Hampshire 03<strong>77</strong>3, fullydescribing all circumstances and conditions involved. If you should return yourrifle to the factory for repair, or order parts for it, please comply with thefollowing suggestions for prompt service:!WARNING: BEFORE SHIPPING ANY FIREARM, BEABSOLUTELY CERTAIN THAT IT IS UNLOADED.DO NOT SHIP BLACK POWDER ORPERCUSSION CAPS WITH A FIREARM.SHIPPING FIREARMS FOR REPAIRRUGER ® MODEL <strong>77</strong>/<strong>50</strong> rifles returned to the factory for repair should besent to: Sturm <strong>Ruger</strong> & Company, Inc., Product Service Department, 411Sunapee Street, Newport, New Hampshire 03<strong>77</strong>3. Telephone (603) 863-3300.Guns should be sent prepaid. We will not accept collect shipments.The Federal Gun Control Act, as well as the laws of most States and localities, donot prohibit an individual (who is not otherwise barred from purchasing orpossessing a firearm) from shipping a firearm directly to the manufacturer forrepair. However, before you ship your rifle to us, be certain that your State orlocality does not have a law or regulation which will prohibit you from receivingthe rifle from us after it has been repaired. If such receiving is prohibited, thenplease have a Federally Licensed firearms dealer ship the gun to us. If your rifleis sent to us by a dealer, it will be returned to him after being repaired. If ahandgun (pistol or revolver) is shipped by an individual who does not hold aFederal Firearms License, it must be shipped via U.P.S. Persons who do not holda Federal Firearms License are prohibited by Federal law from shipping ahandgun by Mail. Handguns mailed in violation of the law are impounded by thePost Office.Please do not include rifle case, sling, telescopic sights or custom accessorieswith a firearm being shipped to the factory for service. DO NOT SEND GUNBOXES OR LITERATURE THAT YOU CONSIDER TO BE COLLECTOR’S ITEMS– THESE ARE INVARIABLY DAMAGED OR DESTROYED IN SHIPMENT. Riflesand shotguns may be shipped via Parcel Post. Always insure your shipment.Enclose a letter which includes your name, address, telephone number, serialnumber and model of the firearm. Describe in detail the trouble you haveexperienced with your firearm, or the work you wish to have done. Merely statingthat the firearm “needs repair” is inadequate information.Work performed will bear a net minimum labor charge of $15.00 plus a $5.00shipping and handling charge. The charge for rebluing the <strong>Model</strong> <strong>77</strong>/<strong>50</strong> rifle is$35.00 plus a $5.00 shipping and handling charge. Custom gunsmithing serviceor non-standard alterations are NOT AVAILABLE from <strong>Ruger</strong> Product ServiceDepartments.38
! WARNING –PARTS PURCHASERSIt is the purchaser’s responsibility to be absolutelycertain that any parts ordered from the factory arecorrectly fitted and installed. Firearms arecomplicated mechanisms and IMPROPERFITTING OF PARTS MAY RESULT IN ADANGEROUS MALFUNCTION, DAMAGE TO THEFIREARM, AND SERIOUS INJURY TO THESHOOTER AND OTHER PERSONS. Thepurchaser and installer of parts must accept fullresponsibility for the correct adjustment andfunctioning of the firearm after such installation.PARTS MUST FIT CORRECTLYORDERING PARTSAll parts orders for the MODEL <strong>77</strong>/<strong>50</strong> rifle should be sent to: Sturm, <strong>Ruger</strong> &Co., Inc., Product Service Department, 411 Sunapee Street, Newport, NewHampshire, 03<strong>77</strong>3. We cannot comply with open account or C.O.D. requests.Payment in the form of a check, money order, Visa or Mastercard mustaccompany your order. Credit Card orders must include the account number,expiration date and whether it is a Visa or Mastercard account. Minimum partsorder is $1.00 plus a $3.<strong>50</strong> shipping and handling charge. Order parts by PartNumber and Part Name and include the entire serial number of the firearm forwhich the parts are being ordered. The price shown for parts does not includethe minimum net labor charge of $15.00 plus $5.00 shipping and handlingcharge if the parts are factory fitted. All factory-fitted parts are fitted on anexchange basis only. We will not return the replaced parts.Because the receiver of the <strong>Model</strong> <strong>77</strong>/<strong>50</strong> rifle (part number J00110) is a serialnumbered component, it is defined as a “firearm” by Federal law and is not soldas a separate component.*Parts designated by an asterisk must be factory fitted. These parts are fitted onan exchange basis only. We will not return the replaced parts. We will not returnany part that is broken, malfunctioning, badly worn or has been modified. See“Warning — Parts Purchasers”, above.!CAUTION: A gun containing modified, broken, malfunctioning,or badly worn parts should not be fired.39
40PARTS LIST AND SUGGESTED RETAIL PRICESDesign, prices and specifications subject to change without notice.SPECIFY MODEL AND CALIBER WHEN ORDERINGRUGER ® MODEL <strong>77</strong>/<strong>50</strong> PERCUSSION RIFLE(See Exploded View on Page 42)CaliberPart Name Part No. <strong>Model</strong> .<strong>50</strong> Blued StainlessAccessory Kit - Includes: Cleaning Tube; J29001 All <strong>Model</strong>s • $ 9.75 –Breech Plug Wrench; & Wrench Handle* Barrel 0J8012 <strong>77</strong>/<strong>50</strong>-RS, <strong>77</strong>/<strong>50</strong>-RSO • 65.00 –* Barrel K0J8012 K<strong>77</strong>/<strong>50</strong>-RSBBZ • – $ 118.00Barrel Band J06801 All <strong>Model</strong>s • 6.00 –Barrel Band Screw B-69 All <strong>Model</strong>s • .<strong>50</strong> –Bolt Handle KJ01006 All <strong>Model</strong>s • <strong>50</strong>.00 –Bolt Lock Plunger KJ02600 All <strong>Model</strong>s • – 2.00Bolt Lock Plunger Retainer J04600 All <strong>Model</strong>s • .<strong>50</strong> –Bolt Lock Plunger Spring J04<strong>50</strong>0 All <strong>Model</strong>s • .<strong>50</strong> –Bolt Sleeve KJ01700 All <strong>Model</strong>s • – 18.75Bolt Stop J05302 <strong>77</strong>/<strong>50</strong>-RS, <strong>77</strong>/<strong>50</strong>-RSO • 3.75 –Bolt Stop KJ5302T K<strong>77</strong>/<strong>50</strong>-RSBBZ • – 4.00Bolt Stop Plunger Spring J05401 All <strong>Model</strong>s • .<strong>50</strong> –Breech Plug KJ06705 All <strong>Model</strong>s • – 9.<strong>50</strong>Breech Plug Wrench J09001 All <strong>Model</strong>s • 6.00 –Breech Plug Wrench Handle J09100 All <strong>Model</strong>s • 1.00 –Butt Plate C-63 <strong>77</strong>/<strong>50</strong>-RSO • 2.<strong>50</strong> –Butt Plate Screw, 2 Req’d B-64 <strong>77</strong>/<strong>50</strong>-RSO • ea. .<strong>50</strong> –Cleaning Tube J09300 All <strong>Model</strong>s • 3.00 –Cocking Piece KJ01800 All <strong>Model</strong>s • – 8.00Front Trigger Guard Screw J04705 All <strong>Model</strong>s • .<strong>50</strong> –Front Sight, Assembly J26016 All <strong>Model</strong>s • 21.<strong>50</strong> –Ramrod Assembly J27105 All <strong>Model</strong>s • 16.<strong>50</strong> –Ramrod Support J08406 All <strong>Model</strong>s • 21.<strong>50</strong> –Rear Mounting Screw J04800 All <strong>Model</strong>s • .<strong>50</strong> –Rear Sight J06100 All <strong>Model</strong>s • 13.00 –
41Receiver J00110 All <strong>Model</strong>s • Not Offered For SaleReceiver Filler Screws, 2 Req’d, Not Illustrated C-83Black <strong>77</strong>/<strong>50</strong>-RS, <strong>77</strong>/<strong>50</strong>-RSO • ea. .<strong>50</strong> –Receiver Filler Screws, 2 Req’d, Not Illustrated C-83 K<strong>77</strong>/<strong>50</strong>-RSBBZ • ea. .<strong>50</strong> –Recoil Pad D06304 <strong>77</strong>/<strong>50</strong>-RS, K<strong>77</strong>/<strong>50</strong>-RSBBZ • 5.00 –Recoil Pad Screw, 2 Req’d. D-84 <strong>77</strong>/<strong>50</strong>-RS, K<strong>77</strong>/<strong>50</strong>-RSBBZ • ea. .<strong>50</strong> –* Safety Selector J03800 <strong>77</strong>/<strong>50</strong>-RS, <strong>77</strong>/<strong>50</strong>-RSO • 8.<strong>50</strong> –* Safety Selector KJ03800 K<strong>77</strong>/<strong>50</strong>-RSBBZ • – 9.00Safety Selector Detent J04300 All <strong>Model</strong>s • .<strong>50</strong> –Safety Selector Detent Spring D-32 All <strong>Model</strong>s • .<strong>50</strong> –Safety Selector Retainer J02100 <strong>77</strong>/<strong>50</strong>-RS, <strong>77</strong>/<strong>50</strong>-RSO • 1.<strong>50</strong> –Safety Selector Retainer KJ02100 K<strong>77</strong>/<strong>50</strong>-RSBBZ • – 2.00Scope Ring Clamp D-74 All <strong>Model</strong>s • 2.00 –Scope Ring Nut D-73 All <strong>Model</strong>s • 2.00 –Scope Ring Screws, 8 Req’d. D-76 All <strong>Model</strong>s • ea. .<strong>50</strong> –Scope Rings (Medium Rings) S-100RH All <strong>Model</strong>s • 40.60 45.40Accommodates a 42mm Lens* Sear KJ02303 All <strong>Model</strong>s • – 5.25Sear Pivot Pin J04201 All <strong>Model</strong>s • .<strong>50</strong> –Sling Swivel Adaptor, Front B08600 All <strong>Model</strong>s • 3.00 –Sling Swivel Rear Mounting Stud S-87 All <strong>Model</strong>s • .75 –Stock, Birch, Complete J20441 <strong>77</strong>/<strong>50</strong>-RS • 145.25 –✝ Stock, Black Laminated, Complete J20442 K<strong>77</strong>/<strong>50</strong>-RSBBZ • – ______✝ Stock, Walnut, Complete J20440 <strong>77</strong>/<strong>50</strong>-RSO • ______ –Striker Cross Pin J04900 All <strong>Model</strong>s • .<strong>50</strong> –Striker Head KJ01307 All <strong>Model</strong>s • – 7.<strong>50</strong>Striker Shaft KJ01308 All <strong>Model</strong>s • – 1.25Striker Spring J01205 All <strong>Model</strong>s • .<strong>50</strong> –* Trigger KJ02000 All <strong>Model</strong>s • – 10.<strong>50</strong>Trigger Guard J00205 All <strong>Model</strong>s • 40.00 –Trigger Pivot Pin D-19 All <strong>Model</strong>s • .<strong>50</strong> –Trigger/Sear Spring J02400 All <strong>Model</strong>s • .<strong>50</strong> –* PARTS SO MARKED MUST BE FACTORY FITTED✝ Contact the New Hampshire Service Dept. for current price. Be sure to have the complete serial number and model information beforecalling (603) 863-3300.
RUGER ® <strong>77</strong>/<strong>50</strong>PERCUSSION RIFLEEXPLODED VIEW42
THE BASIC RULES OF SAFE FIREARMS HANDLINGWe believe that Americans have a right to purchase and use firearms for lawfulpurposes. The private ownership of firearms in America is traditional, but thatownership imposes the responsibility on the gun owner to use his firearms in a waywhich will ensure his own safety and that of others. When firearms are used in a safeand responsible manner, they are a great source of pleasure and satisfaction, andrepresent a fundamental part of our personal liberty.Firearms do not cause accidents! Firearms accidents are almost always found to havebeen the result of carelessness, or ignorance on the part of the shooter of the basicrules of safe gun handling.The following rules must be observed by gun users at all times. Safe gun handling isnot just desirable, it is absolutely essential to your safety, the safety of others, and thecontinuation of gun ownership and sport shooting as we know it today.1. LEARN THE MECHANICAL AND HANDLINGCHARACTERISTICS OF THE FIREARM YOU ARE USING.Not all firearms are the same. The method of carrying and handling firearmsvaries in accordance with themechanical provisions for avoidingaccidental discharge and the variousproper procedures for loading andunloading. No person should handleBlack Powder OnlyRUGER ®INSTRUCTION MANUALREAD THE INSTRUCTIONSAND WARNINGS IN THISMANUAL CAREFULLY BEFOREUSING THIS FIREARM.43any firearm without first havingthoroughly familiarized himself withthe particular type of firearm he isusing, and with safe gun handling ingeneral.2. ALWAYS KEEP THEMUZZLE POINTED IN ASAFE DIRECTION.Be sure of the bullet stop behind yourtarget, even when dry-firing. Never letthe muzzle of a firearm point at anypart of your body or at another person.This is particularly important whenloading or unloading a firearm. In theevent of an accidental discharge, noinjury can occur as long as the muzzleis pointing in a safe direction. A safedirection means a direction which willnot permit a discharged bullet to strikea person, or to strike an object fromwhich the bullet may ricochet.
A safe direction must take into account the fact that a bullet maypenetrate a wall, ceiling, floor, window, etc., and strike a person ordamage property. Make it a habit to know exactly where the muzzle ofyour gun is pointing whenever you handle it, and be sure that you arealways in control of the direction in which the muzzle is pointing, evenif you fall or stumble. Keep your finger off the trigger until you are readyto shoot.3. FIREARMS SHOULD BE UNLOADED WHEN NOT INUSE.Firearms should be loaded onlywhen you are in the field or on thetarget range or shooting area,ready to shoot. Firearms andLOADED ammunition should be securelylocked in racks or cabinets whennot in use. Ammunition shouldsafely be stored separate fromfirearms. Store your firearms outof sight of visitors and children. Itis the gun owner’s responsibilityto be certain that children andpersons unfamiliar with firearmscannot gain access to firearms,ammunition, or components.4. BE SURE THE BARREL IS CLEAR OF OBSTRUCTIONSBEFORE SHOOTING.Even a bit of mud, snow or excesslubricating oil or grease in thebore or an improperly seated bulletmay cause the barrel to bulge, oreven burst on firing, and can causeserious injury to the shooter andbystanders. Be sure that you areusing projectiles of the propercaliber for the gun you are using.If the report or recoil on firingseems weak, or doesn’t seem quiteright, CEASE FIRINGIMMEDIATELY, and check to besure that no obstruction hasbecome lodged in the barrel. Nevertry to shoot out an obstruction!44
5. BE SURE OF YOURTARGET BEFORE YOUSHOOT.Don’t shoot unless you knowexactly where your bullet is goingto strike. Be sure of the bulletstop behind your target, evenwhen dry-firing with an unloadedgun. If you are in the fieldhunting, do not fire at amovement or noise. Take the timeto be absolutely certain of yourtarget before you pull the trigger.6. WEAR SHOOTINGGLASSES AND HEARINGPROTECTORS WHENYOU SHOOT.All shooters should wearprotective shooting glasses andadequate hearing protectors whenshooting. Exposure to shootingnoise can damage hearing, andadequate eye protection whenshooting is essential. Bits ofmetal percussion cap and hotpowder gasses are ejected inmany directions when firing anypercussion muzzleloader.7. NEVER CLIMB A TREEOR FENCE WITH ALOADED FIREARM.Put the firearm down carefullybefore climbing a fence, andremove the cap or unload it beforeclimbing or descending a tree orjumping over a ditch or otherobstruction. Never pull or push aloaded firearm toward yourself oranother person. When in doubt, orwhenever you are about to doanything awkward, remove the capor unload your gun!45
8. DON’T SHOOT AT AHARD SURFACE, OR ATWATER.Bullets can glance off manysurfaces like rocks or the surfaceof water and travel inunpredictable directions withconsiderable velocity.9. NEVER TRANSPORT ALOADED FIREARM.Firearms should always beunloaded before being placed in avehicle. A suitable carrying caseor scabbard should be used tocarry an unloaded firearm to andfrom the shooting area. Withmuzzleloaders, it’s much easierand safer to fire them into a safebackstop before bringing theminto car, camp, or home.10. AVOID ALCOHOLICBEVERAGES WHENSHOOTING.Don’t drink until the day’sshooting is over. Handlingfirearms while under theinfluence of alcohol in any form,or medications that could affectyour judgment or co-ordination,constitutes a criminal disregardfor the safety of others.46
A BRIEF ACCOUNT OF AN EXTRAORDINARYACHIEVEMENT: RUGER FIREARMSOne of the few American firearms manufacturers whose managementhas remained unchanged since starting in business, Sturm, <strong>Ruger</strong> &Company, Inc., had its beginning in a small machine shop occupying arented frame building in Southport, Connecticut. In January, 1949, withan initial investment of only $<strong>50</strong>,000 and an idea, William B. <strong>Ruger</strong> andAlexander M. Sturm started production of a .22 caliber autoloadingpistol–a design which was so successful that it became the cornerstoneupon which one of the most comprehensive lines of sporting firearmsever made in America was established. After Alex Sturm’s death in 1951,William B. <strong>Ruger</strong> continued to direct the company alone and today, asChairman of the Board, he is actively involved in the creativeengineering of new products and continues to provide the leadershipwhich has made this 49-year-old company a sound and successfulenterprise.Sturm, <strong>Ruger</strong> & Company, in this relatively short time, has establisheditself as a leading small arms design organization, developing a uniqueand broad line of fine quality sporting, military and police firearms tobecome one of the world’s most famous producers of revolvers, pistols,rifles and shotguns. From 1949 thru 1998 <strong>Ruger</strong> craftsmen have builtmany millions of firearms.During its four decades of growth and progress under the leadership ofWilliam B. <strong>Ruger</strong>, the company has developed a business philosophy andimplemented policies which represent a constructive influence in the lifeof modern America. From the beginning, Sturm, <strong>Ruger</strong> & Companyplayed a positive role in conservation efforts and has supported theinterests of the National Rifle Association, National Shooting SportsFoundation, and many regional sportsmen’s organizations. The companyhas always endeavored to market its firearms for constructive andrecreational purposes, to emphasize the traditional aspects of shooting,to render meaningful public services and to encourage shooters inconstructive and responsible participation in the shooting sports.Today, Sturm, <strong>Ruger</strong> & Company is particularly mindful of thoseelements which have contributed to the creation of its success, andextends heartfelt thanks to its many loyal employees and customers.A current catalog of <strong>Ruger</strong> firearms is available free upon request toSturm, <strong>Ruger</strong> & Co., Inc., Southport, CT 0649047
WHY NO WARRANTY CARD HAS BEENPACKED WITH THIS NEW RUGER FIREARMThe Magnuson-Moss Act (Public Law 93-637) does not require anyseller or manufacturer of a consumer product to give a writtenwarranty. It does provide that if a written warranty is given, it must bedesignated as “limited” or as “full” and sets minimum standards for a“full” warranty. Sturm, <strong>Ruger</strong> & Company, Inc. has elected not toprovide any written warranty, either “limited” or “full”, rather than toattempt to comply with the provisions of the Magnuson-Moss Act andthe regulations issued thereunder. There are certain impliedwarranties under state law with respect to sales of consumer goods. Asthe extent and interpretation of these implied warranties varies fromstate to state, you should refer to your state statutes. Sturm, <strong>Ruger</strong> &Company wishes to assure its customers of its continued interest inproviding service to owners of <strong>Ruger</strong> firearms.STURM, RUGER & Company, Inc.Southport, Connecticut 06490 U.S.A.http://www.ruger-firearms.comA COPY OF THE INSTRUCTION MANUAL FOR ANY RUGERFIREARM IS AVAILABLE FROM THE FACTORY FREE ON REQUEST.THESE INSTRUCTION MANUALS CONTAIN IMPORTANTWARNINGS WHICH MUST BE UNDERSTOODBEFORE USING THESE FIREARMS.“RUGER”, the Sturm, <strong>Ruger</strong> logo, “SINGLE-SIX”, “BLACKHAWK”, “REDHAWK”, “SECURITY-SIX”,“SPEED-SIX”, “SERVICE-SIX”, “BEARCAT”, “OLD ARMY”, “10/22”, “MINI-14”, “MINI THIRTY”,“RANCH RIFLE”, “M<strong>77</strong>”, “<strong>77</strong>/22”, “GP-100”, “SP101”, “P-85”AND “VAQUERO”are registered U.S. trademarks. “<strong>77</strong>/<strong>50</strong>” is a <strong>Ruger</strong> trademark.