Model 84M Bolt Action Sport Rifles Owners Manual - Kimber
Model 84M Bolt Action Sport Rifles Owners Manual - Kimber
Model 84M Bolt Action Sport Rifles Owners Manual - Kimber
- No tags were found...

You also want an ePaper? Increase the reach of your titles
YUMPU automatically turns print PDFs into web optimized ePapers that Google loves.
<strong>Model</strong> <strong>84M</strong><strong>Bolt</strong> <strong>Action</strong> <strong>Sport</strong> <strong>Rifles</strong><strong>Owners</strong> <strong>Manual</strong>Read the instructions and warningscontained in the manual carefullybefore using the rifle.Be sure to note warnings printed in red.
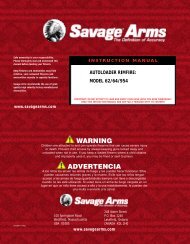
Light <strong>Sport</strong>ing(Classic Pictured)ReceiverVarmintStockFloorplate(not on Montana <strong>Model</strong>)ReceiverBarrelMuzzle2FloorplateBarrelHeavy Barrel(Longmaster VTPictured)StockReceiverFloorplate
KIMBERDear <strong>Kimber</strong> rifle owner:Congratulations on your purchase of your new <strong>Kimber</strong> <strong>84M</strong> sporting rifle.We can tell you with assurance that this rifle ranks as one of the finestproduction sporting bolt action rifles made in the world.Predestined to become a classic in its own time, the <strong>Kimber</strong> <strong>84M</strong> modelscombine many time-tested design features with modern manufacturingtechnology. Made only in the United States to please the tastes of Americanriflemen, this rifle includes the attention to detail and hand craftsmanshipgenerally associated with custom firearms costing much more.All the way through the manufacturing process our objective has beento produce a rifle of dependable heirloom quantity which will provide alifetime of satisfaction for the owner and be a worthwhile investment.Those who will settle for nothing but the best now have no other choice. Nosporting rifle, regardless of price, can compete with the design, elegance,accuracy and dependability of the new <strong>Kimber</strong> <strong>84M</strong> models.To assure satisfaction with your new <strong>Kimber</strong> rifle we urge you to carefullyread these instructions prior to operation or initial firing. Should you haveany questions please feel free to contact our customer service personal at thefactory in Yonkers, NY.Firearms safety is a responsibility we all share. <strong>Kimber</strong> urges everyone touse proper care and precautions with their firearms. For additional safetyinformation, see the National Rifle Association, the National Shooting<strong>Sport</strong>s Foundation or <strong>Kimber</strong>’s safety instruction at our web site:www.kimberamerica.com.Sincerely<strong>Kimber</strong> Mfg., Inc.3
TABLE OF CONTENTSFirearms Safety Procedures..........................................................................5General information and mechanical characteristicsA. Safety ......................................................................................................9B. Installing the <strong>Bolt</strong> ................................................................................10C. Removal of the <strong>Bolt</strong> ............................................................................10D. Loading and Firing the Rifle ................................................................11Parts list ......................................................................................................12Exploded view ............................................................................................13E1. Unloading the Rifle ............................................................................14E2. Unloading the <strong>84M</strong> Montana Rifle ....................................................15F. Disassembly of <strong>Bolt</strong> ............................................................................16G. Removing Barreled <strong>Action</strong> from Stock................................................16H. Trigger ..................................................................................................17I. <strong>Action</strong> - Cleaning and Care..................................................................18J. Barrel - Cleaning ..................................................................................18K. Care and Cleaning ..............................................................................19L. Dry Firing ............................................................................................20M. Maintenance..........................................................................................20N. Lead Warning........................................................................................20O. Scope Mounts and Bases......................................................................20<strong>Kimber</strong> Service Policy ..........................................................................21Warranty......................................................................................................21Instructions for Ordering Parts ..................................................................22Instructions for Factory Service ................................................................234
KIMBER MFG., INC. MODEL <strong>84M</strong>Firearms Safety ProceduresFirearm safety is every gun owner's responsibility. Since making our firstrimfire rifle <strong>Kimber</strong> has advocated the safe use, handling, secure storage andproper education that accompany responsible firearms ownership. Bothgeneral and specific firearms safety rules and information have always beenpackaged with every <strong>Kimber</strong> firearm.<strong>Kimber</strong> encourages everyone to store all guns under lock and key, and to takespecial precautions to keep guns out of the sight and reach of children.Today all firearms are shipped with a cable lock that when used prohibitsloading and discharge. If you do not have a cable lock for your <strong>Kimber</strong> firearmwe will provide one. Just send a request in writing to: <strong>Kimber</strong> Mfg., Inc.,1 Lawton Street, Yonkers, NY 10705. Please include five dollars per lock forshipping and handling. This offer is subject to change without notice.<strong>Kimber</strong> firearms have always been and will continue to be distributed in fullcompliance with the letter and spirit of all applicable laws pertaining to theirsale. All sales are made only to the federally licensed professional firearmdealers with fixed retail storefronts.Failure to follow these instructions or failure to obey any safety warnings mayresult in injury to yourself or others, or cause damage to your gun.As a gun owner, you accept a set of demanding responsibilities. How seriouslyyou take these responsibilities can be the difference between life and death.There's no excuse for careless or abusive handling of any firearm. At all timeshandle your rifle with intense respect for its power and potential danger.This product is classified as a lethal weapon. The failure to read and properlyexecute the instructions and warnings contained in this manual could result inserious injury or death or damaged property.Remember that firearm ownership and use is a responsibility that no oneshould take lightly. Most firearm accidents would not occur if the followingrules were observed1. Consider every firearm loaded. Never point the muzzle at anything youdo not intend to shoot.Always do this even though you are certain the gun isunloaded. Be extremely alert and aware of all personsor property within the range of your ammunition.5
2. Learn the mechanical and handling characteristics of the firearm you’re using.Always assume that your gun can be fired at anytime, even with all safety mechanisms engaged.Like any mechanical device, a safety can sometimesfail; it can be jarred or inadvertently manipulatedinto an unsafe condition. Mechanical safeties merely aidsafe gun handling and are no excuse for pointingyour guns muzzle in an unsafe direction. Safe gunhandling does not stop with your guns mechanicalsafety devices - it starts there. Always treat all firearmswith the respect a loaded, ready to fire gun deserves.3. Use the correct ammunition of the caliber and type intended for the firearm.The <strong>Kimber</strong> barrel and action has been made withsubstantial safety margins over the pressuresdeveloped by established American commercial loads.Nevertheless, <strong>Kimber</strong>, assumes no liability for incidentswhich occur through the use of nonstandard cartridgeswhich develop pressures in excess of commerciallyavailable ammunition.4. Make sure your barrel is always free from any obstruction includingmud, dirt, snow, grease, heavy oil or other foreign matter.Always be alert to the signs of ammunition malfunction.If you detect an off sound or light recoil when the cartridgesfire, do not load another cartridge into the chamber beforechecking for obstructions.5. Always wear eye and ear protection when shooting.Unprotected, repeated exposure to gunfire can causehearing damage. Wear hearing protection, shootingearplugs or muffs, to guard against such damage.Wear shooting glasses to protect your eyes fromflying particles. Also, wear eye protection whendisassembling and cleaning all firearms to preventthe possibility of springs, spring tensioned parts,solvents or other agents from contacting your eyes.6. When not in use, store unloaded guns and ammunition separately underlock and key.Store your firearm and ammunition separately wellbeyond the reach of children. Take all safeguards toinsure that any firearm does not become available tountrained, inexperienced or unwelcome hands.6
7. Never climb a fence or tree or jump a ditch with a loaded gun.Never lean or place any loaded firearm on or against a fence,tree, car or other similar object. If this is done the gun mayinadvertently all, causing the gun to fire accidentally.8 Never pull a gun toward your body by the muzzle.If this is done, and there is an accidental discharge,you will surely be injured or fatally wounded.9. Keep your fingers away from the trigger, while unloading or loading,until you are ready to shoot.10. Be sure of your target and beyond before you shoot. Never use hard flatsurface or water as your backstop.Especially during low light conditions. Know the range ofyour ammunition. Never fire at water or hard objects asricochets may occur.11. If repairs are necessary or indicated, contact <strong>Kimber</strong> Mfg., Inc. for furtherinstructions.Do not, under any circumstances, alter the trigger,safety or other parts of the firing mechanism on thisor any other firearm. Failure to obey this warningmay result in injury or death to yourself or others.12. Never loan your gun to anyone unfamiliar with these precautions.Supervise and teach firearms safety to all membersof your family - especially to children and non-shooters.Closely supervise newcomers to the shooting sports.Encourage enrollment in hunting/shooting safety courses.The National Rifle Association’s Eddie Eagle program is agreat starting point.13. Be defensive and on guard against unsafe gun handling around you and others.Don’t be timid when it comes to gun safety.If you observed other shooters violating anyof the safety precautions, politely suggestsafer handling practices.14. Never drink alcoholic beverages or take any type of drugs before or duringshooting.Your vision and judgement could be dangerously impaired,making your gun handling unsafe to you and to others.7
15. Don’t neglect periodic maintenance. Avoid unauthorized servicing.Your new firearm is a mechanical device, which will notlast forever, and as such, is subject to wear and requiresperiodic inspection, adjustment, and service. <strong>Kimber</strong>firearms should only be serviced by authorized gunsmithsat the factory. <strong>Kimber</strong> cannot assume any responsibilityfor injuries suffered or caused by unauthorized servicing,alterations or modifications.Important: Before firing, thoroughly clean the insideof the barrel and chamber to remove any grease oil orother possible obstructions.8
Service InformationA. SafetyThe safety lever is a traditional 3 position version of the <strong>Model</strong> 70 type, it allowsunloading from the safe position (see Fig. A2). When the safety is in the fullrearward position the bolt is locked and a cartridge cannot be removed (seeFig. A3).A1A2Safety-OFF (FIRE)Position 1The safety lever is located at the right rear of the bolt. There are 3 positionsof the safety lever. Position 1 – the safety lever is fully forward. The rifle willfire upon depressing the trigger! Position 2 – The safety lever is at halfforward position. The rifles safety is engaged, and the bolt is free to beopened to unload or view the chamber. Position 3 – The safety lever is pulledcompletely to the rear, the safety is on and the bolt is locked in position.1. To engage the safety, pull the serrated lever fully to the rear (as picturedin Fig. A3).2. When you are prepared to fire, push the serrated lever fully to the forwardposition (see Fig. A1). Note: The safety mechanism is fitted into positionbefore the rifle leaves the factory. You should see a red dot on the back ofthe safety.3. To unload the rifle or view the chamber of the rifle, you must first engagethe safety to the rear. Then, push the serrated lever forward to the halfway position (see Fig. A2). You may now safely open the bolt to inspector unload the rifle (see Section: UNLOADING THE RIFLE).CAUTION: The rifle should neverbe carried with the safety lever inPosition 2. The lever may bemanipulated forward to the fireposition without the user knowing it.POSITION 2 is only for Chamberinspection and unloading of theweapon.WARNING: When the safety lever is in the forward position the rifle will fire.Do not touch the trigger while moving the safety. Never pull the trigger whenthe safety is in the “Safe” position. Even when the rifles safety is in the “safe”position, always adhere to Safety procedures on pages 5 - 8.No safety or mechanical device is a substitutefor careless handling of firearms. Even with thesafety on, never point the muzzle at anythingyou do not intend to shoot.9A3Safety-on (Safe)<strong>Bolt</strong> ReleasePosition 2Safety-on (Safe)<strong>Bolt</strong> lockedPosition 3
B. Installing the <strong>Bolt</strong>Your rifle is completely assembled except for the bolt, which has beenremoved for safety during transportation and storage. The bolt is packedseparately in the shipping carton.1. To install, hold rifle in your left hand.2. With your right hand, slip the bolt head forward into the receiver.NOTE: Special care should be taken not to contact the comb of thestock as damage could occur.3. Rotate the bolt handle down to place bolt in the fully closed position.B1Inserting <strong>Bolt</strong> - <strong>84M</strong>C. Removal of <strong>Bolt</strong>1. Point rifle in safe direction.2. Place the safety switch to the rear (on safe) position. Keep your fingeraway from the trigger.3. Lift the bolt handle and slide the bolt to the rear. Check the ejection portto confirm that the firing chamber is empty.NOTE: Every time you lift thebolt handle it automaticallyblocks the firing pin so the riflecannot be fired. If the bolt isclosed the rifle will be ready tofire unless you manually applythe safety.C1<strong>Bolt</strong> stop4. Find the bolt stop lever (see Fig. C1), a small rectangular knob at the leftrear section of the receiver.5. While pushing the bolt stop lever down, pull the bolt fully to the rearand clear of the receiver. (see Fig. C2)10
NOTE: Be careful not to contact the comb of the stock, as damage to thefinish may occur. This type of damage will not be covered under Warranty.C2<strong>Bolt</strong> removalD. Loading and Firing the Rifle1. Point the rifle in a safe position.2. Before attempting to load the rifle it is imperative too visually inspectthat the barrel is clear of oil, dry and free of any obstructions.3. Check that you have the proper caliber ammunition. (Check caliber ofrifle on the barrel where the barrel and receiver meet.)4. Place the safety lever into Position 2 (see Fig. A2).5. Raise the bolt handle and slide the bolt to the most rearward position.6. Feeding one cartridge at a time, push three of the correct calibercartridges into the magazine, making sure to keep cartridge aligned with thechamber (see Fig. D1 & D2).7. To close the bolt, first, use your fingers to push the cartridges all the wayinto the magazine. Then, while pushing the top cartridge downward withyour thumb or finger, enough to clear the bolt, slowly slide the boltassembly forward so that the bolt glides over the top of the cartridge inthe magazine.8. When the bolt is fully seated, push the bolt handle down.THE RIFLE IS NOW LOADED WITH AN EMPTY CHAMBER.9. Lift the bolt handle, pull the bolt fully to the rear, slide bolt forward, pickingup the cartridge, when the bolt is fully closed, rotate bolt handle down,pull the safety lever to the Position 3 (see Fig. A3).THE RIFLE IS NOW LOADED!10. To fire the rifle, push the safety to the forward position (see Fig. A1).THE RIFLE IS NOW READY TO FIRE!11
Parts List1. Barrel**2. Recoil Lug**3. Receiver**4. <strong>Bolt</strong> Stop5. <strong>Bolt</strong> Stop Screw6. <strong>Bolt</strong> Stop Spring7. Ejector8. Ejector Pin9. Ejector Spring10. Trigger Assembly11. Trigger Fixing Screw12. Takedown Screw -Front13. Takedown Screw -Rear14. <strong>Bolt</strong>15. <strong>Bolt</strong> Handle16. Extractor17. Extractor Clip18. Cocking PieceHousing19. Cocking Piece20. Cocking Piece21. Firing Pin22. Firing Pin Spring23. Safety24. Cocking PieceHousing Plunger25. Safety Plunger Spring26. Cocking PieceHousing Locator27. Magazine Well28. Trigger Guard29. Floor Plate30. Trigger Guard Screw31. Latch32. Latch Pin33. Latch Spring34. Trap Door35. Trap Door Pin36. Magazine Follower37. Magazine Spring38. Stock*39. Butt Plate*40. Butt Plate Screws41. Sling Swivel42. Pillar43. Grip Cap*44. Grip Cap Screw45. Trigger Housing****46. Sear****47. Sear Pivot Pin48. Sear Spring49. Trigger PressureSpring50. Trigger Overtravel51. Sear ContactAdjustment52. Securing Pin53. Trigger AdjustmentNut54. Trigger55. Trigger Pivot Pin56. Trigger PressureSpring57. Scope Base Plug58. Scope Base, Front***59. Scope Base, Rear***60. Scope Base Screw***61. Scope ClampingScrew***62. Safety Fixing Pin• * Supplied Only AsStock Assembly• ** Supplied Only AsBarrel Assembly• *** Should be OrderedSeparately from Rifle• **** Supplied Only AsTrigger AssemblyExploded View12
NOTE: By recycling the bolt backwards and forwards, loaded roundsshould enter into the chamber in a controlled manner. In other words, therim of the cartridge case should slide up into the bolt face as the bolt ismoved forward and cartridges picked up out of the magazine. The cartridgewill then feed into the chamber. The bullet should not touch any part of themechanism as it is feeding into the chamber.D1D2Cartridge positioningLoading cartridgeE1. Unloading the Rifle1. Point the rifle in a safe position.2. Place the safety into the SAFE position (see Fig. A1).3. Raise the bolt handle and slide the bolt slowly to the rear position withyour free hand over the ejection port.4. Remove cartridge with free hand.5. Once the first cartridge is removed, place your hand under the floor plate.6. Push the Trap door release latch to drop the trap door plate (see Fig. D3).The magazine spring, follower and cartridges will be released from themagazine.7. Remove released cartridges.8. Push the follower back into the magazine, then close the Trap doormaking sure the latch fully engages.14
E2. Unloading the <strong>84M</strong> Montana Rifle (No Floorplate)1. Repeat steps 1 through 4 in Section E1.2. Keeping the muzzle pointed in a safe direction, push the bolt handleslowly forward, just until the next cartridge is released from the magazine.Caution: The cartridge may possibly slide forward into the chamber if thebolt is pushed to far forward. Normally, the cartridge will slide back withthe bolt if the bolt is pulled rearward. If the cartridge remains in thechamber, then you must slide the bolt all the way forward and push thebolt handle downward to close the bolt. THE GUN IS NOW READY TOFIRE. Then repeat #1-4 of Section E1 to remove the cartridge.3. Pull the bolt handle slowly to the rear position. With your free hand overthe ejection port, the cartridge should come free of the bolt.4. Repeat #2 & 3 until the magazine well is completely empty, and thechamber is empty.WARNING: Visually inspect the magazine and chamber to confirm thatthere are no cartridges in the rifle.D3Loaded cartridgeD4Trap door release button15
F. Disassembly of the <strong>Bolt</strong>NOTE: Only the firing pin assembly can be disassembled from the bolt.1. Make sure the rifle is unloaded. Lift the bolt handle and close it to cockthe firing pin.2. With the firing pin in the cocked position, pull the safety into the safeposition (see Fig. A1).3. Lift up on the bolt handle remove the bolt (see Section C).4. With your hand, unscrew the cocking piece housing counter clockwiseout of bolt. (see Fig. F1)5. You now have the firing pin assembly ready for inspection, cleaning andoiling.F1NOTE: Further disassembly ofthe bolt is not recommended. Iffor any reason you cannotassemble the bolt together, donot use force. Send the parts to<strong>Kimber</strong> Mfg.<strong>Bolt</strong> disassemblyG. Removing Barreled <strong>Action</strong> from StockWhen taking the barreled action out of the stock, the following procedureshould be carefully followed to avoid damage to stock.1. Put the Safety in the rear (on) position.2. Remove <strong>Bolt</strong> assembly (see Section C).3. Remove both takedown Screws from trigger guard (see Fig. G1).4. Carefully lift the barreled action from the stock taking particular care toprotect the wood around the receiver tang area.5. The Magazine Well can easily be removed from the action for cleaning(see Fig. G2) by lifting the forward section up slightly then pull entireMagazine Well out of the action. To re-install carefully slip the rear of theMagazine Well into the action until bottomed out then push the frontdown until seated snugly in the action.NOTE: The floor plate and trigger guard do not have to be removed in orderto take the barreled action out of the stock. If for some reason they areremoved, be sure to replace them before the barreled action is put back intothe stock.16
If for some reason the trigger guard must be removed from the stock, thebest way to achieve this is to lightly tap each end of it, fore and aft, with thetip of a screwdriver from inside the stock.To return the action to the stock, reverse procedures 1 through 4. Be sure totighten the front take down screw first, then the rear screw.G1Floor PlateReceiver ScrewsG2THEN LIFT UP AND OUT AT SLIGHT ANGLEFIRST LIFT UP SLIGHTLYMagwell on rifleH. TriggerThe trigger is a single stage mechanism which is set at the factory forbetween 3 - 3-1/2 lbs. for Varmint <strong>Model</strong>s and between 3-1/2 and 4 lbs. forthe Classic <strong>Model</strong>s.It is fully adjustable for over travel, depth of sear engagement and weight ofpull. However, the trigger pull has been set at the factory with properovertravel and sear engagement, so we do not recommend disassembly oradjustment except by a qualified gunsmith or by our factory personnel.Only experience <strong>Kimber</strong> gunsmiths shouldadjust the trigger mechanism.17
I. <strong>Action</strong> – Cleaning & CareWhen it is necessary to clean the action, the stock should be removed. Cleanthe action with a good quality gun cleaning solvent such as Shooters ChoiceExtreme Clean or other quality gun solvent. Follow Manufacturersdirections then re-oil lightly with Shooters Choice FP-10 or other highquality gun oil. The cocking cam surfaces on the bolt should be keptlubricated.NOTE: Use oil in moderation, remember more is not better. A light coatingis all that is needed.J. Barrel – CleaningAlways visually check the chamber and magazine to assure no cartridges arein the rifle.1. Always use a good quality cleaning kit with the proper caliber rods and brushes.2. Follow gun solvent manufacturers cleaning instructions for bore cleaning.NOTE: Some gun bore solvents are extremely aggressive to metal and woodfinishes, <strong>Kimber</strong> accepts no responsibility for damaged finishes due tomisuse of solvents.3. Remove bolt assembly (see Section C).4. Use correct cleaning rod and patch attachment.5. Run patch completely through bore from the action end, once the patchis clear of the barrel, wet the patch with solvent. Pull the rod through thebarrel to wet the inside thoroughly (this will assure no solvents will leakdown into the action and into the wood stock).6. Change to correct caliber brass cleaning brush.7. Push the brush completely through the bore exiting to the front of thebarrel. Place solvent on brush then pull the brush back through the barrel.SPECIAL NOTE: Always make sure the ejection port is facing towards thefloor and the barrel is horizontal on a flat protected surface so as to allowexcess solvent to fall away from the workings of the gun.8. Push the cleaning rod and brush from the action end through the barrelbore several times.9. Remove brush and replace with swab/patch tip then push through bore.10. Repeat steps 5 - 7several times until the fresh patches come out clean.11. Push a dry patch through the bore to remove any solvent residue.12. Wipe exterior surface with a lightly oiled cloth.13. If storing for any period of time, lightly oil the inside of the barrel.Remember to always remove any oil from inside the barrel before firing.18
K. Care and CleaningWhen storing any firearm, always thoroughly clean and oil. Outside surfacesshould be wiped with a light coat of oil or good quality rust preventativesuch as Shooters Choice Rust Prevent or equivalent.Before firing any firearm, be sure to remove all excess lubrication from the gun,making sure the chamber and bore of the firearm is clean and dry of any oil.Handling leaves invisible prints of moisture that can cause rust to metalparts. Always wipe receiver and barrel with an oiled cloth after handling.Rust is neglect.Abrupt temperature changes cause condensation and moisture; therefore,special care to interior metal parts is needed to prevent rusting.Do not store the rifle overnight in the truck of a car, even if it is inside a softgun case. Humid, cool conditions can cause condensation and rust in a shortperiod of time.Insure that a light coating of oil is maintained on the bolt and receiver thusinsuring a smooth fluid functioning of these two major parts.Warning: after cleaning the bore, always check to see that nopart of the cleaning rod or part of a patch remains inside thebarrel as an obstruction.The wood stock on your gun requires very little care. Wipe the wood stockof your <strong>Kimber</strong> rifle with a good quality wood or furniture polish or wax.Using this method will enhance the beauty and durability of your rifle.<strong>Owners</strong> of <strong>Model</strong>s with Kevlar Synthetic StocksYour synthetic stock should give you years of trouble free performance ifyou follow a few simple rules.1. Do not use Degreasers, Lacquer Thinners or aggressive Cleaners on yourstock! The finish will not be covered under Warranty if damage caused bysolvents or aggressive cleaners is evident.2. To avoid Bore solvents from dripping and settling into your stock, removethe stock from the action when cleaning the rifle (see Section G, #1-4Removing Barreled <strong>Action</strong> from Stock). If solvent comes in contact withthe stock, immediately wipe the solvents from the stocks finish.3. For cleaning, use only soap and water or mild Car Washing Detergent.Allow to air dry before reassembling the rifle. Never use solvents to cleanyour Stock.19
L. Dry FiringGoing through the actions of cocking, aiming and pulling the trigger of anunloaded gun is known as dry firing. Dry firing can be useful to learn thefeel of your new <strong>Kimber</strong> rifle. Be certain the rifle is unloaded and pointed ina safe direction even when practicing. Your new <strong>Kimber</strong> rifle can be dryfired without damage to the firing pin or other components.M. MaintenanceThis rifle should be checked periodically by competent gunsmiths to ensureproper function and replacement of any worn or damaged part. This is bestperformed at the factory by <strong>Kimber</strong> trained gunsmiths.N. Lead WarningDischarging firearms in poorly ventilated areas, cleaning firearms, orhandling ammunition may result in exposure to lead and other chemicalsknown to cause birth defects, reproductive harm, cancer, and other seriousphysical injury. Have adequate ventilation at all times. Wash handsthoroughly after exposure.O. Scope Mounts and BasesThe model <strong>84M</strong> rifle receiver is drilled and tapped for <strong>Kimber</strong> two piececontoured scope mount bases. The front scope mount base is different fromthe rear. Order only <strong>Kimber</strong> rifle scope mount base in sets. They areavailable from your dealer or from our customer service department inYonkers, NY. Remember that you will need one base for the front and onefor the rear. The screws and wrench are supplied with the bases.The <strong>Kimber</strong> scope mount bases will accept Redfield, Leupold and Burrisrotating front dovetails and windage adjustable rear ring sets.Before ordering scope rings is very important to first decide on the scopeyou want to fit. This will have a bearing on the height of the rings you needto order.Most styles of rings come in at least three different heights. Medium heightrings should be adequate for all standard size scopes. Low and high rings areavailable for special applications.20
<strong>Kimber</strong> Service Policy<strong>Kimber</strong> Mfg., Inc. does not recommend and is not responsible for anyalteration or modification to the rifle not made by <strong>Kimber</strong> factory personnel,nor the replacement of worn or damaged parts with those not manufacturedby <strong>Kimber</strong> Mfg., Inc. We reserve the right to refuse service on firearms thathave been altered, added to or substantially changed.Every rifle is carefully inspected and test fired for function and accuracybefore shipment to insure that is leaving the factory in perfect condition andfully conforms to our specifications and standards. Should damage occurenroute, or if there are any questions regarding its performance, please call,fax, email or write our Customer Service department in Yonkers, NY andfully describe the problem encountered.WarrantyThis limited warranty has been drafted to comply with the Magnuson-MossWarranty Federal Trade Commission Improvement Act which is effectivefor goods manufactured on or after December 31, 1995.<strong>Kimber</strong> Mfg., Inc. firearms are warranted to be free from defects inmaterial and workmanship for one year after the date of original new gunretail purchase. The manufacturer agrees to correct by repair or replacement(with the same or comparable quality model) your firearm, without charge,if returned prepaid with a copy of the bill of sale.<strong>Kimber</strong> Mfg., Inc. assumes no responsibility for product malfunction orfor physical injury or property damage resulting in whole or in part fromcriminal or negligent use of the product, improper or careless handling,unauthorized modifications, use of defective, improper, hand-loadedammunition, customer abuse or neglect of the product, or other influencesbeyond <strong>Kimber</strong> Mfg., Inc.'s control. This warranty does not apply to normalwear of any parts, including metal, wood, plastic, rubber and other materialssurface finish or if unauthorized repair and/or alteration has been performed.This warranty does not cover repairs related to unreasonable use, corrosion,failure to provide proper maintenance, damaged or shopworn display guns,gun barrels damaged by an obstructed bore or guns damaged in returnshipment due to improper packing and handling.21
<strong>Kimber</strong> Mfg., Inc. reserves the right to inspect any product before makingany adjustment covered by this warranty.Under no circumstances shall <strong>Kimber</strong> Mfg., Inc. be liable for incidental orconsequential damages with respect to economic loss or injury or propertydamage whether the result of breach of express or implied warranty. Somestates do not allow the exclusion of consequential or incidental damages sothe limitation may not apply to you. This warranty gives only the originalretail purchaser specific legal rights. Other rights may also be availablewhich may vary from state to state.The terms of this warranty cannot be changed except in writing by anofficer of <strong>Kimber</strong> Mfg., Inc.The <strong>Kimber</strong> factory at: 1 Lawton Street, Yonkers, NY 10705 is the onlyauthorized repair location.Instructions for Ordering PartsPlease provide model number/name, part number and part name. Supplyserial number and caliber of gun. Identify parts from list, or exploded view.Parts being made to close dimensions, may require slight adjustment orfitting to insure proper function of the firearm.Please note that some parts are marked restricted - these parts can only beordered and mailed to gunsmiths with FFL's on record.Send part orders directly to;<strong>Kimber</strong> Mfg. Inc.Parts Department1 Lawton StreetYonkers, NY 1070522
Instructions for Factory ServiceReturn firearms to <strong>Kimber</strong> Mfg., Inc. for factory service only uponauthorization by <strong>Kimber</strong> customer service personnel. A return authorizationnumber will be assigned to every authorized firearm return.Please package your firearm carefully. Ship firearm in original shippingcontainer with proper cushioning material to prevent movement of gun orparts. Gun cases are especially recommended for return shipping. Clearlymark forwarding and return address on the outside of the package as well ason attached letter.Securely attached complete letter to outside of each package returned to thefactory. Include also inside the package a copy of the same letter. Thecontents of the letter must include: your name, complete mailing address,your telephone number, serial number of firearm and a complete descriptionof the problem.Please do not return gun accessories such as sling straps, quick releaseswivels, telescopes, mounts or any other special equipment to the factorywith the gun shipment. Identify complete condition of firearm and contents- any parts missing or damaged.To avoid delays please do not include part orders with repair instructions.Unless otherwise specified return shipments will be made by UPS. <strong>Kimber</strong>gun parts are not interchangeable with those of any other make. For thisreason <strong>Kimber</strong> cannot service any gun not of its manufacture.Before packaging guns for return to the factory, all ammunition must beremoved.Please send repairs directly to:KMIWarranty Repairs1 Lawton St.Yonkers, NY 1070523
<strong>Kimber</strong> Mfg., Inc.1 Lawton StreetYonkers, NY 10705Sales - Telephone - 888-243-4522Customer service - Telephone - 914-964-0771Customer service - Fax - 914-964-9340Web address: www.kimberamerica.com03/04 - 1100336