Download - Vortex Optics
Download - Vortex Optics
Download - Vortex Optics

Create successful ePaper yourself
Turn your PDF publications into a flip-book with our unique Google optimized e-Paper software.
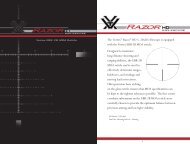
OWNER’S MANUAL<br />
1–4X24<br />
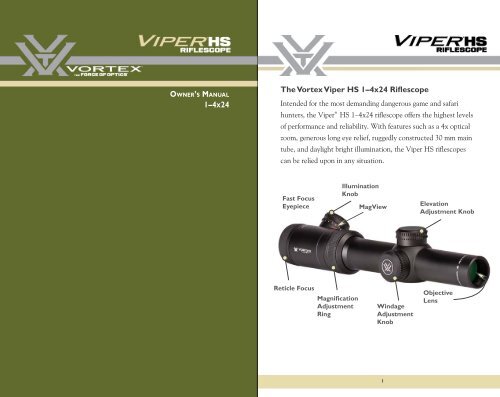
The <strong>Vortex</strong> Viper HS 1–4x24 Riflescope<br />
Intended for the most demanding dangerous game and safari<br />
hunters, the Viper ® HS 1–4x24 riflescope offers the highest levels<br />
of performance and reliability. With features such as a 4x optical<br />
zoom, generous long eye relief, ruggedly constructed 30 mm main<br />
tube, and daylight bright illumination, the Viper HS riflescopes<br />
can be relied upon in any situation.<br />
Fast Focus<br />
Eyepiece<br />
Illumination<br />
Knob<br />
MagView<br />
Elevation<br />
Adjustment Knob<br />
Reticle Focus<br />
Magnification<br />
Adjustment<br />
Ring<br />
Windage<br />
Adjustment<br />
Knob<br />
Objective<br />
Lens<br />
1
RIFLESCOPE ADJUSTMENTS<br />
Reticle Focus<br />
<strong>Vortex</strong> Viper HS riflescopes use a fast focus eyepiece designed<br />
to quickly and easily adjust the focus on the riflescope’s<br />
reticle.<br />
To adjust the reticle focus:<br />
• Look through the<br />
riflescope at a blank<br />
white wall or up at the<br />
sky.<br />
• Turn the eyepiece<br />
focus knob in or out<br />
until the reticle image is<br />
Adjust the reticle focus<br />
as crisp as possible.<br />
• Note: Try to make this particular adjustment quickly, as the<br />
eye will try to compensate for an out-of-focus reticle.<br />
Once this adjustment is complete, it will not be necessary to<br />
re-focus every time you use the riflescope. However, because<br />
your eyesight may change over time, you should re-check this<br />
adjustment periodically.<br />
Warning<br />
Looking directly at the sun through a riflescope, or any optical<br />
instrument, can cause severe and permanent damage to your<br />
eyesight.<br />
Windage and Elevation Adjustments<br />
The Viper HS riflescope incorporates adjustable elevation and<br />
windage dials with audible clicks. Each audible click moves the<br />
bullet’s point-of-impact 1/2 of a minute of angle (MOA).<br />
1/2 MOA closely corresponds to 1/2 inch at 100 yards, 1 inch<br />
at 200 yards, 1 1/2 inches at 300 yards...taking two (2) clicks<br />
to move the bullet’s point-of-impact approximately one inch at<br />
100 yards.<br />
How to adjust windage and elevation settings<br />
Begin adjusting the windage and elevation settings by first<br />
removing the outer covers. Then,<br />
move the turrets in the direction<br />
you wish the bullet’s point-ofimpact<br />
to change. To make the<br />
adjustments, dial the adjustment<br />
knob in the appropriate direction<br />
(up/down or left/right) as<br />
indicated by the arrows.<br />
To adjust settings, turn knobs<br />
· Up / Down<br />
After sight-in, you can re-align<br />
· Left / Right<br />
the zero marks on the turret knobs<br />
with the reference dots if you wish (see Resetting Adjustment Levels<br />
with Zero Reset section). Replace outer covers when done.<br />
2<br />
3
ILLUMINATED RETICLE<br />
This scope uses professional-grade illumination, designed for<br />
daytime, low light, and night vision devices. The variable intensity<br />
reticle illumination system aids in low light performance and rapid<br />
target acquisition.<br />
Illumination Knob<br />
The adjustment knob is located on the left<br />
side of the scope’s eyepiece.To activate the<br />
illumination, rotate the adjustment knob<br />
in either direction. The illumination knob<br />
allows for 10 levels of brightness intensity;<br />
an off click between each level allows<br />
the shooter to turn the illumination off and return to a favored<br />
intensity level with just one click. The top five settings (6, 7, 8, 9<br />
and 10) are visible in the daytime, depending on the background<br />
color. Settings below 6 are for low light use when the user’s eyes<br />
have adjusted to lower light levels. Lowest settings are for use with<br />
night vision devices.<br />
Replacing the Illumination Battery<br />
• Unscrew the outer cap on the illumination knob with a coin.<br />
• Remove the battery.<br />
• Replace with a new CR 2032 battery. MagView<br />
Variable Power Adjustments<br />
To change magnifications, turn the<br />
magnification ring to the desired level. The<br />
<strong>Vortex</strong> MagView system will provide a low<br />
light reference for magnification level.<br />
RIFLESCOPE MOUNTING<br />
To get the best performance from your <strong>Vortex</strong> Viper HS riflescope,<br />
proper mounting is essential. Although not<br />
difficult, the correct steps must be followed.<br />
If you are unsure of your abilities, it would<br />
be best to use the services of a qualified<br />
gunsmith.<br />
Rings and Bases<br />
Mount an appropriate base and matching rings to your rifle according<br />
to the manufacturer’s instructions. The <strong>Vortex</strong> Viper HS riflescopes<br />
require 30mm rings.<br />
Use the lowest ring height that will provide complete clearance of<br />
scope and rifle—avoiding any contact with barrel, receiver, bolt<br />
handle or any other part of the rifle. A low mounting will help assure<br />
proper cheek weld, aid in establishing a solid shooting position, and<br />
promote fast target acquisition.<br />
Centering of the Reticle<br />
If you wish to re-center the reticle to the center, this can be done<br />
easily:<br />
• Turn the windage or elevation dial as far as possible in either<br />
direction. Do not force the dial. As soon as any any resistance is felt,<br />
stop turning.<br />
• Carefully count the dial rotations while turning the dial back in<br />
the opposite direction. Stop turning as soon as resistance is felt.<br />
• Turn the dial the other direction to half the amount of rotations<br />
counted in step one.<br />
Complete this procedure for both windage and elevation dials to<br />
approximately center the reticle.<br />
4<br />
5
Eye Relief and Reticle Alignment<br />
After installing the bottom ring halves on the mounting base,<br />
place the riflescope on the bottom ring halves and loosely install<br />
the upper ring halves. Before tightening the scope ring screws,<br />
adjust for maximum eye relief to avoid injury from recoil:<br />
• Set the riflescope to the middle of its magnification range.<br />
• Slide the riflescope as far forward as possible in the rings.<br />
• While viewing through the riflescope in a normal shooting<br />
position, slowly slide the riflescope back towards the shooter’s<br />
face—paying attention to the field of view. Just as the full view<br />
is visible, stop.<br />
• Without disturbing the front-back placement, rotate the<br />
riflescope until the vertical crosshair exactly matches the<br />
vertical axis of the rifle. Use of a reticle leveling tool, a weight<br />
hung on a rope, or an adjustable set of feeler gauges will help<br />
with this procedure.<br />
Bore Sighting<br />
Initial bore sighting of the riflescope will save time and money<br />
at the range. This can be done by using a mechanical or laser<br />
bore sighter according to the manufacturer’s instructions or by<br />
removing the bolt and sighting through the barrel on some rifles.<br />
To visually bore sight a rifle:<br />
• Place the rifle solidly on a rest and remove the bolt.<br />
• Sight through the bore at a target approximately 100 yards<br />
away.<br />
• Move the rifle and rest until the target is visually centered<br />
inside the barrel.<br />
• With the target centered in the bore, make windage<br />
and elevation adjustments until the reticle crosshair is also<br />
centered over the target.<br />
• After aligning the reticle, tighten and torque the ring<br />
screws down per the manufacturer’s instructions.<br />
Use of an adjustable set of feeler<br />
gauges between a one-piece<br />
base and flat bottom section<br />
of the riflescope to square the<br />
riflescope (and reticle) to the<br />
base.<br />
Visually bore-sighting a rifle.<br />
6<br />
7
Final Range Sight-In<br />
After the riflescope has been bore-sighted, final sight-in should<br />
be done at the range using the exact ammunition expected to<br />
be used while shooting. Sight in and zero the riflescope at the<br />
preferred distance. 100 yards is the most common zero distance,<br />
although a 200 yard zero may be preferred for long range<br />
applications.<br />
Be sure the reticle is in focus (see Reticle Focus) and set the<br />
parallax adjustment to match the distance being used for sight-in:<br />
• Following all safe shooting practices, fire a three-shot<br />
group as precisely as possible.<br />
• Next, adjust the reticle to match the approximate center<br />
of the shot group (see section on Windage and Elevation<br />
Adjustment).<br />
Resetting Adjustment Dials with Zero Reset<br />
Viper HS riflescopes feature windage/elevation dials wthat will<br />
allow you to re-index the zero indicator after sight-in without<br />
disturbing your settings. This allows you to quickly return to<br />
your original zero if temporary corrections are used in the field.<br />
Reset the windage and elevation dials in this way:<br />
1. Remove the outer cap and pull the adjustment dial<br />
outward against the spring tension until it stops.<br />
2. With the dial pulled fully outwards, rotate the dial to<br />
repositio the zero mark on the index line.<br />
3. Release the dial, allowing it to return to the normal<br />
inward position.<br />
Remove the outer cap and<br />
expose the turret dial.<br />
Note: If the rifle is very solidly mounted and cannot be moved,<br />
simply look through the scope and adjust the reticle until it is<br />
centered on the fired group.<br />
• Carefully fire another three-shot group and see if the<br />
bullet group is centered on the bullseye.<br />
This procedure can be repeated as many times as necessary to<br />
achieve a perfect zero.<br />
Grasp turret dial, pull<br />
upward and rotate<br />
until the etched zero<br />
mark (arrow) aligns<br />
with the indicator line<br />
on scope body.<br />
8<br />
9
MAINTENANCE<br />
Cleaning<br />
The fully waterproof and fogproof <strong>Vortex</strong> Viper HS riflescope<br />
requires very little routine maintenance other than periodically<br />
cleaning the exterior lenses. The exterior of the scope may be<br />
cleaned by wiping with a soft, dry cloth.<br />
When cleaning the lenses, be sure to use products, such as<br />
the <strong>Vortex</strong> Fog Free cleaning products or Lens Pen, that are<br />
specifically designed for use on coated optical lenses.<br />
• Be sure to blow away any dust or grit on the lenses prior to<br />
wiping the surfaces.<br />
• Using your breath, or a very small amount of water or pure<br />
alcohol, can help remove stubborn things like dried water<br />
spots.<br />
Lubrication<br />
All components of the <strong>Vortex</strong> Viper HS riflescopes are<br />
permanently lubricated, so no additional lubricant should be<br />
applied.<br />
Note: Other than to remove the turret caps, do not attempt to<br />
disassemble any components of the riflescope. Disassembling of<br />
riflescope may void warranty.<br />
Storage<br />
If possible, avoid exposing your <strong>Vortex</strong> riflescope to direct<br />
sunlight or any very hot location for long periods of time.<br />
TROUBLESHOOTING<br />
Sighting-in Problems<br />
Many times, problems thought to be with the scope are actually<br />
mount problems. Be sure the mounts are tight to the rifle and the<br />
scope is secured so it doesn’t twist or move in the rings.<br />
An insufficient windage or elevation adjustment range may indicate<br />
problems with the base mount, base mount holes drilled in the rifle’s<br />
receiver, or barrel/receiver alignment.<br />
Check for Correct Base and Ring Alignment<br />
• Re-center the scope reticle (see Centering of the Reticle).<br />
• Attach bore sighter, or remove bolt and visually boresight rifle.<br />
• Look through the scope. If the reticle appears way off center on<br />
the boresighter image or when compared to the visually centered<br />
target when looking through rifle’s bore, there may be a problem<br />
with the bases or rings being used. Confirm that correct base and<br />
rings are being used—and in the proper orientation.<br />
Grouping Problems<br />
There are many issues that can cause poor bullet grouping.<br />
• Maintain a good shooting technique and use a solid rest.<br />
• Check that all screws on rifle’s action are properly tightened.<br />
• Be sure rifle barrel and action are clean and free of excessive<br />
oil or copper fouling.<br />
• Check that rings are correctly torqued per the manufacturer’s<br />
instructions.<br />
• Some rifles and ammunition don’t work well together—try<br />
different ammunition and see if accuracy improves.<br />
10<br />
11
THE VIP WARRANTY<br />
We build optics based on our commitment to your absolute satisfaction.<br />
That’s why <strong>Vortex</strong> products are unconditionally guaranteed.<br />
<strong>Vortex</strong> pledges this Very Important Promise to you—a Very Important<br />
Person.<br />
Our VIP unlimited, unconditional warranty<br />
covers your Viper HS riflescope in the event<br />
it requires service. No matter the cause,<br />
<strong>Vortex</strong> <strong>Optics</strong> will repair or replace the<br />
binocular at no charge to you.<br />
Call vortex <strong>Optics</strong> at 800-426-0048 for prompt, professional, and<br />
friendly service.<br />
<strong>Vortex</strong> <strong>Optics</strong><br />
2120 West Greenview Drive<br />
Middleton, WI 53562<br />
service@vortexoptics.com<br />
Visit <strong>Vortex</strong> <strong>Optics</strong> at vortexoptics.com for more information.<br />
© <strong>Vortex</strong> <strong>Optics</strong> usa<br />
12