HS3.0 Screwdriver - Hofer-medical
HS3.0 Screwdriver - Hofer-medical
HS3.0 Screwdriver - Hofer-medical

Create successful ePaper yourself
Turn your PDF publications into a flip-book with our unique Google optimized e-Paper software.
Instruction Manual<br />
<strong>HS3.0</strong> <strong>Screwdriver</strong><br />
Save Lock Pull & Push<br />
www.hofer-<strong>medical</strong>.com
Content<br />
Single Parts and Assembling<br />
SDSL-1<br />
Single Parts<br />
SDSL-1.1<br />
Assembling<br />
SDSL-1.2<br />
Intra-operative Handling<br />
SDSL-2<br />
Putting on Screws<br />
SDSL-2.1<br />
Releasing and Locking Screws<br />
SDSL-2.2<br />
Screw Removal<br />
SDSL-2.3<br />
Cleaning during Application<br />
SDSL-2.4<br />
Post-operative Handling<br />
SDSL-3<br />
Preparation<br />
SDSL-3.1<br />
Functional Checks<br />
SDSL-3.2<br />
Epilogue<br />
SDSL-4<br />
Symbols<br />
Do not touch!<br />
Warning<br />
This description is not sufficient for immediate use of implants and instruments.<br />
An instruction into handling these instruments by a surgeon experienced with them is strongly recommended.
SDSL-1.1<br />
Single Parts<br />
Long<br />
or<br />
Short<br />
B<br />
B<br />
Holding Sleeve ForceDRIVE T8 Save Lock Pull & Push:<br />
Consisting of:<br />
A Jaw Sleeve and<br />
B Screwing Sleeve<br />
A<br />
A<br />
Long (811-961-108-003)<br />
Short (811-961-108-004)<br />
+ +<br />
175 mm or<br />
100 mm<br />
ForceDRIVE Shaft T8 AO-QC<br />
175 mm (811-961-108-175)<br />
100 mm (811-961-108-100)<br />
+ +<br />
<strong>Screwdriver</strong> Handle Silicon AO-QC<br />
(811-980-000-011)<br />
Attention:<br />
The following figures show the handling of the screwdriver using the example of an 175 mm screwdriver<br />
shaft and a long holding sleeve. The handling for the 100 mm screwdriver shaft and the short holding sleeve<br />
is the same.
SDSL-1.2<br />
Assembling<br />
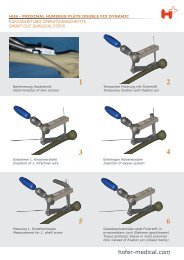
1) Connect screwdriver shaft to the handle<br />
1<br />
2 and 3) Please note the correct alignment of jaw sleeve and screwing sleeve. The jaw sleeve is inserted on the screwdriver<br />
shaft (2). Then the screwing sleeve is pushed up until it snaps in (3).<br />
Attention: For inserting the screwing sleeve touch it only in its front part to avoid compression of the slot.<br />
only touch<br />
front part<br />
2<br />
3<br />
Detail<br />
4) Both parts are now screwed together in front position (screw jaw sleeve while holding the screwing sleeve). The jaws<br />
should finally embrace the socket of the screwing sleeve. Please also consider the section tips.<br />
4<br />
5) The sleeves can now be moved together backwards to the ”parking position“.<br />
Detail (Jaws embrace socket of screwing sleeve and<br />
tip of screwdriver shaft is not visible)<br />
5<br />
”Parking position“<br />
Tips:<br />
• For aligning the jaw sleeve relative to the screwing sleeve turn in clockwise direction while exerting slight pressure.<br />
• If the jaw sleeve can not be easily connected to the screwing sleeve, slightly press the slot of the screwing sleeve<br />
together.
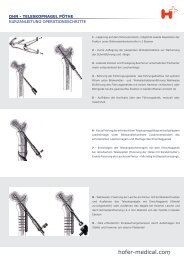
SDSL-2.1 Intra-operative Handling - Putting on Screws<br />
The angle stable screws are fixed with their threaded heads in the holding sleeve of the screwdriver. Therefore, the<br />
ForceDrive is inserted in the head of the screw and axially aligned with the screw first (1). Then both components of the<br />
holding sleeve (jaw sleeve and screwing sleeve) are moved down together from the ”parking position“ (2). Jaw sleeve<br />
and screwing should be connected via the square connection. (3) Then the screwing sleeve is screwed on the screw head<br />
by means of the jaw sleeve (4). The screw can now be safely removed from the tray (5).<br />
Important:<br />
• Hold the screwdriver as vertically as possible to make putting on the screw easier.<br />
• The screwdriver can only be used for angle stable screws.<br />
• Put the screwdriver only with little effort onto the screw. Otherwise the head thread could be damaged making<br />
the locking effect impossible.<br />
• Stop screwing the holding sleeve on the screw when reaching a distance of 1 mm to the tray! (criterion torque)<br />
• In case of too strong tightening the screwing sleeve could be widened being no longer compatible with the<br />
sleeve system of an aiming device and may be stuck. In this case loosen the holding sleeve until it can be inserted<br />
easily into the aiming device.<br />
• Too strong axial pressure may press the screw in the tray. This can make putting on more difficult and damage the<br />
thread of the screw head.<br />
2<br />
4<br />
3<br />
1<br />
5<br />
Detail<br />
1 mm
SDSL-2.2 Intra-operative Handling - Releasing and Locking of Screws<br />
Inserting the screw, care has to be taken that the fixed screw head is released timely. For this it is necessary to build<br />
up pressure to the tip of the screwdriver by means of the jaw sleeve and to hold it while turning until the screw is<br />
released (1). Without this pressure jaw sleeve and screwing sleeve might be unscrewed. Then the sleeve is put back to<br />
the ”parking position“ (2).<br />
Important: Screw placement has to happen manually and carefully. Don‘t turn too fast and too strong until<br />
the head has reached the hole.<br />
1<br />
2
SDSL-2.3 Intra-operative Handling - Screw Removal<br />
The screwdriver shaft is connected to the ForceDrive of the screws and the screws are unscrewed for 2 - 3 mm (1). Then<br />
the holding sleeve can be screwed on the threaded head. The connection is achieved by pushing the sleeve forward while<br />
further turning the screwdriver (2). Now the screws are fixed to the screwdriver as during implantation and it is possible<br />
to turn and pull simultaneously (3).<br />
Important:<br />
• Too strong tightening may widen the screwing sleeve, which then is no longer compatible with the sleeve system<br />
of an aiming device and may be stuck. In this case loosen the holding sleeve until it can be moved easily again<br />
within the aiming device.<br />
• Put jaw sleeve on screwing sleeve only in front position.<br />
1<br />
2 3<br />
2 - 3mm
SDSL-2.4<br />
Intra-operative Handling - Cleaning during Application<br />
It is important to clean the holding sleeve after each application to remove residual blood and tissue. Dried blood<br />
and tissue should be avoided, as it can harm the functionality of the screwdriver.
SDSL-3.1<br />
Post-operative Handling - Preparation<br />
The screwdriver has to be disassembled before cleaning. The two components of the holding sleeve are unscrewed<br />
from each other in front position (1).<br />
1<br />
Then screwing sleeve and jaw sleeve are removed from the shaft (2). Finally the handle is taken off (3).<br />
Attention: For removing the screwing sleeve only touch it in its front part to avoid compression of the slot.<br />
3<br />
2<br />
For information on preparation, desinfection and sterilisation refer to the instruction manual for instruments.
SDSL-3.2 Post-operative Handling - Functional Checks<br />
Check:<br />
• Are the holes free of blood and tissue?<br />
• Is the tip of the screwdriver in good condition (sharp edges) and not twisted?<br />
• Is it possible to put on and to move the screwing sleeve easily?<br />
If necessary widen the rear collet or check the holes for intactness.<br />
• Is it possible to unscrew and to lock the two components of the holding sleeve easily?<br />
Fig. 10: Functional checks
Epilogue<br />
© 2012 <strong>Hofer</strong> GmbH & Co KG. All rights reserved.<br />
Operation Manuals, Handbooks, Handouts and Software are proprietary. Copies, duplicates, translations or conversion of<br />
any form in a whole or only in parts are not allowed without a prior written approval by HOFER.<br />
Any further rights for the software are specified in the provided licence regulation.<br />
The HOFER logo is a registered trademark of the <strong>Hofer</strong> GmbH & Co KG in Austria and other countries.<br />
The rights at other brand and product names mentioned in this document lie with its owners and are recognized hereby.<br />
The mentioning of products which aren‘t from HOFER serves exclusively for information purposes and doesn‘t represent<br />
advertisement of any form. HOFER doesn‘t take on any liability with regard to the choice, performance or usability of<br />
the products.<br />
The methods specified in this document, modes of operation and the like were carefully checked. If faults or suggestions<br />
for improvement should stand out, however, despite this examination, then we ask you to inform us about these. The<br />
operation method represented here introduces merely a possible method for the indication to be treated. It remains<br />
to the decision of the respective surgeon to hold on to the described surgical technique or to vary it according to the<br />
requirements. Direct and indirect damages as well as consequential damages are therefore excluded in every case.<br />
Please do not hesitate to contact us for further information.<br />
20120515da_HS30_<strong>Screwdriver</strong>_Save_Lock_Instruction_Manual-ge.indd<br />
Rev. May 2012<br />
<strong>Hofer</strong> GmbH & Co KG<br />
Fehringerstrasse 45<br />
A-8280 Fürstenfeld<br />
TEL: +43 (0)3382/53388<br />
FAX: +43 (0)3382/53093<br />
office@hofer-<strong>medical</strong>.com<br />
www.hofer-<strong>medical</strong>.com<br />
FN21826y<br />
UID ATU30764704