PDF instructions - FDJ On Time
PDF instructions - FDJ On Time
PDF instructions - FDJ On Time

You also want an ePaper? Increase the reach of your titles
YUMPU automatically turns print PDFs into web optimized ePapers that Google loves.
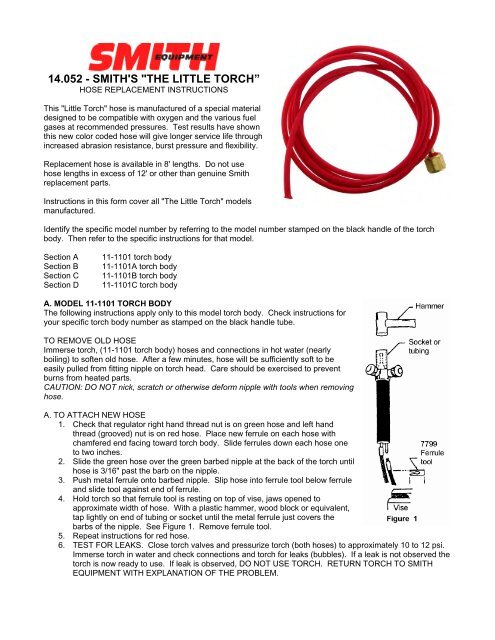
14.052 - SMITH'S "THE LITTLE TORCH”<br />
HOSE REPLACEMENT INSTRUCTIONS<br />
This "Little Torch" hose is manufactured of a special material<br />
designed to be compatible with oxygen and the various fuel<br />
gases at recommended pressures. Test results have shown<br />
this new color coded hose will give longer service life through<br />
increased abrasion resistance, burst pressure and flexibility.<br />
Replacement hose is available in 8' lengths. Do not use<br />
hose lengths in excess of 12' or other than genuine Smith<br />
replacement parts.<br />
Instructions in this form cover all "The Little Torch" models<br />
manufactured.<br />
Identify the specific model number by referring to the model number stamped on the black handle of the torch<br />
body. Then refer to the specific <strong>instructions</strong> for that model.<br />
Section A<br />
Section B<br />
Section C<br />
Section D<br />
11-1101 torch body<br />
11-1101A torch body<br />
11-1101B torch body<br />
11-1101C torch body<br />
A. MODEL 11-1101 TORCH BODY<br />
The following <strong>instructions</strong> apply only to this model torch body. Check <strong>instructions</strong> for<br />
your specific torch body number as stamped on the black handle tube.<br />
TO REMOVE OLD HOSE<br />
Immerse torch, (11-1101 torch body) hoses and connections in hot water (nearly<br />
boiling) to soften old hose. After a few minutes, hose will be sufficiently soft to be<br />
easily pulled from fitting nipple on torch head. Care should be exercised to prevent<br />
burns from heated parts.<br />
CAUTION: DO NOT nick, scratch or otherwise deform nipple with tools when removing<br />
hose.<br />
A. TO ATTACH NEW HOSE<br />
1. Check that regulator right hand thread nut is on green hose and left hand<br />
thread (grooved) nut is on red hose. Place new ferrule on each hose with<br />
chamfered end facing toward torch body. Slide ferrules down each hose one<br />
to two inches.<br />
2. Slide the green hose over the green barbed nipple at the back of the torch until<br />
hose is 3/16" past the barb on the nipple.<br />
3. Push metal ferrule onto barbed nipple. Slip hose into ferrule tool below ferrule<br />
and slide tool against end of ferrule.<br />
4. Hold torch so that ferrule tool is resting on top of vise, jaws opened to<br />
approximate width of hose. With a plastic hammer, wood block or equivalent,<br />
tap lightly on end of tubing or socket until the metal ferrule just covers the<br />
barbs of the nipple. See Figure 1. Remove ferrule tool.<br />
5. Repeat <strong>instructions</strong> for red hose.<br />
6. TEST FOR LEAKS. Close torch valves and pressurize torch (both hoses) to approximately 10 to 12 psi.<br />
Immerse torch in water and check connections and torch for leaks (bubbles). If a leak is not observed the<br />
torch is now ready to use. If leak is observed, DO NOT USE TORCH. RETURN TORCH TO SMITH<br />
EQUIPMENT WITH EXPLANATION OF THE PROBLEM.
B. MODEL 11-1101A TORCH BODY<br />
The following <strong>instructions</strong> apply only to this model torch body. Check <strong>instructions</strong> for your specific torch body<br />
number as stamped on the black handle tube.<br />
TO REMOVE OLD HOSE<br />
1. Unscrew black handle from torch head. Slide handle away from torch head.<br />
2. Immerse torch, hoses and connections in hot water (nearly boiling) to soften<br />
old hose. After a few minutes, hose will be sufficiently soft to be easily pulled<br />
from fitting nipple on torch head. Care should be exercised to prevent burns<br />
from heated parts.<br />
CAUTION: DO NOT nick, scratch or otherwise deform nipple with tools when<br />
removing hose.<br />
TO ATTACH NEW HOSE<br />
1. Check that regulator right hand thread nut is on green hose and left hand<br />
thread (grooved) nut is on red hose. Place new ferrule on each hose with<br />
chamfered end facing toward torch body. Slide ferrules down each hose one<br />
to two inches.<br />
2. Insert hoses through the black handle tube of the torch body. Slide handle<br />
down hoses to allow work space. NOTE: Knurled portion of torch handle must<br />
face the torch head.<br />
3. Slide the green hose over the barbed nipple nearest the green torch valve until<br />
the hose completely covers the nipple.<br />
4. Push metal ferrule onto barbed nipple. Slip hose into ferrule tool below ferrule<br />
and slide tool against end of ferrule.<br />
5. Hold torch so that ferrule tool is resting on top of vise, jaws opened to<br />
approximate width of hose. With a plastic hammer, wood block or equivalent,<br />
tap lightly on end of tubing or socket until the metal ferrule just covers the<br />
barbs of the nipples. See Figure 2. Remove ferrule tool.<br />
6. Repeat <strong>instructions</strong> for red hose.<br />
7. TEST FOR LEAKS. Close torch valves and pressurize torch (both hoses) to 10 to 12 psi. Immerse torch<br />
in water and check connections and torch for leaks (bubbles). If a leak is not observed, the torch is now<br />
ready to use. If leak is observed, DO NOT USE TORCH. RETURN TORCH TO SMITH EQUIPMENT<br />
WITH EXPLANATION OF THE PROBLEM.<br />
C. MODELS 11-1101 B, 11-1102B, 11-1103B, 11-1104B TORCH BODIES<br />
The following <strong>instructions</strong> apply only to these torch models. Check <strong>instructions</strong> per your specific torch body<br />
number as stamped on the black handle tube.<br />
TO REMOVE OLD HOSE<br />
1. Unscrew black handle from torch. Slide handle away from torch head.<br />
2. Lock ferrule tool in vise. Insert tool between torch head and ferrule. See Figure<br />
3.<br />
3. Grasp torch firmly and pull forward. The ferrule will slide back on the hose.<br />
Repeat operation on second hose. Slide ferrules and fabric covering away from<br />
torch.<br />
4. Immerse torch, hoses and connections in hot water (nearly boiling) to soften old<br />
hose. After a few minutes, hose will be sufficiently soft to be easily pulled from<br />
fitting nipple on torch head. Care should be exercised to prevent burns from<br />
heated parts.<br />
CAUTION: DO NOT nick, scratch or otherwise deform nipple with tools when<br />
removing hose.<br />
TO ATTACH NEW HOSE<br />
1. Check that regulator right hand thread nut is on green hose and left hand<br />
thread (grooved) nut is on red hose. Place new ferrule on each hose with<br />
chamfered end facing toward torch body. Slide ferrule down each hose one to<br />
two inches.
2. Insert hoses through the black handle tube of the torch body. Slide handle down hoses to allow work<br />
space. NOTE: Knurled portion of torch handle must face the torch head.<br />
3. Slide the green hose over the barbed nipple nearest the green torch valve until hose is against the torch<br />
head.<br />
4. Push metal ferrule onto barbed nipple. Slip hose into ferrule tool below ferrule and slide tool against end<br />
of ferrule.<br />
5. Hold torch so that ferrule tool is resting on top of vise, jaws opened to approximate width of hose. With a<br />
plastic hammer, wood block or equivalent, tap lightly on end of tubing or socket until the metal ferrule just<br />
covers the barbs of the nipples. See Figure 2. Remove ferrule tool.<br />
6. Repeat <strong>instructions</strong> for red hose.<br />
7. TEST FOR LEAKS. Close torch valves and pressurize torch (both hoses) to 10 to 12 psi. Immerse torch<br />
in water and check connections and torch for leaks (bubbles). If a leak is not observed, the torch is now<br />
ready to use. If leak is observed, DO NOT USE TORCH. RETURN TORCH TO SMITH EQUIPMENT<br />
WITH EXPLANATION OF THE PROBLEM.<br />
D. MODELS 11-1101 C, 11-1102C, 11-1103C, 11-1104C TORCH BODIES<br />
The following <strong>instructions</strong> apply only to these model torch bodies. Check <strong>instructions</strong> for your specific torch body<br />
number as stamped on the black handle tube.<br />
TO REMOVE OLD HOSE<br />
1. Lock ferrule tool in vise. Insert tool between torch body and<br />
ferrule. See Figure 4.<br />
2. Grasp torch firmly and pull forward. The ferrule will slide back<br />
on the hose. Repeat operation on second hose. Slide ferrules<br />
away from torch.<br />
3. Remove hoses from torch body.<br />
TO ATTACH NEW HOSE<br />
1. Check the regulator right hand thread nut is on green/blue hose<br />
and left hand thread (grooved) nut is on red hose. Place new<br />
ferrule on each hose with chamfered end facing toward torch<br />
body. Slide ferrules down each hose one to two inches.<br />
2. Slide the green/blue hose over the barbed nipple nearest the<br />
oxygen mark on handle tube until it is 3/16" past the barb on the<br />
nipple.<br />
3. Push metal ferrule onto barbed nipple. Slip hose into ferrule tool<br />
below ferrule and slide tool against end of ferrule.<br />
4. Hold torch so that ferrule tool is resting on top of vise, jaws<br />
opened to approximate width of hose. With a plastic hammer,<br />
wood block or equivalent, tap lightly on end of tubing or socket<br />
until the metal ferrule just covers the barbs of the nipple. See<br />
Figure 1. Remove ferrule tool.<br />
5. Repeat <strong>instructions</strong> for red hose.<br />
6. TEST FOR LEAKS. Close torch valves and pressurize torch<br />
(both hoses) to 10 to 12 psi. Immerse torch in water and check<br />
connections and torch for leaks (bubbles.) If-a leak is not<br />
observed, the torch is now ready to use. If leak is observed, DO<br />
NOT USE TORCH. RETURN TORCH TO SMITH EQUIPMENT WITH EXPLANATION OF THE<br />
PROBLEM.<br />
<strong>FDJ</strong> <strong>On</strong> <strong>Time</strong> presents the manufacturer’s <strong>instructions</strong> in a useful, organized form. Original <strong>instructions</strong> are available with the product.