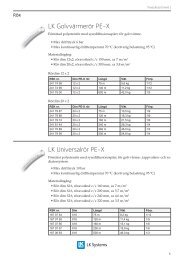
Product Catalogue 2012 - LK Systems AB
Product Catalogue 2012 - LK Systems AB
Product Catalogue 2012 - LK Systems AB

Create successful ePaper yourself
Turn your PDF publications into a flip-book with our unique Google optimized e-Paper software.
MultiFill® | <strong>LK</strong> 520 MultiFill® 25<br />
<strong>LK</strong> 520 MultiFill® 25<br />
Technical Data<br />
Working temperature<br />
Max. working pressure<br />
Media<br />
Mesh opening, filter<br />
Material, valve body<br />
Material, cover<br />
Material, filter element<br />
Material, sealings<br />
Material, insulation<br />
Min. -20°C/Max. +60°C<br />
0.6 MPa (6 bar)<br />
Water - Glycol/Ethanol<br />
mixture max. 50%<br />
1.0 mm<br />
Brass EN 12165 CW617N<br />
PPS Composite<br />
POM<br />
EPDM<br />
Expanded Polystyrene EPS<br />
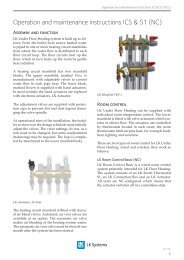
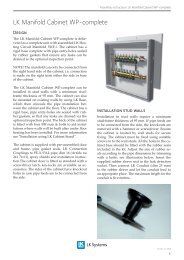
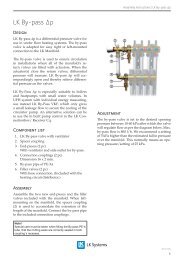
Filling of refrigerant fluid<br />
Close valve 1. Connect the refrigerant fill to valve 2 according<br />
to the flow arrow. Connect the refrigerant return to valve 3.<br />
After completion of the filling operation, close valves 2 and 3.<br />
Open valve 1. The included handle can be used to open and<br />
close the valves.<br />
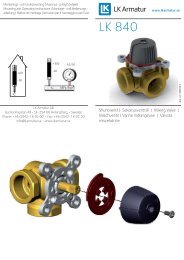
<strong>LK</strong> 520 MultiFill® 25 is a combination valve for easy filling<br />
of refrigerant fluid into ground source heat systems. The<br />
valve has a filter to protect the evaporator against possible<br />
grit. Its compact construction allows it to be installed in tight<br />
spaces. The valve is equipped with insulation to protect<br />
against condensation and possible icing. <strong>LK</strong> 520 MultiFill® 25<br />
can also be used in other applications where filling and<br />
filtration are required.<br />
Arrows on the valve body indicate the direction of the<br />
flow. The enclosed insulation should be used.<br />
Apart from cleaning the filter no maintenance is required.<br />
The filter should be cleaned immediately after installation,<br />
a month later and then every other year or when refilling<br />
fluid to the system. Check the installation regularly.<br />
Cleaning the filter<br />
Close valve 4 and remove the knob using the included<br />
handle. Remove the filter and clean it with water. When<br />
refitting, the bevels on the filter and the filter holder must<br />
be on the same side. Vent the system. N.B. Water splashes<br />
may occur.<br />
4<br />
1<br />
2 3<br />
64