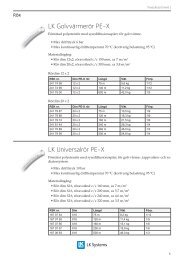
Product Catalogue 2012 - LK Systems AB
Product Catalogue 2012 - LK Systems AB
Product Catalogue 2012 - LK Systems AB

Create successful ePaper yourself
Turn your PDF publications into a flip-book with our unique Google optimized e-Paper software.
Zone Valves | <strong>LK</strong> 525 Zone Valve Solar<br />
<strong>LK</strong> 525 Zone Valve Solar<br />
Technical Data<br />
Working temperature<br />
Min. -15°C/Max. +120°C<br />
(+160°C briefly)<br />
Ambient temperature Min. +1°C/Max. +60°C<br />
Max. working pressure 1.0 MPa (10 bar)<br />
Max. pressure difference 100 kPa<br />
Leakage<br />
< 0.5% of Kvs at 100 kPa<br />
Angle of rotation 60°/360°<br />
Material, valve body Brass EN 12165 CW617N<br />
Material, cover<br />
Brass EN 12164 CW614N<br />
Material, slide<br />
PPS Composite<br />
Media<br />
Water - Glycol/Ethanol<br />
mixture max. 50%<br />
Actuator<br />
7 VA, 230 VAC, 50 Hz<br />
7 VA, 24 VAC, 50 Hz<br />
Operation time 8 seconds (60°)<br />
Electrical connection Fixed wire alternatively<br />
Molex-compatible<br />
connector<br />
Signal connector Single pole SPST<br />
Protection class IP 40<br />
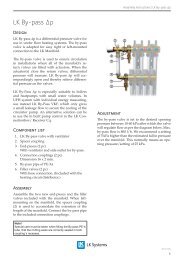
<strong>LK</strong> 525 Solar is a motorised 3-way zone valve for On/Off<br />
control intended for use in solar heating systems where<br />
the temperature of the media can reach very high levels.<br />
The plastic adapter is installed between the valve unit and<br />
the actuator to protect the actuator against high temperatures.<br />
The zone valve is designed with a turning slide which allows<br />
it to withstand a larger pressure difference and reduces the<br />
risk of it stalling after longer periods of intermission. On<br />
the upper surface of the actuator is an indicator that shows<br />
which port is open.<br />
The zone valve must not be installed with the motor underneath<br />
the valve unit.<br />
In case of a power failure, the valve cone stays in its current<br />
position. When the power is switched off, the valve can be<br />
manually set to the centre position, which distributes the<br />
flow between the circuits. Remove the motor and turn the<br />
spindle about 30° or turn until fluid flows through both<br />
valve ports. When the power is restored, turn the valve<br />
back to its original position and reinstall the motor.<br />
Please note that the motor can be installed in only one<br />
position.<br />
Cable specification:<br />
Dimension<br />
Wire colours<br />
External insulation<br />
Connector<br />
3 x 0.75 mm²<br />
Blue, brown, black<br />
PVC<br />
Molex® or Molex-compatible<br />
connector, 6-circuit<br />
Type approval certificates - actuator only:<br />
76