This worksheet will help you to produce a PowerPoint presentation ...
This worksheet will help you to produce a PowerPoint presentation ...
This worksheet will help you to produce a PowerPoint presentation ...

Create successful ePaper yourself
Turn your PDF publications into a flip-book with our unique Google optimized e-Paper software.
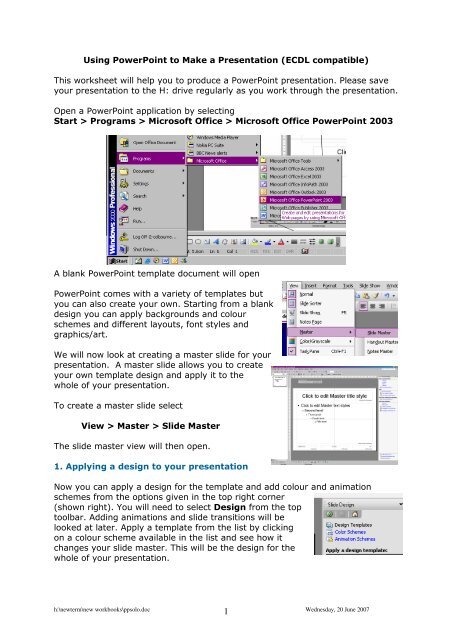
Using <strong>PowerPoint</strong> <strong>to</strong> Make a Presentation (ECDL compatible)<br />
<strong>This</strong> <strong>worksheet</strong> <strong>will</strong> <strong>help</strong> <strong>you</strong> <strong>to</strong> <strong>produce</strong> a <strong>PowerPoint</strong> <strong>presentation</strong>. Please save<br />
<strong>you</strong>r <strong>presentation</strong> <strong>to</strong> the H: drive regularly as <strong>you</strong> work through the <strong>presentation</strong>.<br />
Open a <strong>PowerPoint</strong> application by selecting<br />
Start > Programs > Microsoft Office > Microsoft Office <strong>PowerPoint</strong> 2003<br />
A blank <strong>PowerPoint</strong> template document <strong>will</strong> open<br />
<strong>PowerPoint</strong> comes with a variety of templates but<br />
<strong>you</strong> can also create <strong>you</strong>r own. Starting from a blank<br />
design <strong>you</strong> can apply backgrounds and colour<br />
schemes and different la<strong>you</strong>ts, font styles and<br />
graphics/art.<br />
We <strong>will</strong> now look at creating a master slide for <strong>you</strong>r<br />
<strong>presentation</strong>. A master slide allows <strong>you</strong> <strong>to</strong> create<br />
<strong>you</strong>r own template design and apply it <strong>to</strong> the<br />
whole of <strong>you</strong>r <strong>presentation</strong>.<br />
To create a master slide select<br />
View > Master > Slide Master<br />
The slide master view <strong>will</strong> then open.<br />
1. Applying a design <strong>to</strong> <strong>you</strong>r <strong>presentation</strong><br />
Now <strong>you</strong> can apply a design for the template and add colour and animation<br />
schemes from the options given in the <strong>to</strong>p right corner<br />
(shown right). You <strong>will</strong> need <strong>to</strong> select Design from the <strong>to</strong>p<br />
<strong>to</strong>olbar. Adding animations and slide transitions <strong>will</strong> be<br />
looked at later. Apply a template from the list by clicking<br />
on a colour scheme available in the list and see how it<br />
changes <strong>you</strong>r slide master. <strong>This</strong> <strong>will</strong> be the design for the<br />
whole of <strong>you</strong>r <strong>presentation</strong>.<br />
h:\newterm\new workbooks\ppsolo.doc<br />
1<br />
Wednesday, 20 June 2007
Once <strong>you</strong> have tried several different designs and decided which one <strong>to</strong> use and<br />
have finished applying colours and backgrounds return <strong>to</strong> <strong>you</strong>r <strong>presentation</strong> by<br />
selecting View > Normal<br />
You can now start entering text in<strong>to</strong> the text boxes on <strong>you</strong>r slides.<br />
2. Adding text <strong>to</strong> a slide<br />
The Title Slide la<strong>you</strong>t contains text boxes for a title and a subtitle.<br />
a. Click in the Title text box. A thick grey border appears around the text box<br />
indicating that it is selected.<br />
b. Type Presentations as a title for <strong>you</strong>r <strong>presentation</strong>.<br />
c. Click the Subtitle text box and type <strong>you</strong>r name as a subtitle for <strong>you</strong>r<br />
<strong>presentation</strong>.<br />
3. Adding another slide<br />
a. Click the New Slide but<strong>to</strong>n on the Common Tasks<br />
<strong>to</strong>olbar.<br />
b. A new slide <strong>will</strong> appear. It <strong>will</strong> choose Title and Text as the next appropriate<br />
slide, though <strong>you</strong> could choose a different slide from the panel on the right, stick<br />
with this one for now.<br />
c. Now type Slide Types in the title line and add the following text for the bullet<br />
points putting each on a separate line: Building by bullets, Text only, Clip art,<br />
Scanned images, Charts<br />
4. Adding a title only slide and creating a text box<br />
Sometimes, <strong>you</strong> may want <strong>to</strong> add text <strong>to</strong> a slide without using a built-in text box.<br />
For example, <strong>you</strong> may want <strong>to</strong> type a label for a drawing, or <strong>you</strong> may want <strong>to</strong><br />
add text <strong>to</strong> a blank slide la<strong>you</strong>t. In <strong>PowerPoint</strong>, <strong>you</strong> can add <strong>you</strong>r own text boxes<br />
<strong>to</strong> any slide using the Text Box <strong>to</strong>ol on the drawing <strong>to</strong>olbar.<br />
a. Click the New Slide but<strong>to</strong>n on the Common Tasks <strong>to</strong>olbar again and this time<br />
choose the slide titled Title Only on the <strong>to</strong>p row.<br />
b. For the Title type Text Only<br />
c. On the drawing <strong>to</strong>olbar at the bot<strong>to</strong>m of the screen, click the Text Box<br />
but<strong>to</strong>n. The pointer <strong>will</strong> change <strong>to</strong> a cross.<br />
d. Click on the slide where <strong>you</strong> want <strong>to</strong> place the text. A small text box <strong>will</strong><br />
appear.<br />
h:\newterm\new workbooks\ppsolo.doc<br />
2<br />
Wednesday, 20 June 2007
e. Type the following italic text in<strong>to</strong> the text box and notice as <strong>you</strong> type, the box<br />
<strong>will</strong> expand <strong>to</strong> fit the text<br />
Make up <strong>you</strong>r notes, design the slides and put them in order. Remember not <strong>to</strong><br />
put <strong>to</strong>o many words on one slide.<br />
f. After <strong>you</strong> finish typing, click outside the text box. The border around the box<br />
<strong>will</strong> disappear. The text may appear <strong>to</strong> go off the slide and across the screen, so<br />
<strong>you</strong> <strong>will</strong> need <strong>to</strong> resize the text box <strong>to</strong> fit it on<strong>to</strong> the slide.<br />
5. Resizing a text box<br />
You can also resize the text box. The grey border that appears around an object<br />
when <strong>you</strong> select it has square handles on its corners and on its sides. These are<br />
called selection or resizing handles. You can click and drag these handles <strong>to</strong><br />
resize text boxes.<br />
a. Click the text box <strong>to</strong> select it. A grey border <strong>will</strong> appear around the text box.<br />
b. Place the pointer on a resizing handle (The circles on the text box border).<br />
The pointer <strong>will</strong> change in<strong>to</strong> a two-headed arrow.<br />
c. Hold down the mouse but<strong>to</strong>n and drag the resizing handle until the box fits on<br />
the slide. Drag outwards <strong>to</strong> make the box larger. Drag inwards <strong>to</strong> make the box<br />
smaller.<br />
You can also resize the box so the height and width change at the same time,<br />
click on a corner handle and drag the box.<br />
6. Moving a text box<br />
If <strong>you</strong> don't like where a text box is positioned on a page, <strong>you</strong> can move it <strong>to</strong> a<br />
new location. First <strong>you</strong> select it, and then <strong>you</strong> move it.<br />
a. Click the text box created above. A thick grey border <strong>will</strong> appear around the<br />
text box.<br />
b. Place the pointer on the border. The pointer <strong>will</strong> change in<strong>to</strong> a four-headed<br />
arrow.<br />
c. Hold down the mouse but<strong>to</strong>n and drag the box <strong>to</strong> the new location.then<br />
release the mouse but<strong>to</strong>n<br />
7. Copying a text box<br />
h:\newterm\new workbooks\ppsolo.doc<br />
3<br />
Wednesday, 20 June 2007
a. Click the text box <strong>to</strong> select it.<br />
b. Place the pointer on the box's border and right click.<br />
c. Select Copy Here from the drop-down menu.<br />
d. Right click again, and then click Paste. A copy of the text box is now pasted on<br />
<strong>to</strong>p of the original box. You won’t see it because it is placed perfectly on <strong>to</strong>p of<br />
the other, but it is there.<br />
e. Click and drag on the border of the new text box <strong>to</strong> move it <strong>to</strong> the location<br />
<strong>you</strong> want.<br />
8. Deleting a text box<br />
You can delete <strong>you</strong>r text boxes using the Delete key on <strong>you</strong>r keyboard.<br />
a. Click the text box <strong>to</strong> select it. A grey border <strong>will</strong> appear around the text box.<br />
b. Click the box's border. The insertion point <strong>will</strong> disappear from the text box.<br />
c. Press the Delete key on <strong>you</strong>r keyboard. The text and the border both<br />
disappear. The entire text box is deleted.<br />
9. Adding a clip art slide<br />
a. Add a new slide and choose Title only as the slide <strong>you</strong> want. We <strong>will</strong> be using<br />
this slide a lot from now on.<br />
b. Click in the Title box and type Clip art then click outside the box <strong>to</strong> deselect<br />
it.<br />
You can add clip art <strong>to</strong> any slide using the Insert but<strong>to</strong>n on the Standard Toolbar.<br />
Try adding a car<strong>to</strong>on image <strong>to</strong> <strong>you</strong>r 3 rd slide.<br />
b. Click on the Insert menu and select Picture then Clip Art… A clip art box<br />
appears on the right hand side of the screen.<br />
c. It has a search facility so click in the search box and type person and then<br />
click on an image that appears below <strong>to</strong> choose an image.<br />
f. The image is inserted on <strong>you</strong>r slide. You can drag the image <strong>to</strong> the appropriate<br />
size and position using the mouse<br />
10. Adding <strong>you</strong>r own works of art<br />
You are not restricted <strong>to</strong> using clip art or pictures from the Clip Art gallery.<br />
<strong>PowerPoint</strong> lets <strong>you</strong> insert images from other sources.<br />
h:\newterm\new workbooks\ppsolo.doc<br />
4<br />
Wednesday, 20 June 2007
Let's say <strong>you</strong>'ve used a digital camera <strong>to</strong> create an amazing picture for <strong>you</strong>r<br />
<strong>presentation</strong>, and <strong>you</strong> want <strong>to</strong> insert it in<strong>to</strong> <strong>you</strong>r <strong>PowerPoint</strong> <strong>presentation</strong>. Here's<br />
how <strong>to</strong> do it:<br />
a. Add a new slide and choose Title only as the slide <strong>you</strong> want.<br />
b. Click in the Title box and type Scanned Image then click outside the box <strong>to</strong><br />
deselect it.<br />
c. Click the Insert menu, point <strong>to</strong> Picture, and then click From File. The Insert<br />
Picture dialog box <strong>will</strong> appear.<br />
d. In the Look in box, find the S drive and folder<br />
hsc then the folder STUDENT then the one called<br />
matt or person, <strong>you</strong> have a choice. <strong>This</strong> is where<br />
the artwork is located. (S:\hsc\STUDENT\matt)<br />
c. Double click on the one <strong>you</strong> want <strong>to</strong> use and the picture <strong>will</strong> be inserted on<strong>to</strong><br />
<strong>you</strong>r slide.<br />
The picture <strong>will</strong> need <strong>to</strong> be resized so resize the picture as <strong>you</strong> did with the text<br />
box using the handles at the edge of the picture.<br />
11. Adding a slide with a chart<br />
a. Add a new slide and choose Title only as the slide <strong>you</strong> want.<br />
b. Click in the Title box and type Chart then click outside the box <strong>to</strong> deselect it.<br />
Please note: The chart facility is not as comprehensive as the one in MS Excel<br />
so I recommend designing <strong>you</strong>r chart in Excel and copying it as a picture in<strong>to</strong><br />
<strong>you</strong>r slide. If <strong>you</strong> wish <strong>to</strong> see an explanation of how <strong>to</strong> paste a chart from<br />
Excel then go <strong>to</strong> section 12. Otherwise carry on:<br />
c. Click the Insert menu and then click<br />
Chart….<br />
When <strong>you</strong> insert a chart, a sample data sheet and corresponding bar chart <strong>will</strong><br />
appear on <strong>you</strong>r slide. <strong>PowerPoint</strong> has included some sample data in the first four<br />
columns. The bars in the chart are the graphical re<strong>presentation</strong> of the numbers<br />
in the data sheet. Notice how a higher number in the data sheet results in a<br />
taller corresponding bar.<br />
To create <strong>you</strong>r own chart, <strong>you</strong> can replace the data in the sample data sheet with<br />
<strong>you</strong>r own. Try adding a number <strong>to</strong> the chart <strong>to</strong> see how it changes the<br />
corresponding bar on the chart.<br />
h:\newterm\new workbooks\ppsolo.doc<br />
5<br />
Wednesday, 20 June 2007
Note: If the datasheet is not visible double click on the chart and it <strong>will</strong><br />
reappear.<br />
a. On the data sheet, click in the first row of column A.<br />
b. Type in the number 50, then press Enter. The corresponding bar on the chart<br />
increases in height.<br />
c. Try adding other numbers in<strong>to</strong> the data sheet <strong>to</strong> see how they affect the bars<br />
After <strong>you</strong>'ve finished entering data, exit the work window by clicking anywhere<br />
outside the chart or the data sheet. The data sheet <strong>will</strong> disappear.<br />
If <strong>you</strong> need <strong>to</strong> make any revisions <strong>to</strong> the chart, double-click the chart and the<br />
data sheet <strong>will</strong> appear again.<br />
If the data sheet doesn't appear after <strong>you</strong> double-click the chart, click the View<br />
Data Sheet but<strong>to</strong>n on the Standard Toolbar.<br />
12. Inserting a chart from MS Excel in<strong>to</strong> a slide<br />
If <strong>you</strong> are happy with using the chart feature in MS <strong>PowerPoint</strong> then <strong>you</strong> can go<br />
<strong>to</strong> section 13, If <strong>you</strong> skipped the above section then carry on here<br />
a. Create a chart in MS Excel using the chart <strong>worksheet</strong> and save it on<strong>to</strong> <strong>you</strong>r H:<br />
drive or use the chart already prepared for <strong>you</strong>.<br />
b. Make sure <strong>you</strong> have the slide titled Chart open on the screen<br />
c. Insert a text box in<strong>to</strong> the slide as <strong>you</strong> did before and ensure a flashing<br />
cursor is in the box<br />
d. On the Insert menu, click Object and then click on Create from file.<br />
e. Click Browse <strong>to</strong> select from a location. Find the S drive and the folder hsc<br />
then the folder STUDENT then the file <strong>you</strong> want is called chart, <strong>you</strong> have a<br />
choice. <strong>This</strong> is where the artwork is located. (S:\hsc\STUDENT\chart) Select the<br />
file and then click the OK but<strong>to</strong>n<br />
h:\newterm\new workbooks\ppsolo.doc<br />
6<br />
Wednesday, 20 June 2007
f. To create a linked object, select the Link check box.<br />
Note When <strong>you</strong> create a linked or embedded object from an existing Microsoft<br />
Excel workbook, the entire workbook is inserted in<strong>to</strong> <strong>you</strong>r slide. Only one<br />
<strong>worksheet</strong> is displayed at a time. To display a different <strong>worksheet</strong>, double-click<br />
the Excel object, and then click a different <strong>worksheet</strong>.<br />
<strong>This</strong> might seem complicated but does give <strong>you</strong> more chart options.<br />
13. Adding a slide with a table<br />
a. Add a new slide and choose Title only as the slide <strong>you</strong> want.<br />
b. Click in the Title box and type Table then click outside the box <strong>to</strong> deselect it.<br />
c. Click the Insert menu and then click Table.<br />
<strong>This</strong> box <strong>will</strong> appear so that <strong>you</strong> can select how many<br />
columns and rows <strong>to</strong> have in <strong>you</strong>r table. Select 2 columns<br />
and 2 rows when <strong>you</strong> have decided.<br />
A table <strong>will</strong> appear in <strong>you</strong>r slide. Click in the boxes and fill<br />
in some text, make it up or just put a list of things <strong>you</strong> want <strong>to</strong> do. You can make<br />
changes <strong>to</strong> see how it affects the table. Also try merging and splitting cells.<br />
Once <strong>you</strong> have inserted <strong>you</strong>r table this box <strong>will</strong> appear which allows <strong>you</strong> <strong>to</strong> add<br />
more rows and columns, merge cells and change the colour and text distribution.<br />
14. Moving from slide <strong>to</strong> slide<br />
From the list on the left of <strong>you</strong>r <strong>PowerPoint</strong> screen select the slides<br />
<strong>you</strong> want <strong>to</strong> look at by clicking on them with the mouse.<br />
15. What are the Other Views?<br />
In <strong>PowerPoint</strong> <strong>you</strong> can view <strong>you</strong>r slides in 4 different views. We<br />
have been working in the Normal View, but <strong>you</strong> can also look at<br />
<strong>you</strong>r slides in Slide Sorter, Slide Show and Notes Pages.<br />
You can change the view from the <strong>to</strong>p <strong>to</strong>ol bar by selecting view and<br />
then the view that <strong>you</strong> would like, or<br />
by using the<br />
but<strong>to</strong>ns in the bot<strong>to</strong>m left of the<br />
screen.<br />
h:\newterm\new workbooks\ppsolo.doc<br />
7<br />
Wednesday, 20 June 2007
Normal View<br />
Normal view, with<br />
either Slides (left) or<br />
Outline (right)<br />
selected.<br />
In normal view <strong>you</strong><br />
can design and edit<br />
slides<br />
Slide Sorter View<br />
In Slide Sorter View <strong>you</strong> can reorder slides and apply<br />
slide design and animations, which we <strong>will</strong> cover<br />
later.<br />
Slide Show View<br />
Slide show view displays <strong>you</strong>r slides as a<br />
<strong>presentation</strong>. <strong>This</strong> lets <strong>you</strong> see what it all<br />
looks like when put <strong>to</strong>gether.<br />
Notes Page<br />
In the Notes Page view <strong>you</strong> can write notes <strong>to</strong><br />
accompany each slide. <strong>This</strong> means that <strong>you</strong><br />
can print it off so that when <strong>you</strong> do <strong>you</strong>r<br />
<strong>presentation</strong> <strong>you</strong> can have a copy of the slide<br />
and <strong>you</strong>r notes on the same page.<br />
h:\newterm\new workbooks\ppsolo.doc<br />
8<br />
Wednesday, 20 June 2007
16. Presentation Effects: Animation<br />
Please note: Save <strong>you</strong>r <strong>presentation</strong> at this point if <strong>you</strong> have not already done<br />
so.<br />
Slide Animation<br />
Once <strong>you</strong> have created <strong>you</strong>r <strong>presentation</strong> <strong>you</strong> can also add animations <strong>to</strong> the text<br />
on <strong>you</strong>r slides by using the cus<strong>to</strong>m animation option from the slide transition<br />
drop down menu. Here <strong>you</strong> can add motion paths, entrance and exit styles and<br />
emphasis.<br />
Select the element on the slide that <strong>you</strong> would like <strong>to</strong> animate for example; title<br />
text or bulleted text<br />
a. Click on the Slide Show menu and then select the<br />
Cus<strong>to</strong>m Animation option<br />
b. In the Cus<strong>to</strong>m Animation task pane on the right<br />
hand side of the screen click Add Effect and select the<br />
effect that <strong>you</strong> would like <strong>to</strong> apply, and then select<br />
More Effects.<br />
c. Select an effect (a preview of the effect <strong>will</strong> be shown if the Preview Effect<br />
box is ticked) and then click OK. The animation effect <strong>will</strong> appear in the list in<br />
the Cus<strong>to</strong>m Animation task pane.<br />
d. To alter effect options click on the drop down menu arrow and select<br />
Effect Options<br />
e. Experiment with these options until <strong>you</strong> are happy with the results.<br />
If <strong>you</strong> would like <strong>to</strong> see examples of <strong>PowerPoint</strong> animations go <strong>to</strong> the following<br />
website:<br />
http://pptheaven.mvps.org/tu<strong>to</strong>rials.html#SBSA<br />
Remember <strong>to</strong> keep <strong>you</strong>r animations simple so that <strong>you</strong>r <strong>presentation</strong> viewers<br />
listen <strong>to</strong> what <strong>you</strong> are saying, rather than watching <strong>you</strong>r <strong>presentation</strong><br />
animations.<br />
Don’t just read out <strong>you</strong>r slides, they are there for clarification for <strong>you</strong>r audience<br />
and don’t forget above all don’t rush.<br />
17. Presentation Effects: Slide transition<br />
Slide Transitions are the way in which the slides appear on the screen.<br />
You can apply a slide transition <strong>to</strong> <strong>you</strong>r master slide, or create one for each slide,<br />
or apply <strong>to</strong> all slides.<br />
h:\newterm\new workbooks\ppsolo.doc<br />
9<br />
Wednesday, 20 June 2007
a. Select Slide Show from the Standard Toolbar and then select Slide<br />
Transition.<br />
The column on the left <strong>will</strong> be displayed. From this <strong>you</strong> can<br />
select what sort of transition <strong>you</strong> would like and whether <strong>you</strong><br />
want <strong>to</strong> apply it <strong>to</strong> all the slides or just one. Once <strong>you</strong> have<br />
chosen a transition <strong>you</strong> can set the speed and add sounds. You<br />
can also set the trigger for the slide transition.<br />
b. In the Slide Transition task pane click an effect (a preview<br />
of the effect <strong>will</strong> be shown) and the speed. Click Apply <strong>to</strong> All<br />
Slides.<br />
You can now view <strong>you</strong>r <strong>presentation</strong><br />
Remember <strong>to</strong> have Slide One selected before <strong>you</strong> click here or it<br />
<strong>will</strong> start from the current slide!<br />
Select Slide Show from the menu bar and then choose view<br />
show<br />
To advance through the <strong>presentation</strong> click either the left mouse<br />
but<strong>to</strong>n, or press<br />
the space-bar or the right arrow key. The left arrow key <strong>will</strong><br />
take <strong>you</strong> back.<br />
Press the escape key (Esc) <strong>to</strong> exit <strong>you</strong>r <strong>presentation</strong> at any point<br />
18. Deleting a built in text box<br />
If <strong>you</strong> want <strong>to</strong> delete a built-in text box (one that came with the original slide),<br />
<strong>you</strong> need one additional step more than an ordinary text box.<br />
1. Click the text box <strong>to</strong> select it.<br />
2. Click the box's border and then click the Delete key. The text disappears, but<br />
the border remains.<br />
3. Click the border again and press the Delete key. The entire text box is<br />
deleted.<br />
h:\newterm\new workbooks\ppsolo.doc<br />
10<br />
Wednesday, 20 June 2007