Modelling Your Armiya Krajowa PDF... - Flames of War
Modelling Your Armiya Krajowa PDF... - Flames of War
Modelling Your Armiya Krajowa PDF... - Flames of War

You also want an ePaper? Increase the reach of your titles
YUMPU automatically turns print PDFs into web optimized ePapers that Google loves.
When large numbers <strong>of</strong> helmets fell into<br />
Polish hands, some AK squads painted the<br />
Polish eagle on them.<br />
On some <strong>of</strong> the figures’ helmets without<br />
covers, I painted the Polish eagle emblem. I<br />
painted a very simple ‘V’ with a line down<br />
the middle. Then, another small line at the<br />
bottom to simulate the eagle’s feet.<br />
<strong>Modelling</strong> Kedyw<br />
Rifleman with an<br />
eagle emblem on<br />
the helmet<br />
The Kedyw were the elite troops <strong>of</strong> the AK.<br />
They were tasked with the most difficult<br />
assignments to secure critical buildings and<br />
locations. To complete their mission, they<br />
received a lot <strong>of</strong> the AK’s precious few heavy<br />
weapons.<br />
Heer Panzerfaust The Kedyw teams use the same equipment<br />
figure. with<br />
as the other AK teams, only they had many<br />
civilian trousers.<br />
more submachine-guns and heavy weapons.<br />
The Waffen-SS figures are ideal for Kedyw platoons as they<br />
used a significant portion <strong>of</strong> the captured uniforms. For my<br />
force I used the SS figures for all <strong>of</strong> my Kedyw troops with a<br />
few head swaps here and there.<br />
Mid-war SS Figure (note<br />
the jack boots)<br />
The most tricky <strong>of</strong> these would be the<br />
SS cam<strong>of</strong>lage smocks and trousers.<br />
The AK’s SS camouflage was in the<br />
Pea Dot pattern, so I used James<br />
Brown’s excellent tutorial found in<br />
Art <strong>of</strong> <strong>War</strong> II: Wehrmacht Edition on<br />
page 30. For some troops I painted<br />
both tunic and trousers in Pea Dot,<br />
while for others I mixed in a few<br />
civilian pants here and there.<br />
The Kedyw had a lot <strong>of</strong> hand-held anti-tank weapons as<br />
well, ranging from PIAT projectors to Panzerfaust launchers.<br />
German Panzerfaust figures are perfect for Kedyw troops.<br />
PIAT teams are a bit more tricky, but <strong>of</strong>ten a head-swap with<br />
a British figure or two will suffice.<br />
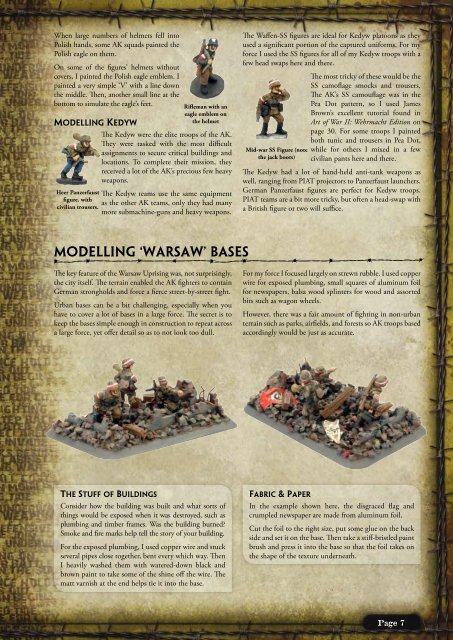
<strong>Modelling</strong> ‘<strong>War</strong>saw’ Bases<br />
The key feature <strong>of</strong> the <strong>War</strong>saw Uprising was, not surprisingly,<br />
the city itself. The terrain enabled the AK fighters to contain<br />
German strongholds and force a fierce street-by-street fight.<br />
Urban bases can be a bit challenging, especially when you<br />
have to cover a lot <strong>of</strong> bases in a large force. The secret is to<br />
keep the bases simple enough in construction to repeat across<br />
a large force, yet <strong>of</strong>fer detail so as to not look too dull.<br />
For my force I focused largely on strewn rubble. I used copper<br />
wire for exposed plumbing, small squares <strong>of</strong> aluminum foil<br />
for newspapers, balsa wood splinters for wood and assorted<br />
bits such as wagon wheels.<br />
However, there was a fair amount <strong>of</strong> fighting in non-urban<br />
terrain such as parks, airfields, and forests so AK troops based<br />
accordingly would be just as accurate.<br />
The Stuff <strong>of</strong> Buildings<br />
Consider how the building was built and what sorts <strong>of</strong><br />
things would be exposed when it was destroyed, such as<br />
plumbing and timber frames. Was the building burned?<br />
Smoke and fire marks help tell the story <strong>of</strong> your building.<br />
For the exposed plumbing, I used copper wire and stuck<br />
several pipes close together, bent every which way. Then<br />
I heavily washed them with watered-down black and<br />
brown paint to take some <strong>of</strong> the shine <strong>of</strong>f the wire. The<br />
matt varnish at the end helps tie it into the base.<br />
Fabric & Paper<br />
In the example shown here, the disgraced flag and<br />
crumpled newspaper are made from aluminum foil.<br />
Cut the foil to the right size, put some glue on the back<br />
side and set it on the base. Then take a stiff-bristled paint<br />
brush and press it into the base so that the foil takes on<br />
the shape <strong>of</strong> the texture underneath.<br />
Page