Modelling Your Armiya Krajowa PDF... - Flames of War
Modelling Your Armiya Krajowa PDF... - Flames of War
Modelling Your Armiya Krajowa PDF... - Flames of War

Create successful ePaper yourself
Turn your PDF publications into a flip-book with our unique Google optimized e-Paper software.
Urban Basing Theory<br />
My theory <strong>of</strong> basing is that bases should set the scene for the<br />
story your army tells. Sometimes that scene is simple, like<br />
a late-spring pasture or a winter wonderland. Or, they can<br />
be complex, like urban basing. In the end basing is just as<br />
important (if not more) to me as the figures themselves.<br />
For my <strong>War</strong>saw force, rather than just making random<br />
urban bases, I carefully thought about the scene and how<br />
and where each platoon in the force fit. Photographs really<br />
helped at this stage.<br />
For example, anti-tank guns will be in the street with improvised<br />
cover around them. The infantry will be found in<br />
trickier terrain such as a destroyed building. But overall,<br />
these platoons are found near each other and thus similar<br />
rubble and wreckage will be found on each base.<br />
Though a neat effect, bases don’t have to be inter-connecting<br />
as if it were a puzzle. They just have to look as though they<br />
connect, and having a scene established in your head is a<br />
great way to make sure you don’t deviate and end up with a<br />
random assortment <strong>of</strong> urban bases.<br />
When working on rubble from a ruined building, it really<br />
helps to know ahead <strong>of</strong> time what your building looked like<br />
before and after it was destroyed, even if you aren’t modelling<br />
the whole building. Basically, you want to know how<br />
the building lived, and how it died.<br />
For example, if your troops will be fighting in and around<br />
a department store, think about the colour <strong>of</strong> the building<br />
and decorative architecture, such as fascades and cast-iron<br />
embellishments.<br />
Also think about what was inside. Was it looted? Was it fully<br />
stocked? Is there anything inside that the civilians would<br />
have pulled out to make barricades?<br />
In the example here I wanted to focus on the corner <strong>of</strong> an<br />
abandoned German HQ building (though you probably<br />
can’t easily see it now!). This helps make the stand ‘make<br />
sense’ and scenic.<br />
For rubble I used several sizes <strong>of</strong> model railway ballast.<br />
Mixing small and medium grains help vary the size <strong>of</strong> the<br />
rubble so that it doesn’t look like the building collapsed in<br />
tidy, uniform, easy-to-clean bits.<br />
When painting rubble remember the colour you chose for<br />
the building. The bricks or stone blocks would be painted<br />
on one side. I base coated all my rubble in a brick-coloured<br />
red-brown to simulate bricks. I then painted several light<br />
grey (the colour I chose for the exterior <strong>of</strong> my building).<br />
Rubble isn’t clean either. When a building collapses a good<br />
portion <strong>of</strong> the material is pulverised into dust and grit. At<br />
the end <strong>of</strong> the painting process, I dry-brushed the rubble<br />
with brick red and shades <strong>of</strong> khaki.<br />
Then add ambient wreckage, from wood splinters, exposed<br />
plumbing, wall paper, recruiting posters, graffiti, and more.<br />
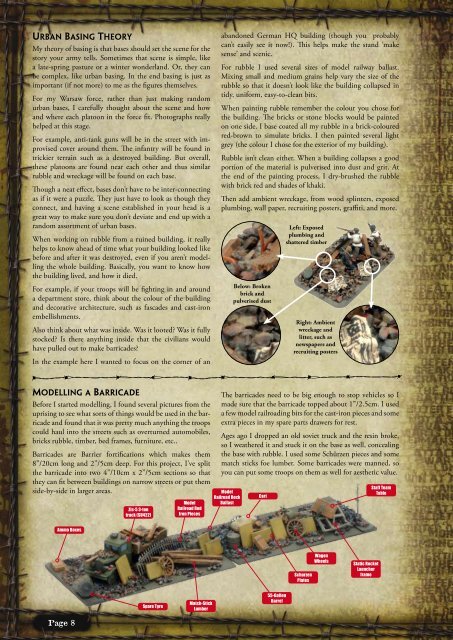
Below: Broken<br />
brick and<br />
pulverised dust<br />
Left: Exposed<br />
plumbing and<br />
shattered timber<br />
Right: Ambient<br />
wreckage and<br />
litter, such as<br />
newspapers and<br />
recruiting posters<br />
<strong>Modelling</strong> a Barricade<br />
Before I started modelling, I found several pictures from the<br />
uprising to see what sorts <strong>of</strong> things would be used in the barricade<br />
and found that it was pretty much anything the troops<br />
could haul into the streets such as overturned automobiles,<br />
bricks rubble, timber, bed frames, furniture, etc..<br />
Barricades are Barrier fortifications which makes them<br />
8”/20cm long and 2”/5cm deep. For this project, I’ve split<br />
the barricade into two 4”/10cm x 2”/5cm sections so that<br />
they can fit between buildings on narrow streets or put them<br />
side-by-side in larger areas.<br />
Zis-5 3-ton<br />
truck (SU422)<br />
Model<br />
Railroad Rod<br />
Iron Pieces<br />
The barricades need to be big enough to stop vehicles so I<br />
made sure that the barricade topped about 1”/2.5cm. I used<br />
a few model railroading bits for the cast-iron pieces and some<br />
extra pieces in my spare parts drawers for rest.<br />
Ages ago I dropped an old soviet truck and the resin broke,<br />
so I weathered it and stuck it on the base as well, concealing<br />
the base with rubble. I used some Schürzen pieces and some<br />
match sticks foe lumber. Some barricades were manned, so<br />
you can put some troops on them as well for aesthetic value.<br />
Model<br />
Railroad Rock<br />
Ballast<br />
Cart<br />
Staff Team<br />
Table<br />
Ammo Boxes<br />
Schurzen<br />
Plates<br />
Wagon<br />
Wheels<br />
Static Rocket<br />
Launcher<br />
frame<br />
Spare Tyre<br />
Match-Stick<br />
Lumber<br />
55-Gallon<br />
Barrel<br />
Page