Technical Instructions - Brother TN-350
Technical Instructions - Brother TN-350
Technical Instructions - Brother TN-350

You also want an ePaper? Increase the reach of your titles
YUMPU automatically turns print PDFs into web optimized ePapers that Google loves.
<strong>TN</strong><strong>350</strong>TECH<br />
<strong>Technical</strong> <strong>Instructions</strong> Cartridge Information Tools & Supplies 1<br />
CORPORATE<br />
LOS ANGELES, USA<br />
US 1 800 394.9900<br />
Int’l +1 818 837.8100<br />
FAX 1 800 394.9910<br />
Int’l +1 818 838.7047<br />
ATLANTA, USA<br />
US 1 877 676.4223<br />
Int’l +1 678 919.1189<br />
FAX 1 877 337.7976<br />
Int’l +1 770 516.7794<br />
KANSAS CITY, USA<br />
US 1 913 871.1700<br />
FAX 1 913 888.0626<br />
MIAMI, USA<br />
US 1 800 595.4297<br />
Int’l +1 305 594.3396<br />
FAX 1 800 522.8640<br />
Int’l +1 305 594.3309<br />
NEW YORK, USA<br />
US 1 800 431.7884<br />
Int’l +1 631 588.7300<br />
FAX 1 800 431.8812<br />
Int’l +1 631 588.7333<br />
TORONTO, CAN<br />
CAN 1 877 848.0818<br />
Int’l +1 905 712.9501<br />
FAX 1 877 772.6773<br />
Int’l +1 905 712.9502<br />
BUENOS AIRES, ARG<br />
ARG 0810 444.2656<br />
Int’l +011 4583.5900<br />
FAX +011 4584.3100<br />
MELBOURNE, AUS<br />
AUS 1 800 003. 100<br />
Int’l +62 03 9561.8102<br />
FAX 1 800 004.302<br />
Int’l +62 03 9561-7751<br />
SYDNEY, AUS<br />
AUS 1 800 003.100<br />
Int’l +62 02 9648.2630<br />
FAX 1800 004.302<br />
Int’l +62 02 9548.2635<br />
MONTEVIDEO, URY<br />
URY 02 902.2001<br />
Int’l +5982 902.2001<br />
FAX +5982 900.0858<br />
JOHANNESBURG, S.A.<br />
S.A. +27 11 974.6155<br />
FAX +27 11 974.3593<br />
SÃO PAULO, BRAZIL<br />
Int’l +55 11 5524.8000<br />
RAANANA, ISRAEL<br />
ISR 09 760.12.39<br />
Int’l +972 9760.12.39<br />
ISR 052.38.555.82<br />
Int’l +972 5238.555.82<br />
See Last Page.<br />
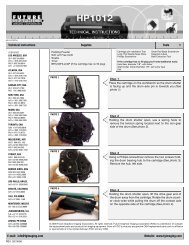
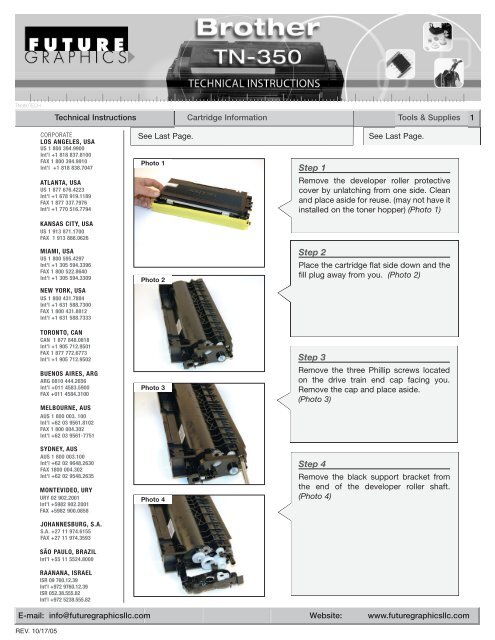
Photo 1<br />
Photo 2<br />
Photo 3<br />
Photo 4<br />
Step 1<br />
See Last Page.<br />
Remove the developer roller protective<br />
cover by unlatching from one side. Clean<br />
and place aside for reuse. (may not have it<br />
installed on the toner hopper) (Photo 1)<br />
Step 2<br />
Place the cartridge flat side down and the<br />
fill plug away from you. (Photo 2)<br />
Step 3<br />
Remove the three Phillip screws located<br />
on the drive train end cap facing you.<br />
Remove the cap and place aside.<br />
(Photo 3)<br />
Step 4<br />
Remove the black support bracket from<br />
the end of the developer roller shaft.<br />
(Photo 4)<br />
E-mail: info@futuregraphicsllc.com Website: www.futuregraphicsllc.com<br />
REV. 10/17/05
2 <strong>Brother</strong> <strong>TN</strong>-<strong>350</strong> <strong>Technical</strong> <strong>Instructions</strong><br />
Notes<br />
Photo 5<br />
Step 5<br />
Take off the white train gears making note<br />
of their orientation. (Photo 5)<br />
Photo 6<br />
Step 6<br />
Using a flat blade screwdriver remove the<br />
“E” clip from the end of the drive gear on<br />
the developer roller shaft. (Photo 6)<br />
Photo 7<br />
Step 7<br />
Remove the drive gear from the end of the<br />
developer roller gear shaft. (Photo 7)<br />
Photo 8<br />
Step 8<br />
Lift the end of the tab on the white bearing<br />
out from the side wall of the hopper<br />
and rotate the tab upward to unlock the<br />
developer roller from the toner hopper.<br />
(Photo 8)<br />
Photo 9<br />
Step 9<br />
Lift up the developer roller enough to clear<br />
the toner hopper and remove by carefully<br />
pulling forward towards you until the shaft<br />
comes out of the toner hopper on the<br />
opposite side. Clean the developer roller<br />
using a dry lint free cloth.<br />
(Photo 9)
<strong>Brother</strong> <strong>TN</strong>-<strong>350</strong> <strong>Technical</strong> <strong>Instructions</strong> 3<br />
Photo 10<br />
Step 10<br />
Remove the toner fill plug. Dump out the<br />
toner from the toner hopper. Using dry<br />
compressed air or vacuum, thoroughly<br />
clean out the toner hopper. Clean the<br />
developer blade using a dry lint free cloth.<br />
(Photo 10)<br />
Notes<br />
Photo 11<br />
Step 11<br />
Place the cartridge flat side down and the<br />
fill plug away from you. Carefully install<br />
the developer back into the toner hopper<br />
with the white bearing clip towards you<br />
on the end of the shaft. Make sure the tab<br />
of the white bearing is in the upright position.<br />
(Photo 11)<br />
Photo 12<br />
Step 12<br />
Rotate the white bearing clip until it clicks<br />
into its position in the hole on the toner<br />
hopper.<br />
Install the developer roller drive gear onto<br />
the end of the developer roller shaft.<br />
(Photo 12)<br />
Photo 13<br />
Step 13<br />
Place the “E” clip onto the end of the shaft<br />
of the developer roller. Using the flat blade<br />
screwdriver snap the ring back into place.<br />
(Photo 13)<br />
Photo 14<br />
Step 14<br />
Reinstall the train drive gears and the<br />
black support bracket from the end of the<br />
developer roller shaft. (Photo 14)
4 <strong>TN</strong>-<strong>350</strong> <strong>Technical</strong> <strong>Instructions</strong><br />
Step 15<br />
The drive train end cap contains<br />
a mechanical lever that has to<br />
be reset so that the gear strip<br />
on the lever will engage with the<br />
gear train and trigger the movement<br />
from left to right of the<br />
lever. The movement of the<br />
lever triggers a switch inside the<br />
print engine that resets during<br />
initial rotation of the cartridge<br />
when the cartridge is first<br />
installed. (Photos 15 & 16)<br />
Photo 17<br />
Photo 18<br />
Step 16<br />
Replace the drive train end cap back onto<br />
the toner hopper and install the Phillip<br />
screws that hold it in place. (Photo 17)<br />
Step 17<br />
Fill with toner.<br />
Replace fill cap. (Photo 17)<br />
Photo 15<br />
Photo 16<br />
Photo 19<br />
Step 18<br />
Replace the developer roller protective<br />
cover by latching from one side.<br />
(Photo 17)<br />
OEM INFO:<br />
Part Number: <strong>TN</strong>-<strong>350</strong><br />
Yield @ 5% 2,500 pages<br />
Gram Load: 90 grams<br />
PPM: 20<br />
PRINTERS:<br />
HL-2040 / HL-2070N<br />
MFC-7220 / MFC-7225N / MFC-7420<br />
/ MFC-7820N<br />
FAX-2820 / FAX-2920<br />
DCP-7020<br />
TOOLS:<br />
Flat Blade Screwdriver<br />
Phillips Screwdriver<br />
The <strong>Brother</strong> HL-2040 and HL-2070N printers are 20ppm<br />
monochrome laser printers with up to 2400x600 dpi resolution<br />
and standard 250 sheet input capacity. Both printers have standard<br />
interface connection that is Parallel and USB the HL-<br />
2070N contains the network 10/100 BaseT Ethernet connection.<br />
The other models MFC, FAX and DCP take the same supplies<br />
but have other options.<br />
Consumables that come in the box for the above mentioned<br />
models contain a starter cartridge rated at 1,500 pages and the<br />
regular drum unit DR<strong>350</strong> rated at 12,000 pages. The starter cartridge<br />
is a one use cartridge due to a mechanical reset lever that<br />
is missing but contained in the standard cartridge.<br />
Future Graphics (FG) is a distributor of compatible replacement parts and products for imagining equipment.<br />
None of FG's products are genuine OEM replacement parts and no affiliation or sponsorship is to be implied between FG and any OEM.<br />
E-mail: info@futuregraphicsllc.com<br />
Website: www.futuregraphicsllc.com