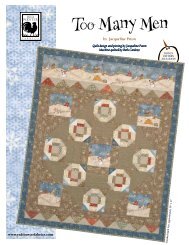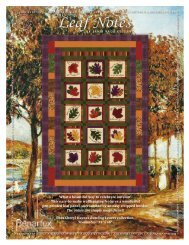
Garden Grove by Henry Glass & Co. - 3 Dudes Quilting
Garden Grove by Henry Glass & Co. - 3 Dudes Quilting
Garden Grove by Henry Glass & Co. - 3 Dudes Quilting

Create successful ePaper yourself
Turn your PDF publications into a flip-book with our unique Google optimized e-Paper software.
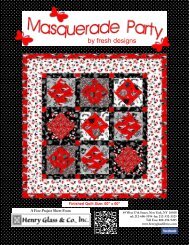
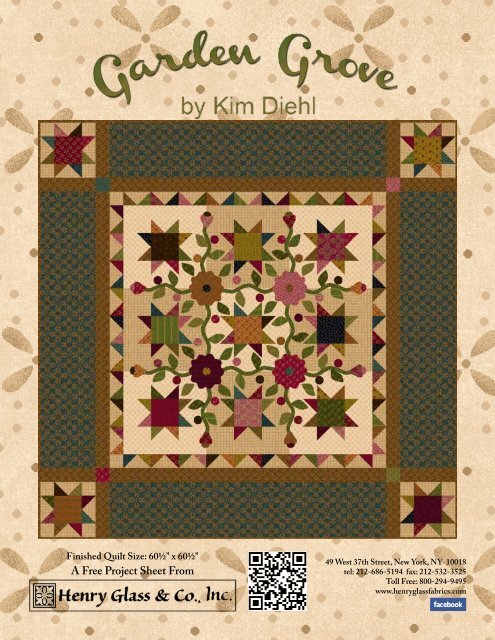
Finished Quilt Size: 60½" x 60½"<br />
A Free Project Sheet From<br />
49 West 37th Street, New York, NY 10018<br />
tel: 212-686-5194 fax: 212-532-3525<br />
Toll Free: 800-294-9495<br />
www.henryglassfabrics.com
<strong>Garden</strong> <strong>Grove</strong><br />
Finished Quilt Size: 60½" x 60½"<br />
Finished Block Size: 12" x 12"<br />
Fabrics in the <strong>Co</strong>llection<br />
5953-22 5953-77 5953-88 5954-44 5954-66 5954-88<br />
5955-44 5955-46 5955-77 5956-30 5956-33 5956-66<br />
5957-30 5957-33 5957-88 5958-33 5958-77 5958-88<br />
5959-22 5959-66 5959-77 5960-44 5960-66 5960-88
<strong>Garden</strong> <strong>Grove</strong><br />
Materials<br />
∙ 1 1/4 yards of tan print for blocks and borders<br />
(5955-44)<br />
∙ 1 yard of cream print for blocks (5954-44)<br />
∙ 1 1/8 yards of medium brown print for blocks,<br />
borders, appliqués, and binding (5957-33)<br />
∙ 1 1/8 yard of teal print for outer border (5953-77)<br />
∙ 1/2 yard of green print for blocks, borders, vines,<br />
and appliqués (5959-66)<br />
∙ 19 fat eighths (9” x 22”) of assorted prints for<br />
blocks, borders, and appliqués (5953-22, 88;<br />
5954-66, 88; 5955-46, 77; 5956-30, 33, 66;<br />
5957-30, 88; 5958-33, 77, 88; 5959-22, 77;<br />
5960-44, 66, 88)<br />
∙ 3 3/4 yards of gold print fabric for backing<br />
(5960-44)<br />
∙ 1 square, 66” x 66”, of batting<br />
∙ 3/8” bias bar<br />
∙ Water-soluble liquid glue for fabric<br />
∙ Basic supplies for quiltmaking and your favorite<br />
appliqué method<br />
Cutting Instructions<br />
Please cut all pieces across the width of the fabric in the<br />
order given, unless otherwise noted.<br />
From the tan print, cut:<br />
4 strips, 4 1/2” x 42”; crosscut into 32 squares,<br />
4 1/2” x 4 1/2”<br />
8 strips, 2 1/2” x 42”; crosscut into 52<br />
rectangles,<br />
2 1/2” x 4 1/2”, and 20 squares,<br />
2 1/2” x 2 1/2”<br />
From the cream print, cut:<br />
5 strips, 4 1/2” x 42”; crosscut into 40 squares,<br />
4 1/2” x 4 1/2”<br />
From the medium brown print, cut:<br />
4 strips, 2 1/2” x 40 1/2”<br />
8 strips, 2 1/2” x 42”; crosscut 2 strips into 8<br />
rectangles, 2 1/2” x 8 1/2”. The remaining<br />
strips will be used for the binding.<br />
Reserve the scraps.<br />
From the teal print, cut:<br />
4 strips, 8 1/2” x 40 1/2”<br />
Reserve the scraps.<br />
From the 1/2 yard cut of green print, cut:<br />
Enough 1 1/4”-wide bias strips to make four strips,<br />
40” each, when joined together end to end using<br />
straight, not diagonal, seams. Reserve the scraps.<br />
Page 1<br />
From each of the assorted print fat eighths, and the<br />
reserved brown, teal, and green print scraps, cut:<br />
8 squares, 2 1/2” x 2 1/2” (combined total of 176)<br />
From the remainder of the prints listed above, cut an<br />
additional:<br />
13 squares, 4 1/2” x 4 1/2” (star block center<br />
squares)<br />
4 squares, 2 1/2” x 2 1/2” (middle border<br />
sashing squares)<br />
Reserve the scraps for the appliqués.<br />
From the reserved scraps of assorted green prints, cut:<br />
20 leaves<br />
20 reversed leaves<br />
8 calyxes’s (bud base)<br />
From the remaining reserved prints, cut:<br />
4 flowers<br />
36 circles (flower centers, berries, and buds)<br />
Piecing the Star Blocks<br />
and the Quilt Center<br />
All pieces are sewn with right sides together using a 1/4”<br />
seam allowance unless otherwise noted.<br />
1. Use a pencil and an acrylic ruler to draw a sewing<br />
line from corner to corner on the wrong side of 176 of the<br />
assorted print 2 1/2” squares.<br />
2. Layer a prepared assorted print 2 1/2” square over one<br />
corner of a tan print 4 1/2” square. Stitch the pair together<br />
on the drawn line. Press the resulting inner triangle open,<br />
aligning the corner with the bottom layers to keep it<br />
square. Trim away the layers underneath the top triangle,<br />
leaving a 1/4” seam allowance. In the same manner, stitch,<br />
press, and trim a second prepared assorted print square to<br />
the tan square to make a mirror-image point. Repeat for a<br />
total of 16 star point units.<br />
3. Lay out one assorted print 4 1/2” square, four star<br />
point units, and four tan print 4 1/2” squares as shown.<br />
Join the pieces in each horizontal row. Press the seam<br />
allowances away from the star points. Join the rows. Press<br />
the seam allowances away from the middle row. Repeat<br />
for a total of four tan print Star blocks measuring 12 1/2”<br />
square, including the seam allowances.
<strong>Garden</strong> <strong>Grove</strong><br />
Page 2<br />
4. Repeat steps 2 and 3 to piece 20 cream print star point<br />
units and make a total of five cream print Star blocks.<br />
5. Referring to the pictured quilt, lay out the Star blocks<br />
to form the quilt center. Join the blocks in each horizontal<br />
row. Press the seam allowances open. Join the rows. Press<br />
the seam allowances open. The pieced quilt center should<br />
measure 36” square, including the seam allowances.<br />
Appliquéing the Quilt Center<br />
1. Join the 1 1/4”-wide green print bias strips together<br />
end to end to make four pieced 40” strips. Press the<br />
seam allowances to one side, all in the same direction.<br />
With wrong sides together, fold each pieced strip in half<br />
lengthwise and use a scant 1/4” seam to stitch along the<br />
long raw edges to make a tube. Use the bias bar to press<br />
each tube flat, centering the seam so that it will be hidden<br />
from the front. After removing the bias bar, apply tiny dots<br />
of liquid fabric glue underneath each pressed seam and use<br />
a hot, dry iron to heat set the seam in place.<br />
2. Lay out nine pieced sawtooth units end to end to form<br />
a pieced strip. Join the units. Press the seam allowances<br />
open. Repeat for a total of four pieced sawtooth strips.<br />
3. Join a pieced sawtooth strip to the right and left sides<br />
of the quilt center. Press the seam allowances toward<br />
the quilt center. Join a tan print 2 1/2” square to each<br />
end of the remaining pieced sawtooth strips. Press the<br />
seam allowances toward the tan print. Join these strips<br />
to the remaining sides of the quilt center. Press the seam<br />
allowances toward the quilt center.<br />
4. Join a medium brown print 2 1/2” x 40 1/2” strip<br />
to the right and left sides of the quilt top. Press the seam<br />
allowances toward the brown print. Join an assorted print<br />
2 1/2” square to each end of the remaining 2 1/2” x 40<br />
1/2” brown print strips. Press the seam allowances toward<br />
the brown print. Join these strips to the remaining sides of<br />
the quilt top. Press the seam allowances toward the brown<br />
print.<br />
5. Lay out one assorted print 4 1/2” square, four pieced<br />
sawtooth units, and four tan print 2 1/2” squares as<br />
shown. Join the pieces in each horizontal row. Press the<br />
seam allowances away from the sawtooth units. Join the<br />
rows. Press the seam allowances away from the middle<br />
row. Repeat for a total of four pieced border Star blocks<br />
measuring 8 1/2” square, including the seam allowances.<br />
2. Dot the seam allowance of each prepared vine with<br />
liquid fabric glue. Referring to the pictured quilt, lay<br />
the vines out along the Star block seams, forming gentle<br />
curves as you position them; trim away any excess vine<br />
length. From the back of the quilt top, use a hot, dry iron to<br />
heat set the glue-basted vines. Use your favorite appliqué<br />
method to stitch the vines in place.<br />
3. Using the pictured quilt as a guide, work from the<br />
bottom layer to the top to lay out, baste and stitch the<br />
appliqués to the quilt center.<br />
Piecing and Adding the Borders<br />
1. Layer a prepared assorted print 2 1/2” square onto one<br />
end of a tan print 2 1/2” x 4 1/2” rectangle. Stitch the pair<br />
together on the drawn line. Press and trim the resulting<br />
point as previously instructed. Position, press, and trim<br />
a second prepared assorted print 2 1/2” square onto the<br />
remaining end of the rectangle to make a sawtooth unit.<br />
Repeat for a total of 52 pieced sawtooth units.<br />
6. Join a medium brown print 2 1/2” x 8 1/2” rectangle<br />
to each end of the teal print 8 1/2” x 40 1/2” strips. Press<br />
the seam allowances toward the teal print. Join a pieced<br />
teal strip to the right and left sides of the quilt top. Press<br />
the seam allowances toward the teal print. Join a border<br />
Star block to each end of the remaining pieced teal strips.<br />
Press the seam allowances away from the Star blocks.<br />
Join these pieced strips to the remaining sides of the quilt<br />
top. Press the seam allowances away from the quilt center.<br />
The finished quilt top should now measure 60 1/2” square,<br />
including the seam allowances.<br />
<strong>Co</strong>mpleting the Quilt<br />
Layer the quilt top, batting, and backing. Quilt the layers<br />
as desired. Join the brown print 2 1/2” x 42” strips into one<br />
length and use it to bind the quilt.<br />
©2012 <strong>Henry</strong> <strong>Glass</strong> & <strong>Co</strong>., Inc.