smart Bridges
smart Bridges
smart Bridges

You also want an ePaper? Increase the reach of your titles
YUMPU automatically turns print PDFs into web optimized ePapers that Google loves.
airBridgeSeriesWirelessEthernetClient<br />
QuickInstallGuide<br />
InstallingtheairBridgeSeries<br />
<strong>smart</strong><strong>Bridges</strong><br />
tothefuture...<br />
air<strong>Bridges</strong>eriesisawirelessclientwhichcanbeusedtoconnectanyPCwithEthernet<br />
porttoanetwork/PC/Internetwirelessly.Itisasimpleplugandplaydeviceneedingno<br />
configuration. It operates at 2.4 GHz ISM band. Using an external directional antennas<br />
fortheairBridgeoutdoorcanproviderangeofupto32Kilometers.Itprovidesdatarates<br />
upto 11Mbps and encryption capability of 64 bits or 128 bits. It can interface with any<br />
wirelessLANdevicecomplyingwith802.11bspecifications.<br />
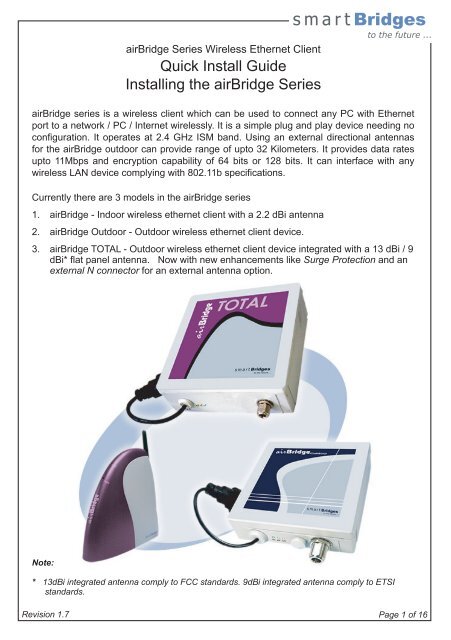
Currentlythereare3modelsintheair<strong>Bridges</strong>eries<br />
1. airBridge-Indoorwirelessethernetclientwitha2.2dBiantenna<br />
2. airBridgeOutdoor-Outdoorwirelessethernetclientdevice.<br />
3. airBridgeTOTAL-Outdoorwirelessethernetclientdeviceintegratedwitha13dBi/9<br />
dBi*flatpanelantenna. NowwithnewenhancementslikeSurgeProtectionandan<br />
externalNconnectorforanexternalantennaoption.<br />
Note:<br />
* 13dBiintegratedantennacomplytoFCCstandards.9dBiintegratedantennacomplytoETSI<br />
standards.<br />
Revision1.7<br />
Page1of16
Revision1.7<br />
Page2of16<br />
Contentsof Package<br />
airBridge<br />
<br />
airBridgeUnit<br />
<br />
powerShot<br />
<br />
ACAdapter<br />
<br />
External2.2dBiAntenna<br />
<br />
EthernetCable1.5meter<br />
long<br />
<br />
airBridgeSetupSoftware<br />
andUserManualCD<br />
<br />
QuickInstallGuide<br />
airBridgeOutdoor<br />
<br />
airBridgeOutdoorUnit<br />
<br />
powerShot<br />
<br />
ACAdapter<br />
<br />
PoleMountingKit:U<br />
Bracket,Nuts,Washers<br />
<br />
WallMountingKit:Wall<br />
plugs,Screws<br />
<br />
airBridgeSetupSoftware<br />
andUserManualCD<br />
<br />
QuickInstallGuide<br />
<br />
CoaxSeal<br />
airBridgeTOTAL<br />
<br />
airBridgeTOTALUnit<br />
<br />
powerShot<br />
<br />
ACAdapter<br />
<br />
PoleMountingKit:U<br />
Bracket,Nuts,Washers<br />
<br />
WallMountingKit:Wall<br />
plugs,Screws<br />
<br />
airBridgeSetupSoftware<br />
andUserManualCD<br />
<br />
QuickInstallGuide<br />
<br />
EarthingTagforGrounding<br />
theTOTAL<br />
<br />
CoaxSeal<br />
HardwareInstallation<br />
forairBridge<br />
<br />
InsertthePowerJackintothepowerShot&connecttheACAdaptertothemainswall<br />
outlet.<br />
<br />
ConnecttheRJ45EthernetcablefrompowerShottoPC.<br />
<br />
ConnectthepowerShotwithairBridge.<br />
<br />
VerifythatthePWRÐLEDsareON.<br />
<br />
airBridgewithitsFactoryDefaultSettingswillassociatewiththenearbyAccessPoint<br />
byitself.(indicatedbysteadyTxRxLED)airBridgeisnowreadyforoperation.<br />
Ethernetport
ForairBridgeOutdoor/TOTAL<br />
<strong>smart</strong><strong>Bridges</strong><br />
tothefuture...<br />
Importantnote-EarthingRequirements:<br />
FollowNationalElectricCodeNEC810-20andNEC810-21forthisinstallation.<br />
RooftopInstallation<br />
The airBridge TOTAL can be mounted on the rooftop with the directional antenna<br />
pointing towards the Access Point. Connect a outdoor rated shielded CAT5 / CAT5e<br />
ethernet cable which carries power and data signals to airBridge Outdoor / airBridge<br />
TOTAL.OtherendofthecableisconnectedtothePCthroughthepowerShot.TheAC<br />
adapter connected to the powerShot provides the power to the airBridge Outdoor /<br />
airBridgeTOTAL.<br />
PreparationoftheSite:<br />
Thewirelesswavespropagateinstraightlines.Soitisessentialthattheantennasinthe<br />
airBridge Outdoor / airBridge TOTAL andAccess Point are in line of sight without any<br />
obstruction.Selectthemostappropriateplaceontheroofwhichwillprovideadirectview<br />
totheAccessPoint.Securea1.5inchsteelpipeverticallyandinsurethatitcannotcome<br />
Access Point<br />
RJ45 Ethernet Port<br />
to airBridge Outdoor /<br />
airBridge TOTAL<br />
powerShot<br />
AC/DC Adapter<br />
Revision1.7<br />
Page3of16
MountingtheairBridgeOutdoor<br />
Attach the airBridgeOutdoor unit with the U bolts tothe steel pipe. Make sure to<br />
tighten both top and bottom mounting plates to the pipe with U bolts, nuts and<br />
spring washers. Tighten the nuts so that the airBridge does not rotate on the<br />
pipe. The mounting should be such that the antenna socket, LED's, Ethernet<br />
Cable outlet etc face downward. The airBridge Outdoor is weather proof box<br />
made to NEMA4 specs. There are no user adjustable parts inside and it is<br />
recommended that the unit is used in the same way it is shipped.<br />
MountingtheAntenna:<br />
Follow the mounting instructions provided by the antenna manufacturer and mount<br />
the antenna on the steel pipe. Antenna should bemounted on the same pipe as<br />
the airBridge Outdoor and positioned above it. The height of the antenna and<br />
direction should be in the direction of the AccessPoint. The antenna socket of<br />
the airBridge Outdoor and the antenna input have to be connected by an RG8<br />
N Male to N Male cable. UsetheCoaxSealtosealtheNConnectorafterfixingRG8<br />
Malecable. PreventrainwaterenteringtheRFcable.<br />
Outdoor<br />
Revision1.7<br />
Page4of16
MountingtheairBridgeTOTAL<br />
<strong>smart</strong><strong>Bridges</strong><br />
tothefuture...<br />
Fix the Bracket arm of the airBridge TOTAL unit with the 2pcs of U bolts to the mast.<br />
MakesuretotightenbothtopandbottomUbolts,withnutsandspringwashers.Tighten<br />
thenutssothattheBracketarmdoesnotrotateonthemast. Usetheinternalexternal<br />
Toothed washer between cabinet bracket and mounting arm. Use the internal toothed<br />
washerwiththenuttoensurethattheTOTAListightlyheldinplace.<br />
The airBridge TOTAL has a high gain in-built directional antenna. Depending on the<br />
required signal polarity, use the correct fin for Vertical / Horizontal polarization. Please<br />
notethattheverticalpolarityisindicatedonthebacksideofthedevice.Mounttheuniton<br />
theMountingarmwiththe1/4"bolt,springwasherandnutandtighten.<br />
AdjusttheazimuthoftheairBridgeTOTALunitbyrotatingtheMountingarmattachedto<br />
themast.Adjusttheelevation/tiltangleoftheairBridgeTOTALunitbyrotatingitaround<br />
thefin.<br />
Use the correct azimuth and the elevation angle to point the airBridge TOTAL unit<br />
towardstheremotetransmissiontower.<br />
UsetheAntennaalignmentmodeinthesimpleMonitorsoftwaretomaximizethereceived<br />
signalstrengthfortheunit.<br />
MountingArm<br />
airBridgeTOTAL<br />
U-boltfixingpipe<br />
toMountingArm<br />
CableTie<br />
Weatherproof<br />
Connector<br />
RJ45Cable<br />
MountingArm<br />
Revision1.7<br />
Page5of16
Grounding:<br />
TheinternalgroundoftheTOTALisbroughtouttoanearthingstudatthebottomsideof<br />
theunit. Pleasecrimpa10AWGwiretotheearthtagandsecuretheearthtagontothe<br />
earthingstudtightlywiththeM6nutprovided. Ensurethattheotherendofthe10AWG<br />
wireisgroundedtotheearthatthepowergroundofthepremises.<br />
Note:GroundinghastobedonebeforemountingtheTOTALonwall/pole.<br />
Cabling:<br />
The airBridge TOTAL is terminated into a weatherproof RJ45 female connector for<br />
outdooruse.Refertothecableandconnectorinstallationinstructionssupplied withthe<br />
weatherproof connector for more information. The user can connect required length of<br />
suitableethernetcabletoconnecttheairBridgeTOTALtotheuser'sPC/Network. RJ45<br />
maleconnectorisprovidedinsideweatherproofconnectorforusewiththeethernetcable<br />
from PC. We strongly recommend an outdoor rated shielded CAT5 / CAT5e cable to<br />
connecttheTOTALtothePCinsidepremises.<br />
Note:TheBBDNcableconnectedtoTOTALhasminimumbendingrating50mm.Sharper<br />
bendswillbreakthegroundfoilinsidethecable.<br />
MountingtheExternalAntennaforTOTAL:<br />
Follow the mounting instructions provided by the antenna manufacturer and mount the<br />
antenna on the steel pipe. Antenna should be mounted on the same pipe as the<br />
airBridgeTOTALandpositionedaboveit. Theheightoftheantennaanddirectionshould<br />
beinthedirectionoftheAccessPoint. TheantennasocketoftheairBridgeTOTALand<br />
theantennainputhavetobeconnectedbyanRG8NMaletoNMalecable.<br />
Wallmounting:<br />
Use the supplied wall mounting plugs with screws and washers to mount the mounting<br />
armdirectlyonthewallinsteadofusingUboltstomountonamast.<br />
RJ45toNetwork/PC<br />
toairBridge/airBridgeOutdoor/<br />
airBridgeTOTAL<br />
powerShot<br />
ACAdapter<br />
RJ45Cable<br />
CrossCouplerswitch<br />
SB2820<br />
Revision1.7<br />
Page6of16
PC,powerShotConnection:<br />
<strong>smart</strong><strong>Bridges</strong><br />
tothefuture...<br />
ThepowerShothastwoinputpointsandanoutlet.OneinputisDCjackadaptabletothe<br />
ACadapteroutput.Thisisaflyingleadconnectorasshowninthediagram.Otherinputis<br />
RJ45Ethernetmaleconnectorwithashortcableasshowninthediagram.Thiscanbe<br />
directlypluggedintotheethernetsignalportoftheLANorPC.ThereisanLEDindicator<br />
ontheinjectorindicatingpowerisON.TheoutputportisRJ45socketwithDCpowerand<br />
ispartofthecasingitself.AstandardRJ45maletomalecableisprovidedasstandard<br />
accessorytopowerinjectortoairBridge.Whentheuserwantstousealongercableto<br />
positionairBridgeatadistance,theuserisadvisedtouseastandardRJ45cable(CAT<br />
5cable)with8wires.<br />
Cross coupler switch in SB2820 powerShot selects straight or crosssed ethernet<br />
connection.<br />
Forcablelengthsinexcessof50metersitisrecommendedthattheACadaptershould<br />
beof18Volttype.Normally12VoltACadapterisprovidedwiththeairBridge.<br />
Note:<br />
Restore Default button at the bottom side of the powerShot should be used to restore the device<br />
backtofactory/WISPdefaults.<br />
RestoreDefaultbutton<br />
CrossCouplerswitch<br />
Revision1.7<br />
Page7of16
SoftwareInstallation<br />
SystemRequirements<br />
ComputerwithWindows98/ME/NT/2000/XPsupportingethernetconnectivity<br />
Installingair<strong>Bridges</strong>etupSoftware:<br />
PleaseinserttheSetupSoftwareCDintotheCD-ROMdriveofyourPC.TheCDwillrun<br />
automatically.Ifitdoesn'tautorun,pleasebrowsetheCDanddoubleclickonindex.htm.<br />
<br />
<br />
<br />
<br />
<br />
<br />
Selecttheappropriateproductfromthedrop-downlistandclicktheGobutton.<br />
ClickontheSetupFilelink. YoushouldseetheFileDownloaddialogbox.<br />
SelectOpenorRunthisprogramfromitscurrentlocationtostartthesetup.<br />
Thesetupwillinstallallthenecessaryfilesinthe"C:\Program<br />
Files\<strong>smart</strong><strong>Bridges</strong>\airBridge"directory.<br />
TheinstallationwillcreatetheshortcutsinyourProgramMenuat<br />
<strong>smart</strong><strong>Bridges</strong>\airBridgeforeasyaccessibilityofSetupsoftware.<br />
<br />
<br />
<br />
<br />
<br />
<br />
Firmwareupgradeutilityallowsupgradingoffirmware.<br />
simpleMonitorallowsconfigurationoftheairBridge.<br />
UserGuideshowstheUserGuideinHTMLform.<br />
WebRegisteropenstheproductregistrationofairBridgeon<strong>smart</strong><strong>Bridges</strong><br />
website.<br />
KnownIssueswiththeSoftware,FirmwareandHardware.<br />
UninstalltheSetupSoftware.<br />
AfterInstallingpleaserestartthePCifasked.<br />
UninstallingairBridgeSetupSoftware:<br />
Clickontheshortcut"Start>Programs><strong>smart</strong><strong>Bridges</strong>>airBridge>Uninstall<br />
airBridge"anditwilluninstallthesetupsoftwarefromyourPC.<br />
Note:<br />
airBridge,airBridgeOutdoorandairBridgeTOTALcanbeconfiguredusingthesame<br />
softwarewhichisreferredtoasairBridge.<br />
Revision1.7<br />
Page8of16
ConfiguringtheairBridge<br />
ForWindows 98/ME/NT/2000/XP<br />
<strong>smart</strong><strong>Bridges</strong><br />
tothefuture...<br />
ThefactorydefaultparametersfortheairBridgeare<br />
IPAddress : 192.168.0.22<br />
<br />
SubnetMask : 255.255.255.0<br />
Gateway : 0.0.0.0<br />
AdministratorPassword : public(casesensitive)<br />
UserPassword : public(casesensitive)<br />
AuthenticationType : openkey<br />
<br />
WEPKeys : None<br />
WEPAlgorithm : Disabled<br />
ESSID : Any<br />
BSSID : 000000000000<br />
Preamble : Long<br />
OperatingChannel : CountrySpecific<br />
<br />
RegulatoryDomain : CountrySpecific<br />
ConfigurationPort : Both<br />
PrimaryDHCPPort : Wireless<br />
Revision1.7<br />
Page9of16
Login<br />
<br />
<br />
<br />
<br />
<br />
ConnecttheairBridgetotheNetworkCard'sRJ45connectorusingthegivencable.<br />
MakesurethepowertotheairBridgeisON.<br />
StartthesimpleMonitorbyclickingontheshortcut:Start>Programs><br />
<strong>smart</strong><strong>Bridges</strong>>airBridge>air<strong>Bridges</strong>impleMonitor.<br />
ClickonSearchbutton.<br />
Iftheloginparametersarecorrect,youwillgetthemessage:<br />
"SuccessfullyreadtheairBridgeConfiguration".<br />
In case of a successful connection to the airBridge, simpleMonitor acknowledges by<br />
enablingallthetabs.<br />
Revision1.7<br />
Page10of16
Security<br />
<strong>smart</strong><strong>Bridges</strong><br />
tothefuture...<br />
<br />
Bydefaultencryptionisdisabledwhichmeansthecommunicationisnotsecure.In<br />
caseyouwanttohaveasecurecommunication,ensurethattheWEPencryption<br />
settingforairBridgearethesameasthatofAccessPoint.<br />
<br />
Tosettheencryptionkeysclickonsecuritytab:<br />
<br />
<br />
<br />
<br />
<br />
SelecttheEncryptionKey(64Bit/128Bit).<br />
EnterHexdata.<br />
Selectthedesiredkeytobeused(DefaultKey).<br />
SavetheWEPKeys....<br />
Youwillgetapopupwindowwiththemessage"WEPEncryptionKeysSaved<br />
Successfully".<br />
Note:<br />
RecommendedformatisHEXformat.Incaseotherdevicesusedalongwith<strong>smart</strong>bridges<br />
products need only ASCII based encryption, please use the ASCII to HEX table. See<br />
appendixA.<br />
Revision1.7<br />
Page11of16
SiteSurvey<br />
<br />
<br />
<br />
<br />
<br />
ClickonSiteSurveytab:<br />
SelectInfrastructureMode<br />
CheckSelectFromAvailableAccessPoint.<br />
DoubleclickonthedesiredAccessPoint.<br />
Youwillseethemessage"DeviceissuccessfullyAssociated…"<br />
Useantennaalignmenttoolwhileadjustingtheantennatogetbetterlink.<br />
TheRSSIvaluesareshownindBminthedialogboxaspertheinternalformula. If<br />
youwantspecificvaluestobeshowninthere,pleasestoretheminthetableandset<br />
theoptionas"UserDefined"fromAdvancedTAB.<br />
TheTxRxLEDwillbelightedaftersuccessfulassociation.<br />
IfairBridgefails toassociate,PleaseensurethattheWEPkeysettingsforairBridge<br />
aswellasthedesiredAccessPointarethesameandairBridgeisauthorizedto<br />
associatewiththedesiredAccessPoint.<br />
Note:<br />
Alternatively, if the desired access point does not appear in the available list the ESSID, BSSID,<br />
Channel and the Preamble of a particular access point can be entered manually if you want to<br />
associatewithit.Thiscanbedonebyuncheckingthe'SelectfromAvailableAccessPoints'.Please<br />
makesurethatyouarenotusingESSIDas"Any"inADHOCMode.Thisisespeciallyreservedfor<br />
infrastructureModeonly.<br />
Revision1.7<br />
Page12of16
Advanced<br />
<strong>smart</strong><strong>Bridges</strong><br />
tothefuture...<br />
<br />
ChangedefaultvaluesofRegulatoryDomain&operationalchannel:<br />
1. SelectappropriateRegulatoryDomainfromDropDownList.<br />
2. SelectappropriateChannelfromtheChannelDropDownList,clickonSet<br />
DefaultConfigbuttontochangethedefaultsettingsforRegulatoryDomain<br />
andChannel.<br />
3. SpecifyappropriatevaluesforFragmentationandRTSThreshold(referto<br />
userguideformoredetails).<br />
4. Selectauthenticationtypefromdropdownlist.<br />
5. SelecttheappropriateportforgettingtheleasefromtheDHCPserverandthe<br />
defaultgateway.Selecteitherethernetorwirelessport.<br />
6. Youcanselectbothethernetaswellaswirelessasconfigurationport.Thiswill<br />
enabledeviceconfigurationfromtheLANorwireless side.<br />
7. SpecifyDHCPTimeOutoption.ByenablingtheDHCPTimeoutairBridgewill<br />
searchforDHCPServerfor1minafterboot-up(ifDHCPisenabledinIP<br />
Settings)andifitdoesn'tgettheleaseitwillfallbacktopreviouslyobtainedIP<br />
Address.IfyouwantairBridgetosearchforDHCPServertillitobtainsthe<br />
lease,disablethisoption.(ThisoptionissupportedfromF/WVer0.01.09<br />
onwards).<br />
8. Clickonsetconfigurationbuttontosavetheseparameters.<br />
TransmissionandReceptionAntenna:<br />
AllowstheusertoselectbetweenAntennaAandAntennaBforreceptionofsignals.<br />
DiversityoptionswillselecttheAntennawithbestpossiblesignalreceptionsensitivity<br />
(recommended)ifadditionalantennaisconnected.<br />
airBridgeOutdoor:<br />
1. AntennaA-InternalAntenna(thisisnotused)<br />
2. AntennaB-ExternalAntenna<br />
airBridgeTOTAL:<br />
1. AntennaA-InternalAntenna(herethe9dBior13dBiAntennaisused)<br />
2. AntennaB-ExternalAntenna(provisionismadewithNTypeconnector)<br />
AuthenticationType:<br />
Theauthenticationtypedefinesconfigurationoptionsforthesharingofwireless<br />
networkstoverifyidentityandaccessprivilegesofroamingwirelessnetwork<br />
cards.SelectOpenSystemorSharedKeyAuthenticationTypeorBoth:<br />
Revision1.7<br />
Page13of16
OpenSystem:WiththissettinganystationintheWLANcanassociatewith<br />
anAccessPointandreceiveandtransmitdata(nullauthentication).<br />
Thisdefaultsettingallowsadevice,regardlessofitsWEPkeys,to<br />
authenticateandthenattempttocommunicatewithanotherdevice.Ifthe<br />
bridgeisusingWEPandtheotherdeviceisnot,theotherdevicecan<br />
authenticatewiththebridgebutcannotcommunicate.<br />
<br />
<br />
SharedKey:Withthissettingonlystationsusingasharedkeyencryption<br />
identifiedbytheAccessPointareallowedtoassociatewithit.The bridge<br />
sendsanunencryptedchallengetextstringtoanydeviceattemptingto<br />
communicatewiththebridge.Thedevicerequestingauthenticationencrypts<br />
thechallengetextandsendsitbacktothebridge.Ifthechallengetextis<br />
encryptedcorrectly,thebridgeallowstherequestingdevicetoauthenticate.<br />
Boththeunencryptedchallengeandtheencryptionchallengecanbe<br />
monitored,however,whichleavesthebridgeopentoattackfromanintruder<br />
whoguessestheWEPkeybycomparingtheunencryptedandencrypted<br />
textstrings.Becauseofthisweakness,SharedKeyauthenticationcanbe<br />
lesssecurethanOpenauthentication.<br />
Both:OpenandSharedKeysupported.<br />
Note:<br />
TheAuthenticationtype<br />
mustbethesameonthe<br />
airBridgeandonthe<br />
AccessPoint.AllWEP<br />
keysontheairBridgemust<br />
bethesameasthoseon<br />
theAccessPointwith<br />
whichtheairBridgeis<br />
associated.<br />
Important:<br />
Thedefaultsettingis<br />
internalantenna(Antenna<br />
A)shippingcondition,<br />
wheneveranexternal<br />
antennaisconnected,<br />
changetheselectionto<br />
AntennaB.<br />
Revision1.7<br />
Page14of16
Dial-A-Power<br />
<strong>smart</strong><strong>Bridges</strong><br />
tothefuture...<br />
This feature of airBridge allows the user to control the radio transmit power of the<br />
airBridgefromthesimpleMonitorsoftware.Makeuseoftheuserinterfacecontrolsinthis<br />
Tabtoadjusttheradiotransmitpower.DialaPowerfacilityisavailableonlyifyoulogin<br />
asAdministrator.<br />
1. SelecttheantennaconnectedtoairBridgefromAntennaTypedropdownlist,ifyou<br />
happentoselecttheCustomAntenna,pleaseentertheValidGain.Thelimitis1.0<br />
dBito30.0dBi.<br />
2. SpecifyCableLossvalueintheEditbox.Thelimitsforthisvaluearemin0.5dB,<br />
max10.0dB.<br />
3. UseslidercontroltoadjustEIRPOutputpowerfromtheairBridge. Asyoumovethe<br />
sliderpointer,observethatEIRPOutputpowerisdisplayedinEffectiveoutputPower<br />
Display.<br />
4. TheEffectivePoweriscalculatedasequaltoairBridgeoutputPower(dBm)-Cable<br />
Loss(dB)+AntennaGain(dBi).<br />
5. ClickSetPowerbutton.ThiswillchangetheradiotransmitpoweroftheairBridge<br />
unit.Amessagewillbedisplayedaftersuccessfulcompletionofthisoperation.<br />
Revision1.7<br />
Page15of16
RestoreFactoryDefaultSettings<br />
IfyouforgetthecriticalsettingslikeWEPorAdministratorPasswordoftheairBridge,you<br />
canrestoretheairBridgetotheFactoryDefaultSettingsas,<br />
1. MakesurethatthePowertotheairBridgeisON.(indicatedbyPWRLED)<br />
2. LocateandPresstheRestoreDefaultbuttoncontinuously.(TheRestoreDefault<br />
buttonislocatedonthebackofpowerShot.)<br />
3. TheTxRxLEDwilldimitslightintensityforfewseconds.<br />
4. ReleasethebuttonaftertheTxRxLEDrestoresbacktoitsoriginalbrightintensity.<br />
5. AfterrestoringtheFactoryDefaultSettings,pleaseconfiguretheairBridgeagain.<br />
AppendixA<br />
ASCIItoHexadecimalConversionTable<br />
OperatingTemperatureRange<br />
airBridge : 0°C ~ +50°C (+32°F ~ +122°F)<br />
airBridgeOutdoor/TOTAL : -40°C ~ +65°C (-40°F ~ +150°F)<br />
IngressSpecification : IP65forairBridgeOutdoor/TOTAL<br />
Productsandmodelnumbers<br />
sB2100<br />
sB2110<br />
sB2120<br />
sB2125<br />
airBridge TM IndoorFCCandCEversions<br />
airBridge TM OutdoorFCCandCEversions<br />
airBridge TM TOTALFCCversion13dBiantenna<br />
airBridge TM TOTALCEversion9dBiantenna<br />
Note:<br />
PleaserefertotheUserGuidefoundontheSetupCDROMfordetailedandadditionalinformation.<br />
ForthelatestQuickInstallGuideandsoftwareupdates,pleasevisitoursupportwebpageat<br />
http://www.<strong>smart</strong>bridges.com/support/<br />
Revision1.7<br />
Page16of16