BSL PRO Lesson H19 - Biopac
BSL PRO Lesson H19 - Biopac
BSL PRO Lesson H19 - Biopac

You also want an ePaper? Increase the reach of your titles
YUMPU automatically turns print PDFs into web optimized ePapers that Google loves.
Updated 01-26-12<br />
<strong>BSL</strong> <strong>PRO</strong> <strong>Lesson</strong> <strong>H19</strong>:<br />
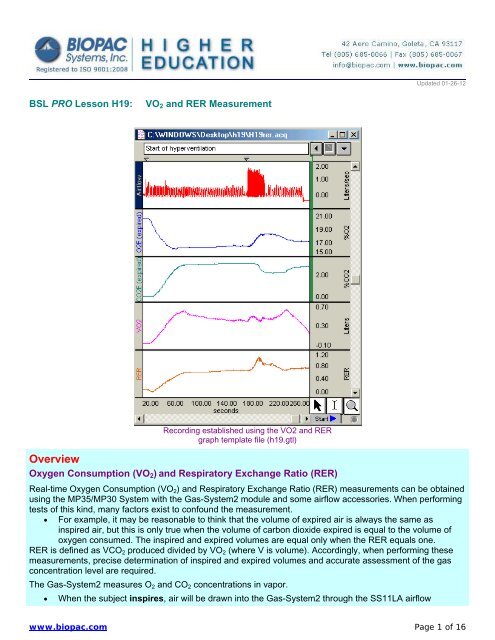
VO 2 and RER Measurement<br />
Recording established using the VO2 and RER<br />
graph template file (h19.gtl)<br />
Overview<br />
Oxygen Consumption (VO 2 ) and Respiratory Exchange Ratio (RER)<br />
Real-time Oxygen Consumption (VO 2 ) and Respiratory Exchange Ratio (RER) measurements can be obtained<br />
using the MP35/MP30 System with the Gas-System2 module and some airflow accessories. When performing<br />
tests of this kind, many factors exist to confound the measurement.<br />
<br />
For example, it may be reasonable to think that the volume of expired air is always the same as<br />
inspired air, but this is only true when the volume of carbon dioxide expired is equal to the volume of<br />
oxygen consumed. The inspired and expired volumes are equal only when the RER equals one.<br />
RER is defined as VCO 2 produced divided by VO 2 (where V is volume). Accordingly, when performing these<br />
measurements, precise determination of inspired and expired volumes and accurate assessment of the gas<br />
concentration level are required.<br />
The Gas-System2 measures O 2 and CO 2 concentrations in vapor.<br />
<br />
When the subject inspires, air will be drawn into the Gas-System2 through the SS11LA airflow<br />
www.biopac.com Page 1 of 16
<strong>BSL</strong> <strong>PRO</strong> <strong>Lesson</strong> <strong>H19</strong><br />
BIOPAC Systems, Inc.<br />
<br />
transducer. The SS11LA is placed on the inspiration side to eliminate any effects associated with<br />
expired air humidity (see Hardware Setup for more detail).<br />
When the subject expires, air will be directed to the Gas-system2 module. The Gas-System2 is<br />
designed to work with saturated expired air.<br />
When using a mixing chamber to average O 2 and CO 2 concentrations over several breaths and measuring<br />
these changes for arbitrarily high breathing rates, there is no performance degradation. Accordingly, a mixing<br />
chamber (such as the Gas-System2 utilizes) is typically recommended for quick, accurate and easy metabolic<br />
analysis.<br />
IMPORTANT CONCEPT!<br />
The non-rebreathing “T” valve directs only expired air to the Gas-System2. Because only expired air is directed<br />
to the module, the system acts to average respiratory outflows. This averaging effect causes the CO 2 and O 2<br />
concentrations to vary in accordance to the mean values resident in a few expired breaths. The size of the<br />
system’s chamber determines the extent of the averaging effect.<br />
For example, if the subject’s expired breath volume is 0.5 liters, the Gas-System2’s chamber will<br />
average about 10 expired breaths.<br />
Definitions<br />
Click here for definitions of abbreviations used in this lesson and the calculation channel Expression formulas<br />
used for VO 2 and RER.<br />
Objectives<br />
1. To obtain absolute VO 2 and RER values for a subject at rest (optional segments include<br />
hyperventilation and recovery from exercise).<br />
2. To demonstrate the relationship between VO 2 and RER.<br />
Equipment<br />
<br />
<br />
<br />
<br />
<br />
<br />
<br />
<br />
<br />
<br />
<br />
<br />
<br />
BIOPAC Gas Analysis System (GASSYS2-EA)<br />
BIOPAC Pneumotach Airflow Transducer [High Flow] (SS11LA)<br />
BIOPAC Calibration Syringe (AFT26 or AFT6)<br />
BIOPAC 22 mm Non-Rebreathing T Valve (AFT22)<br />
BIOPAC Rigid Coupler (AFT11E) for T-valve to tubing<br />
BIOPAC Coupler (AFT11C) for T-valve to calibration syringe<br />
BIOPAC Smooth Bore Tubing-35 mm (AFT7)<br />
BIOPAC Disposable Nose Clip (AFT3)<br />
BIOPAC Disposable Mouthpiece (AFT2)<br />
BIOPAC Disposable Bacterial Filters (AFT1)—requires 2 filters<br />
Computer running Windows XP or higher, or Mac OS X<br />
<strong>Biopac</strong> Student Lab <strong>PRO</strong> software<br />
BIOPAC Data Acquisition Unit (MP36/MP35/MP30)<br />
OPTIONAL: BIOPAC Calibration Gas Cylinder (16% O 2 , 4% CO 2 ), with regulator and tubing<br />
The following measures are also required:<br />
Ambient temperature in °C<br />
Ambient barometric pressure in mmHg<br />
Pressure of water vapor at ambient temperature = 22.4 mmHg<br />
www.biopac.com Page 2 of 16
<strong>BSL</strong> <strong>PRO</strong> <strong>Lesson</strong> <strong>H19</strong><br />
Setup<br />
Hardware<br />
BIOPAC Systems, Inc.<br />
The Gas-System2 sensors are factory calibrated prior to shipping.<br />
<br />
<br />
The O 2 sensor is a zirconia solid electrolyte with a 0.1-25% sensing<br />
range and an estimated 5-year lifetime. It runs hot, which helps to<br />
burn off humidity.<br />
The CO 2 sensor uses a humidity-repellant (hydroponic) membrane<br />
and has a sensing range of 0-5%. It uses non-dispersive infra-red<br />
diffusion with single-beam IR and a self-calibrating algorithm. It also<br />
runs hot, which helps to burn off humidity.<br />
1. The Gas-System2 module is supplied with a 5 VDC @ 4 amp wall adapter. Plug the adapter into the<br />
main power supply and insert the adapter plug into the DC Input on front of the Gas-System2 module.<br />
2. Flip up the power switch on the Gas-System2 to turn it "ON."<br />
o The unit should warm up for at least five minutes before calibration, so it is suggested that<br />
you turn it on now and then complete setup.<br />
3. Plug the transducers into the MP3X as follows:<br />
Transducer MP3X CH #<br />
SS11LA CH 1<br />
O2 line (from the Gas-System2) CH 2<br />
CO2 line (from the Gas-System2) CH 3<br />
www.biopac.com Page 3 of 16
<strong>BSL</strong> <strong>PRO</strong> <strong>Lesson</strong> <strong>H19</strong><br />
BIOPAC Systems, Inc.<br />
4. Turn on the MP unit (assuming the AC100A power adapter has already been connected).<br />
5. Connect the airflow accessories as follows:<br />
Air Flow Accessory<br />
AFT1 filter<br />
SS11LA transducer<br />
AFT22 non-rebreathing T-valve<br />
AFT11E coupler<br />
AFT7 tubing<br />
AFT26 or AFT6 calibration syringe<br />
AFT11C coupler<br />
Connects to<br />
SS11LA transducer, on the "Inlet" side<br />
AFT22 non-rebreathing T-valve<br />
AFT11E coupler<br />
AFT7 tubing<br />
Gas-System2 inlet (back side)<br />
AFT11C coupler<br />
AFT21 non-rebreathing T-valve<br />
Note: The above setup uses the AFT26 or AFT6 calibration syringe. For recording,<br />
you must replace the calibration syringe with an AFT1 filter and an AFT2<br />
disposable mouthpiece (connected to each other and to the AFT22 T-Valve).<br />
www.biopac.com Page 4 of 16
<strong>BSL</strong> <strong>PRO</strong> <strong>Lesson</strong> <strong>H19</strong><br />
BIOPAC Systems, Inc.<br />
AFT7 tubing to Gas-System2 inlet<br />
6. Pump the calibration syringe through enough cycles to fill the chamber with ambient air.<br />
o AFT26, pump 3-4 times.<br />
o AFT6, pump 10-12 times.<br />
Software<br />
1. Launch the <strong>BSL</strong> <strong>PRO</strong> software on the host computer.<br />
The program should create a new "Untitled1" window.<br />
2. Open the VO 2 and RER Template by choosing File > Open > choose Files of type: Graph Template<br />
(*GTL) > File name: “<strong>H19</strong> V02 & RER.gtl”<br />
The template will establish the required settings.<br />
This particular setup will provide a reading that, at any point in time, indicates the absolute<br />
volume of oxygen consumed, carbon dioxide produced, and the respective respiratory<br />
exchange ratio in the last 60 seconds. Units are liters because it is a volume measure, not a<br />
flow rate.<br />
3. Save As the desired file name.<br />
Calibration<br />
The following calibration steps are outlined below:<br />
A. Calibrate flow transducer<br />
B. Calibrate O 2 channel (CH2)<br />
C. Calibrate CO 2 channel (CH3)<br />
D. Normalize moist gas to volume occupied by dry gas at 0°C, 760 mm.<br />
E. Optional: Calibrate for time interval (template is based on 60-second interval).<br />
Note: In the calculation channel formulas, the following assumed values were used for gas concentrations in<br />
normal atmosphere (chamber flooded with ambient air):<br />
0 2 = 20.93% CO 2 = 0.04% N 2 = 79.03%<br />
The optional Stage 2 gas calibration is not required, but can be performed using the small line inlet on the back<br />
panel of the Gas-System2 module. If you introduce calibration gases into the chamber, adjust the calculation<br />
channel expressions for the real gas values.<br />
If you perform a gas calibration, use the following ranges:<br />
Flow (inspired): calibrate within the range of 0 to 13 liters/sec<br />
O 2 concentration: calibrate in range of 21% to 16% O 2<br />
CO 2 concentration: calibrate in range of .04% to 4% CO 2<br />
www.biopac.com Page 5 of 16
<strong>BSL</strong> <strong>PRO</strong> <strong>Lesson</strong> <strong>H19</strong><br />
Flow<br />
BIOPAC Systems, Inc.<br />
1. Select MP3X > Setup Channels.<br />
2. Click the wrench icon for CH 1.<br />
3. Click the Scaling button.<br />
4. Hold the Calibration Syringe such that the SS11LA hangs from it in an upright position.<br />
5. Click on the Cal1 button.<br />
6. Subtract “3,000” from the Cal1 input value and enter the result in Cal2 input value (Cal2 input value<br />
should be 3,000 less than Cal1 input value).<br />
7. Confirm Cal1 scale value= 0 and Cal2 scale value=10.<br />
8. Click OK.<br />
9. Set the equipment down.<br />
www.biopac.com Page 6 of 16
<strong>BSL</strong> <strong>PRO</strong> <strong>Lesson</strong> <strong>H19</strong><br />
BIOPAC Systems, Inc.<br />
O 2<br />
Per Setup, the chamber should have been flooded with ambient air prior to O 2 calibration!<br />
1. Click the wrench icon for CH 2.<br />
2. Click the Scaling button.<br />
3. Click the Cal2 button.<br />
4. Enter “20.93” into the Cal2 scale value.<br />
5. Confirm both Cal1 input value= 0 and Cal1 scale value=0.<br />
6. Click OK.<br />
CO 2<br />
Per Setup, the chamber should have been flooded with ambient air prior to CO 2 calibration!<br />
1. Click the wrench icon for CH 3.<br />
2. Click the Scaling button.<br />
3. Click the Cal1 button.<br />
4. Enter “0.04” into the Cal1 scale value.<br />
5. Add “10” to the Cal1 input value and enter the result as Cal2 input value.<br />
6. Confirm Cal2 scale value=1.04<br />
7. Click OK.<br />
Note: The sensor output is 10 mV per 1% C0 2 . With proper calibration, if the sensor rails, it will read as 5%<br />
CO 2 .<br />
www.biopac.com Page 7 of 16
<strong>BSL</strong> <strong>PRO</strong> <strong>Lesson</strong> <strong>H19</strong><br />
BIOPAC Systems, Inc.<br />
OPTIONAL Stage 2 Calibration (BIOPAC Calibration Gas Cylinder required)<br />
O 2<br />
Per Setup, the chamber should NOW be flooded with a calibrated gas (16% O 2 , 4% CO 2 )!<br />
1. Click the wrench icon for CH 2.<br />
2. Click the Scaling button.<br />
3. Click the Cal1 button.<br />
4. Enter “16” into the Cal1 scale value.<br />
5. Click OK to dismiss scaling dialog.<br />
6. Click OK to dismiss “Input Channel Parameters” dialog for CH 2.<br />
CO 2<br />
Per Setup, the chamber should NOW be flooded with a calibrated gas (16% O 2 , 4% CO 2 )!<br />
1. Click the wrench icon for CH 3.<br />
2. Click the Scaling button.<br />
3. Click the Cal2 button.<br />
4. Enter “4” into the Cal2 input value.<br />
5. Click OK to dismiss the scaling dialog.<br />
6. Click OK to dismiss “Input Channel Parameters” dialog for CH 3.<br />
www.biopac.com Page 8 of 16
<strong>BSL</strong> <strong>PRO</strong> <strong>Lesson</strong> <strong>H19</strong><br />
Gas Normalization<br />
BIOPAC Systems, Inc.<br />
Normalize moist gas to volume occupied by dry gas at 0 deg C, 760mm<br />
1. Use this table to find the normalization factor.<br />
2. Click the wrench icon for C3 Vis (STPD).<br />
3. Enter the normalization factor in the formula: C2*(normalization factor)<br />
Be sure to enter the value as 0.x, with the leading decimal.<br />
4. Click OK.<br />
Optional: Interval<br />
Only required if you change the time interval from the template, which is set for a 60-second interval.<br />
1. Click the wrench icon for C2.<br />
www.biopac.com Page 9 of 16
<strong>BSL</strong> <strong>PRO</strong> <strong>Lesson</strong> <strong>H19</strong><br />
3. Calculate the Samples entry as follows:<br />
Integration Samples = Time Interval x Sample rate<br />
(Template setting: Integration Samples = 60 sec x 100 samples/sec = 6000 samples)<br />
4. Enter the new Samples value.<br />
5. Click OK.<br />
Recording<br />
BIOPAC Systems, Inc.<br />
This lesson records absolute volume of O 2 and CO 2 in a 60-second interval. Units are “liters” because this<br />
provides a volume measure, not a flow rate. If you change the time interval, you must adjust the Integrate<br />
formula.<br />
Hints for minimizing measurement error:<br />
1. Ensure that the connections among the various pieces of equipment are fairly<br />
tight to prevent contamination via room air.<br />
2. Try to start the recording immediately after a full exhale. This will prevent<br />
receiving results with an O 2 inspiration value less than that of the total expiration<br />
value (although the averaging will minimize the inaccuracies that this would<br />
cause).<br />
3. It's very important that any extraneous volumes are minimized between the<br />
subject and the T-valve. Additional volumes affect the effective expired gas<br />
concentration levels.<br />
4. The tubing must be connected to the SS11LA on the unlabeled side (that does<br />
NOT say "Inlet").<br />
Preparation<br />
1. Remove the calibration syringe from the transducer setup.<br />
2. Establish the recording connections as shown below:<br />
Airflow Accessory Connects to<br />
AFT1 Filter<br />
AFT22 T-Valve (in the existing setup)<br />
AFT2 disposable mouthpiece AFT1 Filter<br />
www.biopac.com Page 10 of 16
<strong>BSL</strong> <strong>PRO</strong> <strong>Lesson</strong> <strong>H19</strong><br />
BIOPAC Systems, Inc.<br />
Segment 1<br />
1. Have the subject put a nose clip on.<br />
2. Click START in the <strong>PRO</strong> software.<br />
3. Have the subject breathe normally for at least 2 minutes.<br />
o Subject must breathe long enough to ensure that the 5-liter mixing tank has been filled, thereby<br />
enabling it to average those breaths.<br />
o The subject should breathe into the disposable bacterial filter (AFT1) through a disposable<br />
mouthpiece attachment (AFT2).<br />
4. Click STOP in the <strong>PRO</strong> software.<br />
Optional Segments<br />
Recovery from Exercise<br />
Breathe through the mouthpiece<br />
1. Have the subject perform several minutes of medium-to-strenuous exercise.<br />
o If desired, record the heart rate and correlate VO 2 to heart rate.<br />
2. Click START in the <strong>PRO</strong> software.<br />
3. Have the subject breathe normally for at least 2 minutes.<br />
4. Click STOP in the <strong>PRO</strong> software.<br />
www.biopac.com Page 11 of 16
<strong>BSL</strong> <strong>PRO</strong> <strong>Lesson</strong> <strong>H19</strong><br />
Hyperventilation<br />
BIOPAC Systems, Inc.<br />
1. Click START in the <strong>PRO</strong> software.<br />
2. Have the subject breathe normally for at least 1 minute.<br />
3. Have the subject hyperventilate for at least 1 minute; enter a marker at start of hyperventilation (Esc on PC, F9 on<br />
Mac).<br />
4. Have the subject breathe normally for at least 1 minute.<br />
5. Click STOP in the <strong>PRO</strong> software.<br />
Notes<br />
To save recorded data, choose File menu > Save As… > file type: <strong>BSL</strong> <strong>PRO</strong> files<br />
(*.ACQ) File name: (Enter Name) > Save button<br />
To erase all recorded data (make sure you have saved it first), and begin from Time 0,<br />
choose: MP menu > Setup Acquisition > Click Reset<br />
www.biopac.com Page 12 of 16
<strong>BSL</strong> <strong>PRO</strong> <strong>Lesson</strong> <strong>H19</strong><br />
Analysis<br />
BIOPAC Systems, Inc.<br />
The VO 2 and RER template will display channels as follows:<br />
Channel Displays Measure<br />
CH 1 Fi (inspired Air Flow) Value<br />
CH 2 O 2 E (expired O 2 ) Value<br />
CH 3 CO 2 E (expired CO 2 ) Value<br />
CH 40 (C1) N 2 E (expired N 2 ) Value<br />
CH 41 (C2) Vi (ATP) Value<br />
CH 42 (C3) VIS (STPD; inspired) Value<br />
CH 43 (C4) VES (STPD; expired) Value<br />
CH 44 (C5) VO 2 (STPD) Value<br />
CH 45 (C6) VCO 2 (STPD) Value<br />
CH 46 (C7) RER Value<br />
1. Channels 40-43 are not displayed because they are calculation channels required for conversions. You<br />
can show/hide channels by Ctrl-clicking the channel box.<br />
2. Note that the VO 2 and RER measurements (bottom two channels) vary smoothly with time. The<br />
graphical and continuous nature of this recording and calculation method provides significant<br />
information regarding the changes of these variables over time.<br />
3. To display measurements, click the measurement icon.<br />
4. To display markers, click the flag icon.<br />
5. To display grids, click the grid icon.<br />
www.biopac.com Page 13 of 16
<strong>BSL</strong> <strong>PRO</strong> <strong>Lesson</strong> <strong>H19</strong><br />
Appendix<br />
GRAPH TEMPLATE SETTINGS<br />
BIOPAC Systems, Inc.<br />
Click here to open a PDF of the graph template file settings. The <strong>BSL</strong> <strong>PRO</strong> Graph Template file automatically<br />
establishes the settings shown in the table.<br />
Definitions<br />
These abbreviations are used in the discussion and calculation channel Expression formulas for VO 2 and RER:<br />
ATP<br />
Concentration of gas at ambient temperature and pressure<br />
CO 2<br />
Fi<br />
Carbon dioxide<br />
Est. concentration ambient environment: 0.04%<br />
CO 2 e = Carbon Dioxide fractional concentration in expired air<br />
Inspired air flow (ATP)<br />
N 2<br />
Nitrogen<br />
N 2 e = Nitrogen fractional concentration in expired air<br />
N 2 e = 100 – (CO 2 e + O 2 e)<br />
O 2<br />
Pb<br />
PH 2 0<br />
RER<br />
STPD<br />
Oxygen<br />
Est. concentration in ambient air: 20.93%<br />
O 2 e = Oxygen fractional concentration in expired air<br />
Est. concentration in expired breath: 16% oxygen<br />
Ambient barometric pressure (e.g. 745 mmHg)<br />
Ambient pressure of water vapor (e.g. 22.4 mmHG)<br />
Respiratory Exchange Ratio<br />
RER = VCO 2 / VO 2<br />
Concentration of gas at standard temperature and pressure, dry<br />
Ta Ambient temperature (e.g. 24 deg. C)<br />
VCO 2<br />
VO 2<br />
Vi<br />
Volume of carbon dioxide produced (STPD) per 60-sec interval<br />
Real-time carbon dioxide production<br />
VCO 2 = (1/100)*[(Ves* CO 2 e) – (Vis*.04)]<br />
Volume of oxygen consumed (STPD) per 60-sec interval<br />
Real-time oxygen consumption<br />
VO 2 = (1/100)*[(Vis*20.93) – (Ves*O 2 e)]<br />
Inspired air volume (ATP) per 60-sec interval<br />
Vi = Integrate (Fi) over 60 seconds. The number of samples is equal to the time interval x sample<br />
rate (template is 60 sec. x 100 samples/sec = 6000 samples). Select "Average over samples."<br />
Vis<br />
Inspired air volume (STPD) per 60-sec interval<br />
Vis = C2 * Normalization Factor (see Table of Normalization Factors)<br />
If normalization factors are unavailable, you can use this formula:<br />
Vis = Vi*(273/(273+Ta))*((Pb-PH 2 0)/760)<br />
where<br />
Ta = ambient temperature<br />
Pb = barometric pressure<br />
PH 2 O = 22.4 mmHg (assumed value)<br />
Ves<br />
Expired air volume (STPD) per 60-sec interval<br />
Ves = (Vis*79.03) / N 2 e<br />
Note: If you change the time interval from 60 seconds, you must adjust the Vi formula.<br />
www.biopac.com Page 14 of 16
<strong>BSL</strong> <strong>PRO</strong> <strong>Lesson</strong> <strong>H19</strong><br />
Normalization Factors<br />
BIOPAC Systems, Inc.<br />
The following table lists the factors required to reduce volume of moist gas to volume occupied by dry gas at<br />
0°C, 760 mm. OBR is an abbreviation for observed barometric reading, uncorrected for temperature.<br />
Fahrenheit values are roughly converted and rounded from Celsius values as T F =(9/5*T C )+32ºF.<br />
Important!<br />
All factors are 0.x, with x being the value from the table. Be sure to<br />
include the leading decimal when you complete your calculation.<br />
ºC 15 16 17 18 19 20 21 22 23 24 25 26 27 28 29 30 31 32<br />
ºF 59 61 63 64 66 68 69 72 73 75 77 79 81 82 84 86 88 90<br />
OBR<br />
700 855 851 847 842 838 834 829 825 821 816 812 807 802 797 793 788 783 778<br />
702 857 853 849 845 840 836 832 827 823 818 814 809 805 800 795 790 785 780<br />
704 860 856 852 847 843 839 834 830 825 821 816 812 807 802 797 792 787 783<br />
706 862 858 854 840 845 841 837 832 828 823 819 814 810 804 800 795 790 785<br />
708 865 861 856 852 848 843 839 834 830 825 821 816 812 807 802 797 792 787<br />
710 867 863 859 855 850 846 842 837 833 828 824 819 814 809 804 799 795 790<br />
712 870 866 861 857 853 848 844 839 836 830 826 821 817 812 807 802 797 793<br />
714 872 868 864 859 855 851 846 842 837 833 828 824 819 814 809 804 799 794<br />
716 875 871 866 862 858 853 849 844 840 835 831 826 822 816 812 807 802 797<br />
718 877 873 869 864 860 856 851 847 842 838 833 828 824 819 814 809 804 799<br />
720 880 876 871 867 863 858 854 849 845 840 836 831 826 821 816 812 807 802<br />
722 882 878 874 869 865 861 856 852 847 843 838 833 829 824 819 814 809 804<br />
724 885 880 866 872 867 863 858 854 849 845 840 835 831 826 821 816 811 806<br />
726 887 883 879 874 870 866 861 856 852 847 843 838 833 829 824 818 813 808<br />
728 890 886 881 877 872 868 863 859 854 850 845 840 836 831 826 821 816 811<br />
730 892 888 884 879 875 871 866 861 857 852 847 843 838 833 828 823 818 813<br />
732 895 890 886 882 877 873 868 864 859 854 850 845 840 836 831 825 820 815<br />
734 897 893 889 884 880 875 871 866 862 857 852 847 843 838 833 828 823 818<br />
736 900 895 891 887 882 878 873 869 864 859 855 850 845 840 835 830 825 820<br />
738 902 898 894 889 885 880 876 871 866 862 857 852 848 843 838 833 828 822<br />
740 905 900 896 892 887 883 878 874 869 864 860 855 850 845 840 835 830 825<br />
742 907 903 898 894 890 885 881 876 871 867 862 857 852 847 842 837 832 827<br />
744 910 906 901 897 892 888 883 878 874 869 864 859 855 850 845 840 834 829<br />
746 912 908 903 899 895 890 886 881 876 872 867 862 857 852 847 842 837 832<br />
748 915 910 906 901 897 892 888 883 879 874 869 864 860 854 850 845 839 834<br />
750 917 913 908 904 900 895 890 886 881 876 872 867 862 857 852 847 842 837<br />
752 920 915 911 906 902 897 893 888 883 879 874 869 864 859 854 849 844 839<br />
754 922 918 913 909 904 900 895 891 886 881 876 872 867 862 857 852 846 841<br />
756 925 920 916 911 907 902 898 893 888 883 879 874 869 864 859 854 849 844<br />
758 927 923 918 914 909 905 900 896 891 886 881 876 872 866 861 856 851 846<br />
760 930 925 921 916 912 907 902 898 893 888 883 879 874 869 864 859 854 848<br />
www.biopac.com Page 15 of 16
<strong>BSL</strong> <strong>PRO</strong> <strong>Lesson</strong> <strong>H19</strong><br />
BIOPAC Systems, Inc.<br />
762 932 928 923 919 914 910 905 900 896 891 886 881 876 871 866 861 856 851<br />
764 936 930 926 921 916 912 907 903 898 893 888 884 879 874 869 864 858 853<br />
766 937 933 928 924 919 915 910 905 900 896 891 886 881 876 871 866 861 855<br />
768 940 935 931 926 922 917 912 908 903 898 893 888 883 878 873 868 863 858<br />
770 942 938 933 928 924 919 915 910 905 901 896 891 886 881 876 871 865 860<br />
772 945 940 936 931 926 922 917 912 908 903 898 893 888 883 878 873 868 862<br />
774 947 943 938 933 929 924 920 915 910 905 901 896 891 886 880 875 870 865<br />
776 950 945 941 936 931 927 922 917 912 908 903 898 893 888 883 878 872 867<br />
778 952 948 943 938 934 929 924 920 915 910 905 900 895 890 885 880 875 869<br />
780 955 950 945 941 936 932 927 922 917 912 908 903 898 892 887 882 877 872<br />
ºF 59 61 63 64 66 68 69 72 73 75 77 79 81 82 84 86 88 90<br />
ºC 15 16 17 18 19 20 21 22 23 24 25 26 27 28 29 30 31 32<br />
From Peters and Van Slyke, Quantitative Clinical Chemistry, vol. 11. (Methods) Baltimore: Williams and Wilkins, 1932, reprinted 1956.<br />
www.biopac.com Page 16 of 16