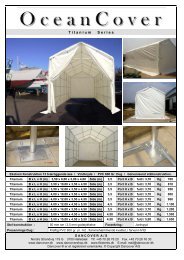
SHELTER - Dancover shop
SHELTER - Dancover shop
SHELTER - Dancover shop

You also want an ePaper? Increase the reach of your titles
YUMPU automatically turns print PDFs into web optimized ePapers that Google loves.
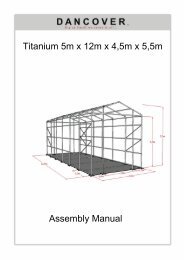
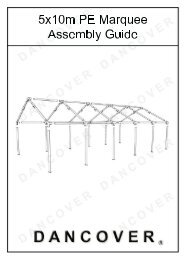
<strong>SHELTER</strong><br />
Assembly Manual<br />
W4xL12xH5,5 m<br />
17-10-2012
Congratulations on your purchase of our instant shelter. This unit is a combination of<br />
excellent manufacturing and design. It is comprised of a rigid frame and a durable cover. For<br />
easy assembly, we have marked all the parts with codes. With proper installation, use and<br />
maintenance, your unit will provide many years of good and suitable service.<br />
READ ALL THE INSTRUCTIONS BEFORE ASSEMBLY!<br />
1. The proper erection and installation of this building requires a high level of care and safety.<br />
We recommend the safety regulations be complied with during the installation. It includes<br />
but is not limited to:<br />
- Safety hats, protective eyewear and protective clothing<br />
- Safety harnesses for all elevated workers<br />
- Proper ladder, cage, and safety operation<br />
2. Site selection: Choose a solid level location for your building. Do not install the building<br />
where the ground could not keep the building steady. Do not install the building where the<br />
ground could not bear the weight of the building. Do not install the building in soft grass<br />
ground or wetland.<br />
3. Be cautious with the surroundings. Keep work area clean. Do not set up it near snow drifts, in<br />
slippery places, or in wet location. The cover of the building will protect against normal<br />
falling leaves and light debris, however, large, fast or sharp falling items etc. may cause a<br />
puncture or tear in the cover material. So, keep the building away from such harmful things.<br />
Be careful with power and heat sources. Don’t keep heat sources near the tarpaulin. Don’t<br />
expose to open flame.<br />
4. Chose a windless day to install the building. It is very difficult to attach the cover in heavy<br />
wind.<br />
5. All snow accumulation on the main cover should be removed as soon as possible. Otherwise,<br />
when old snow on the roof becomes hard with new snow falling in, it will increase the<br />
burden of the roof badly and will damage the roof.<br />
6. Try to keep the building, especially its base, in a dry condition. This will help the building to<br />
have a longer life than keeping it in a wet condition.<br />
7. The user should be responsible for the parts missing or damage occurred during the<br />
installation.<br />
8. Don’t make alteration of the frame. Don’t hang anything besides included parts to the frame.<br />
Damages, consequential damages, or injuries caused by improper installation, alteration,<br />
improper use, or damages caused by snow, wind, or any acts of nature are owing to the user.<br />
The building is not intended for occupancy for any length of time.
ASSEMBLY PROCEDURE<br />
1. Prepare location and place all unit boxes near location sight. Perform an inventory check<br />
before beginning, to be certain all components are available for installtion.<br />
2. Secure base plate flanges to base surface.<br />
3. Assemble every group of arch.<br />
4. Begin frame assembly with front end arch, first interior arch, purlins, etc.<br />
5. Add to assemble other groups of arches.<br />
6. Install main cover over frame.<br />
7. Install end covers over end panels.<br />
Read all the detailed instructions and notices in the following assembly instructions!<br />
MAINTENANCE AND CARE<br />
1. If some parts or the cover were accidently damaged during the use, contact the local supplier<br />
for advises on the repairing method or replacements, so that to prevent from further damage<br />
and keep the building in a good condition.<br />
2. When replacing the parts, make certain the whole frame and the parts connected to the<br />
replaced parts be well fixed or supported.<br />
3. Same with when attaching the cover, choose a windless day to replace the cover. Begin with<br />
making certain all the bolts of the frame and the tensioning equipments be well fixed. When<br />
taking off the cover, make sure the related ropes, etc. be taken off, and the cover will not be<br />
blocked during the way. Avoid taking off the cover with heavy big power equipments.<br />
4. To enlongate the life of the cover, put small duct tape or foam rubber (provide it by yourself)<br />
on the frame that comes to in contact with cover. The tape and foam rubber acts as a cushion<br />
to avoid rubbing damage to the cover over years.<br />
5. Periodically (once in half a year or more often), the building should be completely inspected<br />
and maintained internally and externally to make certain the building remains properly<br />
installed and secured. Including: check all bolts and hardware connectors to be certain they<br />
are in place and tightened, the base plates are still fixed firmly, check and adjust the ropes if<br />
in need, clean the cover with suitable washing. Allowing dirt and debris to sit on cover over<br />
an extended time will damage cover irreparably.<br />
Thanks again for choosing this quality product. The following is the detailed assembly<br />
instructions for you starting the assembly.
Part List of Model#Basic-1339(L12.0xW4.0xH4.5m)<br />
Part Code Description Quantity<br />
1 Top roof curved tube 7<br />
2 Roof tube 14<br />
2A Roof curved tube 14<br />
3 Vertical sidewall tubes 14<br />
4 Horizontal wall and roof purlin 30<br />
5 Base flange of four corner of frame 4<br />
6 Base flange of backwall tube in the middle 1<br />
7 Base flange of sidewall tubes 10<br />
9 Vertical support tube for cross tube in the front wall 1<br />
10 Cross tube in the front and back wall (2 pcs per set) 2sets<br />
12 Standing tube in the middle of back wall 2<br />
13 Lower cross tube forback wall 2<br />
14 Tensioning tube for back cover at the bottom 2<br />
16 Ground support tube in the front wall (2 pcs per set) 1set<br />
17 Bolts M10x60mm for cross tube 4<br />
17A Hex bolts M10x75mm, for arches 116<br />
17B Bolts M10x30mm, for Angles in the ends 6<br />
17C Bolts M10x15mm, for tie down ratchets 28<br />
17D<br />
Bolts M6x40mm, for tensioning tube for front and back cover at<br />
the bottom<br />
1<br />
18 Carriage bolts M10x90mm, connecting the purlins to arches 36<br />
20 Connecting angle for four conners of the frame 6<br />
21 Roof cover 1<br />
22 Lower roof cover tensioning tube 2sets<br />
23 Tie down ratchet 14<br />
24 Nylon bands for tensioning roof cover 14<br />
25 Back cover 1<br />
27 Front cover 1<br />
29 Ropes for fastening the roof cover and the front&back cover 9<br />
30 Pole for help opening and closing the door 1<br />
31 Stake peg 45<br />
33 Plastic cap for cover tensioning tube 10<br />
34 Windstabilizers on both sides of the shelter 8sets
Contact information<br />
Head office:<br />
<strong>Dancover</strong> A/S<br />
Nordre Strandvej 119 G<br />
3150 Hellebæk<br />
Denmark<br />
For more information<br />
please visit:<br />
www.dancover<strong>shop</strong>.com<br />
National contact<br />
Denmark:<br />
denmark@dancover.com<br />
UK:<br />
uk@dancover.com<br />
Germany:<br />
germany@dancover.com<br />
France:<br />
france@dancover.com<br />
Sweden:<br />
sverige@dancover.com<br />
Finland:<br />
suomi@dancover.com<br />
Poland:<br />
polska@dancover.com<br />
Luxembourg:<br />
luxembourg@dancover.com<br />
Spain:<br />
espana@dancover.com<br />
Italy:<br />
italia@dancover.com<br />
Switzerland:<br />
schweiz@dancover.com<br />
Austria:<br />
austria@dancover.com<br />
Norway:<br />
norge@dancover.com<br />
Nederland:<br />
nederland@dancover.com<br />
Ireland:<br />
ireland@dancover.com<br />
Belgium:<br />
belgique@dancover.com


![[PDF Manual [DOWNLOAD HERE]] - Dancover shop](https://img.yumpu.com/35076643/1/184x260/pdf-manual-download-here-dancover-shop.jpg?quality=85)