PHOSPHAX sc - Can-Am Instruments Ltd.
PHOSPHAX sc - Can-Am Instruments Ltd.
PHOSPHAX sc - Can-Am Instruments Ltd.

You also want an ePaper? Increase the reach of your titles
YUMPU automatically turns print PDFs into web optimized ePapers that Google loves.
Installation<br />
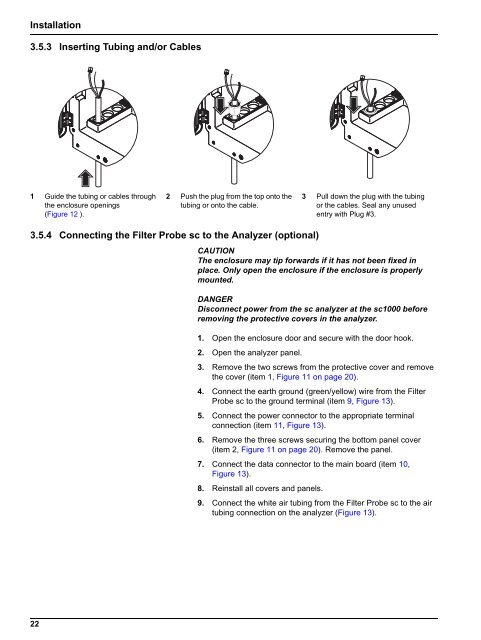
3.5.3 Inserting Tubing and/or Cables<br />
1 Guide the tubing or cables through<br />
the enclosure openings<br />
(Figure 12 ).<br />
2 Push the plug from the top onto the<br />
tubing or onto the cable.<br />
3 Pull down the plug with the tubing<br />
or the cables. Seal any unused<br />
entry with Plug #3.<br />
3.5.4 Connecting the Filter Probe <strong>sc</strong> to the Analyzer (optional)<br />
CAUTION<br />
The enclosure may tip forwards if it has not been fixed in<br />
place. Only open the enclosure if the enclosure is properly<br />
mounted.<br />
DANGER<br />
Di<strong>sc</strong>onnect power from the <strong>sc</strong> analyzer at the <strong>sc</strong>1000 before<br />
removing the protective covers in the analyzer.<br />
1. Open the enclosure door and secure with the door hook.<br />
2. Open the analyzer panel.<br />
3. Remove the two <strong>sc</strong>rews from the protective cover and remove<br />
the cover (item 1, Figure 11 on page 20).<br />
4. Connect the earth ground (green/yellow) wire from the Filter<br />
Probe <strong>sc</strong> to the ground terminal (item 9, Figure 13).<br />
5. Connect the power connector to the appropriate terminal<br />
connection (item 11, Figure 13).<br />
6. Remove the three <strong>sc</strong>rews securing the bottom panel cover<br />
(item 2, Figure 11 on page 20). Remove the panel.<br />
7. Connect the data connector to the main board (item 10,<br />
Figure 13).<br />
8. Reinstall all covers and panels.<br />
9. Connect the white air tubing from the Filter Probe <strong>sc</strong> to the air<br />
tubing connection on the analyzer (Figure 13).<br />
22