Panel Grip Railing - Morse Industries
Panel Grip Railing - Morse Industries
Panel Grip Railing - Morse Industries

You also want an ePaper? Increase the reach of your titles
YUMPU automatically turns print PDFs into web optimized ePapers that Google loves.
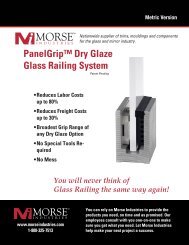
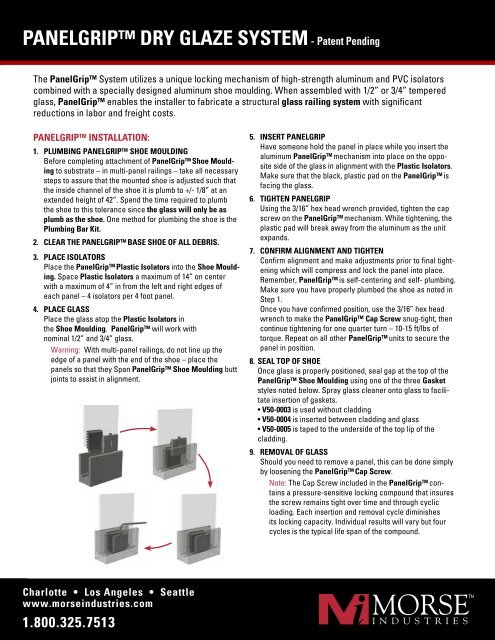
panelgrip dry glaze system - Patent Pending<br />
The <strong>Panel</strong><strong>Grip</strong> System utilizes a unique locking mechanism of high-strength aluminum and PVC isolators<br />
combined with a specially designed aluminum shoe moulding. When assembled with 1/2” or 3/4” tempered<br />
glass, <strong>Panel</strong><strong>Grip</strong> enables the installer to fabricate a structural glass railing system with significant<br />
reductions in labor and freight costs.<br />
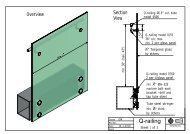
PANELGRIP INSTALLATION:<br />
1. Plumbing <strong>Panel</strong>GriP Shoe Moulding<br />
Before completing attachment of <strong>Panel</strong><strong>Grip</strong> Shoe Moulding<br />
to substrate – in multi-panel railings – take all necessary<br />
steps to assure that the mounted shoe is adjusted such that<br />
the inside channel of the shoe it is plumb to +/- 1/8” at an<br />
extended height of 42”. Spend the time required to plumb<br />
the shoe to this tolerance since the glass will only be as<br />
plumb as the shoe. One method for plumbing the shoe is the<br />
Plumbing Bar Kit.<br />
2. CLEAR THE PANELGRIP BASE SHOE OF ALL DEBRIS.<br />
3. PlACE iSOLATORS<br />
Place the <strong>Panel</strong><strong>Grip</strong> Plastic Isolators into the Shoe Moulding.<br />
Space Plastic Isolators a maximum of 14” on center<br />
with a maximum of 4” in from the left and right edges of<br />
each panel – 4 isolators per 4 foot panel.<br />
4. PLACE GLASS<br />
Place the glass atop the Plastic Isolators in<br />
the Shoe Moulding. <strong>Panel</strong><strong>Grip</strong> will work with<br />
nominal 1/2” and 3/4” glass.<br />
Warning: With multi-panel railings, do not line up the<br />
edge of a panel with the end of the shoe – place the<br />
panels so that they Span <strong>Panel</strong><strong>Grip</strong> Shoe Moulding butt<br />
joints to assist in alignment.<br />
5. iNSERT pANELgRIP<br />
Have someone hold the panel in place while you insert the<br />
aluminum <strong>Panel</strong><strong>Grip</strong> mechanism into place on the opposite<br />
side of the glass in alignment with the Plastic Isolators.<br />
Make sure that the black, plastic pad on the <strong>Panel</strong><strong>Grip</strong> is<br />
facing the glass.<br />
6. tIGHTEN pANELgRIP<br />
Using the 3/16” hex head wrench provided, tighten the cap<br />
screw on the <strong>Panel</strong><strong>Grip</strong> mechanism. While tightening, the<br />
plastic pad will break away from the aluminum as the unit<br />
expands.<br />
7. cONFIRM ALIGNMENT AND TIGHTEN<br />
Confirm alignment and make adjustments prior to final tightening<br />
which will compress and lock the panel into place.<br />
Remember, <strong>Panel</strong><strong>Grip</strong> is self-centering and self- plumbing.<br />
Make sure you have properly plumbed the shoe as noted in<br />
Step 1.<br />
Once you have confirmed position, use the 3/16” hex head<br />
wrench to make the <strong>Panel</strong><strong>Grip</strong> Cap Screw snug-tight, then<br />
continue tightening for one quarter turn – 10-15 ft/lbs of<br />
torque. Repeat on all other <strong>Panel</strong><strong>Grip</strong> units to secure the<br />
panel in position.<br />
8. Seal top of shoe<br />
Once glass is properly positioned, seal gap at the top of the<br />
<strong>Panel</strong><strong>Grip</strong> Shoe Moulding using one of the three Gasket<br />
styles noted below. Spray glass cleaner onto glass to facilitate<br />
insertion of gaskets.<br />
• V50-0003 is used without cladding<br />
• V50-0004 is inserted between cladding and glass<br />
• V50-0005 is taped to the underside of the top lip of the<br />
cladding.<br />
9. reMOVAL OF GLASS<br />
Should you need to remove a panel, this can be done simply<br />
by loosening the <strong>Panel</strong><strong>Grip</strong> Cap Screw.<br />
Note: The Cap Screw included in the <strong>Panel</strong><strong>Grip</strong> contains<br />
a pressure-sensitive locking compound that insures<br />
the screw remains tight over time and through cyclic<br />
loading. Each insertion and removal cycle diminishes<br />
its locking capacity. Individual results will vary but four<br />
cycles is the typical life span of the compound.<br />
Charlotte • Los Angeles • Seattle<br />
www.morseindustries.com<br />
1.800.325.7513