Panel Grip Railing - Morse Industries
Panel Grip Railing - Morse Industries
Panel Grip Railing - Morse Industries

Create successful ePaper yourself
Turn your PDF publications into a flip-book with our unique Google optimized e-Paper software.
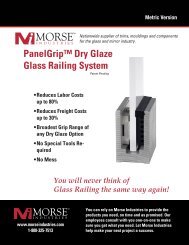
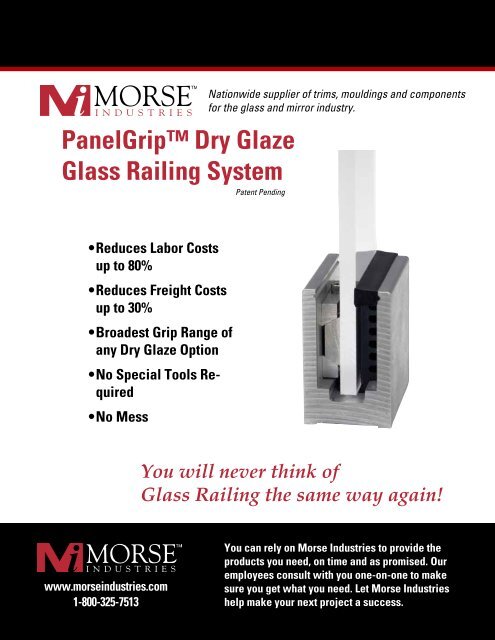
<strong>Panel</strong><strong>Grip</strong> Dry Glaze<br />
Glass <strong>Railing</strong> System<br />
Patent Pending<br />
Nationwide supplier of trims, mouldings and components<br />
for the glass and mirror industry.<br />
• Reduces Labor Costs<br />
up to 80%<br />
• Reduces Freight Costs<br />
up to 30%<br />
• Broadest <strong>Grip</strong> Range of<br />
any Dry Glaze Option<br />
• No Special Tools Required<br />
• No Mess<br />
You will never think of<br />
Glass <strong>Railing</strong> the same way again!<br />
www.morseindustries.com<br />
1-800-325-7513<br />
You can rely on <strong>Morse</strong> <strong>Industries</strong> to provide the<br />
products you need, on time and as promised. Our<br />
employees consult with you one-on-one to make<br />
sure you get what you need. Let <strong>Morse</strong> <strong>Industries</strong><br />
help make your next project a success.
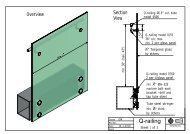
panelgrip dry glaze system - Patent Pending<br />
The latest development in Glass <strong>Railing</strong> technology, <strong>Panel</strong><strong>Grip</strong> facilitates<br />
the quick assembly of structural glass railing without messy fillers or<br />
special tools with significant savings in labor and shipping costs.<br />
Easy to<br />
Install<br />
1. Place Plastic Isolator into Shoe<br />
2. Insert Glass<br />
3. Insert <strong>Panel</strong><strong>Grip</strong> on Opposing Side<br />
4. Tighten Screw with Allen Wrench<br />
5. Done!<br />
Reduce Labor Costs up to 80%<br />
No sealing of shoe, no setting blocks, no plumbing of<br />
glass, no multiple pours of cement, no waiting for cement<br />
to cure, no messy clean-up.<br />
A42-0011<br />
<strong>Panel</strong> <strong>Grip</strong> Locking Mechanism<br />
Patent Pending<br />
Reduce Freight Costs up to 30%<br />
<strong>Panel</strong><strong>Grip</strong> base shoe is 30% lighter than standard base<br />
shoes yet meets structural load requirements for railings.<br />
Broadest <strong>Grip</strong> Range Of Any Dry Glaze Option<br />
Made for nominal 1/2” tempered glass but will work for<br />
any panel between .450” and .515” (11.5mm and 13mm).<br />
No Special Tools Required<br />
All you need is an Allen wrench for installation or removal.<br />
A42-0074 & A42-0075<br />
<strong>Panel</strong> <strong>Grip</strong> Base Shoes<br />
Patent Pending<br />
No Mess<br />
No mixing and pouring of expansion cement, no running<br />
of cement on incline.<br />
Charlotte • Los Angeles • Seattle<br />
www.morseindustries.com<br />
1.800.325.7513
panelgrip dry glaze system - Patent Pending<br />
Aluminum Base Shoe<br />
<strong>Panel</strong><strong>Grip</strong> Base Shoe is extruded from 6063-T5 in mill finish (other lengths available upon request).<br />
1.93”<br />
.410”<br />
.410”<br />
1.68”<br />
4 1/8”<br />
4 1/8”<br />
1 1/4”<br />
1”<br />
1 3/4”<br />
2 3/4”<br />
1 3/4”<br />
2 1/2”<br />
A42-0074<br />
Stocked in:<br />
10’ & 20’ lengths -<br />
Counter Bore,<br />
Counter Sunk & Undrilled<br />
For use with 3/4”glass<br />
A42-0075<br />
Stocked in:<br />
10’ & 20’ lengths -<br />
Counter Bore,<br />
Counter Sunk & Undrilled<br />
For use with 1/2”glass<br />
Screws & Bolts<br />
Part# Description Measurement<br />
F92-0075FH Stainless Steel Flat Head Screws (10 per pkg) 1/2” - 13 x 1 1/4”<br />
F92-0075WB Zinc Plated Wedge-Bolt ® - Orange Tip (10 per pkg) 3/8” x 4”<br />
Aluminum Base Drain Block<br />
Placed under exterior installed base shoes to provide drainage space for water runoff. Great for balconies and decks.<br />
10 blocks per package.<br />
Part#<br />
Measurement<br />
A42-0013-10 2 1/4” x 2 1/2” x 3/8”<br />
Plumbing Bar Kit<br />
Plumbing bar kit includes plumbing bar and one panel grip.<br />
1. Place isolator in shoe, insert plumbing bar on top of the isolator and<br />
lock into place with a <strong>Panel</strong><strong>Grip</strong>.<br />
2. Shim as needed until a level indicates vertical plumb.<br />
3. Remove plumbing bar and repeat as needed.<br />
A42-0021<br />
Charlotte • Los Angeles • Seattle<br />
www.morseindustries.com<br />
1.800.325.7513
panelgrip dry glaze system - Patent Pending<br />
Cladding<br />
Stainless Steel<br />
.035 guage/thickness, #8 polished or #4 brushed finishes are standard.<br />
Part# A B Length Base Section<br />
S16-0075 .8125” 4.125” 10’, 12’ A42-0075<br />
S16-0074 .8125” 4.125” 10’, 12’ A42-0074<br />
A<br />
A<br />
Brass (or Muntz)<br />
.050 guage/thickness, #8 polished or #4 brushed finishes are standard.<br />
Part# A B Length Base Section<br />
B11-0075 .8125” 4.125” 10’, 12’ A42-0075<br />
B11-0074 .8125” 4.125” 10’, 12’ A42-0074<br />
B<br />
B<br />
Aluminum<br />
.050 guage/thickness, available in clear satin and dark bronze.<br />
Part# A B Length Base Section<br />
A16-0075 .8125” 4.125” 10’, 12’ A42-0075<br />
A16-0074 .8125” 4.125” 10’, 12’ A42-0074<br />
S16-0075<br />
B11-0075<br />
A16-0075<br />
S16-0074<br />
B11-0074<br />
A16-0074<br />
End Caps<br />
Stainless Steel End Caps<br />
.035 guage/thickness, #8 polished or #4 brushed finishes are standard.<br />
Part# Base Section Part #<br />
S17-0074 A42-0074<br />
S17-0075 A42-0075<br />
Brass (or Muntz) End Caps<br />
.050 guage/thickness, #8 polished or #4 brushed finishes are standard.<br />
Part# Base Section Part #<br />
B12-0074 A42-0074<br />
B12-0075 A42-0075<br />
Aluminum End Caps<br />
Aluminum end caps are oversized for easy finishing. 050 guage/thickness,<br />
available in mill finish, clear satin and dark bronze.<br />
Part# Base Section Part #<br />
A17-0074 A42-0074<br />
A17-0075 A42-0075<br />
Recommended Cladding Attachment Options<br />
Take care to properly align cladding before pressing into place.<br />
1. Apply two rows of tape to the<br />
vertical face of the cladding and<br />
apply a silicone bead between<br />
the rows.<br />
2. Apply three rows of tape to the<br />
vertical face of the cladding.<br />
3. Apply silicone to the vertical<br />
face of the cladding. Use<br />
clamps to hold the cladding in<br />
place until the silicone cures.<br />
Charlotte • Los Angeles • Seattle<br />
www.morseindustries.com<br />
1.800.325.7513
panelgrip dry glaze system - Patent Pending<br />
<strong>Panel</strong> <strong>Grip</strong> Isolator<br />
The patented <strong>Panel</strong><strong>Grip</strong> TM System utilizes a unique locking mechanism of high-strength aluminum and PVC isolators<br />
combined with a specially designed aluminum shoe moulding. Isolator assembly is adjustable to accommodate both<br />
1/2” and 3/4” glass. The <strong>Panel</strong><strong>Grip</strong> System was tested per ASTM E935 Standard Test Methods for Performance of Permanent <strong>Railing</strong> Systems<br />
and Rails for Buildings. This test report can be requested by calling customer service at 1-800-325-7513.<br />
PANELGRIP SPACING GUIDELINES<br />
Part#<br />
A42-0011-4<br />
A42-0011-1<br />
Description<br />
Package of Four<br />
Single Unit<br />
Rubber Base Shoe Gaskets<br />
For use without cladding. Seals the gap at top of base shoe. Sold by the foot.<br />
Part# Width Height<br />
V50-0003 3/4” 9/16”<br />
System for 200 lb. point load with 4 × safety factor<br />
14" center-to-center maximum with<br />
4" maximum from center to glass edge.<br />
V50-0003<br />
For use with cladding only. Peel back paper to reveal self adhesive strip.<br />
Adhere to underside of cladding before applying cladding to base shoe.<br />
Sold by the foot.<br />
Part# Width Height<br />
V50-0005 1 1/8” 1/4”<br />
V50-0005<br />
Charlotte • Los Angeles • Seattle<br />
www.morseindustries.com<br />
1.800.325.7513
panelgrip dry glaze system - Patent Pending<br />
The <strong>Panel</strong><strong>Grip</strong> System utilizes a unique locking mechanism of high-strength aluminum and PVC isolators<br />
combined with a specially designed aluminum shoe moulding. When assembled with 1/2” or 3/4” tempered<br />
glass, <strong>Panel</strong><strong>Grip</strong> enables the installer to fabricate a structural glass railing system with significant<br />
reductions in labor and freight costs.<br />
PANELGRIP INSTALLATION:<br />
1. Plumbing <strong>Panel</strong>GriP Shoe Moulding<br />
Before completing attachment of <strong>Panel</strong><strong>Grip</strong> Shoe Moulding<br />
to substrate – in multi-panel railings – take all necessary<br />
steps to assure that the mounted shoe is adjusted such that<br />
the inside channel of the shoe it is plumb to +/- 1/8” at an<br />
extended height of 42”. Spend the time required to plumb<br />
the shoe to this tolerance since the glass will only be as<br />
plumb as the shoe. One method for plumbing the shoe is the<br />
Plumbing Bar Kit.<br />
2. CLEAR THE PANELGRIP BASE SHOE OF ALL DEBRIS.<br />
3. PlACE iSOLATORS<br />
Place the <strong>Panel</strong><strong>Grip</strong> Plastic Isolators into the Shoe Moulding.<br />
Space Plastic Isolators a maximum of 14” on center<br />
with a maximum of 4” in from the left and right edges of<br />
each panel – 4 isolators per 4 foot panel.<br />
4. PLACE GLASS<br />
Place the glass atop the Plastic Isolators in<br />
the Shoe Moulding. <strong>Panel</strong><strong>Grip</strong> will work with<br />
nominal 1/2” and 3/4” glass.<br />
Warning: With multi-panel railings, do not line up the<br />
edge of a panel with the end of the shoe – place the<br />
panels so that they Span <strong>Panel</strong><strong>Grip</strong> Shoe Moulding butt<br />
joints to assist in alignment.<br />
5. iNSERT pANELgRIP<br />
Have someone hold the panel in place while you insert the<br />
aluminum <strong>Panel</strong><strong>Grip</strong> mechanism into place on the opposite<br />
side of the glass in alignment with the Plastic Isolators.<br />
Make sure that the black, plastic pad on the <strong>Panel</strong><strong>Grip</strong> is<br />
facing the glass.<br />
6. tIGHTEN pANELgRIP<br />
Using the 3/16” hex head wrench provided, tighten the cap<br />
screw on the <strong>Panel</strong><strong>Grip</strong> mechanism. While tightening, the<br />
plastic pad will break away from the aluminum as the unit<br />
expands.<br />
7. cONFIRM ALIGNMENT AND TIGHTEN<br />
Confirm alignment and make adjustments prior to final tightening<br />
which will compress and lock the panel into place.<br />
Remember, <strong>Panel</strong><strong>Grip</strong> is self-centering and self- plumbing.<br />
Make sure you have properly plumbed the shoe as noted in<br />
Step 1.<br />
Once you have confirmed position, use the 3/16” hex head<br />
wrench to make the <strong>Panel</strong><strong>Grip</strong> Cap Screw snug-tight, then<br />
continue tightening for one quarter turn – 10-15 ft/lbs of<br />
torque. Repeat on all other <strong>Panel</strong><strong>Grip</strong> units to secure the<br />
panel in position.<br />
8. Seal top of shoe<br />
Once glass is properly positioned, seal gap at the top of the<br />
<strong>Panel</strong><strong>Grip</strong> Shoe Moulding using one of the three Gasket<br />
styles noted below. Spray glass cleaner onto glass to facilitate<br />
insertion of gaskets.<br />
• V50-0003 is used without cladding<br />
• V50-0004 is inserted between cladding and glass<br />
• V50-0005 is taped to the underside of the top lip of the<br />
cladding.<br />
9. reMOVAL OF GLASS<br />
Should you need to remove a panel, this can be done simply<br />
by loosening the <strong>Panel</strong><strong>Grip</strong> Cap Screw.<br />
Note: The Cap Screw included in the <strong>Panel</strong><strong>Grip</strong> contains<br />
a pressure-sensitive locking compound that insures<br />
the screw remains tight over time and through cyclic<br />
loading. Each insertion and removal cycle diminishes<br />
its locking capacity. Individual results will vary but four<br />
cycles is the typical life span of the compound.<br />
Charlotte • Los Angeles • Seattle<br />
www.morseindustries.com<br />
1.800.325.7513