Painting Foam Latex by Stuart Bray - Learn Prosthetic Makeup
Painting Foam Latex by Stuart Bray - Learn Prosthetic Makeup
Painting Foam Latex by Stuart Bray - Learn Prosthetic Makeup

Create successful ePaper yourself
Turn your PDF publications into a flip-book with our unique Google optimized e-Paper software.
<strong>Learn</strong> <strong>Prosthetic</strong> <strong>Makeup</strong>: <strong>Painting</strong> <strong>Foam</strong> <strong>Latex</strong><br />
________________________________________________________________<br />
<strong>Painting</strong> <strong>Foam</strong> <strong>Latex</strong> <strong>by</strong> <strong>Stuart</strong> <strong>Bray</strong><br />
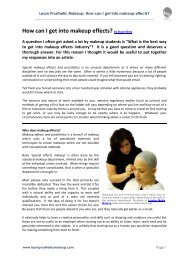
Shock! Horror! It’s flat, opaque and looks nothing like skin whatsoever. When<br />
compared to its translucent cousins, gelatine and silicone, that foam rubber<br />
nose could look like an unwelcome option.<br />
But foam latex does have its advantages. It is durable, absorbs perspiration rather than collecting it in<br />
pockets and it doesn’t dissolve or melt. Best of all, you can repair, re-glue and re-colour knowing that<br />
it’s opacity will hide a multitude of sins- that is if it’s well painted! This article will cover a simple<br />
procedure for colouring a foam appliance on the face.<br />
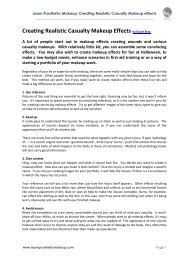
Get your materials<br />
You will need:<br />
Pros-Aide® & remover<br />
Liquitex acrylic paints (avoid using ‘Cadmium’ colours such as Cadmium Red, as these have been<br />
found to be irritant near eyes etc),<br />
Rubber Mask Grease Paint (RMGP)<br />
Alcohol activated makeup (Skin Illustrator/Stacolor/Kryolan)<br />
Plastic cups<br />
IsoPropyl Alcohol<br />
Cheap bristle brush/chip brush (12mm/1/2”)<br />
Cotton tipped buds<br />
I prefer using cotton buds (Johnsons/Q-Tips) instead of brushes for gluing small appliances as you can<br />
ditch them after they become sticky. IsoPropyl Alcohol (IPA) is used for un-tacking any rolled over<br />
edges you get during application. Once the alcohol evaporates, the glue becomes tacky again.<br />
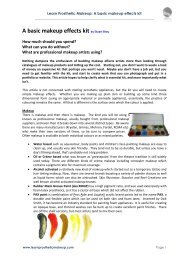
The big brush is a half-inch decorator’s bristle paintbrush, cut halfway down. The ruined looking<br />
brushes are sable brushes repeatedly stamped onto a surface and ‘back combed’ with a wire brush to<br />
spread the bristles. This makes applying natural looking stipples of colour much quicker. I will cover this<br />
process in more detail in another article.<br />
Mix your base<br />
The combination of Pros-Aide® and Liquitex led to the name PAX, a durable and flexible paint which can<br />
be used on both skin and foam latex. Invented <strong>by</strong> Dick Smith, it has become an industry standard for<br />
painting foam appliances.<br />
You mix up the base colour of the subjects skin using the acrylic paints, getting as close as you can. You<br />
can tweak with washes and makeup later. It takes a while to confidently mix flesh tones, so have a play<br />
and try several attempts. A little goes a long way so you don’t need to mix gallons of paint! Half an egg<br />
cup will be plenty. For this makeup I started with Unbleached titanium (off white), adding reds, raw<br />
umber, yellow ochre and a little Olive. Once you are happy with the colour, add 40-50% Pros-Aide® and<br />
mix well. It will look lighter than before because of the whiteness of the Pros-Aide® but because Pros-<br />
Aide® dries clear the colour will return to normal. For darker skin tones, I like to start with a little warm<br />
colour like Apricot and add appropriate shades like Umber and Sienna to avoid going too cold.<br />
www.learnprostheticmakeup.com Page 1
<strong>Learn</strong> <strong>Prosthetic</strong> <strong>Makeup</strong>: <strong>Painting</strong> <strong>Foam</strong> <strong>Latex</strong><br />
________________________________________________________________<br />
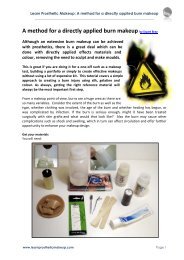
Stage 1: The appliance glued in place using the Pros-Aide®, edges worked a little with<br />
IPA alcohol. Give the whole appliance a coat of Pros-Aide® thinned with a little<br />
water. This seals the foam and prevents any paint soaking into the foam-after all it is<br />
essentially a latex sponge. Dry carefully with a hairdryer, powdering as soon as it is<br />
dry. Pros-Aide® glue remains shiny and tacky when dry, so ensure you powder<br />
before any facial expressions are pulled as everything that touches will stick. If this<br />
happens, a little IPA on a brush or cotton bud will un-tack it.<br />
Stage 2: On with the first coat of PAX paint (thinned with water), blended into the<br />
skin about 5-10mm beyond the edge of the piece. I used water to help blend. It is<br />
essential to avoid a sudden line where the paint finishes. Try applying in a stippling<br />
motion. This will give you a more natural looking distribution of colour. It needs a<br />
few more coats, some lighter and some darker to break it up drying each coat before<br />
applying the next. It definitely needs some red.<br />
Stage 3: A few more coats of PAX washes. Never dump a thick layer of paint on as it<br />
wrinkles horribly when the face moves. Layers of washes are better, giving gradual<br />
change. Squint and look from a distance, and ask yourself:-‘Too red’ ‘Too orange’<br />
‘Too pale’ Address these <strong>by</strong> applying colour wheel logic. ‘Too red’ needs a touch of<br />
green in the next wash. Take a little of your base PA-X onto a palette and add a drop<br />
of Olive. The Pros Aide in the PAX will keep it flexible, so don’t add more.<br />
Stage 4: The finished PAX paint job. There are about five layers of stippled washes.<br />
A light ‘no-colour’ powder and we’re onto the last stages.<br />
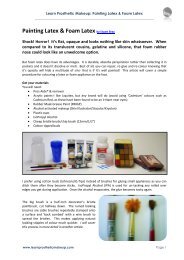
Stage 5: Again using a stippling motion, apply thin washes of Skin Illustrator. I have<br />
used Natural 1 & 2, Rice Paper and a touch of Brown for freckles. The great thing<br />
with these alcohol colours is the washes can be thinned right down with IPA so you<br />
can apply tiny amounts of actual pigment, and the solvent evaporates quickly. Very<br />
handy for tweaking colour. I also apply some washes using the cut down half-inch<br />
decorators brush. I dip the brush into the Illustrator wash, and flick the end bristles<br />
which distributes an ‘airbrush spatter’ evenly over the appliance and skin. You could<br />
use an airbrush if wanted to, but for ease I like the paintbrush for quick colour<br />
changes and cleanup afterwards.<br />
www.learnprostheticmakeup.com Page 2
<strong>Learn</strong> <strong>Prosthetic</strong> <strong>Makeup</strong>: <strong>Painting</strong> <strong>Foam</strong> <strong>Latex</strong><br />
________________________________________________________________<br />
Stage 6: The final makeup. I used a little<br />
RMGP to shade around the eyes. Skin<br />
Illustrator paints dry matt, which helps subdue<br />
any unwanted shine from the PAX. If you still<br />
get some shiny areas, try a little anti-shine<br />
cream.<br />
Remove appliance with Super Solv, Pro Clean or<br />
similar.<br />
Reference is always a good thing, and it always pays to have good, varied images to keep your painting<br />
fresh and informed. Get into the habit of collecting reference photos to get an idea of natural looking<br />
skin on various people and skin types. Once a foam appliance is on, it obliterates the skin colour<br />
underneath and it’s easy to forget what was there. I like to take clear photos of the subject prior to<br />
makeup, and also collect good images from magazines.<br />
I also found some good books, like the National Geographic books and portrait collections. These are<br />
also great tools to refer back to when designing your makeup. Also, photo sharing sites such as flickr<br />
(http://www.flickr.com/) are great. Just type in what you are looking for (‘old face’, ‘sunburn’ or<br />
‘freckles’ etc) and trawl away. Reference often leads you into new directions you hadn’t planned on<br />
going!<br />
Happy sticking!<br />
<strong>Stuart</strong><br />
Questions or comments about this article<br />
Get in touch at www.learnprostheticmakeup.com<br />
Take care whenever working with makeup materials.<br />
Familiarise yourself with the products and take appropriate<br />
health and safety measures. We suggest you obtain and<br />
consult the relevant MSDS (Material Safety Data Sheets) from<br />
your supplier whenever possible. This article is for your<br />
information only. We cannot accept any responsibility for<br />
your actions.<br />
©Copyright <strong>Stuart</strong> <strong>Bray</strong> 2009<br />
www.learnprostheticmakeup.com Page 3