Making Sculpting Loops - Learn Prosthetic Makeup
Making Sculpting Loops - Learn Prosthetic Makeup
Making Sculpting Loops - Learn Prosthetic Makeup

You also want an ePaper? Increase the reach of your titles
YUMPU automatically turns print PDFs into web optimized ePapers that Google loves.
<strong>Learn</strong> <strong>Prosthetic</strong> <strong>Makeup</strong>: <strong>Making</strong> sculpting loops (updated 07 Sept ‘09)<br />
________________________________________________________________<br />
<strong>Making</strong> <strong>Sculpting</strong> <strong>Loops</strong> (updated 07 Sept ‘09) by Stuart Bray<br />
<strong>Sculpting</strong> tools are essential kit for sculpting in clay or plasteline. Usually, there<br />
are two main kinds of sculpting tools-the stick variety which usually are used for<br />
adding material, and loops which are used for taking away. They are not that<br />
expensive to buy, but there are some great tools which are not easily found but<br />
easily made. It’s fun, too.<br />
This article will show you how to make your own loop tools from scratch. <strong>Loops</strong> can be all shapes and<br />
sizes depending on the scale of the job. For blocking out life size figures, you’ll need something bigger,<br />
and for fine lines and wrinkles on prosthetics you’ll need something smaller. The principle remains<br />
the same.<br />
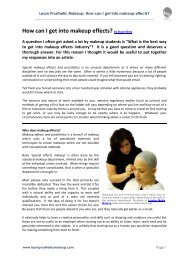
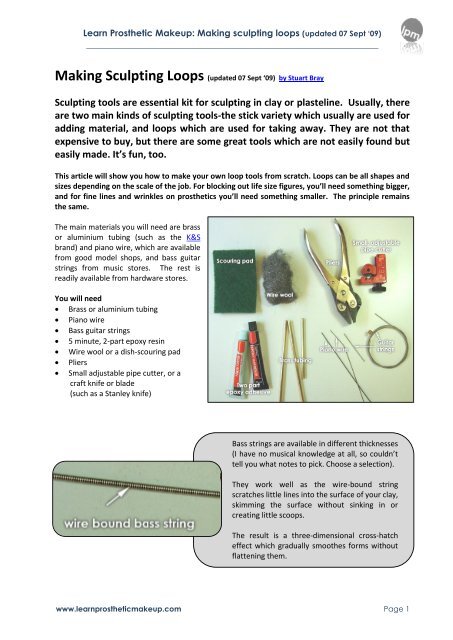
The main materials you will need are brass<br />
or aluminium tubing (such as the K&S<br />
brand) and piano wire, which are available<br />
from good model shops, and bass guitar<br />
strings from music stores. The rest is<br />
readily available from hardware stores.<br />
You will need<br />
Brass or aluminium tubing<br />
Piano wire<br />
Bass guitar strings<br />
5 minute, 2-part epoxy resin<br />
Wire wool or a dish-scouring pad<br />
Pliers<br />
Small adjustable pipe cutter, or a<br />
craft knife or blade<br />
(such as a Stanley knife)<br />
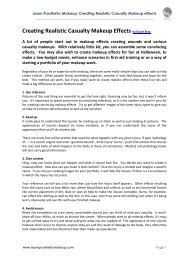
Bass strings are available in different thicknesses<br />
(I have no musical knowledge at all, so couldn’t<br />
tell you what notes to pick. Choose a selection).<br />
They work well as the wire-bound string<br />
scratches little lines into the surface of your clay,<br />
skimming the surface without sinking in or<br />
creating little scoops.<br />
The result is a three-dimensional cross-hatch<br />
effect which gradually smoothes forms without<br />
flattening them.<br />
www.learnprostheticmakeup.com Page 1
<strong>Learn</strong> <strong>Prosthetic</strong> <strong>Makeup</strong>: <strong>Making</strong> sculpting loops (updated 07 Sept ‘09)<br />
________________________________________________________________<br />
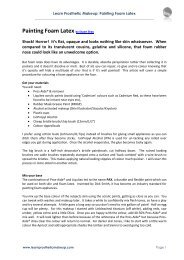
Step 1<br />
Use the pipe cutter to cut a length of brass tubing to around 150mm (6”). Cut a two inch (50mm) length<br />
of your piano wire or guitar string.<br />
Incidentally, if you don’t have a pipe cutter,<br />
a sharp craft knife or blade will work. Place<br />
the tube on a hard work surface, and roll<br />
the blade on the tube whilst pressing down.<br />
Eventually, the scored line will cut through<br />
the brass, creating a nice, clean cut.<br />
If you try cutting with a small hacksaw, very often the brass will bend and leave you with a jagged end.<br />
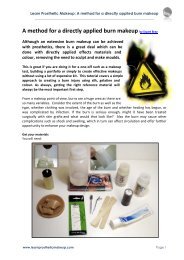
Step 2<br />
Using pliers, slightly flatten the end of the tubing. We want to be able<br />
to freely insert the wire, so make sure it isn’t too closed. If you overdo<br />
it, squeeze the ends gently with the pliers again to open it slightly, or<br />
wiggle a screwdriver in the slot to prise it open.<br />
Step 3<br />
To create a nice curve, bend your wire carefully around the brass<br />
tubing. If you just bend the wire, you can create a point. You can also<br />
use the pliers to bend the wire to any shape you like.<br />
www.learnprostheticmakeup.com Page 2
Step 4<br />
<strong>Learn</strong> <strong>Prosthetic</strong> <strong>Makeup</strong>: <strong>Making</strong> sculpting loops (updated 07 Sept ‘09)<br />
________________________________________________________________<br />
Check your wire fits nicely into the tubing.<br />
Next, squeeze two equal size globs of epoxy<br />
glue onto a mixing surface. Make sure it is well<br />
mixed.<br />
Step 5<br />
Put your mixed glue carefully into the end of your<br />
tubing, making sure it goes down into the tube.<br />
You may need a pin or a little length of wire to get<br />
down far enough. Dip the ends of the loop in the<br />
glue also, then push them into the tube about 5-<br />
6mm. Squeeze the tube gently again with the<br />
pliers, mopping any excess glue with a cotton bud<br />
or piece of tissue.<br />
You may have to hold the tool upside down for a<br />
while, and move it around until the glue thickens<br />
and begins to set. Speed this up with a hairdryer.<br />
That’s pretty much it. Now do the same to the other end, using a different shape loop, or use piano<br />
wire one end, and guitar string on the other.<br />
Experiment with<br />
variations to create<br />
different kinds of tool<br />
marks<br />
www.learnprostheticmakeup.com Page 3
<strong>Learn</strong> <strong>Prosthetic</strong> <strong>Makeup</strong>: <strong>Making</strong> sculpting loops (updated 07 Sept ‘09)<br />
________________________________________________________________<br />
Coarse and fine<br />
Another couple of variations are to use acupuncture needles and fret saw blades as loop material.<br />
Acupuncture needles are available from online acupuncture suppliers and<br />
health stores, and are quite inexpensive. They have both a thin wire and a<br />
wire bound section, so both ends can be used. This is great wire for fine, detail work.<br />
Fret saw blades are available from hardware stores, and are good for more coarse work, when blocking<br />
out shapes and smoothing larger forms.<br />
You need to use a blowtorch to heat the blade white-hot in order to successfully bend it, otherwise the<br />
brittle metal snaps.<br />
Twist & Shout<br />
Another variation is to twist some wire to create another kind of rough texture which is excellent for<br />
raking. Use piano/music wire or something a little less hard if you find it too tough to work.<br />
Cut a 300mm (12”) length, and fold it in half.<br />
Put the ends into the jaws of a pair of pliers,<br />
molegrips or metalworking vice. Insert a tool or<br />
strong rod such as a screwdriver in the loop. Now<br />
you can grasp both ends of the wire<br />
www.learnprostheticmakeup.com Page 4
<strong>Learn</strong> <strong>Prosthetic</strong> <strong>Makeup</strong>: <strong>Making</strong> sculpting loops (updated 07 Sept ‘09)<br />
________________________________________________________________<br />
Twist the ends in opposite directions, working<br />
against the resistance of the wire.<br />
Keep going until the wire starts to buckle and<br />
loops onto itself. When it looks like the picture,<br />
you’re done twisting.<br />
As before, cut the wire to size, being careful to<br />
create the loop by bending it around something<br />
circular in profile, such as a round handle on a<br />
vice, a paintbrush or a battery.<br />
Insert the ends into the slightly flattened tubing,<br />
and apply adhesive. If you want, you can crimp it<br />
in place instead or in addition to the adhesive.<br />
If you don’t have a crimping tool, you can use a pair of pliers with a<br />
crimping device in the jaws, as shown above left.<br />
Make sure that squash the middle area between the two twisted prongs,<br />
as shown in the middle picture. Once you have squeezed the jaws tight,<br />
you should have a nice clean groove in the end holding your wire firmly.<br />
Make thicker versions with extra wire. In the picture on the right, I used<br />
two loops of wire at the same time and repeated the procedure. Do this to<br />
create tougher loops for larger tools or for working with firmer sculpting<br />
material.<br />
www.learnprostheticmakeup.com Page 5
<strong>Learn</strong> <strong>Prosthetic</strong> <strong>Makeup</strong>: <strong>Making</strong> sculpting loops (updated 07 Sept ‘09)<br />
________________________________________________________________<br />
And, finally…<br />
Here is a variation using the same techniques using brass square section rod. I have chosen to use 1/16<br />
and 1/32 gauge from K&S. The shot on the right just shows you a comparison of sizes.<br />
1/32” 1/16”<br />
Cut yourself a decent amount of brass rod to work with-here I used about 65mm (2½”) to make this one.<br />
Using molegrips, pliers or a vice, slowly twist the brass rod in opposite directions.<br />
Make sure they there is plenty of the rod in the jaws to be able to grip the brass while twisting, and<br />
maintain a firm grip whilst you do it. Molegrips or a vice are best, as this grip is held in place<br />
mechanically rather than by the strength of your hands.<br />
Keep twisting slowly until you end up with something that looks like this…<br />
www.learnprostheticmakeup.com Page 6
<strong>Learn</strong> <strong>Prosthetic</strong> <strong>Makeup</strong>: <strong>Making</strong> sculpting loops (updated 07 Sept ‘09)<br />
________________________________________________________________<br />
…and then bend your twisted brass into shape before<br />
inserting into your tube and fix as before, using an<br />
epoxy resin glue, crimping or both.<br />
Voila- the finished twisted brass loop tool. These<br />
work really well with plasteline and clay, and should<br />
give you years of excellent service. You may as well<br />
make a few once you have all the bits you need. That<br />
way, if you lose or break any, you can just grab<br />
another to keep sculpting.<br />
Have fun experimenting with different shapes and<br />
sizes, and create your own customised sculpting tool<br />
kit. If you ever break or lose any of your tools, you’ll<br />
be able to replace them with ease.<br />
Happy tool-making!<br />
Stuart<br />
Having trouble finding materials<br />
Maybe it has a different name or supplier in your country<br />
Is there an alternative<br />
Drop me a line at mail@learnprostheticmakeup.com, and I’ll<br />
do my very best to help you.<br />
Questions or comments about this article<br />
Get in touch at www.learnprostheticmakeup.com<br />
Take care whenever working with makeup materials.<br />
Familiarise yourself with the products and take appropriate<br />
health and safety measures. We suggest you obtain and<br />
consult the relevant MSDS (Material Safety Data Sheets) from<br />
your supplier whenever possible. This article is for your<br />
information only. We cannot accept any responsibility for<br />
your actions.<br />
©Copyright Stuart Bray 2009<br />
Photographs © Jane Hobson<br />
www.learnprostheticmakeup.com Page 7