

DEMO - 1977 Ford Truck Shop Manual - ForelPublishing.com
DEMO - 1977 Ford Truck Shop Manual - ForelPublishing.com
DEMO - 1977 Ford Truck Shop Manual - ForelPublishing.com

You also want an ePaper? Increase the reach of your titles
YUMPU automatically turns print PDFs into web optimized ePapers that Google loves.
11-03-1 Wheels and Tires-Two-Piece Rims 11-03-1<br />
Wheels and Tires -<br />
PART<br />
Two-Piece Rims 11-03<br />
APPLIES TO F·250, F·350 VEHICLES<br />
SUBJECT PAGE SUBJECT PAGE<br />
DESCRIPTION .......................... 03-1 Tire Removal and Mounting (Cont'd)<br />
REMOVAL AND INSTALLATION<br />
Two-Piece Semi-Drop<br />
Tire Removal and Mounting Center Rims ....................... 03-2<br />
Two-Piece Rims .................... 03-1<br />
DESCRIPTION<br />
Two-piece rims are used on disc and<br />
cast wheels with tube-type tires only.<br />
Refer to Part 11-01 for diagnosis and<br />
testing procedures, safety procedures and<br />
illustrations.<br />
REMOVAL AND INSTALLATION<br />
The tire must be <strong>com</strong>pletely deflated<br />
before removal, and the bead must not be<br />
damaged by a tire iron.<br />
After installation, a tube tire should<br />
be inflated to re<strong>com</strong>mended pressure,<br />
deflated, and then inflated again to insure<br />
that the tube is not folded inside the tire.<br />
Be sure the tube flap is properly<br />
positioned before inflating the tire.<br />
It is re<strong>com</strong>mended that tire-changing<br />
equipment be used in changing all truck<br />
tires. See Safety Precautions in Part 11<br />
01.<br />
TIRE REMOVAL AND<br />
MOUNTING-TWO·PIECE RIM<br />
Removing Tire from Wheel<br />
If no tire-changing machine is<br />
available, remove tire as detailed in<br />
following Steps.<br />
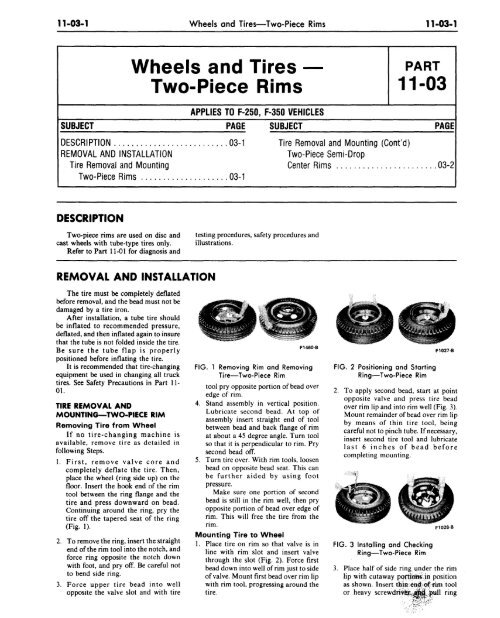
1. First, remove valve core and<br />
<strong>com</strong>pletely deflate the tire. Then,<br />
place the wheel (ring side up) on the<br />
floor. Insert the hook end of the rim<br />
tool between the ring flange and the<br />
tire and press downward on bead.<br />
Continuing around the ring, pry the<br />
tire off the tapered seat of the ring<br />
(Fig. 1).<br />
2. To remove the ring, insert the straight<br />
end ofthe rim tool into the notch, and<br />
force ring opposite the notch down<br />
with foot, and pry ofT. Be careful not<br />
to bend side ring.<br />
3. Force upper tire bead into well<br />
opposite the valve slot and with tire<br />
F1460·B<br />
FIG. 1 Removing Rim and Removing<br />
Tire-Two-Piece Rim<br />
tool pry opposite portion of bead over<br />
edge of rim.<br />
4. Stand assembly in vertical position.<br />
Lubricate second bead. At top of<br />
assembly insert straight end of tool<br />
between bead and back flange of rim<br />
at about a 45 degree angle. Turn tool<br />
so that it is perpendicular to rim. Pry<br />
second bead ofT.<br />
5. Turn tire over. With rim tools, loosen<br />
bead on opposite bead seat. This can<br />
be further aided by using foot<br />
pressure.<br />
Make sure one portion of second<br />
bead is still in the rim well, then pry<br />
opposite portion of bead over edge of<br />
rim. This will free the tire from the<br />
rim.<br />
Mounting Tire to Wheel<br />
1. Place tire on rim so that valve is in<br />
line with rim slot and insert valve<br />
through the slot (Fig. 2). Force first<br />
bead down into well ofrim just to side<br />
ofvalve. Mount first bead over rim lip<br />
with rim tool, progressing around the<br />
tire.<br />
FIG. 2 Positioning and Starting<br />
Ring-Two-Piece Rim<br />
F1027·B<br />
2. To apply second bead, start at point<br />
opposite valve and press tire bead<br />
over rim lip and into rim well (Fig. 3).<br />
Mount remainder ofbead over rim lip<br />
by means of thin tire tool, being<br />
careful not to pinch tube. Ifnecessary,<br />
insert second tire tool and lubricate<br />
last 6 inches of bead before<br />
<strong>com</strong>pleting mounting.<br />
FIG. 3 Installing and Checking<br />
Ring-Two-Piece Rim<br />
F1028-B<br />
3. Place half of side ring under the rim<br />
lip with cutaway p~O'ttSjn.position<br />
as shown. Insert. th'itl.en~:'()ftim tool<br />
or heavy screwdri~~ '. ", ,~un ring<br />
'i:/,~~f;,'.:t:~·~<br />
..... :'.,;.,


