OWNER'S MANUAL MINI-E-BIKE™ - Electric bikes & folding bikes
OWNER'S MANUAL MINI-E-BIKE™ - Electric bikes & folding bikes
OWNER'S MANUAL MINI-E-BIKE™ - Electric bikes & folding bikes

Create successful ePaper yourself
Turn your PDF publications into a flip-book with our unique Google optimized e-Paper software.
OWNER’S <strong>MANUAL</strong><br />
<strong>MINI</strong>-E-BIKE
For future reference, please fill in the important information below.<br />
Serial Number<br />
(Your serial number can be found inside the main hinge. Unfold the Mini-E-Bike<br />
to see it.)<br />
Model Code (Printed on the end of your shipping carton.)<br />
Key Number<br />
Dealer Name:<br />
Address:<br />
City/State/Zip:<br />
Telephone:<br />
Contact:
This manual contains important safety, performance and<br />
maintenance information. Read the manual before taking<br />
your first ride on your new Mini-E-Bike, and keep the<br />
manual handy for future reference.<br />
TABLE OF CONTENTS<br />
1. About This Manual 1<br />
Why Should You Read This Manual 1<br />
Important Safety Information 1<br />
Inspection and Maintenance 3<br />
2. Operational Instructions 5<br />
Important Notices 5<br />
LED Codes 6<br />
Right Hand Controls 6<br />
Left Hand Controls 7<br />
Battery Management 8<br />
Operating the Mini-E-Bike 10<br />
Folding/Un<strong>folding</strong> 11<br />
Quick Release Binder 13<br />
Using the Centerstand 14<br />
Care and Cleaning 15<br />
4. Riding Safely and Responsibly 19<br />
The Basics 19<br />
Rules of the Road 20<br />
Wet Weather Riding 21<br />
Night Riding 22<br />
5. How Things Work 22<br />
Removing/Installing the Wheels 22<br />
Brakes 24<br />
Shifting 27<br />
Tires and Tubes 30<br />
6. Service and Maintenance 32<br />
Service and Maintenance Schedule 33<br />
Getting Home When Something Breaks 35<br />
Upgrading Your Bike and Equipment 36<br />
About Your Dealer 38<br />
3. Fit and Safety 15<br />
Fit 15<br />
Safety Equipment 17<br />
Mechanical Safety Check 18
1. ABOUT THIS <strong>MANUAL</strong><br />
WHY YOU SHOULD READ THIS <strong>MANUAL</strong><br />
This manual was written to help you get the most<br />
performance, comfort, enjoyment and safety when riding<br />
your new Mini-E-Bike. The manual describes specific care<br />
and maintenance procedures that help protect your warranty<br />
and ensure years of trouble free use. Please pay particular<br />
attention to the section on battery charging and<br />
maintenance.<br />
It is important for you to understand your new Mini-E-Bike,<br />
its features and its operation, so you get maximum<br />
enjoyment with maximum safety. By reading this manual<br />
before you go on your first ride, you’ll know how to get the<br />
most from your new Mini-E-Bike.<br />
It is also important that your first ride on a new Mini-E-Bike<br />
be taken in a controlled environment, away from cars,<br />
obstacles, and other cyclists.<br />
GENERAL WARNING:<br />
Cycling can be a hazardous activity even under the best of<br />
circumstances. Proper maintenance of your Mini-E-Bike is<br />
your responsibility as it helps reduce the risk of injury. This<br />
manual contains many "Warnings" and "Cautions"<br />
concerning the consequences of failure to maintain or<br />
1<br />
inspect your Mini-E-Bike. Many of the Warnings and<br />
Cautions say "you may lose control and fall". Because any<br />
fall can result in serious injury or even death, we do not<br />
repeat the warning of possible injury or death whenever the<br />
risk of falling is mentioned.<br />
IMPORTANT SAFETY INFORMATION<br />
Your Mini-E-Bike can provide many years of service, fun<br />
and fitness - if you take responsibility for your own safety.<br />
Understand the features of your Mini-E-Bike and become<br />
aware of the challenges that you will meet on the road. There<br />
is much that you can do to protect yourself while riding. We<br />
will offer many recommendations and safety tips throughout<br />
this manual. The following are those that we feel are most<br />
important.<br />
Always Wear A Helmet!<br />
Helmets significantly reduce the number and severity of head<br />
injuries. Always wear a helmet that complies with your state<br />
laws when riding the Mini-E-Bike. Check with your local<br />
police department for requirements in your community. Do<br />
not wear loose fitting clothing that can become tangled in the<br />
moving parts of the Mini-E-Bike. Wear sturdy shoes and<br />
eye protection. Also check your state laws concerning other<br />
protective gear that may be required when riding the Mini-E-<br />
Bike.
WARNING:<br />
Not wearing a helmet significantly increases the chance of<br />
serious injury or death in a crash. Always wear a helmet, eye<br />
protection and appropriate apparel when you ride.<br />
Know your Mini-E-Bike!<br />
Your new Mini-E-Bike incorporates many features and<br />
functions that have never been built into a bicycle before.<br />
Read this manual thoroughly to understand how those<br />
features enhance your riding pleasure and safety.<br />
Ride Defensively!<br />
One of the most frequent cycling accidents occurs when the<br />
driver of a parked car opens his door into a rider’s path.<br />
Another common occurrence is when a car or another cyclist<br />
moves suddenly into your path. Always be aware of other<br />
vehicles around you. Do not assume that the driver or the<br />
other cyclist sees you. Be prepared to take evasive action or<br />
stop suddenly.<br />
Make Yourself Easy To See!<br />
Make yourself more visible by wearing bright reflective<br />
clothing. Keep your reflectors clean and properly aligned.<br />
Signal your intentions so that drivers and other cyclists can<br />
anticipate your actions.<br />
Ride Within Your Limits!<br />
Take it slow until you are familiar with the riding conditions<br />
that you encounter. Be especially careful in wet conditions as<br />
traction can be greatly reduced and brakes less effective.<br />
Never ride faster than conditions warrant or beyond your<br />
riding abilities. Remember that alcohol, drugs, fatigue and<br />
inattention can significantly reduce your ability to make good<br />
judgements and ride safely.<br />
Keep Your Mini-E-Bike In Safe Condition<br />
Follow the inspection and maintenance guidelines beginning<br />
on page 3. Check critical safety equipment before each and<br />
every ride.<br />
Know The Law<br />
Cyclists are required to follow the rules of the road.<br />
Additionally, some communities regulate the use of<br />
motorized bicycles regarding minimum age requirements and<br />
necessary equipment. Check with your local police<br />
department for specific details.<br />
Offroad Riding<br />
Offroad riding is not recommended because the Mini-E-<br />
Bike tires are for street use only. Dust and extreme impacts<br />
from offroad riding can cause electrical system problems.<br />
2
INSPECTION AND MAINTENANCE<br />
For your safety and enjoyment and to insure a long life for<br />
your Mini-E-Bike, inspect and maintain your Mini-E-Bike<br />
regularly. Use the table below for guidance. It is very<br />
important that you check certain systems and components<br />
before each and every ride. The proper condition and<br />
function of these systems is critically important for your<br />
safety.<br />
Your Mini-E-Bike should be returned to your servicing<br />
dealer at least once a year for a complete and thorough<br />
inspection and tune up. If a problem arises that is not<br />
described below, discontinue riding the Mini-E-Bike and<br />
return it to your servicing dealer immediately. For more<br />
information about service and maintenance, please refer to<br />
page 32.<br />
3
Refer to Component or Condition Inspect before Inspect Clean and/or Adjust/Tighten Repair/Replace<br />
Page every ride periodically* lubricate if necessary<br />
30 Tire pressure (60-65 psi)<br />
18 Tire wear/damage<br />
26 Brake pad adjustment<br />
13 Handlebar quick release adjustment<br />
6 Controls and displays<br />
13 Seat post quick release adjustment<br />
26 Brake pad wear<br />
26 Brake cable tension/wear<br />
34 Spoke tension<br />
18 Wheel true<br />
7 Hub bearings<br />
33 Chain lubrication<br />
28 Derailleur adjustment<br />
2 Reflectors<br />
8 Battery and charger<br />
33 Headset<br />
34 Bottom bracket<br />
33 All bolts, nuts, and mounting hardware<br />
*Every 5 to 10 rides depending on length and conditions of the ride.<br />
4
2. OPERATIONAL INSTRUCTIONS<br />
Please read and understand these instructions completely<br />
before operating your Mini-E-Bike to prevent serious injury<br />
to yourself and others, and to prevent damage to the bike.<br />
IMPORTANT NOTICES<br />
• Always recharge the battery pack immediately after<br />
each use. Failure to do so may damage the battery.<br />
• The charger can remain plugged-in for trickle-charge<br />
purposes during long periods of storage.<br />
• For storage periods over 3 months, the battery pack<br />
should be checked and fully recharged every 3 months.<br />
• Keep the battery compartment lid closed and locked<br />
during use.<br />
• Always remove the key from the battery compartment<br />
lid before operating the Mini-E-Bike. Never ride the<br />
Mini-E-Bike with the key in the lid lock.<br />
5
LED CODES<br />
The three state-of-charge LEDs on the throttle controller<br />
indicate battery state of charge. The Mini-E-Bike uses<br />
these LEDs to alert you to particular conditions. The following<br />
chart describes these signals and their various meanings.<br />
CODE MEANING LEDs<br />
System ON Whenever the power knob The charge level<br />
is turned ON, the system LEDs cycle four<br />
performs a series of checks. times in sequence.<br />
This signal indicates that<br />
the Mini-E-Bike is ON and<br />
ready for operation.<br />
RIGHT HAND CONTROLS<br />
Power On/Off<br />
• Turn the power knob (A, Figure 1) on the throttle control<br />
clockwise to the ON position.<br />
• The three state-of-charge LEDs cycle four times in<br />
sequence to indicate the system and controls are ready<br />
for operation.<br />
Battery The battery has 100% to Green LED on.<br />
state-of-charge 84% of run time remaining.<br />
84% to 16% of run time Yellow LED on.<br />
remaining.<br />
Less than 15% of run time<br />
Red LED on.<br />
Very low battery The state-of-charge battery Red LED flashes<br />
charge is below the minimum<br />
level. The motor is<br />
shut off to protect the<br />
battery. Charge the battery<br />
immediately after use.<br />
6
A<br />
C<br />
• Green (or full) indicates the battery is 100% to 84%<br />
charged.<br />
• Yellow (or half) indicates the battery is 84% to 16%<br />
charged.<br />
• Red (or empty) indicates the battery is less than 15%<br />
charged.<br />
D<br />
FIG. 1<br />
B<br />
The motor automatically shuts off when the battery is below<br />
a preset limit to help extend battery life. The red LED flashes<br />
to signify the motor is off and the battery must be recharged.<br />
Recharge the battery pack immediately after use. Failure<br />
to do so may damage the battery.<br />
LEFT HAND CONTROLS<br />
Throttle<br />
Press the throttle lever (B, Figure 1) with your thumb to apply<br />
power to the motor while your are pedaling. Please note that<br />
the motor only operates while you are pedaling. Power to the<br />
motor is cutoff three seconds after you stop pedaling.<br />
Rear Brake Lever<br />
The rear brake is activated by squeezing the right brake lever.<br />
(C, Figure 1).<br />
Battery Charge Level<br />
The three state-of-charge LEDs (D, Figure 1) on the throttle<br />
control indicate the battery charge level.<br />
7<br />
Twist Grip Gear Selector<br />
By twisting this grip (A, Figure 2) while pedaling, you can<br />
select any one of five gears on the rear wheel. The grip is<br />
labeled with the corresponding gear selection.<br />
Front Brake Lever<br />
The front brake is activated by squeezing the left brake lever<br />
(B, Figure 2).<br />
WARNING:<br />
Sudden or excessive application of the front brake may pitch<br />
the rider over the handlebars, causing serious injury or<br />
death.
B<br />
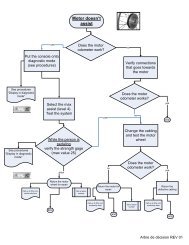
2. Turn the master switch (A, Figure 3) to the OFF (O)<br />
position.<br />
3. Release the battery latch (B, Figure 3).<br />
4. Grasp the battery pack handle (C, Figure 3) and pull the<br />
battery pack straight up and out of the battery<br />
compartment.<br />
A<br />
NOTE:<br />
If the seat is set low on the frame, the tip of the seat could<br />
interfere with battery removal. If this is the case, open the<br />
seatpost quick release and rotate the seat 90 degrees.<br />
FIG. 2<br />
D<br />
BATTERY MANAGEMENT<br />
Always recharge the battery pack immediately after each<br />
use. Failure to do so may damage the battery. The charger<br />
can remain plugged-in for trickle-charge purposes during<br />
long periods of storage. For storage periods over 3 months,<br />
the battery pack should be checked and fully recharged<br />
every 3 months. Always turn off the master switch when the<br />
Mini-E-Bike is not in use.<br />
B<br />
C<br />
A<br />
Battery Pack Removal<br />
1. Unlock the lid on the battery compartment and open the<br />
lid.<br />
FIG. 3<br />
8
Battery Pack Installation<br />
1. Position the battery pack over the battery compartment so<br />
contacts on the bottom of the battery pack (Figure 4) sit<br />
above the terminals at the front of the battery<br />
compartment.<br />
NOTE:<br />
If the battery pack protrudes above the top of the battery<br />
compartment, the battery has been installed backwards.<br />
Remove the battery pack, rotate the battery pack 180<br />
degrees, and reinsert it so the contacts on the bottom of the<br />
battery pack engage the terminals at the front of the battery<br />
compartment.<br />
3. Secure the battery in place with the battery latch (B, Figure 3).<br />
4. Close and lock the battery compartment lid.<br />
FIG. 4<br />
2. Lower the battery pack straight down into the<br />
compartment until it bottoms. When properly installed, the<br />
battery pack will sit down inside the compartment.<br />
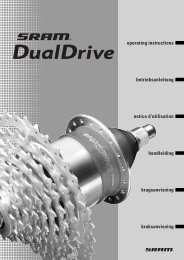
Charging the Battery<br />
The battery can be charged while it is on-board the Mini-E-<br />
Bike or when removed from the battery compartment.<br />
1. Remove the cap (D, Figure 3) from the charge port on the<br />
battery.<br />
2. Plug the 3-pin charge cord (A, Figure 5) into the charge<br />
port on the battery pack. Press the lock bezel (B, Figure<br />
5) down onto the port and rotate the bezel clockwise until<br />
it locks into place.<br />
3. Plug the female end of the power cord into the charger<br />
(Figure 6), and plug the male end of the cord into a<br />
standard U.S. 110/60 cycle wall socket.<br />
9
A<br />
B<br />
FIG. 5<br />
FIG. 6<br />
4. Turn the master switch to the ON (-) position. The LED on<br />
the charger indicates the state of charge.<br />
• Red means the charger power is ON.<br />
• Yellow means the battery is being charged.<br />
• Green means the battery is fully charged.<br />
NOTE:<br />
If the master switch is not on, the battery will not charge.<br />
5. When the battery is fully charged, turn the master switch<br />
to the OFF (o) position and unplug the power cord from the<br />
wall socket.<br />
6. Turn the lock bezel (B, Figure 5) 1/2 turn<br />
counterclockwise, and remove the plug from the charge port.<br />
10<br />
7. Fit the cap back onto the charge port, and reinstall the<br />
battery into the battery compartment.<br />
WARNING:<br />
Keep the charger and battery pack away from water to<br />
prevent electrical shock and shorting. The charger is<br />
intended for indoor use only.<br />
OPERATING THE <strong>MINI</strong>-E-BIKE<br />
1. Unlock the battery compartment and open the lid.<br />
2. Turn the master switch (A, Figure 3) to ON. The master<br />
switch uses the international symbols for on and off. The line
(-) on the master switch indicates the ON position. The letter<br />
“O” indicates OFF.<br />
3. Close and lock the battery compartment lid.<br />
4. Turn the power knob (A, Figure 1) on the throttle control<br />
to ON. The state-of-charge LEDs cycle four times in<br />
sequence and then indicate the current battery state-ofcharge.<br />
The Mini-E-Bike is powered and ready for use.<br />
5. Roll the Mini-E-Bike forward to lower it from the<br />
centerstand.<br />
6. Start pedaling the Mini-E-Bike. Once your speed<br />
reaches approximately 2.0-2.5 miles per hour (3-4 km per<br />
hour), apply the throttle. The motor turns on and provides<br />
additional power to the rear wheel as long as you are<br />
pedaling.<br />
7. Once you reach your destination, turn off the power knob<br />
(A, Figure 1) and then turn off the master switch (A, Figure 3).<br />
FOLDING/UNFOLDING<br />
Folding the Mini-E-Bike<br />
1. Raise the Mini-E-Bike onto the centerstand.<br />
2. Turn off the power knob on the throttle control and turn off<br />
the master switch on the battery pack.<br />
3. Remove the battery pack. This lightens the Mini-E-Bike<br />
considerably so it will be easier to lift.<br />
4. Unlock the handlebar quick release lever (A, Figure 7).<br />
B<br />
Pedal Assist<br />
Your Mini-E-Bike is a pedal-assist bike. That is, the motor<br />
only operates while you are pedaling. A sensor on the right<br />
side monitors the motion of the crank and signals the<br />
controller when you are pedaling. The sensor glows red<br />
when it detects crank rotation. To start from a stop, you must<br />
push off and pedal. Power is not applied to the motor until<br />
your speed equals 2.0-2.5 miles per hour (3-4 km per hour)<br />
even if you are applying the throttle. During operation, the<br />
controller automatically cuts power to the motor three<br />
seconds after you stop pedaling. When you wish to use the<br />
motor on your Mini-E-Bike, you must pedal.<br />
11<br />
FIG. 7<br />
5. Rotate the handlebar (B, Figure 7) 90 degrees clockwise<br />
so it faces the right side of the Mini-E-Bike. Lock the<br />
handlebar quick release lever.<br />
A
6. On the right side, rotate the pedal upward so it is<br />
perpendicular to the ground.<br />
7. Release the lock lever from its clasp on the left side of the<br />
Mini-E-Bike.<br />
8. Rotate the lock lever (A, Figure 8) clockwise until it points<br />
forward. Pull the locknut and rotate the locknut (A, Figure 9)<br />
out away from the Mini-E-Bike until the nut clears the lock<br />
plate (B, Figure 9).<br />
9. Grasp the seat and the handlebar. Pivot the front half of<br />
the frame rearward around the hinge until the front wheel is<br />
beside the rear wheel (Figure 10).<br />
CAUTION:<br />
Always use the strap to secure the handlebar stem to the<br />
seatpost when the bike is folded (Figure 10). If you do not,<br />
your finger or hand could be pinched if the bike should<br />
unintentionally unfold while you are handling it.<br />
A<br />
A<br />
B<br />
FIG. 8<br />
10. Use the strap on the seatpost to secure the handlebar<br />
stem to the seatpost. This keeps the Mini-E-Bike securely<br />
folded.<br />
B<br />
12<br />
FIG. 9<br />
Un<strong>folding</strong> the Mini-E-Bike<br />
1. Remove the strap from the handlebar stem. Wrap the<br />
strap around the seatpost.<br />
2. Grasp the seat and the handlebar firmly. Pivot the front<br />
half of the frame forward until the hinge lock plate (B, Figure<br />
9) closes against the lock bolt pivot.<br />
3. Rotate the locknut (A, Figure 9) forward until the nut<br />
engages the lock plate as shown in B, Figure 8.
6. Unlock the handlebar quick release lever. Rotate the<br />
handlebar counterclockwise until the handlebar is perpendicular<br />
to the bike’s frame. Lock the handlebar quick release<br />
lever securely.<br />
7. Reinstall the battery pack as described above.<br />
QUICK RELEASE BINDER<br />
Locked/Unlocked<br />
The handlebar and seatpost on your Mini-E-Bike are<br />
secured with a quick release binder. While a quick release<br />
binder looks like a bolt with a lever on one end and a nut on<br />
the other, a quick release binder uses cam action to firmly<br />
clamp the handlebar or the seatpost in place.<br />
FIG. 10<br />
4. Lock the hinge by rotating the lock lever (A, Figure 8)<br />
rearward until it presses against the side cover. Secure the<br />
lock lever in the clasp on the left side of the Mini-E-Bike.<br />
5. Rotate the right pedal down so it parallels the ground.<br />
On your Mini-E-Bike, each quick release binder is installed<br />
so the lever is on the right side of the bike. The binder is<br />
properly locked when the lever curves around the handlebar<br />
stem (or seatpost) and points forward as shown in Figure 11.<br />
WARNING:<br />
Be sure the handlebar quick release securely clamps the<br />
handlebar stem to the fork stem. An improperly adjusted<br />
handlebar quick release can produce instability that can<br />
cause loss of control and a fall.<br />
13<br />
FIG. 11
To unlock (open) a quick release binder, pull the lever out<br />
away from the handlebar as shown in (A, Figure 12).To lock<br />
(close) the quick release binder, use the palm of your hand to<br />
press the lever forward to the locked position (Figure 11).<br />
Adjusting a quick release binder<br />
The action of the quick release cam squeezes the collar<br />
around the handlebar or seatpost to hold each component<br />
securely in place. The amount of clamping force is controlled<br />
by the tension adjusting nut (B, Figure 12).<br />
FIG. 12<br />
B<br />
A<br />
CAUTION:<br />
Holding the nut with one hand and turning the lever like a<br />
wing nut with the other hand until everything is as tight as you<br />
can get it will not clamp the handlebar or seatpost safely. The<br />
full force of the cam action is needed to clamp them securely.<br />
Turning the tension adjusting nut clockwise while keeping the<br />
cam lever from rotating increases clamping force. Turning the<br />
nut counterclockwise while keeping the cam lever from<br />
rotating reduces clamping force. Less than half a turn of the<br />
adjusting nut can make the difference between safe clamping<br />
force and unsafe clamping force.<br />
WARNING:<br />
Riding with an improperly tightened quick release binder can<br />
allow the handlebar or saddle to turn or move, which could<br />
cause you to lose control and fall. Therefore:<br />
1. Ask your dealer to help you make sure you know how to<br />
correctly clamp your handlebar and seatpost in place.<br />
2. Understand and apply the correct technique for clamping<br />
your a quick release binder.<br />
3. Before you ride the Mini-E-Bike, first check that the<br />
handlebar and seatpost are securely clamped in place.<br />
14<br />
USING THE CENTERSTAND<br />
1. To raise the Mini-E-Bike on the centerstand, perform the<br />
following:<br />
a. Use your foot to lower the centerstand until it rests on<br />
the ground.<br />
b. While stepping on the centerstand, simultaneously lift<br />
the seat and pull the Mini-E-Bike rearward until the<br />
centerstand locks in place.
2. To lower the Mini-E-Bike from the centerstand, roll the<br />
Mini-E-Bike forward and off the centerstand. The<br />
centerstand spring holds the stand up against the frame.<br />
CARE AND CLEANING<br />
Remove the battery pack before washing your Mini-E-Bike.<br />
WARNING:<br />
Keep the battery pack and charger away from water to<br />
prevent electrical shock and damage to the charger or<br />
batteries.<br />
Clean the Mini-E-Bike with a mild soap and a sponge. DO<br />
NOT use a power hose or washer. Gently rinse with water.<br />
Avoid spraying water directly onto the control switches, motor<br />
and front hub bearings. Do not spray water inside the battery<br />
compartment. Dry the frame mounted electrical connector in<br />
the battery compartment before reinstalling the battery pack.<br />
Use automotive wax to protect painted surfaces. Lubricate<br />
the chain periodically to help prevent corrosion and minimize<br />
wear.<br />
3. FIT AND SAFETY<br />
FIT<br />
Make sure the Mini-E-Bike fits. A bike that is too big or too<br />
small for the rider is harder to control and can be<br />
uncomfortable.<br />
WARNING:<br />
If your Mini-E-Bike does not fit properly, you may lose<br />
control and fall. If your new Mini-E-Bike does not fit, ask<br />
your dealer to exchange it before you ride it.<br />
Saddle position<br />
Correct saddle adjustment is an important factor in getting<br />
the most performance and comfort from your Mini-E-Bike.<br />
15<br />
FIG. 13
Your dealer will have positioned the saddle where experience<br />
tells him most people find it comfortable. If you find the<br />
saddle position is not comfortable, there are three<br />
adjustments you can make.(See Figure 13 to determine the<br />
type of saddle attachment used on your Mini-E-Bike).<br />
a. Up and down adjustment.<br />
Your leg length determines the correct saddle height. The<br />
saddle is at the correct height if you can just reach the “down”<br />
pedal with one heel when you are seated on the saddle and<br />
the crank arms are parallel to the seat tube. To check for<br />
correct saddle height, perform the following:<br />
1. Sit on the saddle, and place one heel on a pedal.<br />
2. Rotate the crank until the pedal with your heel on it is in<br />
the down position and the crank arm is parallel to the seat<br />
tube.<br />
3. Your leg should be completely straight and just touching<br />
the center of the pedal. If this is not the case, your saddle<br />
height needs to be adjusted.<br />
Mini-E-Bike, and lock the quick release lever so that you<br />
cannot twist the saddle out of alignment. Check the<br />
adjustment as described above. Under no circumstances<br />
should the seatpost project from the frame beyond its<br />
“Minimum Insertion” or “Maximum Extension” mark.<br />
WARNING:<br />
If the Minimum Insert mark or the Maximum Extension mark<br />
on your seatpost extends beyond the frame, the seatpost<br />
may break, which could cause you to lose control and fall.<br />
b. Front and back adjustment<br />
Loosen the saddle clamping mechanism (see Figure 13) and<br />
slide the saddle back or forward on its rails. Start with the<br />
saddle clamped in about the middle, and adjust it forward or<br />
back until you find the position which is most comfortable for<br />
you. Retighten the saddle clamping mechanism securely.<br />
.<br />
WARNING:<br />
Be sure the seatpost quick release securely clamps the<br />
seatpost to the frame. An improperly adjusted seatpost quick<br />
release can produce instability that can cause loss of control<br />
and a fall.<br />
To adjust the saddle height, unlock the quick release lever<br />
(Figure 14) and move the seatpost up or down as required.<br />
Make sure that the saddle is parallel to the top tube of the<br />
16<br />
FIG. 14
c. Saddle tilt adjustment<br />
Most people prefer a horizontal saddle; but some riders<br />
prefer to have the saddle nose tilted slightly up or down. You<br />
can adjust saddle tilt by loosening the saddle clamping<br />
mechanism, tilting the saddle to the desired position, and<br />
retightening the saddle clamping mechanism tight enough so<br />
that you cannot move or jiggle the saddle.<br />
Very small changes in saddle position can have a substantial<br />
effect upon performance and comfort. Consequently,<br />
whenever you make a change to your saddle position, make<br />
only one directional change at a time, and make the changes<br />
in small increments until you have found the position at which<br />
you are most comfortable.<br />
dealer can help you select a saddle which, when correctly<br />
adjusted for your body and riding style, will be comfortable.<br />
CAUTION:<br />
Extended riding with a saddle which is incorrectly adjusted or<br />
which does not support your pelvic area correctly can cause<br />
short-term or long-term injury to nerves and blood vessels. If<br />
your saddle causes you pain or numbness, adjust the saddle<br />
position and your riding position. If pain or numbness persist,<br />
talk to your dealer about fitting a different saddle to your Mini-<br />
E-Bike.<br />
SAFETY EQUIPMENT<br />
WARNING:<br />
After any saddle adjustment, be sure to tighten the saddle<br />
adjusting mechanism properly before riding. A loose saddle<br />
clamp or seatpost binder can cause damage to the seatpost,<br />
or can cause you to lose control and fall. A correctly tightened<br />
saddle adjusting mechanism will allow no saddle movement<br />
in any direction. Periodically check to make sure that the<br />
saddle adjusting mechanism is properly tightened.<br />
If, in spite of carefully adjusting the saddle height, tilt, and<br />
fore-and-aft position, your saddle is still uncomfortable, you<br />
may need a different saddle design. Saddles, like people,<br />
come in many different shapes, sizes, and resilience. Your<br />
17<br />
WARNING:<br />
Many states require specific safety devices. It is your<br />
responsibility to familiarize yourself with the laws of the state<br />
where you ride and to comply with all applicable laws,<br />
including properly equipping yourself and your Mini-E-Bike<br />
as the law requires.<br />
WARNING:<br />
Do not remove the reflectors from your Mini-E-Bike. They<br />
are an integral part of the safety system on the Mini-E-<br />
Bike. Removing the reflectors may reduce your visibility to<br />
others using the roadway. Being struck by other vehicles<br />
often results in serious injury or death.
Eye protection<br />
Any kind of riding involves airborne dirt, dust and bugs, so it’s<br />
a good idea to always ride with protective eyewear — tinted<br />
when the sun is bright, clear when it’s not. Most Mini-E-Bike<br />
shops carry protective fashion eyewear, some with<br />
interchangeable lens systems.<br />
MECHANICAL SAFETY CHECK<br />
Tires in good shape Spin each wheel slowly and look for<br />
cuts in the tread and sidewall. Replace damaged tires before<br />
riding the Mini-E-Bike.<br />
Wheels true Spin each wheel and check for brake clearance<br />
and side-to-side wobble. If a wheel wobbles from side to side<br />
or hits the brake pads, take the Mini-E-Bike to a qualified<br />
bike shop to have the wheel trued.<br />
The mechanical safety check is a simple, sixty-second check<br />
you should perform whenever you’re about to get on the Mini-<br />
E-Bike.<br />
Nuts, bolts & straps<br />
Lift the front wheel off the ground by two or three inches, and<br />
then let it bounce on the ground. Does anything sound, feel<br />
or look loose Do a quick visual and tactile inspection of the<br />
whole Mini-E-Bike. Any loose parts or accessories If so,<br />
secure them. If you’re not sure, ask someone with experience<br />
to check these items.<br />
Tires & Wheels<br />
Tires correctly inflated Check by putting one hand on the<br />
saddle and one on the intersection of the handlebar. Next,<br />
bounce your weight on the Mini-E-Bike while looking at tire<br />
deflection. Compare what you see with how it looks when you<br />
know the tires are correctly inflated. Adjust the tire pressure<br />
if necessary.<br />
18<br />
CAUTION:<br />
Wheels must be true for the brakes to work effectively. Wheel<br />
truing is a skill which requires special tools and experience.<br />
Do not attempt to true a wheel unless you have the<br />
knowledge and tools needed to do the job correctly.<br />
Brakes<br />
Squeeze the brake levers. Does the cable guide on the brake<br />
cable securely engage the quick release bracket on the left<br />
caliper arm (Figure 15) Do the brake pads contact the<br />
wheel rim within an inch of brake lever movement Can you<br />
apply full braking force at the levers without having them<br />
touch the handlebar If not, your brakes need adjustment. Do<br />
not ride the Mini-E-Bike until the brakes are properly<br />
adjusted. See Chapter 5 for details.<br />
WARNING:<br />
Riding with improperly adjusted brakes or worn brake pads<br />
is dangerous and can result in serious injury or death.
FIG. 15<br />
Quick Release Binders<br />
Are the handlebar and seatpost quick releases binders<br />
properly adjusted and in the locked position Adjust the quick<br />
release binders as necessary. See Chapter 2 for details.<br />
Handlebar and saddle alignment<br />
Is the saddle properly aligned with the top tube of the Mini-E-<br />
Bike Is the handlebar perpendicular to the top tube Are<br />
the binder bolts/quick release tight enough so that you<br />
cannot twist them out of alignment<br />
Handlebar grips<br />
Are the handlebar grips secure and in good condition If not,<br />
19<br />
replace them. Are the handlebar ends plugged If not, plug<br />
them before you ride.<br />
WARNING :<br />
Loose or damaged handlebar grips can cause you to lose<br />
control and fall. Unplugged handlebars can act like a cookie<br />
cutter on your body and can cause serious injury in an<br />
otherwise minor accident.<br />
4. RIDING SAFELY AND<br />
RESPONSIBLY<br />
NOTE:<br />
Like any sport, bicycling involves risk of injury and damage.<br />
By choosing to ride an Mini-E-Bike, you assume the<br />
responsibility for that risk. Not the people who sold you the<br />
Mini-E-Bike. Not the people who made it. Not the people<br />
who distribute it. Not the people who manage or maintain the<br />
roads you ride on. You. So you need to know — and to<br />
practice — the rules of safe and responsible riding.<br />
THE BASICS<br />
1. Always perform the mechanical safety check described<br />
above before you get on an Mini-E-Bike.<br />
2. Always wear a helmet which complies with your state laws<br />
when riding the Mini-E-Bike. Check with your local police<br />
department for requirements in your community.
3. Keep body parts and other objects away from the sharp<br />
teeth of chainring, the moving chain, the turning pedals and<br />
cranks, and the spinning wheels of your Mini-E-Bike.<br />
4. Always wear shoes that will stay on your feet and will grip<br />
the pedals. Never ride barefoot or when wearing sandals.<br />
5. Be thoroughly familiar with the controls of your Mini-E-<br />
Bike.<br />
6. Wear bright, visible clothing that is not so loose that it can<br />
catch on moving parts of the Mini-E-Bike or be snagged by<br />
objects at the side of the road or trail.<br />
7. Do not jump with your Mini-E-Bike. Jumping a Mini-E-<br />
Bike can be fun; but it puts incredible stress on everything<br />
from your spokes to your pedals. Perhaps most vulnerable to<br />
jumping-related damage is your front fork. Riders who insist<br />
on jumping an Mini-E-Bike risk serious damage to the Mini-<br />
E-Bike as well as to themselves.<br />
8. Think about your speed, and keep your speed at a level<br />
which is consistent with conditions. Always keep in mind that<br />
there is a direct relationship between speed and control, and<br />
between speed and component stress<br />
RULES OF THE ROAD<br />
1. You are sharing the road with others — motorists,<br />
pedestrians and other cyclists. Respect their rights, and be<br />
tolerant if they infringe on yours.<br />
2. Ride defensively. Assume that the people with whom you<br />
are sharing the road are so absorbed with what they are<br />
doing and where they are going that they are oblivious to you.<br />
20<br />
3. Look ahead of where you’re going, and be ready to avoid:<br />
• Vehicles slowing or turning in front of you, entering the<br />
road or your lane ahead of you, or coming up behind you.<br />
• Parked car doors opening in front of you.<br />
• Pedestrians stepping out in front of you.<br />
• Children playing near the road.<br />
• Pot holes, sewer grating, railroad tracks, expansion joints,<br />
road or sidewalk construction, debris and other<br />
obstructions that could cause you to swerve into traffic,<br />
catch your wheel or otherwise cause you to lose control<br />
and have an accident.<br />
• The many other hazards and distractions which can occur<br />
on a Mini-E-Bike ride.<br />
4. Use hand signals for turning and stopping. Learn the local<br />
vehicle code for the correct signals.<br />
5. Never ride with headphones. They mask traffic sounds and<br />
emergency vehicle sirens, and they distract you from<br />
concentrating on what is going on around you. Their wires<br />
can also tangle in the moving parts of the Mini-E-Bike,<br />
causing you to lose control.<br />
6. Never carry a passenger.<br />
7. Never carry anything that obstructs your vision, interferes<br />
with your complete control of the Mini-E-Bike, or could<br />
become entangled in the moving parts of the Mini-E-Bike.<br />
8. Never hitch a ride by holding onto another vehicle.<br />
9. Never perform stunts, wheelies, or jumps. They can cause<br />
you injury and damage your Mini-E-Bike.
10. Do not weave through traffic or make any moves that<br />
may surprise people with whom you are sharing the road.<br />
11. Observe and yield the right of way.<br />
12. Never ride your Mini-E-Bike while under the influence<br />
of alcohol or drugs.<br />
13. If possible, avoid riding in bad weather, when visibility is<br />
obscured, or when extremely tired. Each of these conditions<br />
increases the risk of accident.<br />
WET WEATHER RIDING<br />
WARNING:<br />
Wet weather impairs traction, braking, and visibility for both<br />
the rider and for other vehicles sharing the road. The risk of<br />
accident dramatically increases in wet conditions. Wet brakes<br />
and wet rims dramatically increase braking distance. Ride<br />
more slowly and brake sooner when riding in wet conditions<br />
Under wet conditions, the stopping power of your brakes (as<br />
well as the brakes of other vehicles sharing the road) is<br />
dramatically reduced and your tires do not grip nearly as well.<br />
This makes it harder to control speed and easier to lose<br />
control. To make sure that you can slow down and stop safely<br />
in wet conditions, ride more slowly and apply your brakes<br />
earlier and more gradually than you would under normal, dry<br />
conditions.<br />
NIGHT RIDING<br />
Even if you have excellent night vision, many of the people<br />
with whom you share the road do not. A rider is very difficult<br />
for motorists and pedestrians to see at dusk, at night, or at<br />
other times of poor visibility. If at all possible, avoid riding at<br />
night. If you must ride under these conditions, check and be<br />
sure you comply with all local laws about night riding. Follow<br />
the rules of the road even more carefully, and you must take<br />
the following additional precautions:<br />
Before riding at dusk or at night, take the following steps to<br />
make yourself more visible:<br />
• Make sure that your Mini-E-Bike is equipped with<br />
correctly positioned and securely mounted reflectors.<br />
• Wear light colored, reflective clothing and accessories,<br />
such as a reflective vest, reflective arm and leg bands,<br />
reflective stripes on your helmet, flashing lights. Any<br />
reflective device or light source that moves will help you<br />
get the attention of approaching motorists, pedestrians<br />
and other traffic.<br />
• Make sure your clothing or anything you may be carrying<br />
on the Mini-E-Bike does not obstruct a reflector or light.<br />
• Consider installing an aftermarket headlight/taillight on<br />
your Mini-E-Bike.<br />
While riding at dusk or at night:<br />
• Ride slowly.<br />
21
• Avoid areas of heavy traffic, dark areas, and roads with<br />
speed limits over 35 mph.<br />
• Avoid road hazards.<br />
• If possible, ride on routes already familiar to you.<br />
5. HOW THINGS WORK<br />
It’s important to your performance, enjoyment and safety to<br />
understand how things work on your Mini-E-Bike. Even if<br />
you are an experienced cyclist, be sure to read — and to<br />
understand — this section of the manual. If you have even<br />
the slightest doubt as to whether you understand something,<br />
talk to your dealer.<br />
2. Insert the axle into the fork dropouts (the slots at the tip of<br />
the fork blade). Be sure that the axle rests against the top of<br />
each dropout and that each washer sits outside its fork blade.<br />
3. Press each retention washer toward its fork blade so the<br />
tab on the washer engages the hole above the dropout.<br />
4. Use a 15 mm box wrench or a six-inch adjustable wrench<br />
to tighten the axle nuts (B, Figure 16) securely.<br />
5. Fit the cap (A, Figure 16) onto each end of the axle bolt.<br />
6. Close the brakes.<br />
REMOVING/INSTALLING THE WHEELS<br />
Removing the Front Wheel<br />
1. Open the front brake pads. (Refer to page 25.)<br />
2. Remove the cap (A, Figure 16) from each end of the axle<br />
bolt.<br />
3. With a 15 mm box wrench or a six-inch adjustable wrench,<br />
loosen the two axle nuts (B, Figure 16) and pull the retention<br />
washer away from each dropout.<br />
4. Lift the handlebar so the front wheel is off the ground.<br />
5. Tap the top of the wheel with the palm of your hand to<br />
knock the wheel out of the front forks.<br />
Installing the Front Wheel<br />
1. With the steering fork facing forward, set the wheel<br />
between the fork blades.<br />
22<br />
FIG. 16<br />
B<br />
A<br />
7. Spin the wheel to make sure it is centered in the frame and<br />
that it clears the brake pads.<br />
Removing the Rear Wheel<br />
1. Open the rear brake pads. (Refer to page 25.)
B<br />
B<br />
B<br />
A<br />
A<br />
FIG. 17 FIG. 18<br />
2. Shift the rear derailleur to high gear (the smallest rear<br />
sprocket).<br />
3. Remove the cap (A, Figure 17) from each end of the axle bolt.<br />
4. With a 17 mm box wrench or a six-inch adjustable wrench,<br />
loosen the two axle nuts (B, Figure 17).<br />
5. Remove the motor torque arm bolt (A, Figure 18) from the<br />
left side seat stay above the drop out.<br />
6. Release the secondary lock from the post on the QRconnector-housing<br />
clasp. Release the strap from the post<br />
and lift the QR-connector housing (B, Figure18) from the left<br />
chain stay.<br />
7. Remove the retaining clip from the QR-connector.<br />
8. Disconnect the motor QR-connector and the temperaturesensor<br />
connector.<br />
23<br />
9. Lift the rear wheel off the ground a few inches and pull the<br />
derailleur body back with your right hand.<br />
10. With the derailleur still pulled back, push the wheel down<br />
until it comes out of the rear dropouts.<br />
Installing the Rear Wheel<br />
1 Shift the rear derailleur to its outermost position and pull<br />
the derailleur body back with your right hand.<br />
2. Put the chain on to the smallest sprocket.<br />
3. Insert the wheel into the frame dropouts and pull it all the<br />
way into the dropouts. The axle washers should be on the<br />
outside of the dropouts, between the frame and the axle nut.<br />
4. Reinstall the motor torque arm and bolt.
5. Tighten the axle nuts (B, Figure 17) securely, using a sixinch<br />
adjustable wrench or a 17 mm box wrench.<br />
6. Install the cap (A, Figure 17) onto each end of the axle<br />
bolt.<br />
7. Push the rear derailleur back into position.<br />
8. Reconnect the motor QR-connector and temperaturesensor<br />
connector. Install the retaining clip into the QRconnector.<br />
9. Fit the QR-connector housing over both connectors. Be<br />
sure the wires are within the port at each end of the housing<br />
(B, Figure 18).<br />
10. Wrap the strap tightly around the left chain stay, and<br />
secure it to the post on the housing clasp. Press the<br />
secondary lock over the post on the housing.<br />
11. Close the brake. Spin the wheel to make sure that it is<br />
centered in the frame and clears the brake pads.<br />
BRAKES<br />
NOTE:<br />
For most effective braking, use both brakes and apply them<br />
simultaneously.<br />
WARNING:<br />
Sudden or excessive application of the front brake may pitch<br />
the rider over the handlebars, causing serious injury or<br />
death.<br />
How Brakes Work<br />
The braking action of a Mini-E-Bike is a function of the<br />
friction between the brake pads and the wheel rim. To make<br />
sure that you have maximum friction available, keep your<br />
wheel rims and brake pads clean and free of lubricants,<br />
waxes, or polishes.<br />
Make sure that your hands can reach and squeeze the brake<br />
levers comfortably. If your hands are too small to operate the<br />
levers comfortably, consult your dealer before riding the Mini-<br />
E-Bike. You may need a different brake lever design.<br />
Brakes are designed to control your speed, not just to stop<br />
the Mini-E-Bike. Maximum braking force for each wheel<br />
occurs at the point just before the wheel locks up (stops<br />
rotating) and starts to skid. Once the tire skids, you actually<br />
lose most of your stopping force and all directional control.<br />
You need to practice slowing and stopping smoothly without<br />
locking up a wheel. The technique is called progressive brake<br />
modulation. Instead of jerking the brake lever to the position<br />
where you think you will generate appropriate braking force,<br />
squeeze the lever, progressively increasing the braking force.<br />
If you feel the wheel begin to lock up, release pressure just a<br />
little to keep the wheel rotating just short of lockup. It is<br />
important to develop a feel for the amount of brake lever<br />
pressure required for each wheel at different speeds and on<br />
different surfaces. To better understand this, experiment a<br />
little by walking your Mini-E-Bike and applying different<br />
24
amounts of pressure to each brake lever until the wheel<br />
locks.<br />
CAUTION:<br />
The Mini-E-Bike brake are extremely powerful. You should<br />
take extra care in becoming familiar with these brakes and<br />
exercise particular care when using them.<br />
When you apply one or both brakes, the Mini-E-Bike<br />
begins to slow, but your body wants to continue at the speed<br />
at which it was going. This causes a transfer of weight to the<br />
front wheel (or, under heavy braking, around the front wheel<br />
hub, which could send you flying over the handlebars). A<br />
wheel with more weight on it will accept greater brake<br />
pressure before lockup; a wheel with less weight will lock up<br />
with less brake pressure. So, as you apply brakes and your<br />
weight shifts forward, you need to shift your body toward the<br />
rear of the Mini-E-Bike, to transfer weight back onto the<br />
rear wheel. At the same time, you need to both decrease rear<br />
braking and increase front braking force. This is even more<br />
important on steep descents, because descending shifts<br />
weight forward.<br />
Everything changes when you ride on loose surfaces or in<br />
wet weather. Tire adhesion is reduced, so the wheels have<br />
less cornering and braking traction and can lock up with less<br />
brake force. Moisture or dirt on the brake pads reduces their<br />
ability to grip. The way to maintain control on loose or wet<br />
surfaces is to go more slowly to begin with.<br />
Brake Release<br />
The brake pads of the V-brakes can be quickly opened so the<br />
pads can clear the tire when the wheel is removed or<br />
installed. To open the front or rear brake pads, perform the<br />
following:<br />
1. Squeeze the caliper arms together.<br />
2. Disconnect the cable guide on the brake cable from the<br />
quick release bracket on the left caliper arm (A, Figure 19).<br />
A<br />
B<br />
The keys to effective speed control and safe stopping are<br />
controlling wheel lockup and weight transfer. Practice braking<br />
and weight transfer techniques where there is no traffic or<br />
other hazards and distractions.<br />
25<br />
FIG. 19
Once the wheel is reinstalled, close the brake pads by<br />
performing the following:<br />
1. Squeeze the caliper arms together.<br />
2. Connect the cable guide to the bracket on the left caliper<br />
arm (A, Figure 19).<br />
Brake Cable Free Play Adjustment<br />
If either brake lever fails the mechanical safety check, restore<br />
brake lever travel by adjusting the brake lever free play as<br />
described below.<br />
1. Pull the brake lever to simulate a panic stop, and then<br />
release the brake lever. Repeat this at least ten times. This<br />
assures that all components are properly seated.<br />
2. Pull the brake lever until the brake pads just touch the rim.<br />
3. Measure the clearance between the brake lever and the<br />
handlebar grip. This distance should be 25 mm (0.98 in.)<br />
4. Loosen the adjuster locknut (A, Figure 20), and turn the<br />
barrel adjuster (B, Figure 20) as necessary to adjust<br />
clearance to within specification. (Turning the adjuster out<br />
tightens the inner wire; turning the adjuster in loosens the<br />
wire.) When the brake lever is within specification, tighten the<br />
adjuster locknut.<br />
5. Squeeze the caliper arms together, and remove the cable<br />
guide from the quick release bracket on the left caliper arm<br />
(A, Figure 19). The brake lever free play is properly adjusted<br />
if the cable guide can be easily removed from the bracket.<br />
6. If you cannot easily release the cable guide from the<br />
bracket, perform the following:<br />
a. Turn the adjusting barrel at the brake lever in<br />
(clockwise) one full turn. Try to remove the cable guide<br />
again.<br />
b. If you still cannot release the cable guide, turn the<br />
adjusting barrel in an additional turn.<br />
c. If the cable guide still does not release, loosen the<br />
pinch bolt (B, Figure 19) and release 2-3 mm (0.079-<br />
0.118 in.) of inner wire from the pinch mechanism.<br />
d. Tighten the pinch bolt, and repeat the adjusting<br />
procedure.<br />
FIG. 20<br />
A<br />
B<br />
26
SHIFTING<br />
Your five-speed Mini-E-Bike uses a derailleur drivetrain,<br />
which consists of.<br />
• A rear sprocket cluster, called a freewheel or cogset<br />
• A rear derailleur<br />
• One shifter<br />
• One control cable<br />
• One front sprocket called a chainring<br />
• A drive chain<br />
There are many different types of shifter mechanisms, each<br />
preferred for specific applications because of its ergonomic,<br />
performance, and price characteristics. The designers of your<br />
Mini-E-Bike have selected the twist-type shifter design<br />
which will give the best results on your Mini-E-Bike.<br />
To shift to a higher gear, twist the shifter rearward or<br />
clockwise while pedaling forward. To shift to a lower gear,<br />
twist the shifter forward or counterclockwise. See Figure 21.<br />
A downshift is a shift to a lower or slower gear, one which is<br />
easier to pedal. An upshift is a shift to a higher or faster gear,<br />
one which harder to pedal gear. For example, you can<br />
downshift to a lower gear to make pedaling easier on a hill.<br />
On the otherhand, you may upshift to a higher gear when you<br />
wish to go faster.<br />
FIG. 21<br />
DOWNSHIFT<br />
UPSHIFT<br />
Whether upshifting or downshifting, the derailleur system<br />
requires that the drive chain be moving forward and be under<br />
at least some tension. A derailleur will shift only if you are<br />
pedaling forward.<br />
CAUTION:<br />
Never move the shifter while pedaling backward. Also do not<br />
pedal backwards after moving the shifter. Either of these<br />
actions could jam the chain and cause serious damage to the<br />
Mini-E-Bike.<br />
27
WARNING:<br />
Never shift a misadjusted derailleur onto the largest or the<br />
smallest sprocket. The chain could jam, causing you to lose<br />
control and fall.<br />
Derailleur Adjustment<br />
The function of the rear derailleur is to move the drive chain<br />
from one gear to another on the rear gear cluster, thereby<br />
changing gear drive ratios. The smaller sprockets on the gear<br />
cluster produce higher gear ratios. Pedaling in the higher<br />
gears requires greater pedaling effort, but takes you a greater<br />
distance with each revolution of the pedal crank. The larger<br />
sprockets produce lower gear ratios. Using them requires<br />
less pedaling effort, but takes you a shorter distance with<br />
each pedal crank revolution.<br />
A fourth-hand tool (Park Tool BT-2) and a torque wrench are<br />
required to perform this procedure.<br />
1. Check the cable attachment to the derailleur pinch<br />
mechanism.<br />
a. Inspect the position of the inner wire in the pinchmechanism.<br />
The inner wire should follow the groove in<br />
the pinch plate, and the tab on the pinch plate should<br />
be inboard of the cable when you look directly at the<br />
pinch-mechanism stud (Figure 22).<br />
b. Loosen the pinch-mechanism nut. Use the fourth-hand<br />
tool to pull the slack from the inner wire.<br />
c. Torque the pinch-mechanism nut to 42 kg-cm (36.5 in.-lb.)<br />
d. Check that the inner cable is still contained within the<br />
groove in the pinch-mechanism plate.<br />
Moving the chain from a smaller sprocket of the gear cluster<br />
to a larger sprocket results in a downshift. Moving the chain<br />
from a larger sprocket to a smaller sprocket results in an<br />
upshift. In order for the derailleur to disengage the chain from<br />
one sprocket and move it on to another, the chain must be<br />
moving forward (i.e. the rider must be pedaling forward).<br />
TAB<br />
CORRECT<br />
PINCH PLATE<br />
INCORRECT<br />
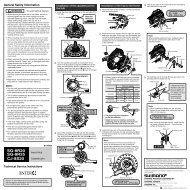
Three screws, the H-, L-, and B-screws, are used to adjust<br />
the derailleur. The H-screw sets the outward limit of the<br />
derailleur’s movement. The L-screw sets its inward limit. The<br />
B-screw adjusts the distance between the bottom of the<br />
cogset and the derailleur’s guide pulley. FIG. 22<br />
TAB<br />
28
2. Set the derailleur as close as possible to the cogset by<br />
performing the following.<br />
a. Shift the chain to the innermost cog.<br />
b. Completely loosen the B-screw (Figure 23).<br />
c. Back-pedal, and check for bouncing at the guide pulley<br />
Figure 24). The B-screw is too loose if bouncing is<br />
noticed.<br />
d. Tighten the B-screw one turn, and repeat the bounce<br />
check.<br />
3. Set the derailleur’s outward limit by performing the<br />
following.<br />
a. Shift the derailleur so the chain is on the outermost cog.<br />
b. Stand behind the Mini-E-Bike, and check the<br />
position of the derailleur. The guide pulley should align<br />
with the outermost cog as shown in Figure 25.<br />
c. If necessary, adjust the outward limit by turning the H-<br />
screw. Tighten the H-screw to adjust the guide pulley<br />
inward. Loosen the H-screw to adjust the derailleur<br />
outward.<br />
4. Set the derailleur’s inward limit by performing the following.<br />
a. Shift the derailleur so the chain rests on the innermost cog.<br />
b. Stand behind the Mini-E-Bike, and check the<br />
position of the derailleur. The guide pulley should align<br />
with the innermost cog as shown in Figure 26.<br />
c. If necessary, adjust the inward limit by turning the L-<br />
screw. Tighten the L-screw to move the derailleur<br />
outward. Loosen the L-screw to move the derailleur<br />
inward.<br />
29<br />
FIG. 23<br />
FIG. 24<br />
MOUNTING BOLT<br />
GUIDE<br />
PULLEY<br />
TENSION PULLEY<br />
BOUNCING<br />
B-SCREW
TIRES AND TUBES<br />
H SCREW<br />
FIG. 25 FIG. 26<br />
L SCREW<br />
The size, pressure rating, and other information appear on<br />
the sidewall of the tire (Figure. 27). The part of this<br />
information which is most important to you is tire pressure.<br />
Inflate the tires to 40-65 psi. Note that best performance is<br />
achieved when tires are inflated to 60-65 psi. These<br />
recommendations apply only to the OEM tires that were<br />
originally installed on your Mini-E-Bike. If you use another<br />
tire, follow the inflation-pressure recommendations marked<br />
on the tire sidewall.<br />
WARNING:<br />
Never inflate a tire beyond the maximum pressure marked on<br />
the tire’s sidewall. Exceeding the recommended maximum<br />
pressure may blow the tire off the rim, which could cause<br />
damage to the Mini-E-Bike and injury to the rider and<br />
bystanders.<br />
Tires<br />
Bicycle tires are available in many designs and<br />
specifications, ranging from general-purpose tires to those<br />
designed to perform best under very specific weather or<br />
terrain conditions. Your Mini-E-Bike has been equipped<br />
with tires that the manufacturer feels provides the best<br />
balance between performance and value for the bike’s<br />
intended use. If, once you’ve gained experience with your<br />
new Mini-E-Bike, you feel that a different tire might better<br />
suit your riding needs, your dealer can help you select the<br />
most appropriate design.<br />
FIG. 27<br />
The best way to inflate a Mini-E-Bike tire to the correct<br />
pressure is with a bike pump.Your dealer can help you select<br />
an appropriate pump.<br />
30
CAUTION:<br />
Gas station air hoses move a large volume of air very rapidly<br />
and will raise the pressure in your tire very rapidly. To avoid<br />
overinflation when using a gas station air hose, put air into<br />
your tire in short, spaced bursts.<br />
Tire pressure is given either as maximum pressure or as a<br />
pressure range. How a tire performs under different terrain or<br />
weather conditions depends largely upon tire pressure.<br />
Inflating the tire to near its maximum recommended pressure<br />
gives the lowest rolling resistance; but also produces the<br />
harshest ride. High pressures work best on smooth, dry<br />
pavement.<br />
Very low pressures, at the bottom of the recommended<br />
pressure range, give the best performance on smooth, slick<br />
terrain such as hard-packed clay, and on deep, loose<br />
surfaces such as deep, dry sand.<br />
Please note, however, tire pressure that is too low for your<br />
weight and the riding conditions can cause rim or tire<br />
damage.<br />
CAUTION:<br />
Pencil type automotive tire gauges and gas station air hose<br />
pressure settings are generally inaccurate and should not be<br />
depended upon for consistent, accurate pressure. Instead,<br />
use a good quality dial gauge.<br />
31<br />
Ask your dealer to recommend the best tire pressure for the<br />
kind of riding you will most often do, and have the dealer<br />
inflate your tires to that pressure. Then check inflation as<br />
described so you will know how correctly inflated tires should<br />
look and feel. Some tires may need to be brought up to<br />
pressure every week or two.<br />
Some special high-performance tires have unidirectional<br />
tread. Their tread pattern is designed to work better in one<br />
direction than in the other. The sidewall marking of a<br />
unidirectional tire have an arrow showing the correct rotation<br />
direction. If you use unidirectional tires on your Mini-E-<br />
Bike, be sure that they are mounted to rotate in the correct<br />
direction.<br />
Tire Valves<br />
The tire valve allows air to enter the tire’s inner tube under<br />
pressure, but doesn’t let it back out unless you want it to.<br />
There are primarily two kinds of bicycle tube valves used in<br />
the United States: the Schraeder Valve and the Presta Valve.<br />
The bicycle pump you use must have the fitting appropriate<br />
to the valve stems on your tire.<br />
The Mini-E-Bike OEM tires use a Schraeder valve (Figure<br />
28), which is like the valve on a car tire. To inflate a Schraeder<br />
valve tube, remove the valve cap and push the air hose or<br />
pump fitting onto the end of the valve stem. To let air out of a<br />
Schraeder valve, depress the pin in the end of the valve stem<br />
with the end of a key or other appropriate object.
Equally important is that your individual maintenance<br />
requirements will be determined by everything from your<br />
riding style to geographic location. Consult your dealer for<br />
help in determining your maintenance requirements. How<br />
much of your Mini-E-Bike service and maintenance you<br />
can do yourself depends upon your level of skill, experience,<br />
and special tool availability.<br />
FIG. 28<br />
6. SERVICE AND MAINTENANCE<br />
NOTE:<br />
Technological advances have made the Mini-E-Bike and<br />
Mini-E-Bike components more complex than ever before.<br />
And the pace of innovation is increasing. This on-going<br />
evolution makes it impossible for this manual to provide all<br />
the information required to properly repair and/or maintain<br />
your Mini-E-Bike. In order to help minimize the chances of<br />
an accident and possible injury, it is critical that you have any<br />
repair or maintenance which is not specifically described in<br />
this manual performed by your dealer.<br />
WARNING:<br />
Many Mini-E-Bike service and repair tasks require special<br />
knowledge and tools. Do not begin any adjustments or<br />
service on your Mini-E-Bike if you have the slightest doubt<br />
about your ability to properly complete them. Improper<br />
adjustment or service may result in damage to the Mini-E-<br />
Bike or in an accident which can cause serious injury or<br />
death.<br />
If you want to learn to do major service and repair work on<br />
your Mini-E-Bike, you have four options:<br />
1. Order an Mini-E-Bike service manual from your dealer.<br />
2. Ask your dealer whether copies of the manufacturer’s<br />
installation and service instructions for the components on<br />
your Mini-E-Bike are available.<br />
3. Ask your dealer to recommend a book on bicycle repair.<br />
4. Ask your dealer about the availability of Mini-E-Bike repair<br />
courses in your area. Regardless of which option you select,<br />
we recommend that you ask your dealer to check the quality<br />
of your work the first time you work on something and before<br />
32
you ride the Mini-E-Bike, just to make sure that you did<br />
everything correctly. Since that will require the time of a<br />
mechanic, there may be a modest charge for this service.<br />
SERVICE & MAINTENANCE SCHEDULE<br />
Some service and maintenance can and should be<br />
performed by the owner, and require no special tools or<br />
knowledge beyond what is presented in this manual.<br />
The following are examples of the type of service you should<br />
perform yourself. All other service, maintenance and repair<br />
should be performed in a properly equipped facility by a<br />
qualified Mini-E-Bike mechanic using the correct tools and<br />
procedures specified by the manufacturer.<br />
Break-in Period<br />
Your Mini-E-Bike will last longer and work better if you<br />
break it in before riding it hard. Control cables and wheel<br />
spokes may stretch or seat when a new Mini-E-Bike is first<br />
used and may require readjustment by your dealer. Your<br />
mechanical safety check (Chapter Three) will help you<br />
identify some things that need readjustment. But even if<br />
everything seems fine to you, it s best to take your Mini-E-<br />
Bike back to the dealer for a checkup. Dealers typically<br />
suggest you bring the Mini-E-Bike in for a 30 day checkup.<br />
Another way to judge when it s time for the first checkup is<br />
to bring the Mini-E-Bike in after 10 to 15 hours of use. But<br />
33<br />
if you think something is wrong with the Mini-E-Bike, take it<br />
to your dealer before riding it again.<br />
Before every ride:<br />
• Perform the mechanical safety check described in Chapter<br />
Three.<br />
After every long or hard ride; if the Mini-E-Bike has<br />
been exposed to water or grit; or at least every 100 miles:<br />
• Clean the Mini-E-Bike.<br />
• Lightly oil the chain, freewheel cogs and rear derailleur<br />
pulley bushings. Wipe off excess oil. Lubrication is a<br />
function of climate. Talk to your dealer about the best<br />
lubricants and the recommended lubrication frequency for<br />
your area.<br />
• Recharge the battery immediately after use.<br />
After every long or hard ride or after every 10 to 20 hours<br />
of riding:<br />
• Squeeze the front brake and rock the Mini-E-Bike<br />
forward and back. Does everything feel solid If you feel a<br />
clunk with each forward or backward movement of the Mini<br />
E-Bike, you probably have a loose headset. Have your<br />
dealer check it.<br />
• Lift the front wheel off the ground and swing it from side to<br />
side. Feel smooth If you feel any binding or roughness in<br />
the steering, you may have a tight headset. Have your<br />
dealer check it.<br />
• Make sure all bolts, nuts and mounting hardware are tight.
CAUTION:<br />
Since the right pedal on your Mini-e folds up, grasp the crank<br />
arm when performing this check on the right side.<br />
• Grab one pedal and rock it toward and away from the<br />
centerline of the Mini-E-Bike; then do the same with the<br />
other pedal. Does the bottom bracket feel loose If so,<br />
have your dealer check it.<br />
• Take a look at the brake pads. Starting to look worn or not<br />
hitting the wheel rim squarely Time to have the dealer<br />
adjust or replace them.<br />
• Carefully check the control cables and cable housings.<br />
Any rust Kinks Fraying If so, have your dealer replace<br />
them.<br />
• Squeeze each adjoining pair of spokes on either side of<br />
each wheel between your thumb and index finger. Do they<br />
all feel about the same If any feel loose, have your dealer<br />
check the wheel runout and spoke tension..<br />
• Check to make sure that all parts and accessories are still<br />
secure. Tighten any which are not.<br />
• Recharge the battery immediately after use.<br />
WARNING:<br />
Like any mechanical device, a Mini-E-Bike and its<br />
components are subject to wear and stress. Different<br />
materials and mechanisms wear at different rates and have<br />
different life cycles. If a component’s life cycle is exceeded,<br />
the component can suddenly and catastrophically fail,<br />
causing serious injury or death to the rider. Scratches,<br />
cracks, fraying and discoloration are signs of stress-caused<br />
fatigue and indicate that a part is at the end of its useful life<br />
and should be replaced.<br />
As required:<br />
• If either brake lever fails the mechanical safety check<br />
adjust the brake lever free play as described in Chapter<br />
Five. If the lever free play cannot be adjusted within<br />
specification, have the brakes checked by your dealer.<br />
• If the chain will not shift smoothly and quietly from gear to<br />
gear, the derailleur is out of adjustment. The cause may be<br />
as simple as cable stretch, in which case you can<br />
compensate by turning the shifter or derailleur cable<br />
adjusting barrel counterclockwise 1/2 turn. Try shifting<br />
again. If turning the cable adjusting barrel 1/2 turn to a full<br />
turn does not cure the problem, see your dealer.<br />
Every 50 hours of riding:<br />
• Take your Mini-E-Bike to your dealer for a complete<br />
checkup.<br />
34
GETTING HOME WHEN SOMETHING BREAKS<br />
Unless you are going for a short ride in the neighborhood<br />
and can walk home or call someone to pick you up if<br />
something breaks, you should never go for a Mini-E-Bike<br />
ride without the following emergency equipment:<br />
• 2.5 mm and 5 mm Allen wrenches, used to tighten various<br />
clamping bolts that may loosen.<br />
• Patch kit and a spare inner tube.<br />
• Tire levers.<br />
• Tire pump or cartridge inflator with correct head to fit your<br />
tire valves (see Chapter Five).<br />
• Some kind of identification (so people know who you are<br />
in case of accident).<br />
• A couple of dollars in cash (for a candy bar, cool drink or<br />
emergency phone call).<br />
Flat Tire<br />
If you get a flat tire, remove the wheel as described in<br />
Chapter Five. Depress the tire valve to let all the air out of the<br />
tube. Remove one bead of the tire from the rim by grasping<br />
the tire at a point opposite the valve stem with both hands<br />
and lifting and peeling one side of the tire off the rim. If the<br />
bead is on too tight for you to unseat it with your hands, use<br />
tire levers to lift the bead carefully over the tire rim. Push the<br />
valve stem through the wheel rim. Remove the inner tube.<br />
Carefully check the outside and inside of the tire for the<br />
cause of the puncture and remove the cause if it is still there.<br />
35<br />
If the tire is cut, line the inside of the tire in the area of the cut<br />
with something handy — tape, a spare patch, a piece of inner<br />
tube, a dollar bill — whatever will keep the cut from pinching<br />
the inner tube.<br />
Either patch the tube (follow the instructions in your patch<br />
kit), or use a new tube. Reinstall the tire and tube. Slip one<br />
tire bead over the rim. Insert the tube valve through its hole<br />
in the rim. Feed the tube carefully into the cavity of the tire.<br />
Inflate the tube just enough to give it some shape. Starting at<br />
the valve stem use your thumbs to seat the tire bead inside<br />
the rim. Work your way around both side of the wheel until the<br />
entire bead is seated in the rim. Be careful not to pinch the<br />
tube between the tire bead and the wheel rim. If you have<br />
trouble getting the last few inches of bead over the edge of<br />
the rim with thumb pressure, use a tire lever and be careful<br />
not to pinch the tube.<br />
CAUTION:<br />
If you use a screwdriver or any tool other than a tire lever, you<br />
are likely to puncture the tube.<br />
Check to make sure the tire is evenly seated around both<br />
sides of the rim and that the tube is inside the tire beads.<br />
Push the valve stem into the tire to make sure that its base is<br />
seated within the tire’s beads. Inflate the tube slowly to the<br />
recommended pressure, all the while checking to make sure<br />
that the tire beads stay seated in the rim. Replace the valve<br />
cap, and install the wheel onto the Mini-E-Bike.
WARNING:<br />
Riding your Mini-E-Bike with a flat or under-inflated tire can<br />
seriously damage the tire, tube and Mini-E-Bike, and can<br />
cause you to lose control and fall.<br />
Broken Spoke<br />
A wheel with a loose or broken spoke is much weaker than a<br />
fully tensioned wheel. If you break a spoke while on a ride,<br />
you will have to ride home much more slowly and carefully<br />
because the weakened wheel could break additional spokes<br />
and become useless.<br />
WARNING:<br />
A broken spoke seriously weakens the wheel and may cause<br />
it to wobble, striking the brakes or the frame. Riding with a<br />
broken spoke can cause you to lose control and fall.<br />
IF YOU CRASH<br />
WARNING:<br />
A crash can put extraordinary stress on Mini-E-Bike<br />
components, causing them to fatigue prematurely.<br />
Components suffering from stress fatigue can fail suddenly<br />
and catastrophically, causing loss of control, serious injury or<br />
death.<br />
First, check yourself for injuries, and take care of them as<br />
best you can. Seek medical help if necessary. Next, check<br />
your Mini-E-Bike for damage, and fix what you can. When<br />
you get home, carefully perform the checks described in<br />
Chapter Three, and check for any other damaged parts. All<br />
bent, scored or discolored parts are suspect and should be<br />
replaced.<br />
Twist the broken spoke around the spoke next to it to keep it<br />
from flopping around and getting caught between the wheel<br />
and the frame. Spin the wheel to see if the rim clears the<br />
brake pads. If the wheel will not turn because it is rubbing<br />
against a brake pad, try turning the brake cable adjusting<br />
barrel(s) clockwise to slacken the cable and open up the<br />
brakes. If the wheel still won’t turn, open the brake’s quick<br />
release and secure any loose cable as best you can. Walk the<br />
Mini-E-Bike, or if you must, ride it with extreme caution,<br />
because you now have only one working brake.<br />
36<br />
CAUTION:<br />
If you have any doubt about the condition of the Mini-E-<br />
Bike or any of its parts, take it to your dealer for a thorough<br />
check.<br />
UPGRADING YOUR BIKE AND YOUR EQUIPMENT<br />
The variety of components and accessories available to<br />
enhance the comfort, performance and appearance of your<br />
Mini-E-Bike is almost endless. Your dealer can help you<br />
select those that will work best for the kind of riding you do.
Even if you are an experienced rider, read and understand<br />
the instructions that accompany the products you purchase<br />
for your Mini-E-Bike. If you have the slightest doubt as to<br />
their suitability or about your ability to install them correctly,<br />
ask your dealer for help.<br />
WARNING:<br />
Failure to install and operate any component or accessory<br />
properly can result in severe damage to the Mini-E-Bike<br />
and serious injury or death to the rider.<br />
Comfort and Convenience Accessories<br />
Once the Mini-E-Bike fit (frame size, saddle position and<br />
angle, stem length and rise) is correct, the saddle becomes<br />
the single most important comfort accessory.<br />
The comfort of a Mini-E-Bike saddle depends much more<br />
on how the saddle shape relates to the rider’s body than on<br />
the thickness or material of the padding. Bicycle<br />
manufacturers select a saddle shape based on their best<br />
guess of what’s likely to be comfortable for most buyers of<br />
that particular model. But that doesn’t mean it’s going to be<br />
the most comfortable shape for you. That’s why your dealer<br />
stocks saddles which offer a variety of shapes, padding,<br />
covering materials and prices. If the saddle on your new Mini-<br />
E-Bike is uncomfortable, ask your dealer to suggest an<br />
alternative.<br />
If you’re planning to spend an hour or more at a time on your<br />
Mini-E-Bike, get a pair of cycling gloves. Their padded<br />
37<br />
palms help keep your hands from getting numb from the<br />
vibration of the handlebars (the numbness, called carpal<br />
tunnel syndrome, can become quite painful if not taken care<br />
of), and they’ll provide some abrasion protection for your<br />
hands if you fall.<br />
Cycling shorts and cycling jerseys are both performance and<br />
comfort accessories. There are two kinds of cycling shorts:<br />
the traditional skin-tight Lycra shorts and loose-fit cycling<br />
shorts. Both are designed to reduce friction and chafing. The<br />
washable pad in the crotch of the shorts both cushions and<br />
protects against chafing. Wear them without underwear to<br />
avoid undergarment bunching up and chafing. Also available<br />
are undergarments designed to reduce chafing<br />
when worn with regular street clothes. The jerseys have<br />
pockets in the back, so that the things you carry don’t bang<br />
around when you ride. Many are made of special materials<br />
with properties that improve riding comfort and performance.<br />
It’s important to drink plenty of liquids before and during<br />
exercise. A water bottle is an essential companion on a<br />
longer ride.<br />
Some basic tools are also useful. The minimum tool kit you<br />
will need to make adjustments, perform maintenance and<br />
handle emergency repairs should include:<br />
• A set of Allen wrenches in 2.5 mm, 4 mm, 5 mm and 6 mm<br />
sizes.<br />
• A set of tire levers.
• A 6-inch adjustable wrench.<br />
• A No.1 Phillips screwdriver and a 1/4 inch flat blade<br />
screwdriver.<br />
• A tire pump.<br />
• A tire patching kit and a spare tire tube.<br />
Performance Upgrades<br />
CAUTION:<br />
Changing the components on your Mini-E-Bike may void<br />
the warranty. To avoid voiding your warranty, check with your<br />
dealer before changing the components on your Mini-E-<br />
Bike.<br />
The most popular way to improve the performance of a Mini-<br />
E-Bike is to substitute higher priced drivetrain or brake<br />
components. Before attempting to upgrade your drivetrain or<br />
brakes, make sure that the components you plan to install are<br />
fully compatible with the rest of the components on your Mini-<br />
E-Bike. Your dealer can help you determine component<br />
compatibility and resolve compatibility conflicts.<br />
Another popular way to improve the performance of a Mini-E-<br />
Bike is to substitute lighter weight racing components.<br />
Lighter wheels, tires, handlebars and so on can enhance the<br />
performance of your Mini-E-Bike; but you must always<br />
keep in mind that light weight racing components are not<br />
intended to have the life expectancy of their heavier counterparts,<br />
and you must therefore exercise extra care in checking<br />
for signs of stress fatigue.<br />
Suspension forks are also a popular component upgrade.<br />
Before installing a suspension fork on a Mini-E-Bike or<br />
installing a fork with different travel or geometry<br />
characteristics, you must make sure that the frame is<br />
designed to take the change in geometry and the changes in<br />
stress characteristics which the change in fork can cause.<br />
Such stresses can result in sudden, catastrophic frame<br />
failure, which can cause serious injury or death.<br />
Disc brakes are becoming a more common performance<br />
upgrade. Most front suspension forks are designed to accept<br />
a disc brake, and can take the added stresses at the brake<br />
mounting points. Be sure that the fork you are using is<br />
designed to accept disc brakes. Otherwise, such stresses<br />
can result in sudden, catastrophic frame failure, which can<br />
cause serious injury or death.<br />
Your dealer has many other comfort and performance<br />
accessories that can increase your cycling enjoyment.<br />
ABOUT YOUR DEALER<br />
Your dealer is there to help you get the Mini-E-Bike and<br />
accessories which are most appropriate for the kind of riding<br />
that you intend to do and to help you maintain your<br />
38
equipment so that you can get the maximum enjoyment from<br />
it. The shop’s staff has the knowledge, tools and experience<br />
to give you reliable advice and competent service. Your<br />
dealer carries the products from a variety of manufacturers<br />
so that you can choose those that meet your needs and your<br />
budget.<br />
But your dealer’s staff can’t make decisions for you; nor can<br />
they assume responsibility for your lack of knowledge,<br />
experience, skill or common sense. They can explain how<br />
something works, or what part or accessory will meet your<br />
special needs, but they cannot know your questions or your<br />
needs unless you tell them.<br />
If you have a problem with your Mini-E-Bike or your riding,<br />
talk to your dealer. Make sure that the dealer understands<br />
your problem or question, and make sure that you really<br />
understand the answers.<br />
Please contact EV Global Motors at:<br />
800-871-4545 toll-free<br />
818-756-0563 fax<br />
www.evglobal.com or www.ebike.com<br />
7. SPECIFICATIONS<br />
1. <strong>Electric</strong>al Specifications:<br />
Battery<br />
24 VDC, 8-amp hour, rechargeable,<br />
deep discharge, sealed AGM lead-acid<br />
Battery life Over 250 recharge cycle-life (70%<br />
maximum capacity at termination of useful<br />
life)<br />
Charger<br />
Input<br />
95-250 VAC, 50/60 Hz, 1.0 amp<br />
Output<br />
24 VDC, 1.5 amp<br />
PAS Controller<br />
Input voltage<br />
24 VDC<br />
Output voltage<br />
Operating temperature<br />
Operating humidity 20-80%<br />
2. Mechanical Specifications:<br />
24 VDC<br />
0-85 degrees C (32-185 degrees F) with<br />
thermo switch interface<br />
Gear Ratio Chainring<br />
36T<br />
Freewheel<br />
14T<br />
Ratio<br />
0.389<br />
36T 16T 0.445<br />
36T 18T 0.500<br />
36T 21T 0.583<br />
36T 24T 0.667<br />
Crank Arms<br />
152 mm (6.0 inches)<br />
Chain<br />
1/2 x 3/32 x 108 L<br />
Tires 20 x 195<br />
Inflation pressure<br />
40-65 psi (best performance @ 60-65 psi)<br />
Rims<br />
20 x 1.5 inch, double wall<br />
Rear<br />
36 H, 14 gauge stainless spokes<br />
Front<br />
36 H, 14 gauge stainless spokes<br />
Bottom bracket<br />
129.5 mm cartridge<br />
39
EV Global Motors Company<br />
16201 Stagg Street<br />
Van Nuys, CA 91406<br />
USA<br />
818-756-0566 tel / 818-756-0563 fax<br />
P/N: LIT-51000-01-B2