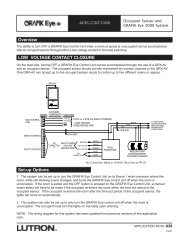
Jamb Mount Roller Blind - Lutron
Jamb Mount Roller Blind - Lutron
Jamb Mount Roller Blind - Lutron

Create successful ePaper yourself
Turn your PDF publications into a flip-book with our unique Google optimized e-Paper software.
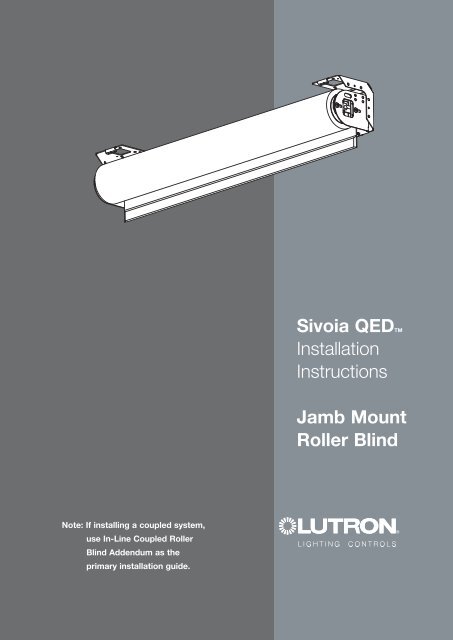
Sivoia QEDTM<br />
Installation<br />
Instructions<br />
<strong>Jamb</strong> <strong>Mount</strong><br />
<strong>Roller</strong> <strong>Blind</strong><br />
Note: If installing a coupled system,<br />
use In-Line Coupled <strong>Roller</strong><br />
<strong>Blind</strong> Addendum as the<br />
primary installation guide.
Sivoia QEDTM<br />
|<br />
jamb mount<br />
Installation Instructions<br />
Tools Required:<br />
Tape Measure<br />
Wire Cutter/Stripper<br />
Pliers<br />
#2 Phillips Screwdriver<br />
1/4” Hex-Head Driver<br />
Level<br />
Power Drill<br />
Notes:<br />
1) For In-Line Coupled <strong>Blind</strong> Systems, begin with Sivoia QED In-Line Coupled <strong>Roller</strong> <strong>Blind</strong><br />
Addendum, P/N 045-048. The Addendum will indicate when to use this document.<br />
2) Complete wiring and programming information can be found in the Sivoia QED Wire and<br />
Programming Guide, P/N 045-038 or at www.lutron.com.<br />
3) The Electronic Drive Unit (EDU) will need to be powered to complete installation.<br />
Box Contents:<br />
Sivoia QED <strong>Roller</strong> <strong>Blind</strong><br />
(2) <strong>Jamb</strong> Sub-Brackets<br />
Left and Right Side <strong>Blind</strong> Brackets (attached)<br />
(1) 7 Pin Terminal Block<br />
(8) <strong>Mount</strong>ing Screws<br />
(#8x44mm (#8x1-3/4") Hex Head Screws)<br />
(2) Extra Retaining Screws<br />
(#6x6mm (#6x1/4") Phillips Head Screws)<br />
(Actual Size)<br />
(Actual Size)<br />
(2) 102mm (4”) Cable Ties (2) 178mm (7”) Cable Ties<br />
SIVOIA QEDTM <strong>Jamb</strong> <strong>Mount</strong> Installation Instructions 1
1 Match <strong>Blind</strong> to Window<br />
1.1<br />
Confirm system dimensions on<br />
package label and window<br />
dimensions to verify appropriate<br />
window/blind combination.<br />
Package Label<br />
System Width<br />
System Height<br />
System Width<br />
System Height<br />
SIVOIA QEDTM <strong>Jamb</strong> <strong>Mount</strong> Installation Instructions 2
2 Pre-drill for Cable<br />
2.1<br />
Determine where to drill for cable<br />
access. See options below.<br />
Wall<br />
Cable should exit from wall, ceiling<br />
or jamb on EDU side of system.<br />
Note: Leave 305-457mm (12-18")<br />
of cable exposed.<br />
Ceiling<br />
Wall<br />
Drill for cable 64-76mm (2 1/2" - 3") from<br />
top of the system and 32-57mm (1 1/4" - 2 1/4")<br />
from end of the system.<br />
<strong>Jamb</strong><br />
Ceiling<br />
Drill for cable 64-76mm (2 1/2" - 3")<br />
from back of the system and<br />
32-57mm (1 1/4" - 2 1/4") from<br />
end of the system.<br />
SIVOIA QEDTM <strong>Jamb</strong> <strong>Mount</strong> Installation Instructions 3<br />
<strong>Jamb</strong><br />
Drill for cable 51mm (2") from top<br />
of the system and 51mm (2") from<br />
back of the system.
3 <strong>Mount</strong> Sub-Brackets<br />
3.1<br />
Use fabric alignment holes to<br />
position the sub-bracket right<br />
to left. The fabric alignment<br />
holes will line up with the outside<br />
edge of the fabric panel.<br />
Note: Fabric edge may not<br />
line up with edge of tube.<br />
Note: Distance between<br />
fabric edge and end of<br />
system is 19mm (3/4")<br />
per side.<br />
Fabric<br />
Alignment<br />
Holes<br />
3.2<br />
Once their position has<br />
been established, mount<br />
sub-brackets using<br />
appropriate fasteners.<br />
WARNING:<br />
The sub-brackets for each<br />
blind tube should be mounted to<br />
support a weight of at least 136kg<br />
(300 pounds). The fasteners<br />
provided with the sub-brackets<br />
may not be appropriate for use in<br />
all applications.<br />
Note: If sub-bracket position<br />
is not flush to jamb as shown<br />
to the left, sub-bracket can be<br />
mounted to ceiling or rear wall<br />
using appropriate fasteners.<br />
SIVOIA QEDTM <strong>Jamb</strong> <strong>Mount</strong> Installation Instructions 4
4 Wire 7-Pin Terminal Block<br />
4.1<br />
Strip jacket off entire<br />
length of exposed cable.<br />
(305-457mm or 12-18”)<br />
4.2<br />
Wire 7-Pin terminal<br />
block (provided) to<br />
cable.<br />
Note: SVQ-CBL-250<br />
shown<br />
Pre-wire via ceiling shown.<br />
EGND (Yellow/Green)<br />
24 VAC (Red)<br />
24 VAC (Red/White)<br />
MUX (Purple)<br />
MUX (Gray)<br />
+12 VDC (Blue)<br />
Common (Yellow)<br />
To EDU<br />
Connector<br />
SIVOIA QEDTM <strong>Jamb</strong> <strong>Mount</strong> Installation Instructions 5
5 <strong>Mount</strong> <strong>Blind</strong> to Sub-Brackets<br />
WARNING:<br />
<strong>Blind</strong>s wider than 4ft (1.2m)<br />
require two people to install.<br />
Note: If installing a coupled<br />
blind system, install the blind<br />
with the EDU first.<br />
5.1<br />
Remove retaining screws from<br />
blind brackets.<br />
Note: Leave protective<br />
wrapping on blind during<br />
installation.<br />
5.2<br />
Hook the lip of each blind<br />
bracket onto the top of each<br />
sub-bracket.<br />
5.3<br />
Swing blind down until bottoms<br />
of blind brackets rest<br />
against sub-brackets.<br />
5.4<br />
Route cable wires from wall,<br />
ceiling or jamb between the<br />
blind bracket and the subbracket<br />
being careful not to<br />
pinch wire.<br />
SIVOIA QEDTM <strong>Jamb</strong> <strong>Mount</strong> Installation Instructions 6
6 Center and Secure <strong>Blind</strong><br />
6.1<br />
Move the blind left<br />
or right until centered.<br />
WARNING:<br />
<strong>Blind</strong> is not secured to<br />
the wall during the<br />
adjustment procedure.<br />
Extreme movement<br />
from side-to-side may<br />
cause blind to fall.<br />
Attention should be<br />
paid to the blind brackets’<br />
engagement into<br />
the sub-bracket as<br />
side-to-side movement<br />
is not restricted at this<br />
point. <strong>Blind</strong>s wider than<br />
914mm (4ft) require<br />
two people to center<br />
the blind.<br />
6.2<br />
Insert and tighten<br />
retaining screws on<br />
BOTH blind brackets<br />
to secure the blind<br />
into position. Screws<br />
should be tightened<br />
down all the way.<br />
WARNING:<br />
After installing retaining<br />
screws, gently push up<br />
and pull down on the<br />
roller blind to ensure a<br />
secure installation.<br />
SIVOIA QEDTM <strong>Jamb</strong> <strong>Mount</strong> Installation Instructions 7
7 Adjust <strong>Blind</strong> Level<br />
7.1<br />
Turn leveling screw<br />
to raise or lower idler<br />
side of blind until level.<br />
7.2<br />
Adjust blind projection from<br />
window so that it clears any<br />
window trim or hardware<br />
when operating.<br />
7.3<br />
Confirm roller tube turns<br />
freely without rubbing on<br />
anything.<br />
SIVOIA QEDTM <strong>Jamb</strong> <strong>Mount</strong> Installation Instructions 8
8 Connect Terminal Blocks<br />
8.1<br />
Plug 7-pin terminal<br />
block on cable into<br />
EDU terminal block<br />
attached to blind<br />
bracket.<br />
Note: EDU terminal block<br />
clips onto blind bracket to<br />
hold connected terminal<br />
block in place.<br />
8.2<br />
Ensure terminal blocks<br />
are oriented as shown.<br />
8.3<br />
Secure terminal block<br />
with 178mm (7”) cable tie.<br />
178mm (7”) cable tie<br />
8.4<br />
Use 102mm (4”)<br />
Cable Ties to dress<br />
wires to prevent<br />
them from rubbing<br />
against shade fabric.<br />
Note: If installing a<br />
coupled blind system,<br />
go to Section 3 of the<br />
In-Line Coupled <strong>Roller</strong><br />
<strong>Blind</strong> Addendum.<br />
SIVOIA QEDTM <strong>Jamb</strong> <strong>Mount</strong> Installation Instructions 9
9 IR Receiver Connection (if applicable)<br />
9.1<br />
Plug in EDU IR connector<br />
to remote eye<br />
connector (SV-IR).<br />
9.2<br />
Position IR eye where<br />
it is not covered from<br />
view of remote control.<br />
9.3<br />
Ensure IR connector<br />
does not rub on blind.<br />
EDU IR connector<br />
SV-IR connector<br />
SIVOIA QEDTM <strong>Jamb</strong> <strong>Mount</strong> Installation Instructions 10
10 Programming Setting Limits from the EDU<br />
The Open and Close Limits determine how far an EDU will travel. When the open button is pressed on a<br />
Keypad, IR transmitter, or CCI, the EDU will move to the Open Limit. When the close button is pressed on<br />
a keypad, IR transmitter, or CCI, the EDU will move to the Close Limit. The EDU will not move higher than<br />
the Open Limit or lower than the Close Limit.<br />
Note: Setting the Open Limit lower than the Close Limit will cause the blind to move down<br />
when raise is pressed and up when lower is pressed.<br />
Setting the Open Limit from the EDU<br />
10.1<br />
Press and release the<br />
“Open Limit Button” ( ),<br />
the LED on the roller <strong>Blind</strong><br />
EDU will turn on steady,<br />
indicating that the EDU is in<br />
“Set Open Limit Mode”.<br />
Press and Release the<br />
Open Limit Button.<br />
Steady LED<br />
10.2<br />
Adjust the position of the<br />
EDU to the desired Open<br />
Limit using the adjustment<br />
buttons ( ).<br />
Use the Adjustment<br />
buttons to move the<br />
EDU position.<br />
SIVOIA QEDTM <strong>Jamb</strong> <strong>Mount</strong> Installation Instructions 11
10 Programming Setting Limits from the EDU<br />
(continued)<br />
Setting the Open Limit from the EDU<br />
10.3<br />
Press and hold the “Open<br />
Limit Button” ( ) for 5 seconds,<br />
the LED on the roller<br />
blind EDU will flash for 2<br />
seconds, then go dark,<br />
indicating that the current<br />
position has been stored as<br />
the Open Limit.<br />
Press and hold the<br />
Open Limit Button<br />
for 5 seconds.<br />
Flashing LED<br />
Setting the Close Limit from the EDU<br />
10.4<br />
Press and release the<br />
“Close Limit Button” ( ),<br />
the LED on the roller<br />
<strong>Blind</strong> EDU will turn on<br />
steady, indicating that the<br />
EDU is in “Set Close Limit<br />
Mode”.<br />
Press and Release the<br />
Close Limit Button.<br />
Steady LED<br />
SIVOIA QEDTM <strong>Jamb</strong> <strong>Mount</strong> Installation Instructions 12
10 Programming Setting Limits from the EDU<br />
(continued)<br />
Setting the Close Limit from the EDU<br />
10.5<br />
Adjust the position of the<br />
EDU to the desired Close<br />
Limit using the adjustment<br />
buttons ( ).<br />
Use the Adjustment<br />
buttons to move<br />
the EDU position.<br />
10.6<br />
Press and hold the “Close<br />
Limit Button” ( ) for 5 seconds,<br />
the LED on the roller<br />
blind EDU will flash for 2<br />
seconds, then go dark,<br />
indicating that the current<br />
position has been stored as<br />
the Close Limit.<br />
Press and hold the<br />
Close Limit Button<br />
for 5 seconds.<br />
Flashing LED<br />
SIVOIA QEDTM <strong>Jamb</strong> <strong>Mount</strong> Installation Instructions 13
11 Finish System Programming<br />
The Sivoia QED blind is now installed, wired, and the OPEN/CLOSE limits for each blind have<br />
been set.<br />
The next step is to finish programming the system.<br />
Use the instructions in the Wiring and Programming Guide (p/n 045-038) or the Technical<br />
Reference Guide (p/n 367-592) and perform these four easy steps:<br />
1. Address the system. This gives each EDU, keypad and contact closure interface<br />
in the system a unique address number or “name”, allowing proper communication<br />
between components.<br />
2. Assign blinds (EDUs) to keypads, IR hand controls and/or contact closure interfaces.<br />
Tell system which blinds (EDUs) respond to which keypads and IR hand controls<br />
and contact closure Interfaces.<br />
3. Set and save PRESET blind positions if you desire them to be different from the<br />
factory defaults.<br />
SIVOIA QEDTM <strong>Jamb</strong> <strong>Mount</strong> Installation Instructions 14
12 Troubleshooting<br />
Symptom<br />
EDU will not move...<br />
<strong>Blind</strong> does not fully open or fully close...<br />
Fabric not level...<br />
Fabric not centered over window...<br />
<strong>Blind</strong> does not move smoothly...<br />
IR controls will not operate blind....<br />
Solution<br />
...EDU is not powered - check EDU Power.<br />
...<strong>Blind</strong> is caught on something - free blind.<br />
...<strong>Blind</strong> is not assigned to keypad, IR, or CCI.<br />
...Limits have been set incorrectly - refer to “set<br />
open limit” and “set close limit” sections.<br />
...<strong>Blind</strong> fabric is caught on something - free blind.<br />
...Adjust using level adjustment screw.<br />
...Check that brackets are mounted level.<br />
...Check that fabric is tracking correctly on<br />
the blind tube.<br />
...Center blind using center adjustment.<br />
...Check that brackets are centered.<br />
...Check for binding of blind fabric on side<br />
channels.<br />
...Check fabric tracking.<br />
...IR transmitter does not have line-of-sight to IR<br />
receiver.<br />
...Out of range - move to within 12m (40 feet) of IR<br />
receiver.<br />
...EDUs not assigned to IR receiver.<br />
...IR receiver not plugged into any EDU within range.<br />
...Batteries are not providing power, replace them.<br />
SIVOIA QEDTM <strong>Jamb</strong> <strong>Mount</strong> Installation Instructions
Technical Assistance<br />
WORLD<br />
HEADQUARTERS<br />
<strong>Lutron</strong> Electronics Co., Inc.<br />
7200 Suter Road<br />
Coopersburg, PA 18036<br />
United States<br />
Tel: +1-610-282-3800<br />
Fax:+1-610-282-1243<br />
EUROPEAN<br />
HEADQUARTERS<br />
<strong>Lutron</strong> EA Ltd.<br />
6 Sovereign Close<br />
London, E1W 3JF<br />
United Kingdom<br />
Tel: +44-(0)20-7702-0657<br />
Fax: +44-(0)20-7480-6899<br />
CUSTOMER<br />
SERVICE/ORDERING<br />
UK +44-(0)20-7702-0657 –<br />
09.00 - 18.00 GMT<br />
USA +1-800-446-1503 –<br />
08.00 - 20.00 EST<br />
CUSTOMER SERVICE<br />
/E-MAIL<br />
shadinginfo@lutron.com<br />
TECHNICAL SUPPORT<br />
& SERVICES<br />
USA +1-800–523-9466 –<br />
24 hours/7 days<br />
UK +44-(0)20-7702-0657<br />
09.00 - 18.00 GMT<br />
INTERNET:<br />
www.lutron.com<br />
ADDITIONAL LUTRON<br />
SALES OFFICES:<br />
Germany<br />
Tel: +49-309-710-4590<br />
Fax: +49-309-710-4591<br />
FREEPHONE<br />
00800-5887 6635<br />
France<br />
Tel: +33-(0)1-44-70-71-86<br />
Fax: +33-(0)1-44-70-70-97<br />
FREEPHONE 0800-90-12-18<br />
Spain-Madrid<br />
Tel: +34-91-567-84-79<br />
Fax: +34-91-567-84-78<br />
FREEPHONE 0900-948-944<br />
Spain-Barcelona<br />
Tel: +34-93-496-57-42<br />
Fax: +34-93-496-57-50<br />
FREEPHONE 0900-948-944<br />
Hong Kong<br />
Tel: +852-2104-7733<br />
Fax: +852-2104-7633<br />
Beijing<br />
Tel: +86-10-5877-1817<br />
Fax: +86-10-5877-1816<br />
Shanghai<br />
Tel: +86-21-6288-1473<br />
Fax: +86-21-6288-1751<br />
Singapore<br />
Tel: +65-6220-4666<br />
Fax: +65-6220-4333<br />
Japan<br />
Tel: +81-3-5575-8411<br />
Fax: +81-3-5575-8420<br />
These products may be covered by one or more<br />
of the following US patents:<br />
5,671,387; 6,100,659<br />
and corresponding foreign patents. US and<br />
foreign patents pending.<br />
PLACEHOLDER<br />
<strong>Lutron</strong>, the Sunburst logo and Sivoia<br />
registered trademarks. Sivoia QED is a<br />
trademark of <strong>Lutron</strong> Electronics Co., Inc.<br />
©2005 <strong>Lutron</strong> Electronics Co., Inc.<br />
PLACEHOLDER<br />
Printed in the U.S.A.<br />
P/N 045-104-12 Rev.A